Compute > Instance > Console Guide
Create Instances
You can create instances either by using the settings below or by using instance templates. To create instances using instance templates, select Use instance template from the Create Instance page. To learn how to create instance templates, see Instance Template Console Guide.
Image
Select the image that contains the operating system you need. You can choose between public images provided by NHN Cloud, images you've previously created, or shared images.
The available instance flavors vary depending on the image you choose, so we recommended you choose an image first when creating an instance.
| OS | Block Storage | Memory |
|---|---|---|
| Linux CentOS, Ubuntu, Debian, Rocky |
20GB or more | 1GB or more |
| Windows | 50GB or more | 2GB or more |
Availability Zone
If an availability zone is not specified, a random zone is selected. An instance can use a block storage only if they both exist in the same availability zone. If the block storage you wish to use exists in a particular availability zone, then select that zone.
[Note] VPC resources are available in all availability zones.
For more details on availability zones, see Availability Zone in Instance Overview.
Flavor
You can select various flavors depending on virtual hardware performance specifications. However, the choice of some flavors may be limited depending on the virtual hardware performance that your image requires. For more details, see Instance Overview.
[Note] 1 vCPU refers to one socket composed of one thread and one core, the number of threads and the number of cores per socket are constant, one each.
Instance flavors can be changed in the NHN Cloud console even after instance creation, from higher to lower specs and vice versa. However, note that some flavors cannot be changed. See Modify flavor for details.
[Caution] An instance's root block storagecannot be changed by changing instance flavors.
Block Storage Size
Determines the root block storage size of an instance.
- The size of the block storage cannot be changed after an instance has been created. If you require more root block storage space, you must use additional block storages.
- The block storage size must be at least the minimum size required by the image.
The root block storage size varies depending on instance flavor.
| Flavors | Supported Block Storage Size |
|---|---|
| u2 flavors | 20 ~ 100 GB (varies by flavor) |
| t2, m2, c2, r2, and x1 flavors | 20 ~ 2000 GB |
[Note] Creating a default block storage with the largest possible size is not always efficient since you are charged by block storage size. We recommend you add block storages as they become necessary.
Block Storage Type
Determines the default block storage type of an instance.
- Choose either HDD or SSD. The choice of block storage type affects pricing and performance.
- You cannot change the block storage type once the instance is created.
Number of Instances
You can specify the number of instances you want to create when creating multiple instances with the same image, availability zone, flavor, block storage size, key pair, and network settings. The instance names will be the name you specified, with numbers such as -1 and -2 appended to the end. For example, creating two instances named my-instance will result in my-instance-1 and my-instance-2. The maximum number of instances you can create at once is 10.
When you create multiple instances without specifying an availability zone, each instance will be created in a randomly selected availability zone. For example, if two instances are created without specifying an availability zone, they may be created in the same zone or they may be created in different zones. If all instances need to be created in the same availability zone, select a particular zone.
Key Pair
Use an existing key pair or create a new key pair. To register an existing key pair, see Import Key Pair (Windows) for Windows users, and Import Key Pair (Mac and Linux) for Mac and Linux users.
Network
Select a subnet defined in your VPC to connect to an instance. For each selected subnet, a network interface is created in the instance to connect to that subnet. You can change the order of selected subnets to change network interfaces, in which case the first network interface (eth0) will be set as the default gateway.
For more details on creating and managing networks, refer to VPC Overview.
Floating IP
Select whether you will use a floating IP after instance creation. If you enable this option, a new floating IP is created and connected to the first network interface. Note that the first network interface must be connected to a subnet where an internet gateway is configured.
Floating IP can be managed from Instance > Management, or Instance > Floating IP. For more details on floating IP, see VPC Console Guide.
Security Group
Select security groups that the instance will be included in. One instance can be included in multiple security groups, in which case,
- The instance can communicate over the network with all other instances included in each security group. When you are dealing with an instance with sensitive data that is not meant to be accessible by other instances, you must carefully select security groups.
- The rules of each security group are aggregated and applied to the instance's external network communication.
For more details on security groups, see VPC Console Guide.
Additional Block Storage
Select whether you will attach an additional block storage after instance creation. If you enable this option, a new block storage separate from the root block storage is created and attached to the instance. As with the root block storage, you can specify the name, storage type, and size of the additional block storage you create.
By using the root block storage only for the OS and storing your frequently used applications and data on the additional block storage, you can easily migrate or copy your applications and data using the block storage attach/detach and snapshot features. In addition, when an instance failure occurs, you can easily recover your services by simply detaching the additional block storage and attaching it to another instance.
Block storage can also be managed from Instance > Block Storage. For more details on block storage, see Block Storage Guide.
User Script
You can specify a script to be executed after instance creation. The user script is executed following the instance's initial boot and after the initialization process including network configuration has completed. User scripts in NHN Cloud are executed by automated tools such as cloud-init (Linux) and Cloudbase-init (Windows), which are embedded in the official images.
[Caution] User scripts are executed with root (Linux)/Administrator (Windows) privileges.
Linux
The first line of a user script must begin with #!.
#!/bin/bash
...
For a user script to run successfully, log files in the instance must be checked. You can check output logs printed by standard output/error from the script in /var/log/cloud-init-output.log.
Windows
Windows images support both Batch and PowerShell formats for user scripts. The format is determined by an indicator specified in the first line.
- Batch Script
rem cmd
...
- PowerShell Script
#ps1_sysnative
...
To use both Batch and PowerShell in your script, use the following format.
- EC2 format
<script>
...
</script>
<powershell>
...
</powershell>
Logs from user scripts can be found in C:\Program Files\Cloudbase Solutions\Cloudbase-Init\log\cloudbase-init.
For more details regarding user scripts, see the cloud-init or Cloudbase-init guides.
Additional Instance Features
Change Instance Status
An instance’s status can be changed by stopping, terminating, deleting, and starting it.
For more details on hypervisor resources and fees for stopping, terminating, and deleting instances, see the table below.
| Classification | Stop instance | Terminate Instance | Delete Instance |
|---|---|---|---|
| Hypervisor resource | Resource remain allocated | Resource returned and reallocated when an instance is started | Resource removed |
| Pricing for instance | Price for stopping applied | Free | Free |
| Pricing for other connected resources | Charged | Charged | Charged |
[Note] GPU Instances and Bare Metal Instances cannot be terminated and will incur normal (100%) rates when stopped.
Create Image
Create an image from an instance's root block storage. It is recommended to stop instances before creating an image in order to ensure data integrity.
While it is possible to create an image from an instance that has no available free space in its root block storage, those images are unusable by other instances because they cannot be properly initialized. Before creating an image, ensure that your instance has at least 100KB of free space.
Created images are registered as private images in Compute > Image. You can use the registered image to create an instance with a block storage identical to that of the original instance.
Associate/Disassociate Floating IP
Floating IP can be associated with or disassociated from an instance, regardless of the instance's status. If you have no available floating IP or if the floating IP you want is not available, you can create one by clicking Create. Alternatively, floating IP can also be created from Network > VPC > Floating IP.
For more details on floating IP, see VPC Overview.
Modify Security Group
An instance's security groups can be modified regardless of the instance's status. Modified security groups are applied immediately.
For more details on security groups, see Security Group and VPC Overview.
Change Network Subnet
An instance's network subnet can only be changed while the instance is stopped. When you add a subnet, a network interface that will be connected to that subnet is automatically created on your instance. If you add multiple subnets at once, the order of the newly created network interfaces on the instance is set randomly. Deleting a subnet from an instance automatically deletes the network interface that was created along with the subnet.
Modify Flavor
Instance flavors can be changed once an instance has been stopped. If an instance is running, click Stop Instance in Additional Features to stop the instance.
You can only change an instance to another flavor that is compatible with its current flavor.
- m2, c2, r2, t2, x1 flavor instances can be changed to m2, c2, r2, t2, x1 flavors.
- m2, c2, r2, t2, x1 flavor instances cannot be changed to u2 flavors.
- u2 flavor instances cannot be changed to other flavors once they have been created, not even to those of the same u2 flavor.
When you modify flavors, instance resize and resize confirmation tasks proceed. When all tasks are completed, the VM changes its status to Shutoff. You can start the instance by clicking Start Instance in Additional Features.
[Note] The instance's root block storage size cannot be modified. If an instance requires additional block storage space, attach a block storage. For details on how to attach block storage, see Block Storage Overview.
Instances will be charged using the new flavor from the moment the modification completes.
Key Pairs
Import Key Pairs (Windows)
You can use puttygen, which is installed when you install the PuTTY SSH client, to create a key pair and register it with NHN Cloud.
Make sure you have PuTTY installed.
Run puttygen.
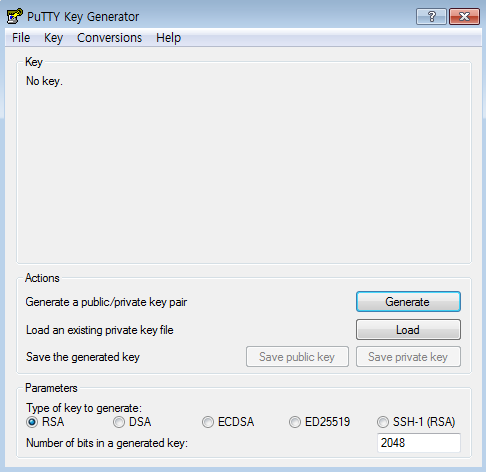
Select RSA (or SSH-2 RSA in older versions of puttygen) under Parameters. Click Generate under Actions. Continuously move your mouse in the empty space in order to generate the key.
After the key is generated, the public key file contents will be visible as shown below. Paste the contents of the public key into the Public Key field in Get Key Pair in order to register the key pair.
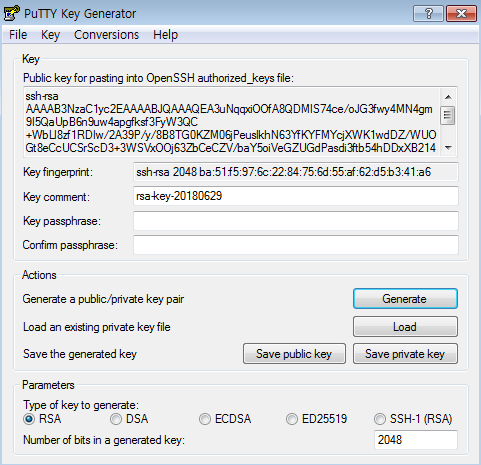
Click Save private key under Actions to save the private key. If you save the private key leaving the Key passphrase field blank, the message "Are you sure you want to save this key without a passphrase to protect it?" will appear. In order to use your converted private key more securely, set a passphrase before saving.
[Caution] If you wish to be able to automatically login to your instance, you should not set a key passphrase. When a passphrase is used, you must manually enter the private key's passphrase during login.
The registered key pair can be used to create instances, and the key pair's private key must be used when accessing instances. For more details on how to access instances, see Instance Overview.
Just as with key pairs created from NHN Cloud, imported key pairs also need to be managed cautiously since exposed private keys can be abused by anyone to access instances.
Import Key Pairs (Mac and Linux)
Key pairs created using ssh-keygen in Mac or Linux can be registered with NHN Cloud. Use the following command to create a key pair.
$ ssh-keygen -t rsa -f my_key.key
You can choose to set a passphrase for the key pair, although it is not required. If you wish to use your key pair more securely, we recommend setting a passphrase. The file with .pub appended to the specified key pair name contains the public key.
$ cat my_key.key.pub
ssh-rsa AAAAB3NzaC1yc2EAAAADAQABAAABAQCnnUAe36txQqk8J7VzbNuYKVQQ3gbNoClndHMX49OD+1Rw5xrDFLUKQqxbBDtlNMoA9tKBZNrQBpKr1kFEtvMIj1HPkH9ocb4MbuoVVjpkIhixbKMMJPDQ4JQJxaifsjR59YsZyDAp0aXZp+o+OB97P3S4AKPY2kQR0JdSr30+6Av6smf+3mZceAE4abzklfbyWT5slP1im/wfYEPO3QBEDl/0JbmTjKWPYI6QnbwnPRHS63SJ+Kd2QeYQYJCadv7X4mXnw81qEIWq/dx1SQkGDTNgR7lnN2ApFlU5EZcow69z6tiCr0hlyigwjGooMg3wTZvcSlYcVeTzZ755RArd ...
Paste the contents of the public key into the Public Key field in Get Key Pair in order to register the key pair.
The registered key pair can be used to create instances, and the key pair's private key must be used when accessing instances. For more details on how to access instances, see How to Access Instances.
Just as with key pairs created from NHN Cloud, imported key pairs also need to be managed cautiously since exposed private keys can be abused by anyone to access instances.
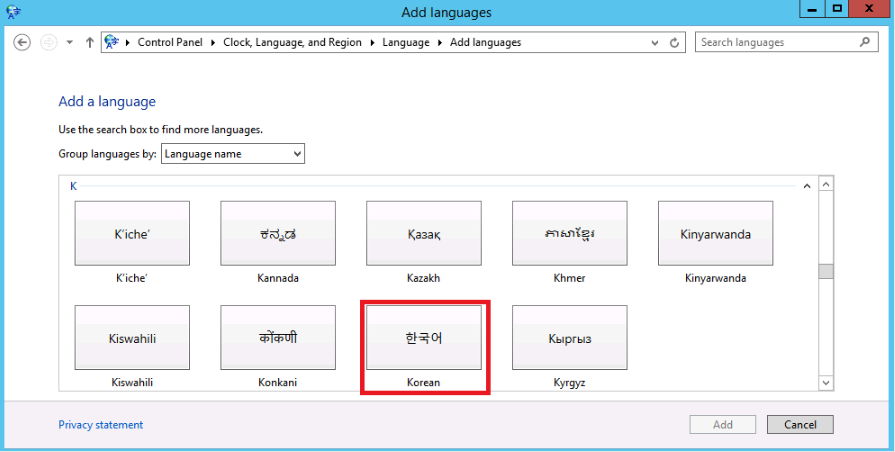
Appendix 1. Change Language Packs in Windows
NHN Cloud provides Windows images with English as the primary language. You may change your language preferences with the following steps.
-
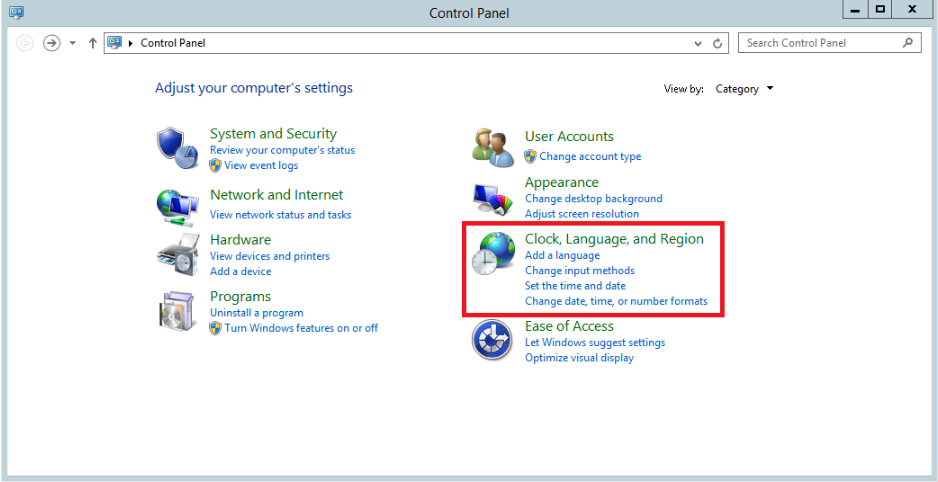
Go to START > Control Panel > Clock, Language, and Region > Add a language.
-
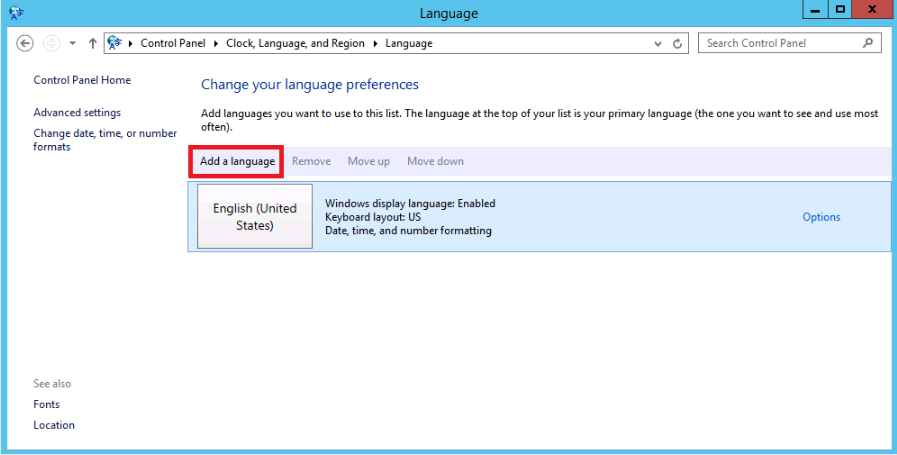
Select Change your language preferences > Add a language.
-
Choose a language in Add a language and click Add.
-
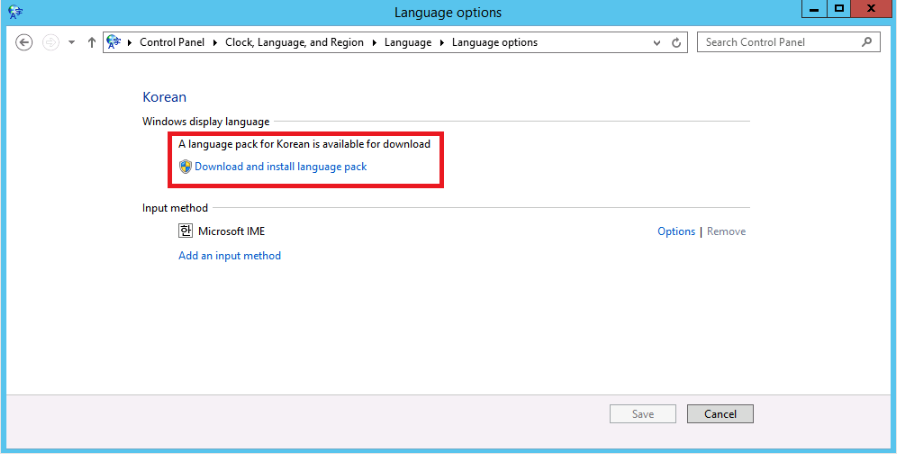
Check the language pack just added.

-
Download and install the language pack.
-
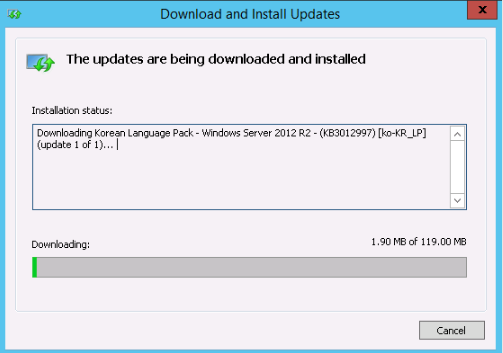
Download and install updates.
-
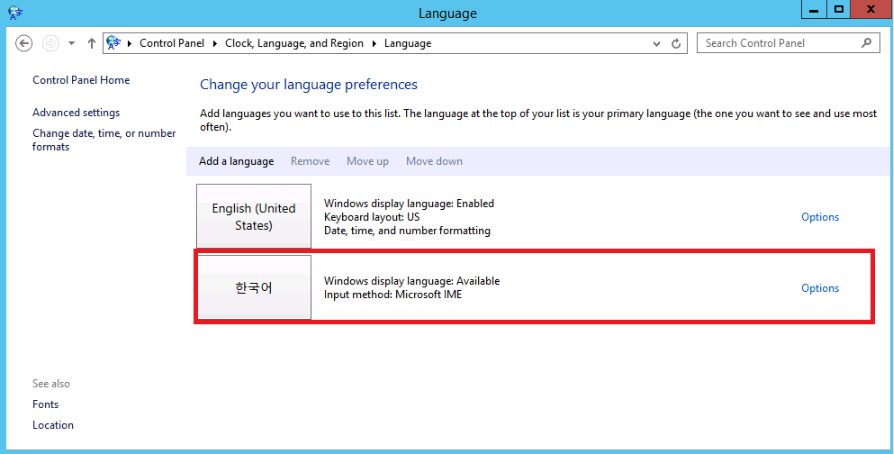
To change to the installed language pack, double-click the selected language or select Options.
-
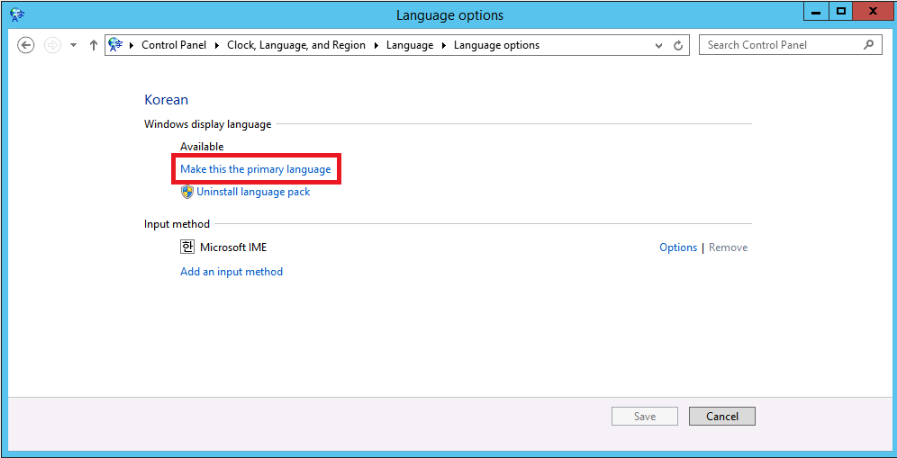
Choose Make this the primary language for Windows display language.
-
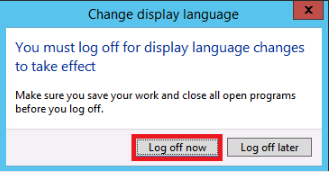
To apply the changes, click Log off now.
-
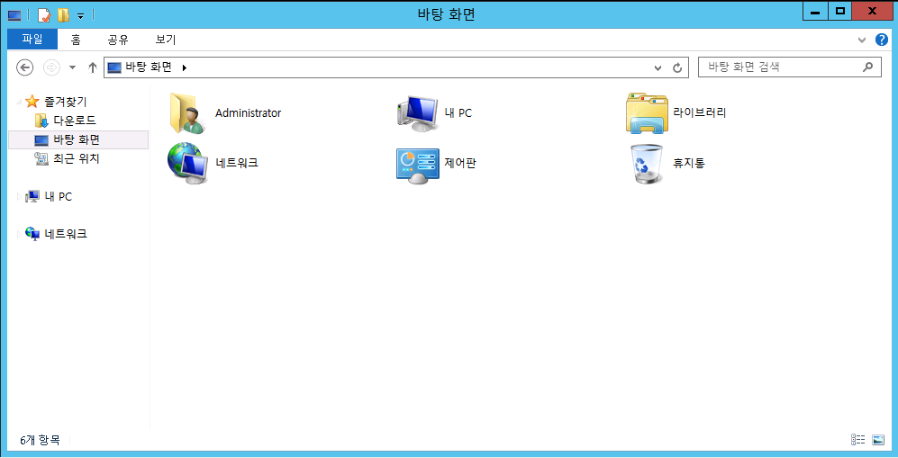
Log in again, and you can see Windows is displayed using the language pack of your choice.
Appendix 2. Change Routing in Windows
Routing in NHN Cloud Windows instances can be changed as follows.
- Press Windows Key + R to open an execution window, and enter
cmdand execute to open a command prompt window. You can enter route commands here.
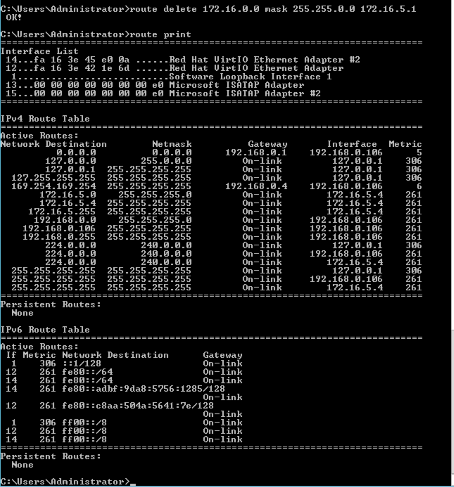
Route commands
- Print current configuration: route print
- Add : route add "Destination" mask "subnet" "gateway" metric "Metric value" if "Interface number"
- Change : route change "Destination" mask "subnet" "gateway" metric "Metric value" if "Interface number"
- Delete : route delete "Destination" mask "Destination subnet" "gateway" metric "Metric value" if "Interface number"
- Option : -p (specify as persistent route)
Description
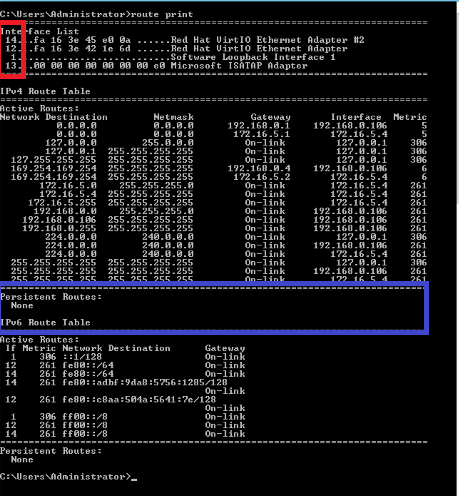
- Metric Value: A lower value indicates higher priority
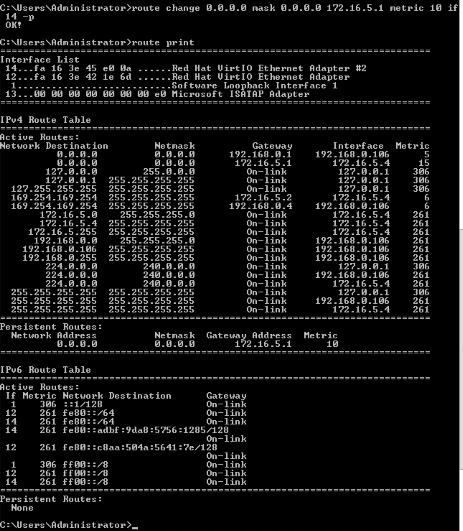
- Interface Number: This value can be obtained from route print (red box above)
- Persistent Route: Use the -p option to avoid the configured routes being reset across system reboots (blue box above)
Example 1 - Restricting external communication for particular interfaces
- You can restrict an interface from communicating externally by using the route change command to change its route metric or by leaving the default gateway field blank when configuring fixed IP settings.
- How to Modify Metrics
- Increase interface metric value
$ route change 0.0.0.0 mask 0.0.0.0 172.16.5.1 metric 10 if 14 -p
- Increase interface metric value
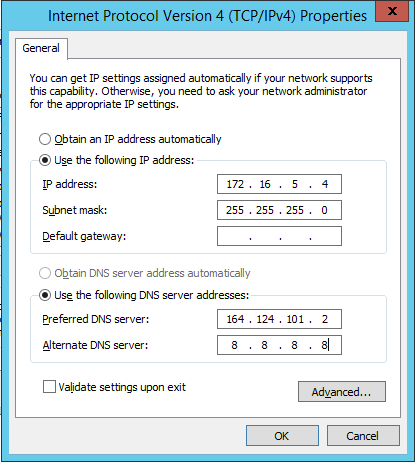
- How to Set Fixed IP
- Use the ipconfig /all command to view IP information.

- Enter the corresponding IP information, leaving the default gateway field blank, in the IP Properties window.
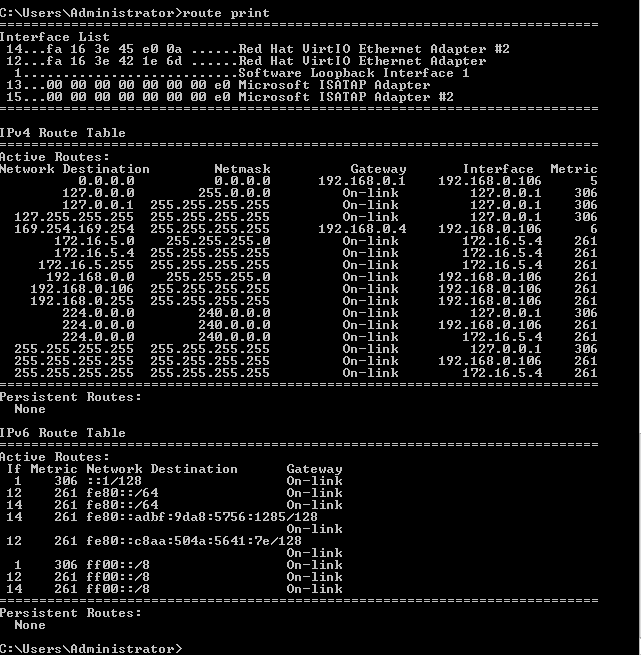
- Check the results using the route print command.
- Use the ipconfig /all command to view IP information.
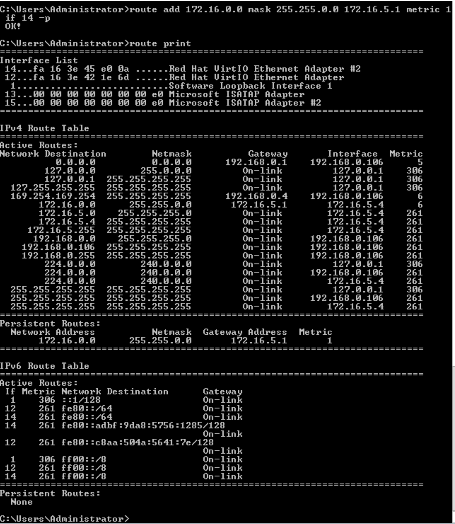
Example 2 - Setting routes for a particular address range
- Use the route add command to set routes for a particular address range.
$ route add 172.16.0.0 mask 255.255.0.0 172.16.5.1 metric 1 if 14 -p
Example 3 - Removing a particular route
- Use the route delete command to remove specified routes.
$ route delete 172.16.0.0 mask 255.255.0.0 172.16.5.1
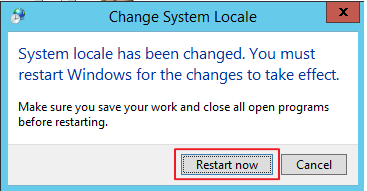
Appendix 3. Change System Locale
System locale in NHN Cloud Windows instances can be changed as follows.
-
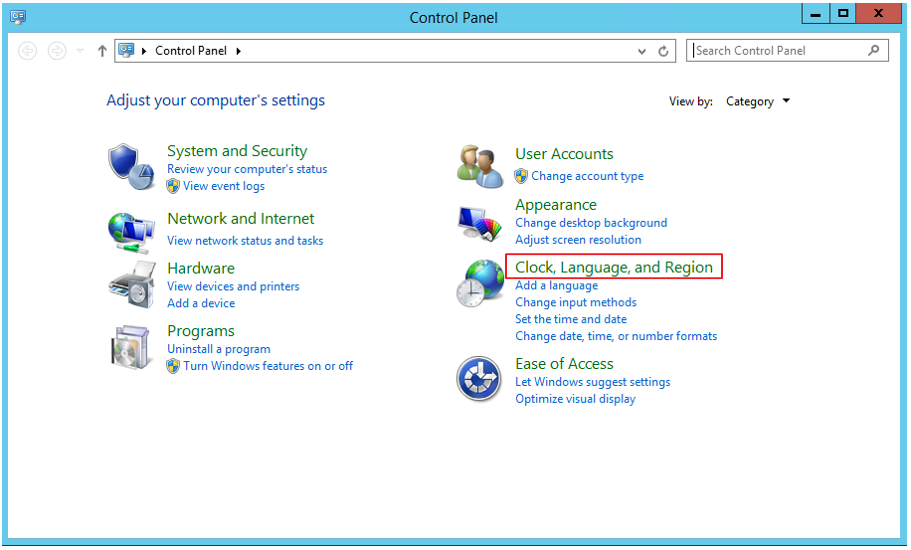
Go to Windows Key > Control Panel > Clock, Language, and Region.
-
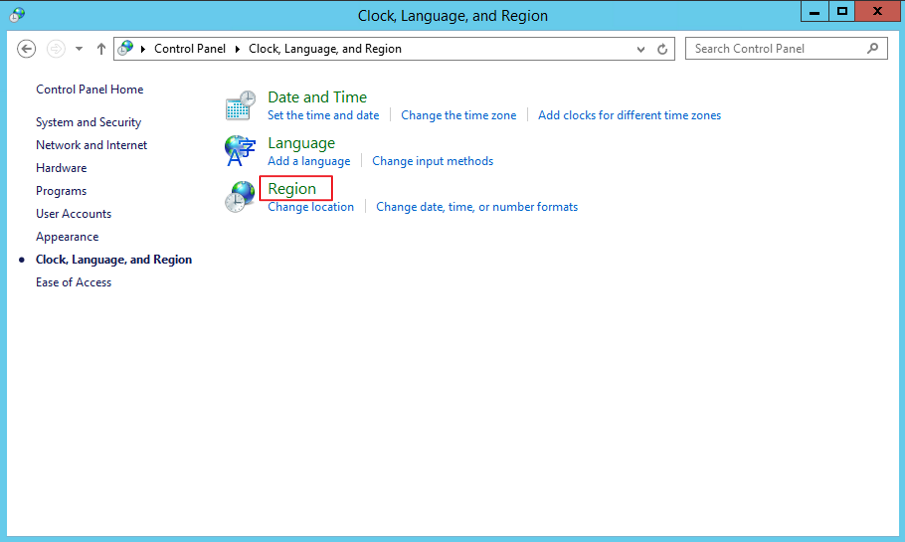
Select Region.
-
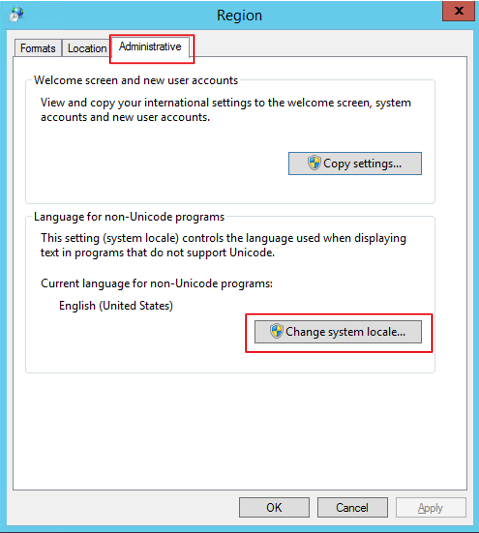
From the Administrative tab, click Change system locale.
-
Select a system locale to use.
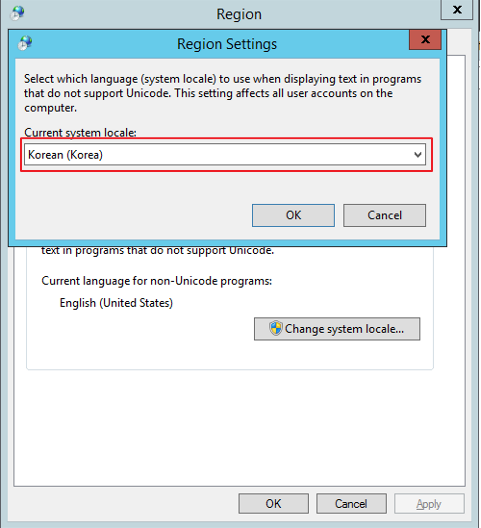
-
Restart the system to apply the changes.
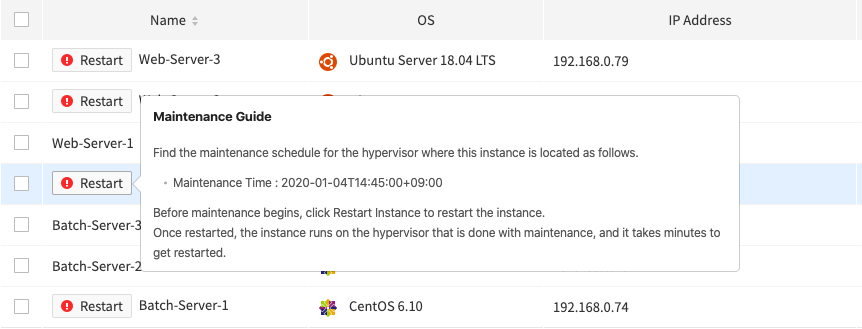
Appendix 4. Restarting Instances for Hypervisor Maintenance
NHN Cloud updates hypervisor software on a regular basis to enhance the security and stability of infrastructure services that we provide. Instances running on a hypervisor that requires maintenance must be restarted and migrated to a hypervisor which has completed maintenance.
To restart an instance, use the ! Restart button that has been created next to the instance name in the console.
Using the "Restart Instances" button in the console or rebooting the operating system will not migrate an instance to another hypervisor.
Follow the guide below to use the restart feature in the console.
Go to the project where your instance requiring maintenance is located.
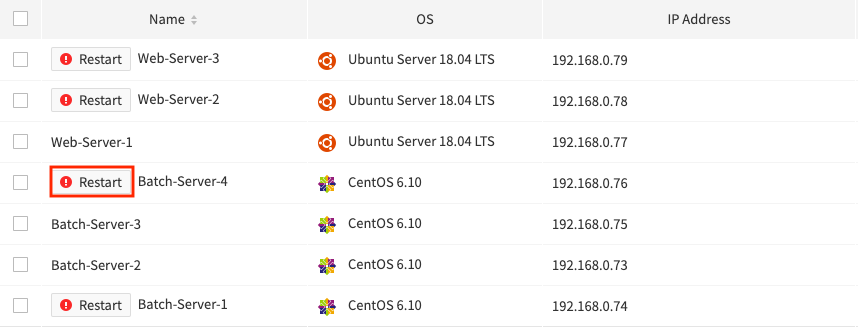
1. Check if your instance requires maintenance.
Any instance that has the ! Restart button before its name requires maintenance.
Put the mouse cursor over the ! Restart button to find maintenance schedule details.
2. Deactivate or stop application programs running on an instance which requires maintenance.
Any application programs running on an instance which requires maintenance must be deactivated or stopped in order not to impact your service. If there is no way to do so without impacting your service, please contact NHN Cloud Customer Center and we will provide you with guidance on appropriate measures to take.
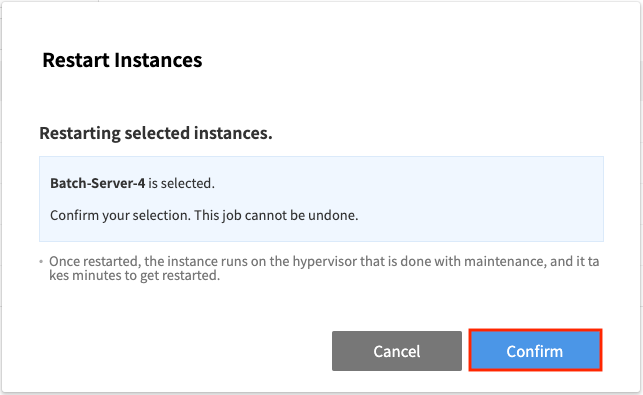
3. Click the [! Restart] button created next to the name of the target instance.
4. Click [Confirm] in the Restart Instances confirmation window.
5. Wait until the instance status turns green and the [! Restart] button disappers.
If the status does not change or the ! Restart button is not disabled, try refreshing the page.
You cannot operate or modify the instance while a restart is underway. If an instance restart does not complete successfully, the administrator will automatically be notified and you'll also be contacted by NHN Cloud.
Table of Contents
- Compute > Instance > Console Guide
- Create Instances
- Image
- Availability Zone
- Flavor
- Block Storage Size
- Block Storage Type
- Number of Instances
- Key Pair
- Network
- Floating IP
- Security Group
- Additional Block Storage
- User Script
- Additional Instance Features
- Change Instance Status
- Create Image
- Associate/Disassociate Floating IP
- Modify Security Group
- Change Network Subnet
- Modify Flavor
- Key Pairs
- Import Key Pairs (Windows)
- Import Key Pairs (Mac and Linux)
- Appendix 1. Change Language Packs in Windows
- Appendix 2. Change Routing in Windows
- Appendix 3. Change System Locale
- Appendix 4. Restarting Instances for Hypervisor Maintenance