Dev Tools > Deploy > Console User Guide
This document contains the following:
(Any other functions are available in Detail Functional Guide.)
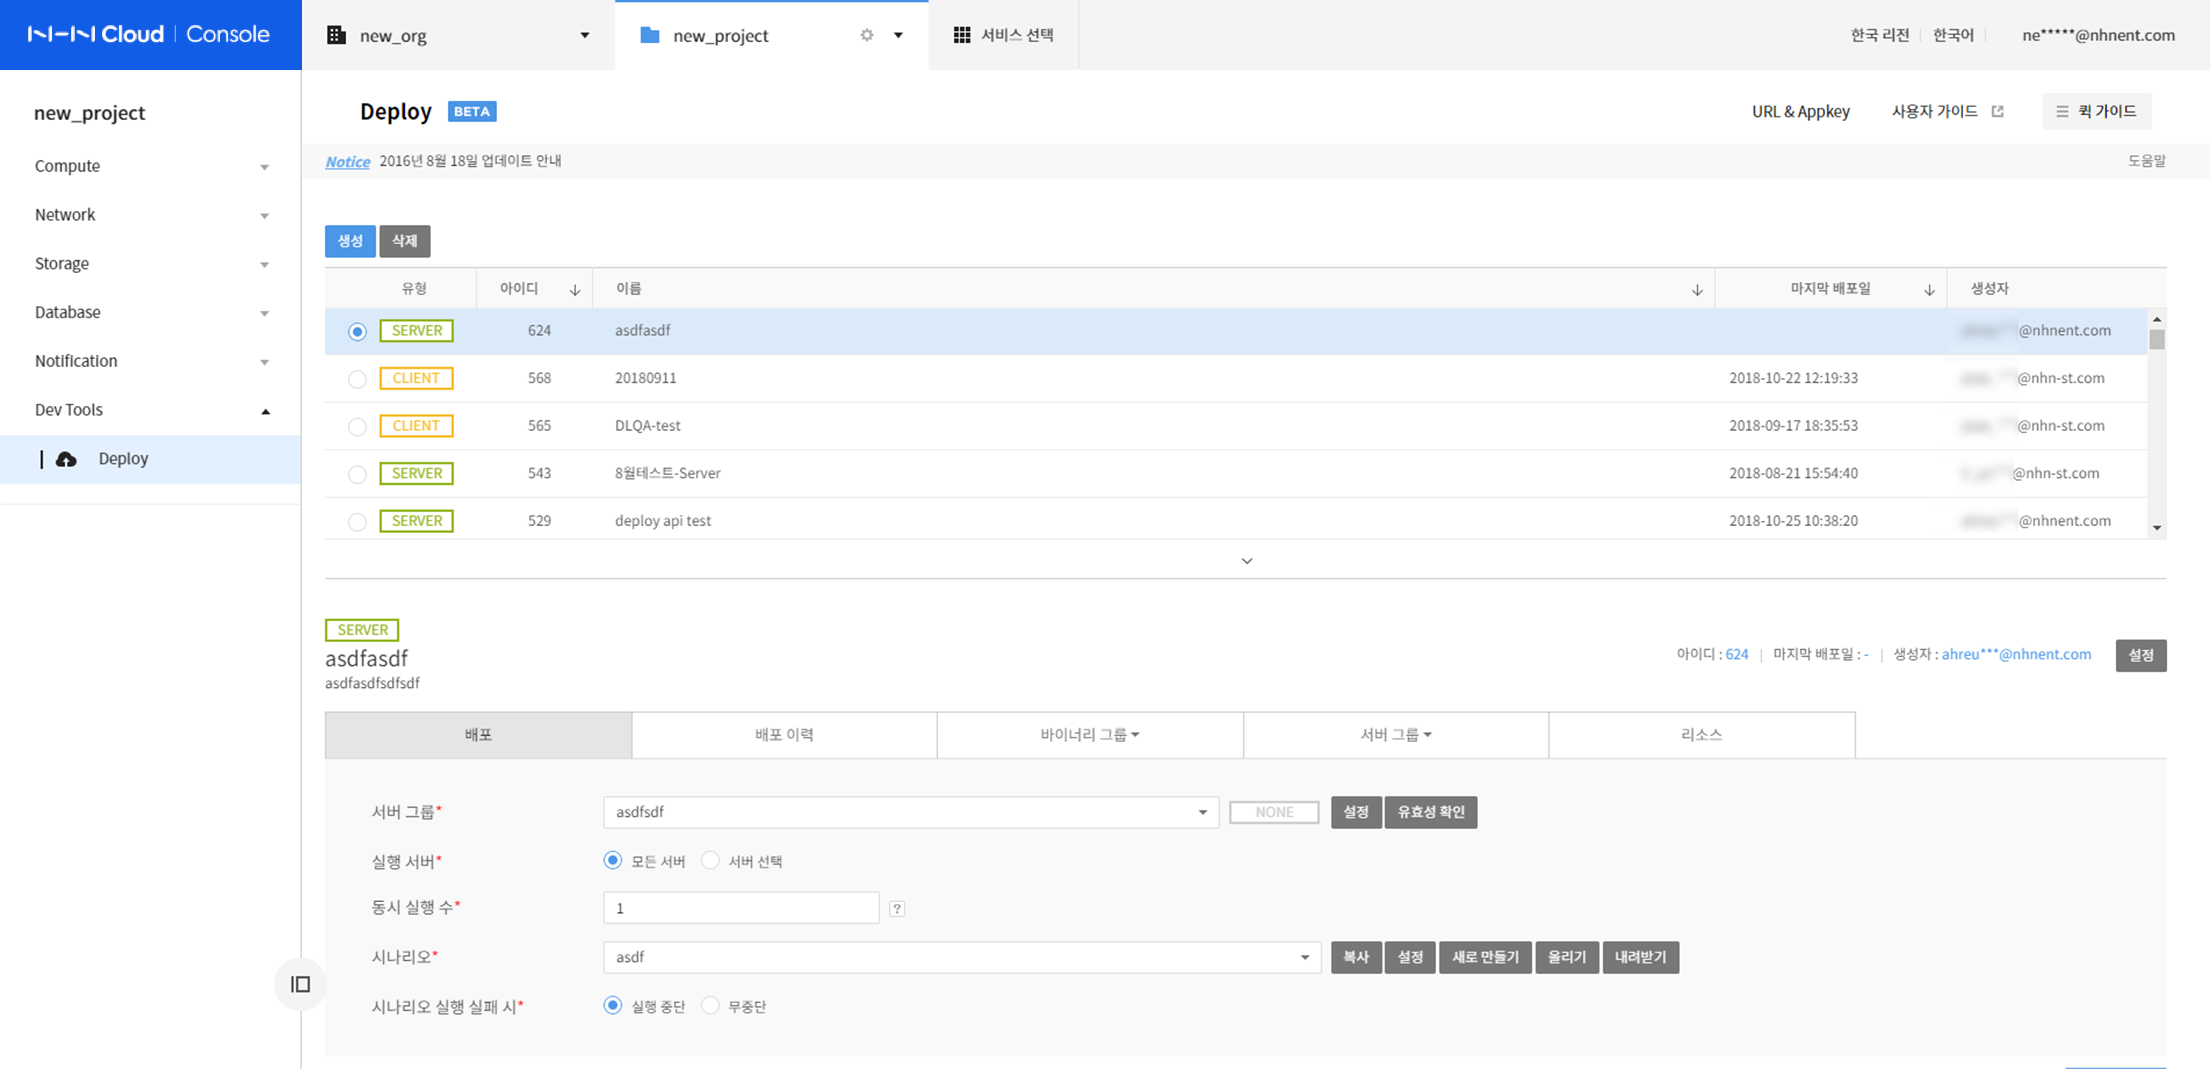
Deploy Console Page
Below is the console page for the Deploy service.
Client Application
Client application deployment requires setting artifacts and uploading binaries.
Setting Artifacts
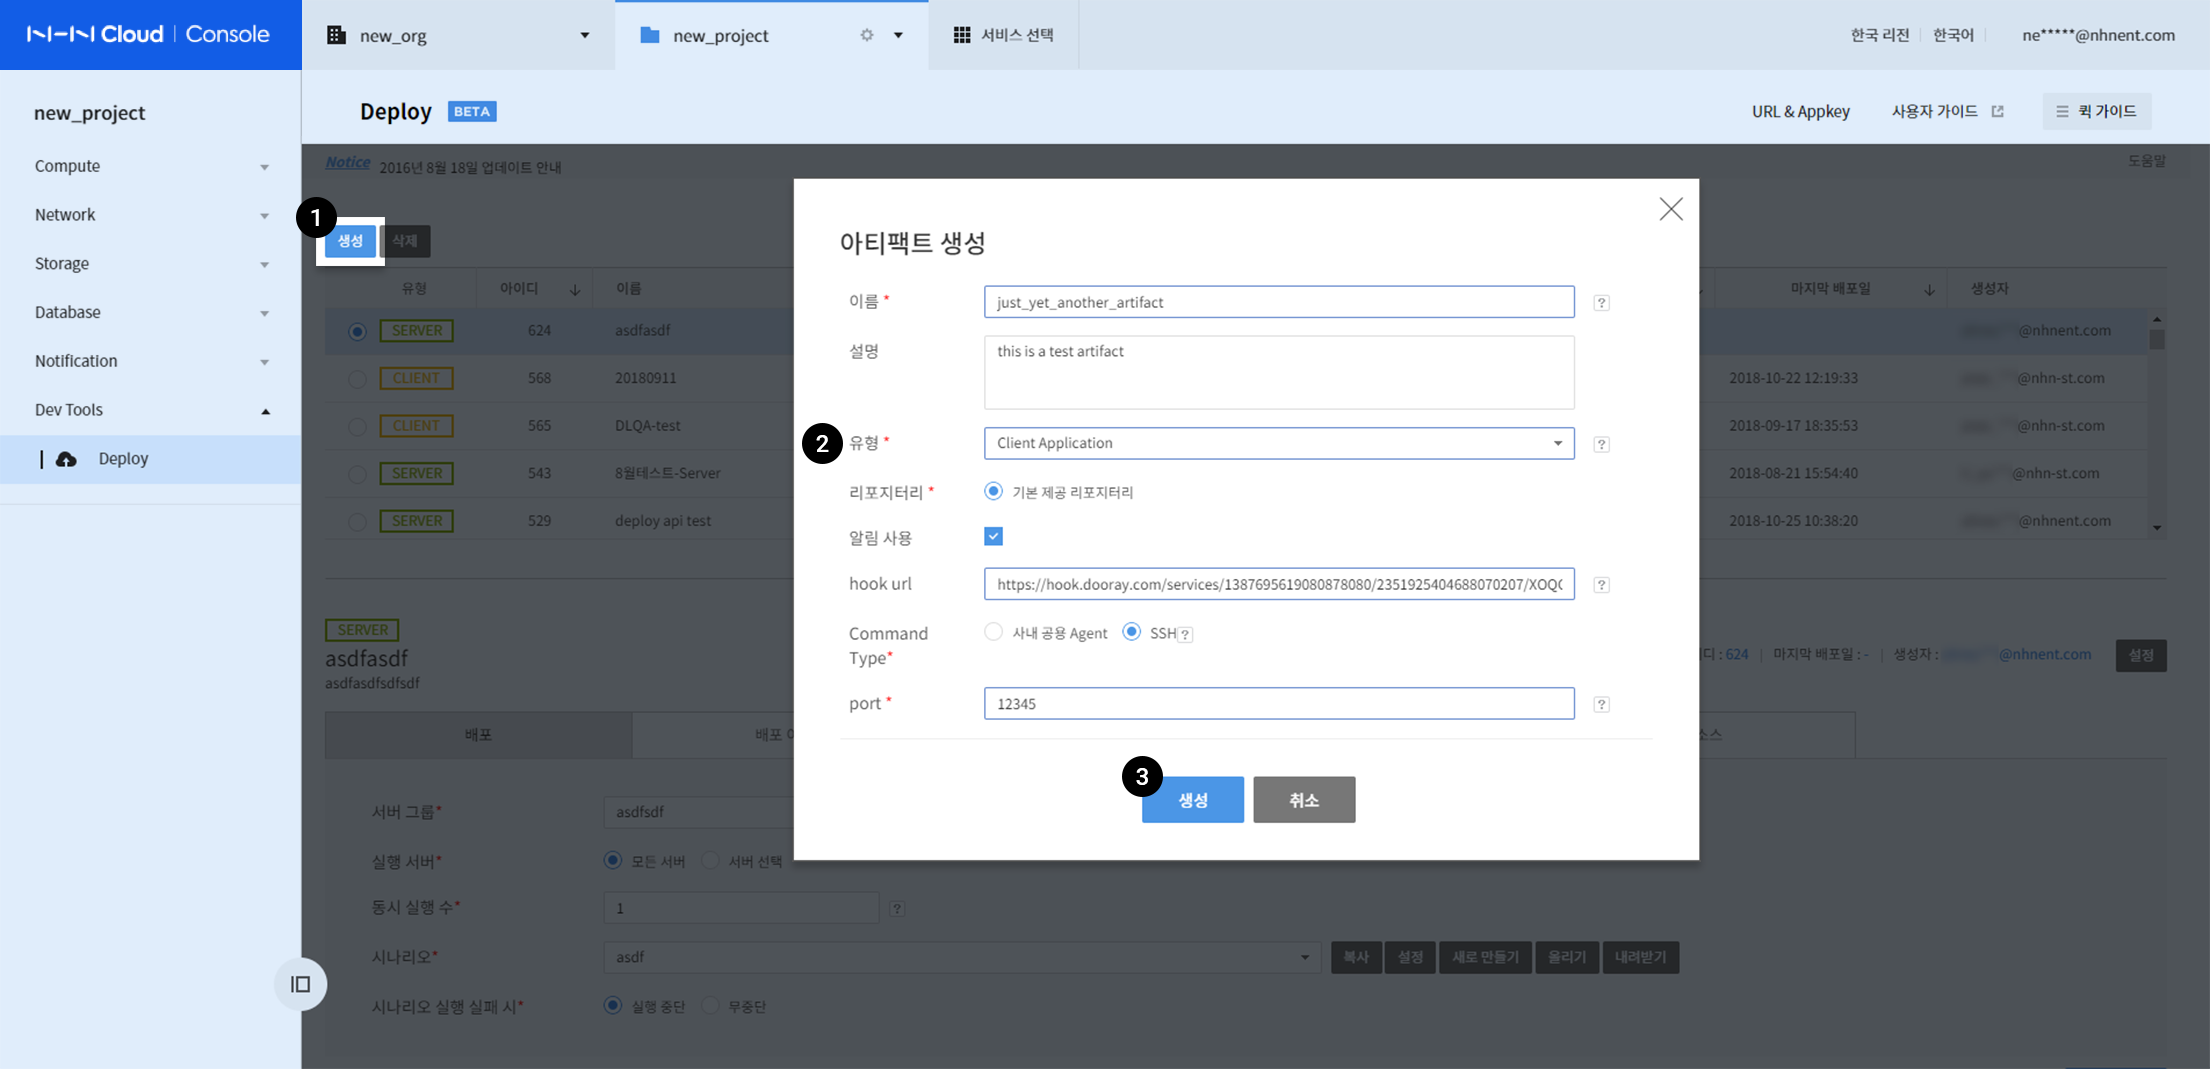
- Click Create on the top left of the Deploy page.
- Choose Client Application for the type of an artifact.
- Enter name (required), description (optional), and port (required).
- Click Create.
Setting Binaries
Upload
- Upload .ipa and .plist files for iOS, and .apk files for Android.
- etc. is applied as an installation application for other OS, like Windows.
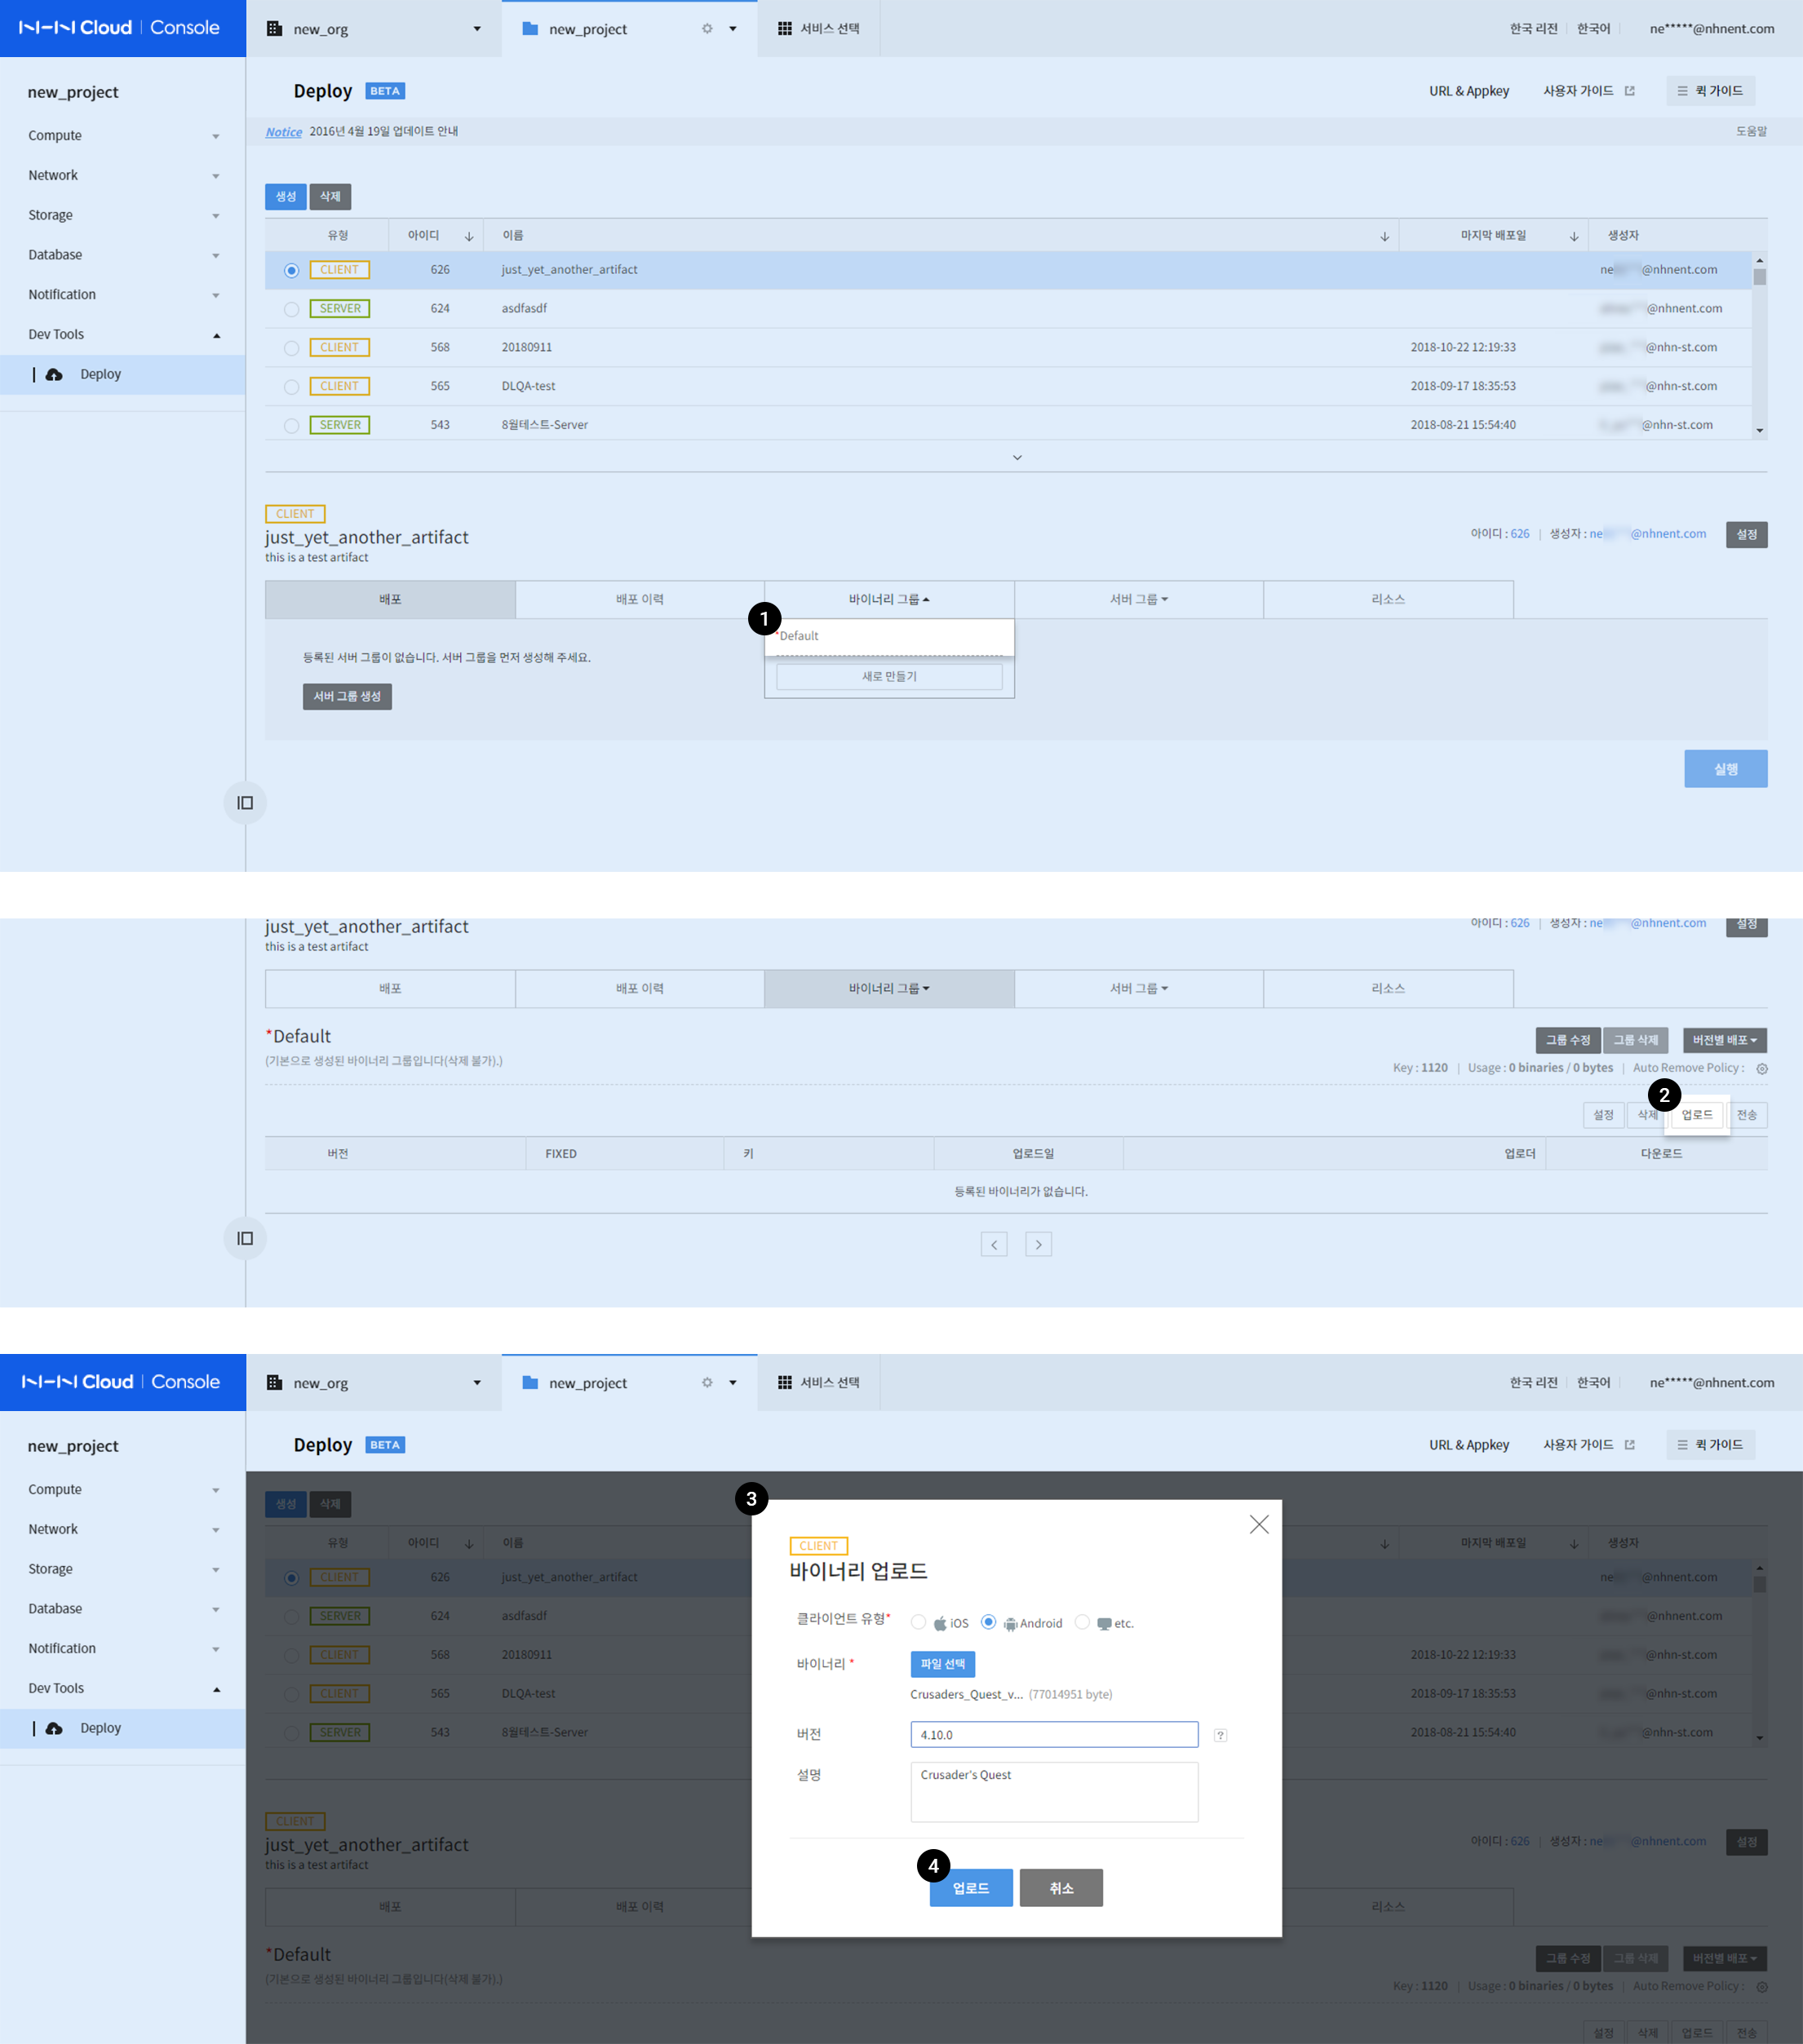
- Go to Binary Group > Default on the tab below the Deploy page. Click Create to create a new binary group.
- Click Upload on the right.
- Choose Select Files from Upload Binaries, and select a binary file.
- iOS: .ipa file (required), .plist file (required)
- .plist: Applied to install on the download page. Download URL in the file is optional.
- Android: .apk file (required)
- Enter version (optional) and description (optional).
- iOS: .ipa file (required), .plist file (required)
- When it is completed, click Upload.
Deploy
Download pages can be selectively delivered via SMS or email.
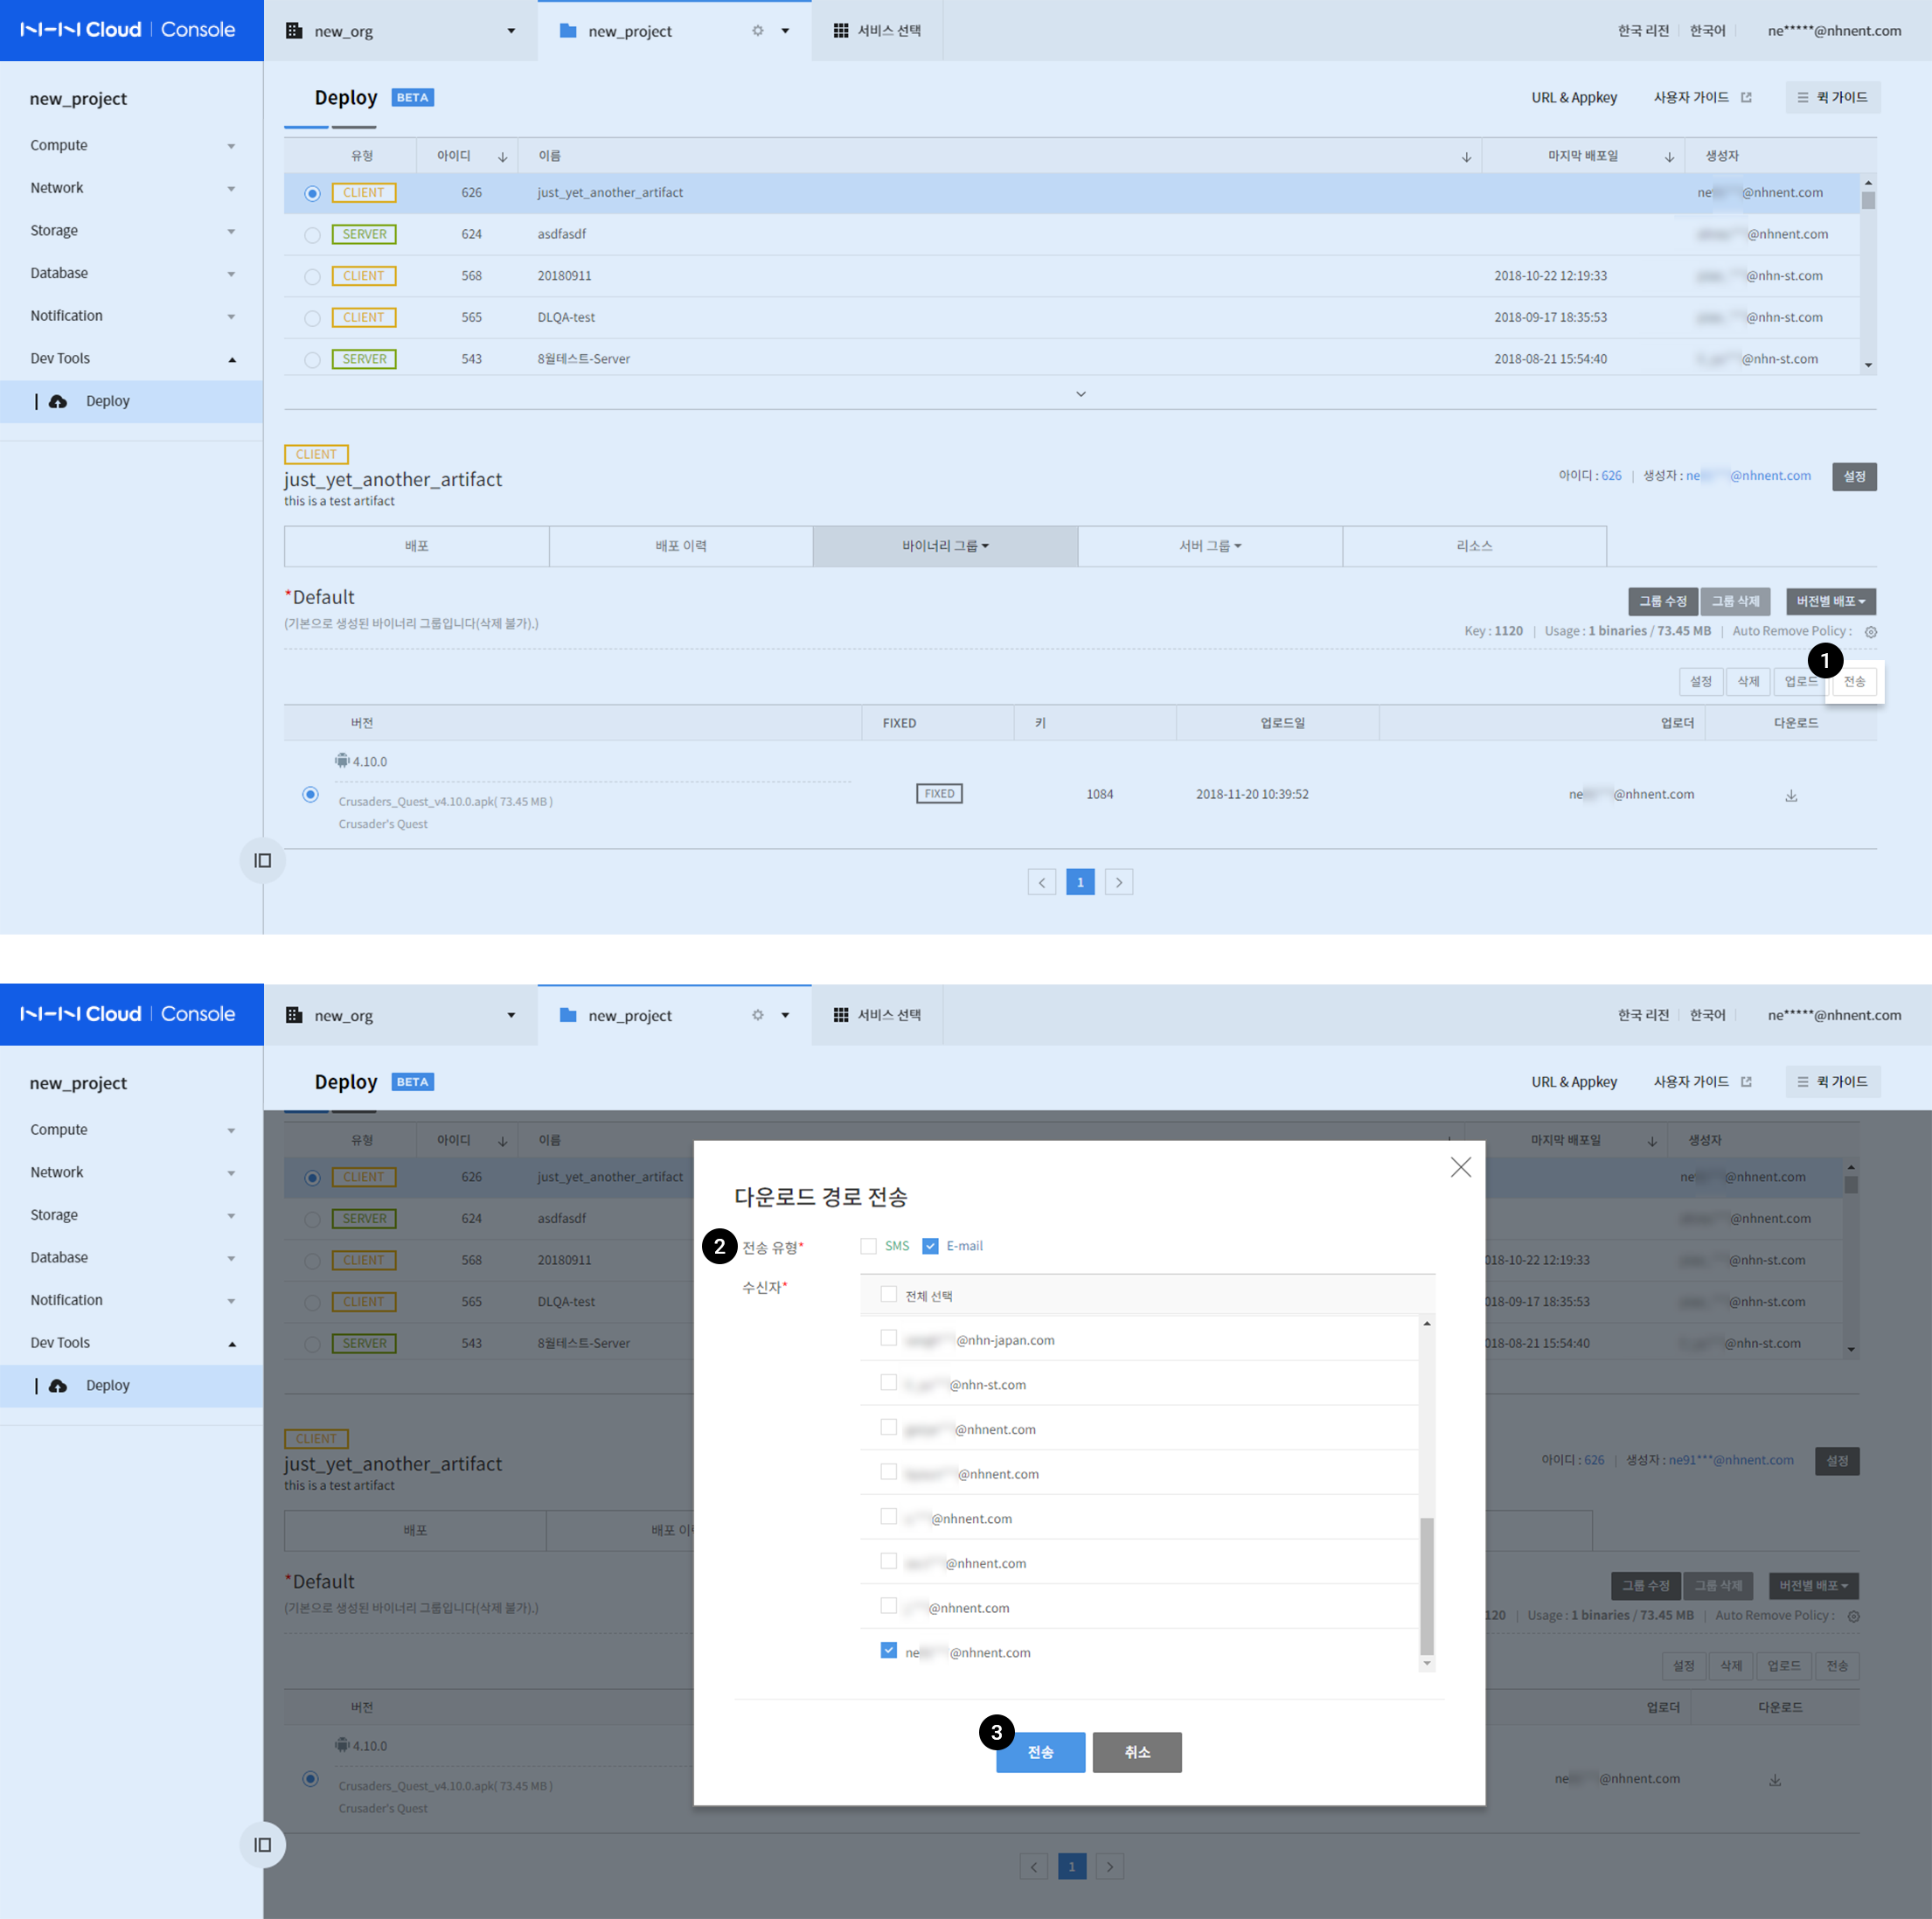
- Click Send on the right.
- On the Send Download Path window, select Type and Recipient, and click Send.
- You may choose either SMS or email, or both.
Then, the binary download page is delivered to the recipient in the specified type of delivery.
Server Application
Server application requires setting deployment (artifact, server, server group, and scenario), uploading binaries, and deployment.
Setting Artifacts
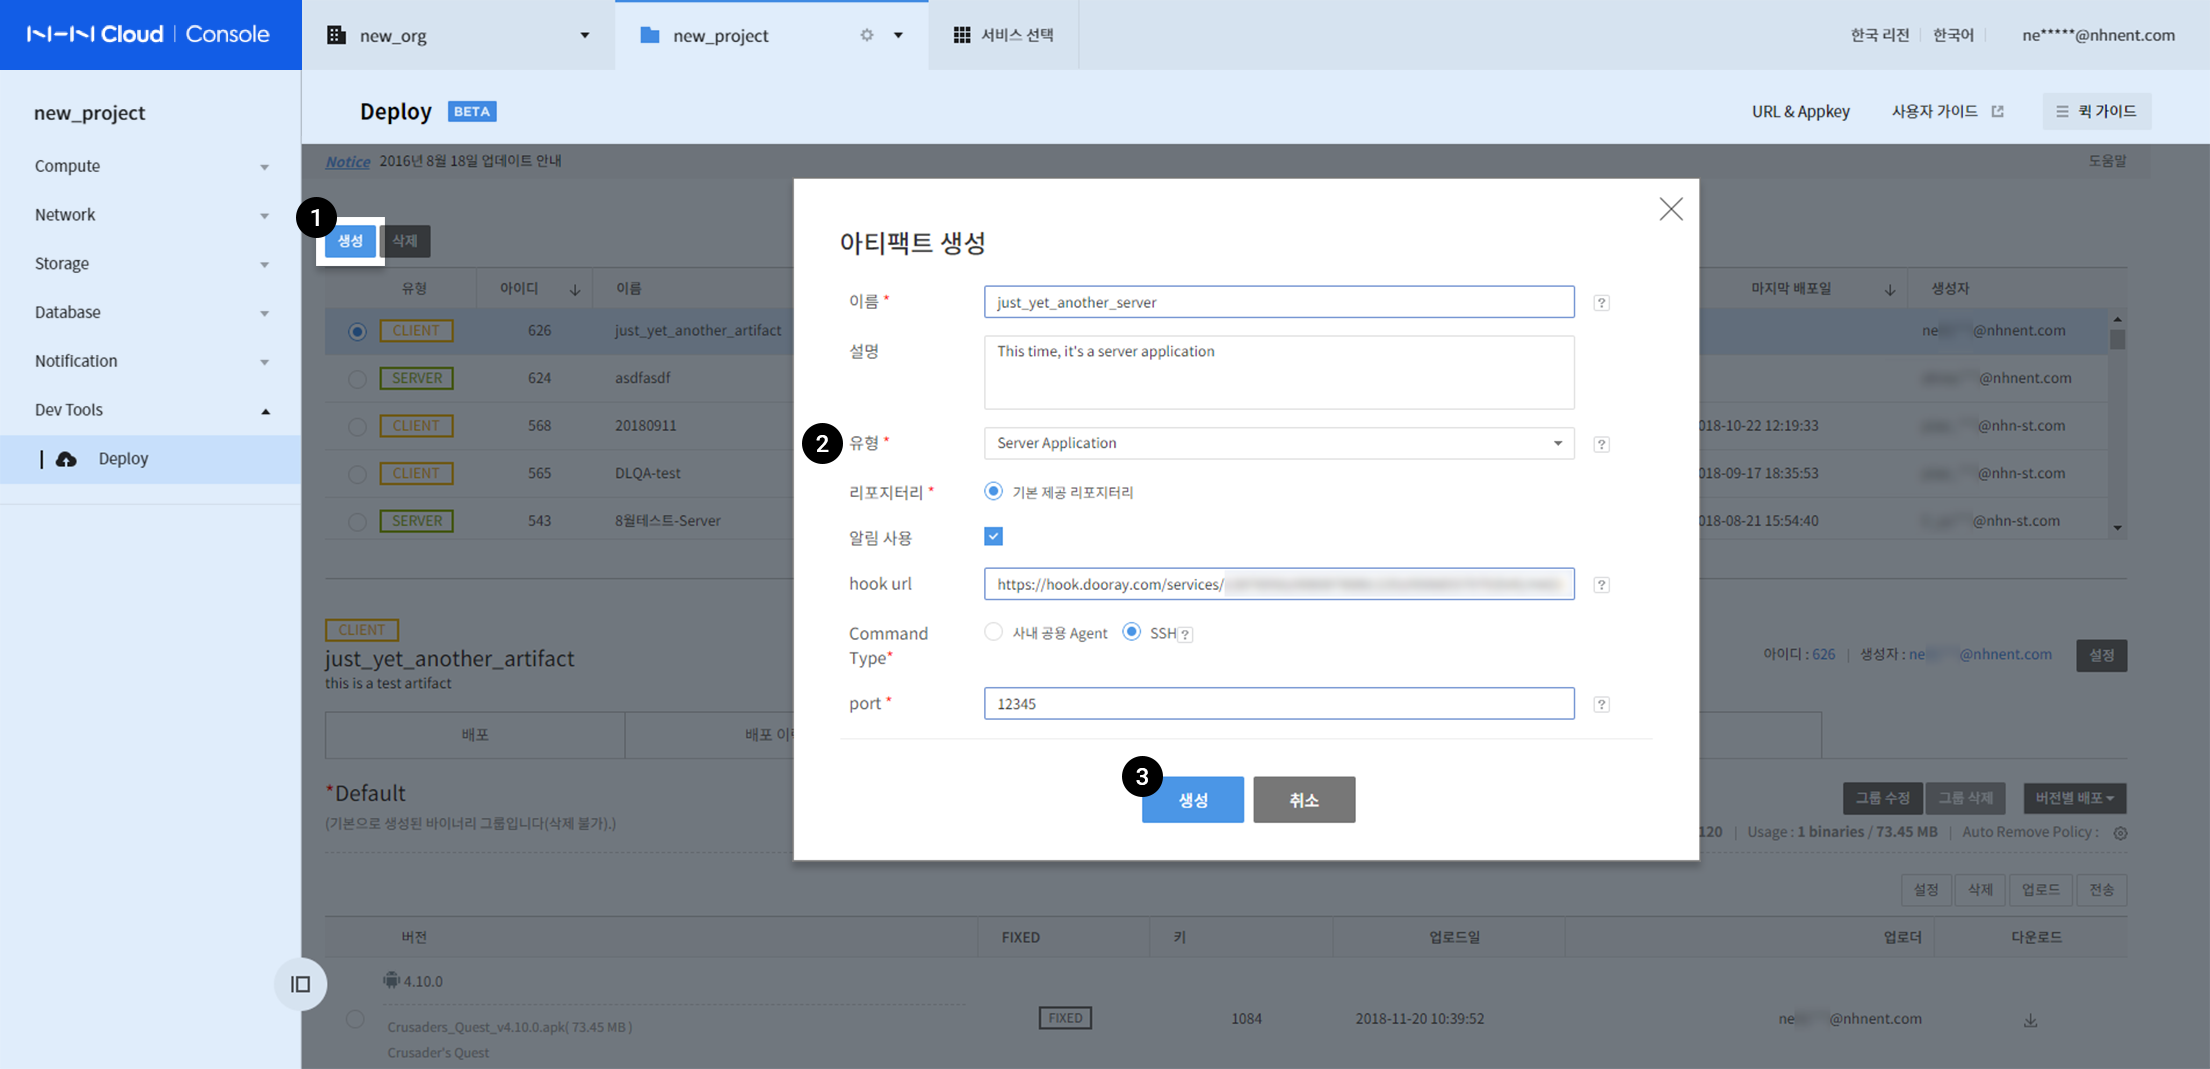
- Click Create on the list.
- Select Server Application for the type of an artifact.
- Enter name (required), description (optional), and port (required).
- Click Create from the Create Artifacts window.
Setting Server Groups
Deployment servers are managed by this setting.
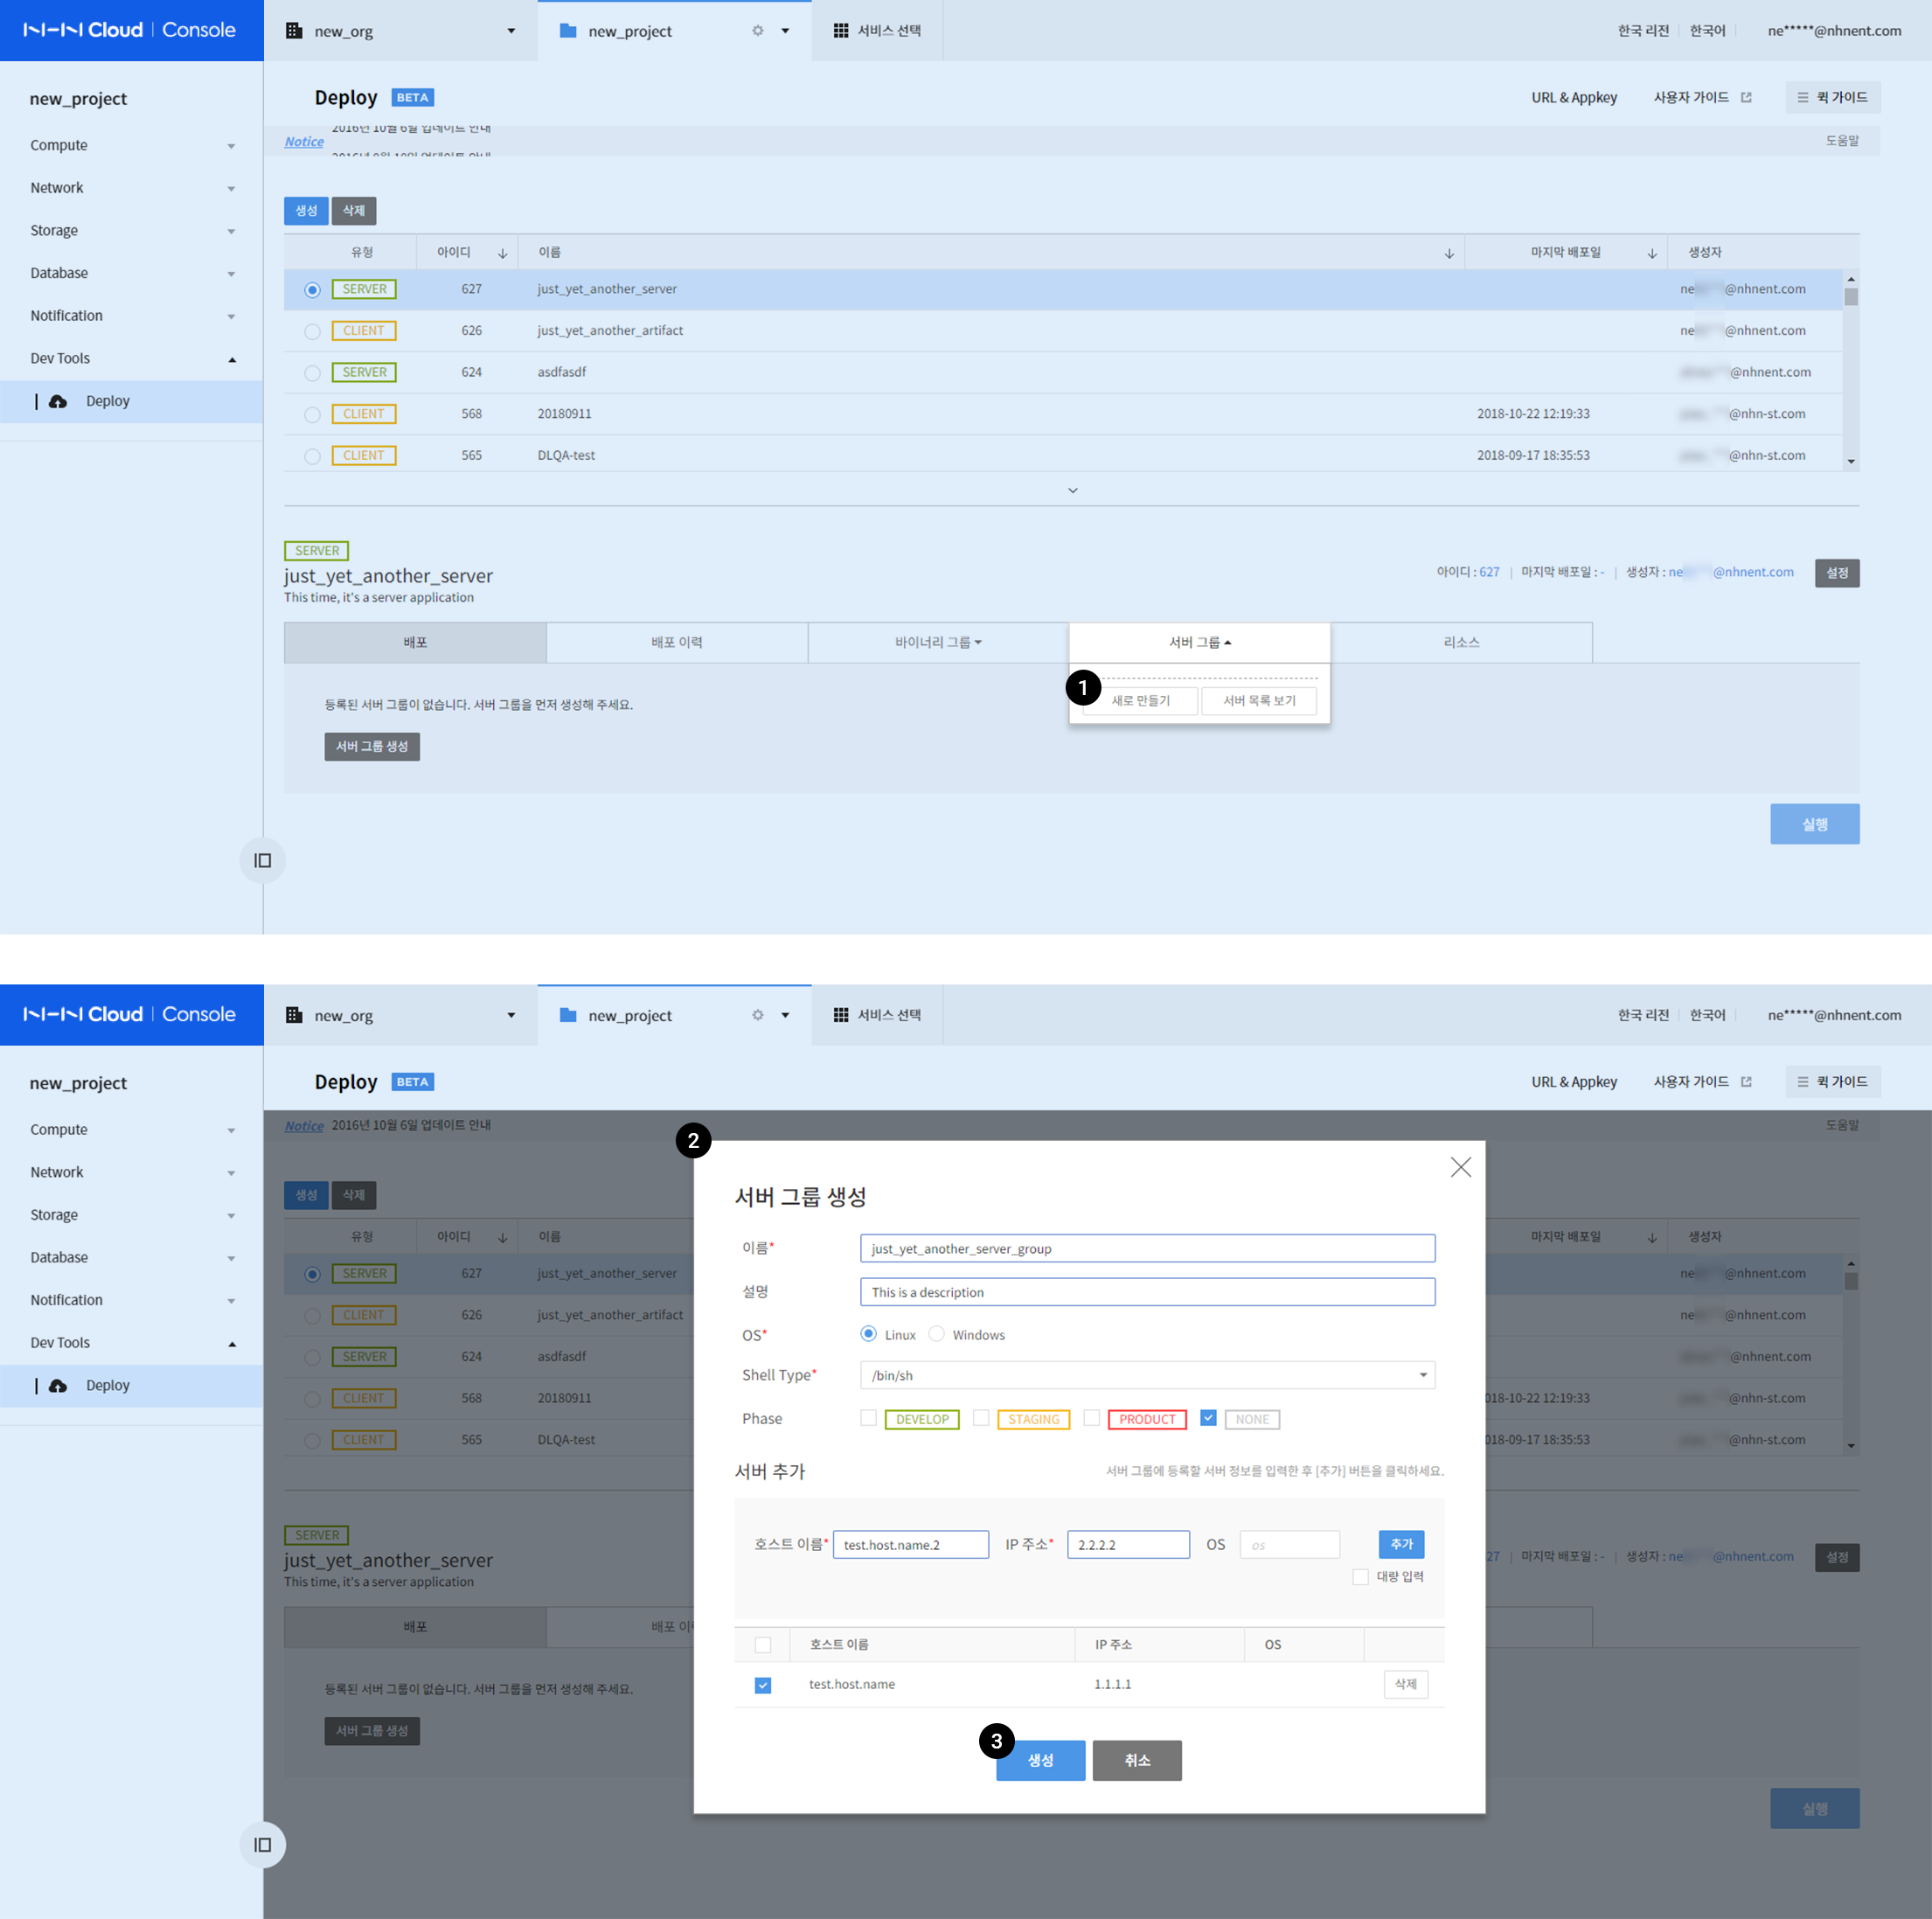
- Go to Deploy and click Server Group > Create at the bottom of the page.
-
Set a server group to create on the Create Server Group window.
- Enter name (required) and description (optional).
- Select OS and specify the Shell Type: enter one or select from the list.
- Select Phase: Choose a server tool. Otherwise, select NONE.
- Add Servers
- Servers can be added in the following two methods, and find more details from Detail Functional Guide on Server Groups.
- Add in Mass
- Add Individually
- Enter host name (required), IP address (required), and OS (optional), and click Add.
- See what is added on the server list: only the servers checked on the left box can be registered.
- Servers can be added in the following two methods, and find more details from Detail Functional Guide on Server Groups.
-
When it is completed, click Create.
Setting Binary Groups
The feature to manage binaries to be deployed.
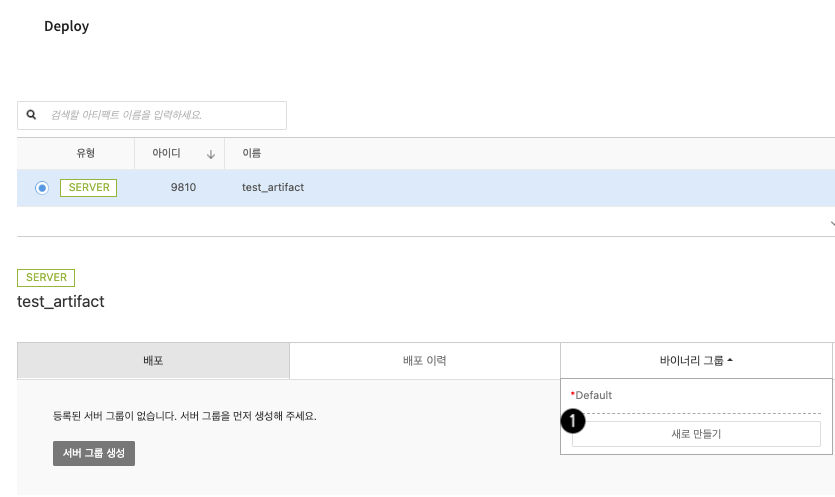
- On the tab below the Deploy screen, click Binary Group > New.
- The Default binary group is automatically created when you create an artifact.
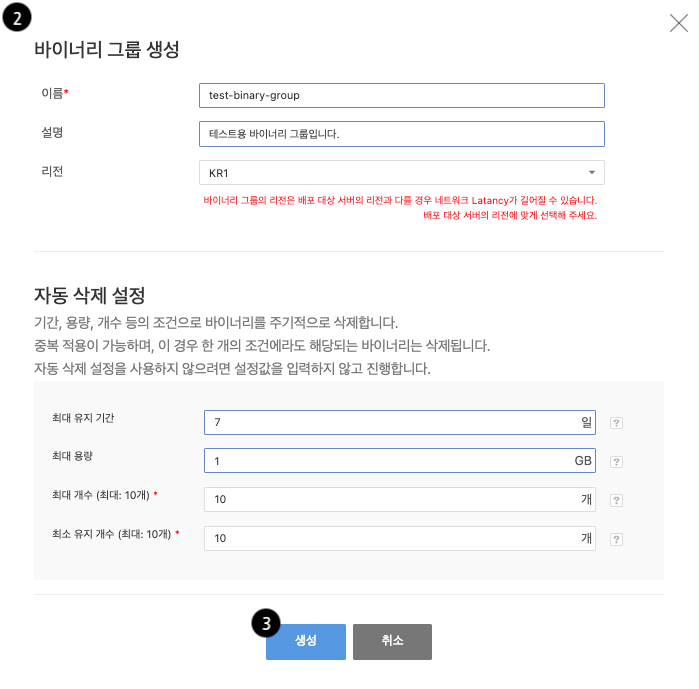
- In the Create Binary Group window, set the binary group you want to create.
- Enter a name, description, and region.
- Network latency can be longer if the regionis different from the region of the server being deployed.
- Enter the auto-delete settings.
- The feature to periodically delete binaries based on conditions such as duration, size, count, etc.
- The maximum number and minimum number to keep are required values and can be set to a maximum of 10.
- Enter a name, description, and region.
- When it is completed, click Create.
Create Scenarios
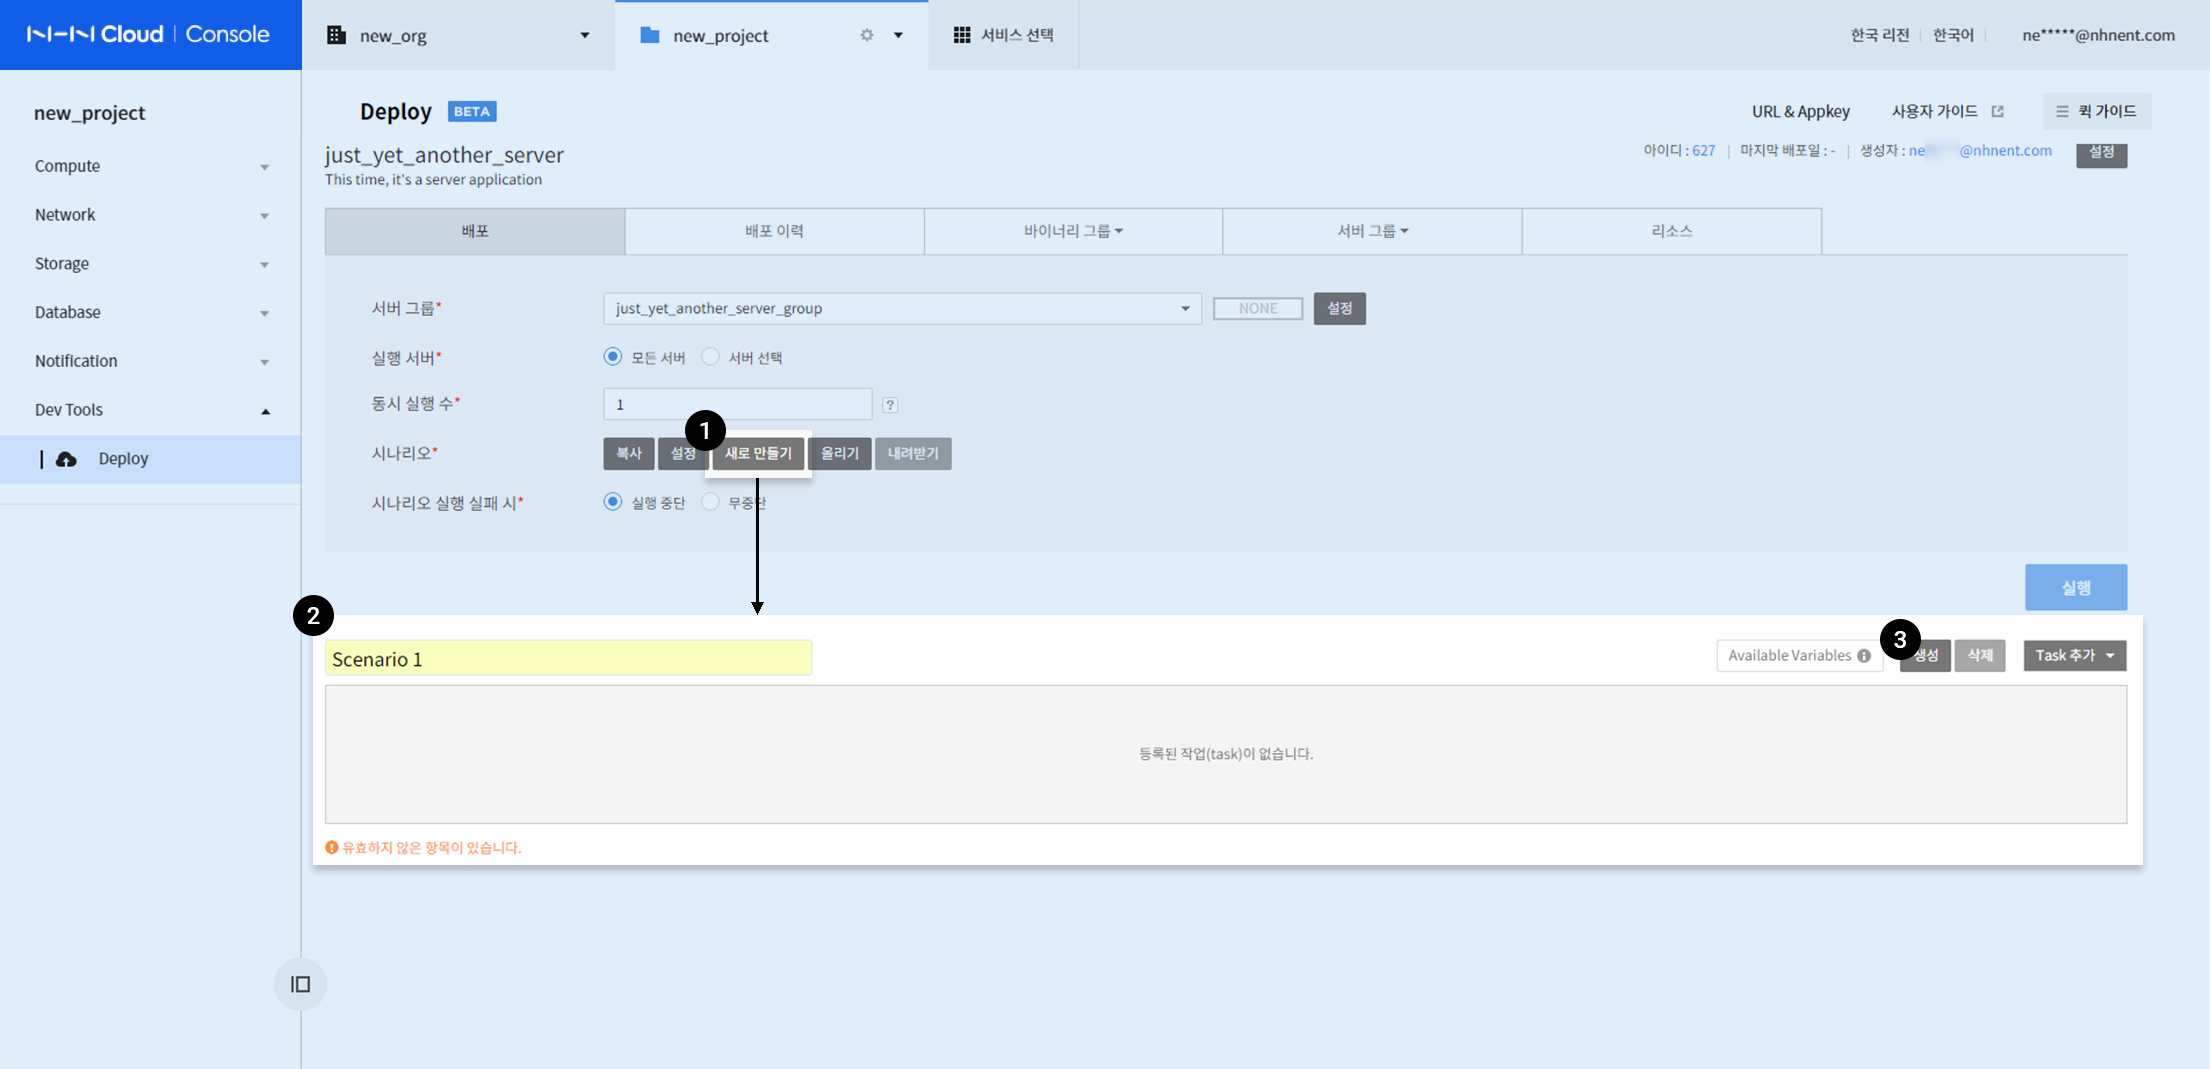
- Go to Deploy and click Deploy > Create.
- Enter scenario name (optional) in Scenario which is added below.
- Click Create.
Add Tasks
A task is an element of a scenario which can execute individual functions and control order, and it is categorized into two as below:
- pre-run Task: Execute before deployment
- Normal Task: Execute while deployed
Choose one as you need. This document describes tasks that are basically required for deployment. Find more tasks on Detail Functional Guide on Tasks.
To test deployment, the following three tasks are added:
1. Add User Commands
- It is a user-defined command task which is executed for deployment.
- You may use Available Variables.
- Available Variables: Reserved words. Find more details on Detail Functional Guide on Tasks.
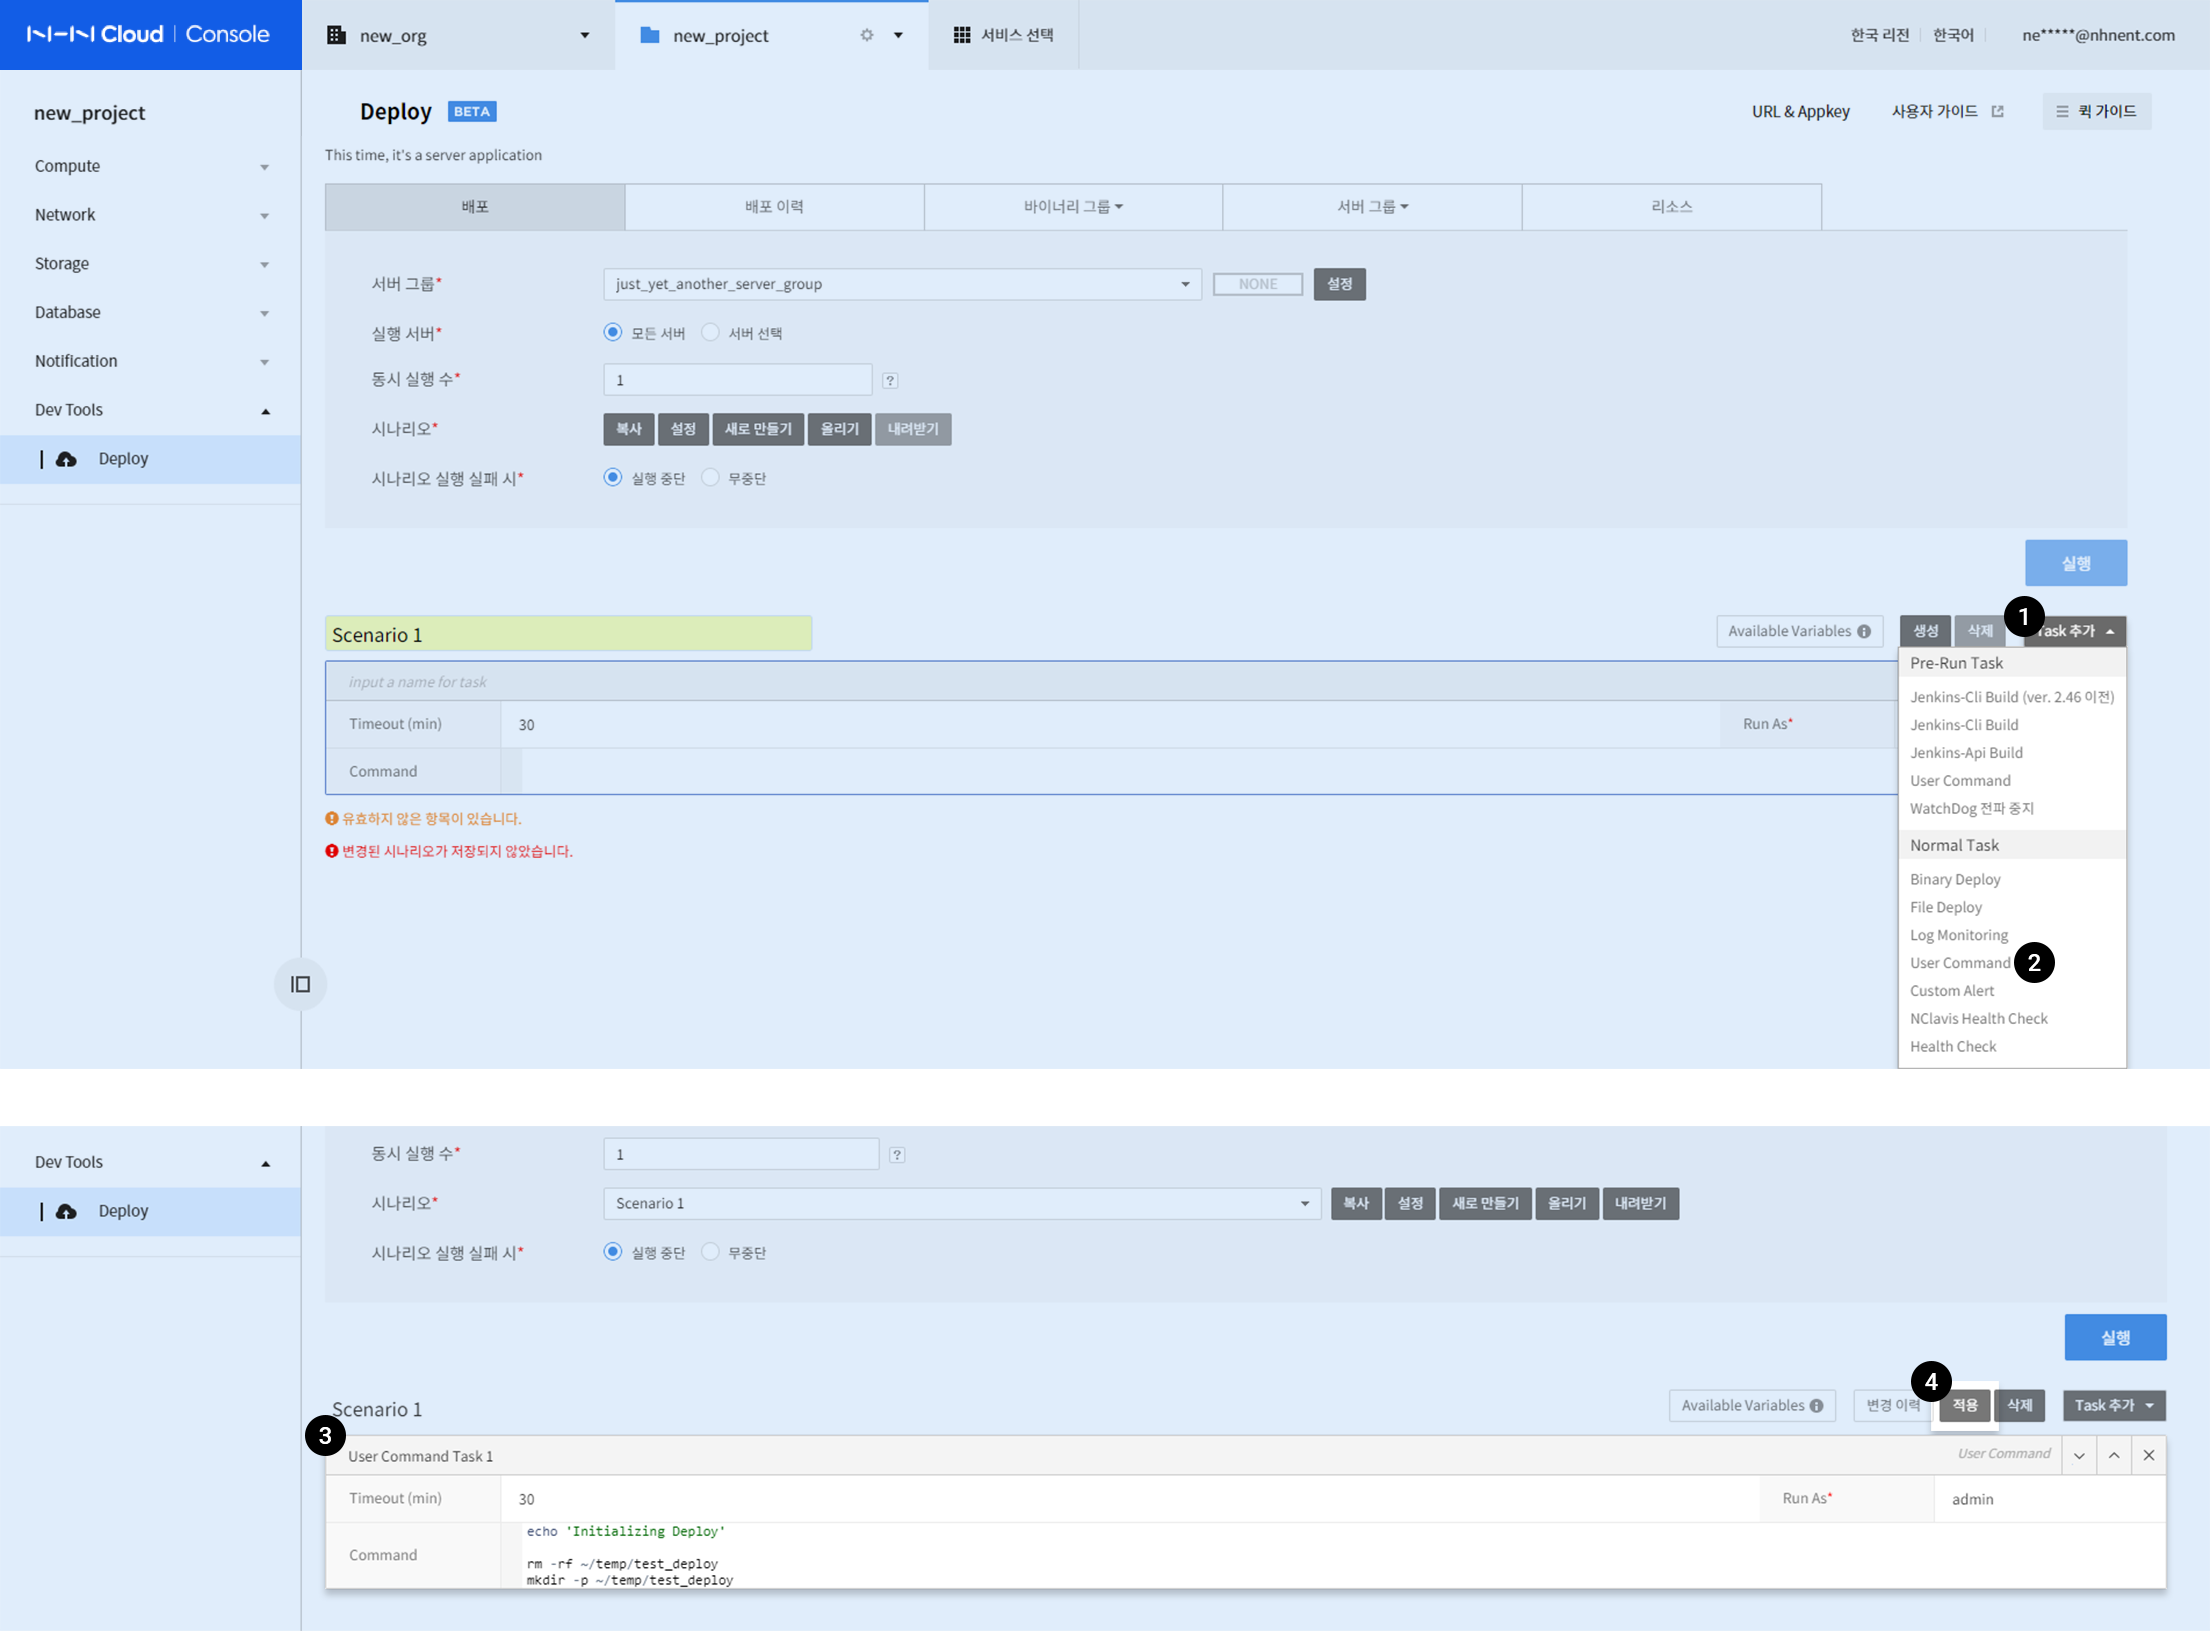
- Click Add Tasks on the right of Scenario from the Deploy tab.
- Click User Command below Normal Task.
-
Fill out information for the new task.
- Timeout (min)
- Specify timeout to complete task execution: min 1, and max 30 minutes.
- Run As
- Enter execution account.
- Command
- Enter commands to run.
- Timeout (min)
-
When it is completed, click Apply.
2. Add Binary Deploy
Deployment for uploaded binary files can be set.
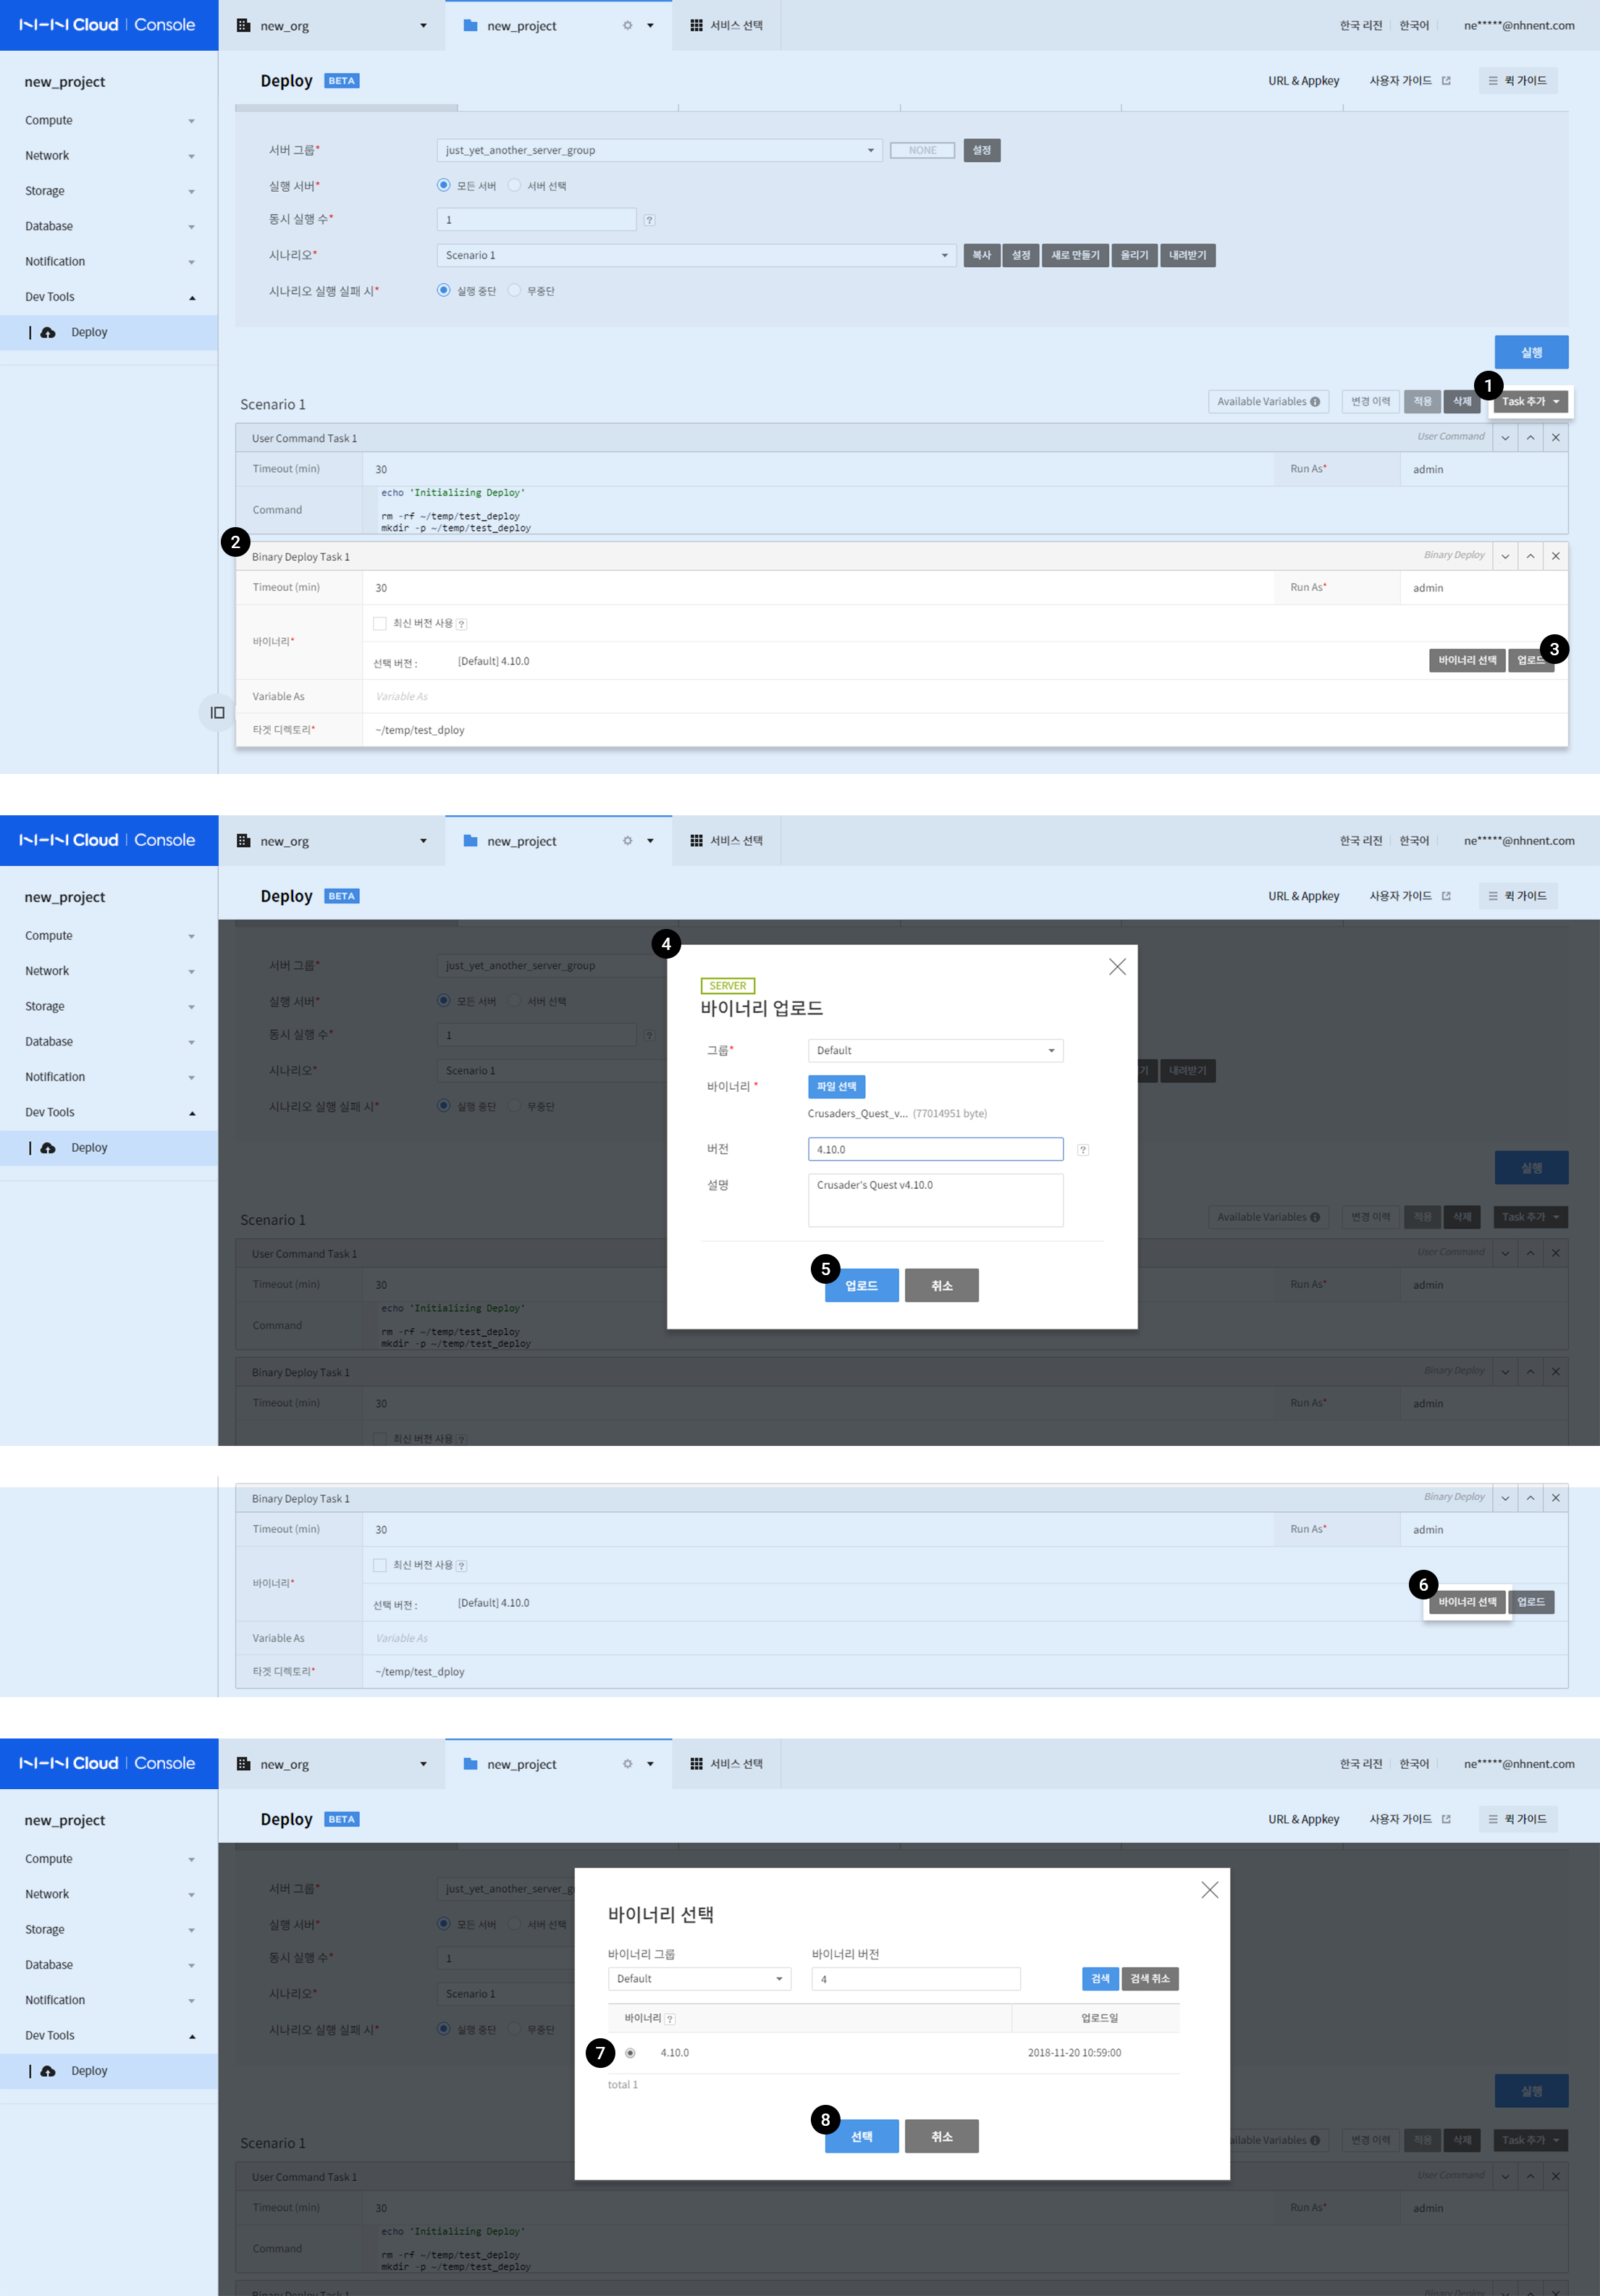
- Click Add Tasks and Binary Deploy below Normal Task.
- Fill out information for the new task.
- Timeout (min)
- Specify timeout to complete task execution: min 1, and max 30 minutes.
- Run As
- Enter execution account.
- Timeout (min)
- To upload binary files, click Upload on the right.
- Enter binary file information.
- Click Select Files to choose a binary file.
- Enter Version (optional) and Description (optional).
- Click Upload.
- After it is uploaded, click Select Binaries.
- Select a binary version you need.
- Use Search to choose from many versions.
- Click Select.
- Variable As
- You can specify the name of variables of binary and use binary information at User Command. Find moe details at the bottom of the task menu of Detail Functional Guide.
- Target Directory
- Specify a target directory to deploy binaries.
3. Add User Commands

- Click Add Tasks and select User Command below Normal Tasks.
- Fill in information for the new task.
- Timeout (min)
- Specify timeout to complete task execution: min 1, and max 30 minutes.
- Run As
- Enter account for execution.
- Command
- Enter commands to execute.
- Timeout (min)
- When it is completed, click Apply.
Execute
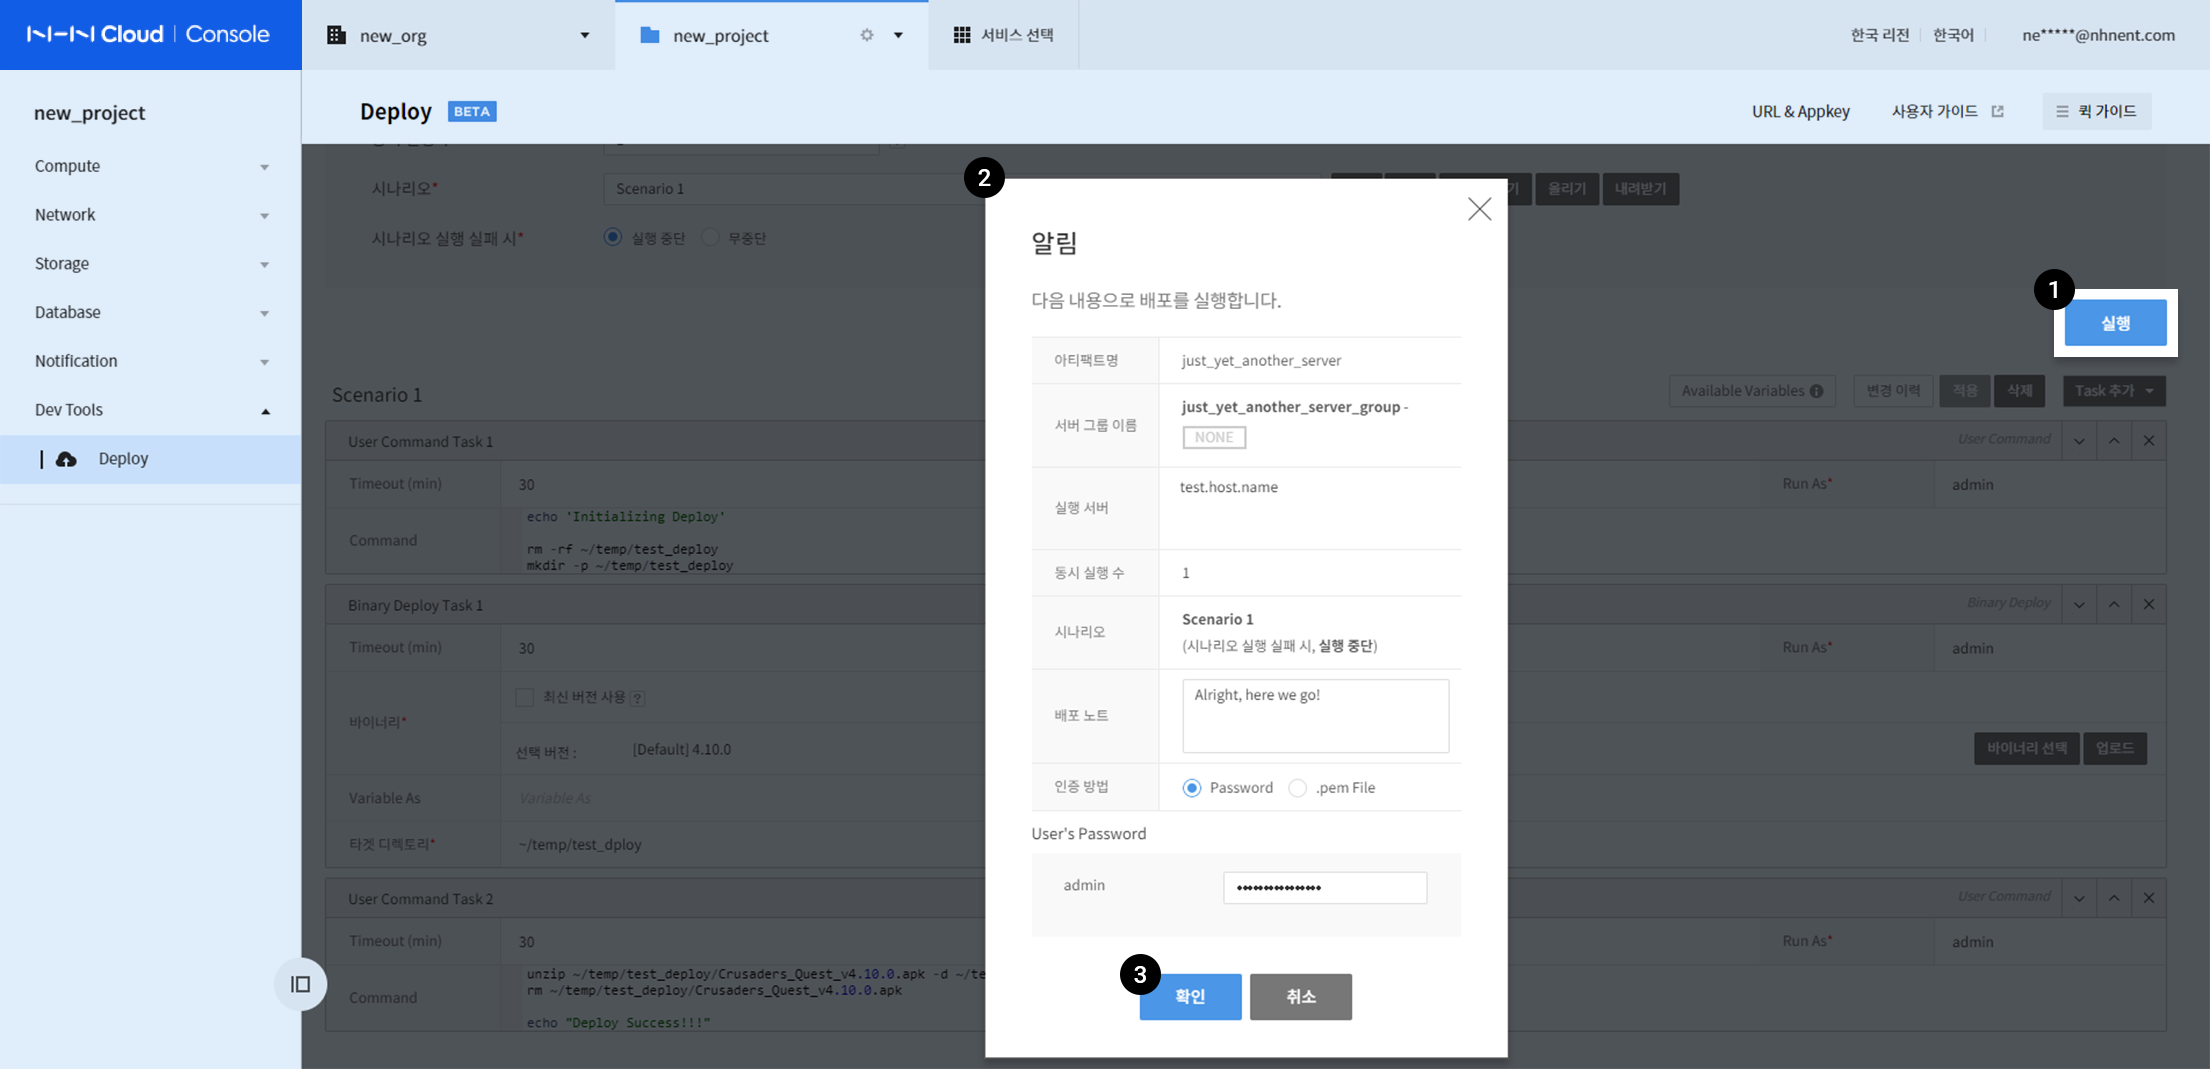
- Click Execute on the right to request for deployment.
- Fill in execution information for deployment.
- Specify deployment note (optional) and an authentication method.
- Enter password for Password, or select and upload .pem file.
- When it is completed, click Confirm.
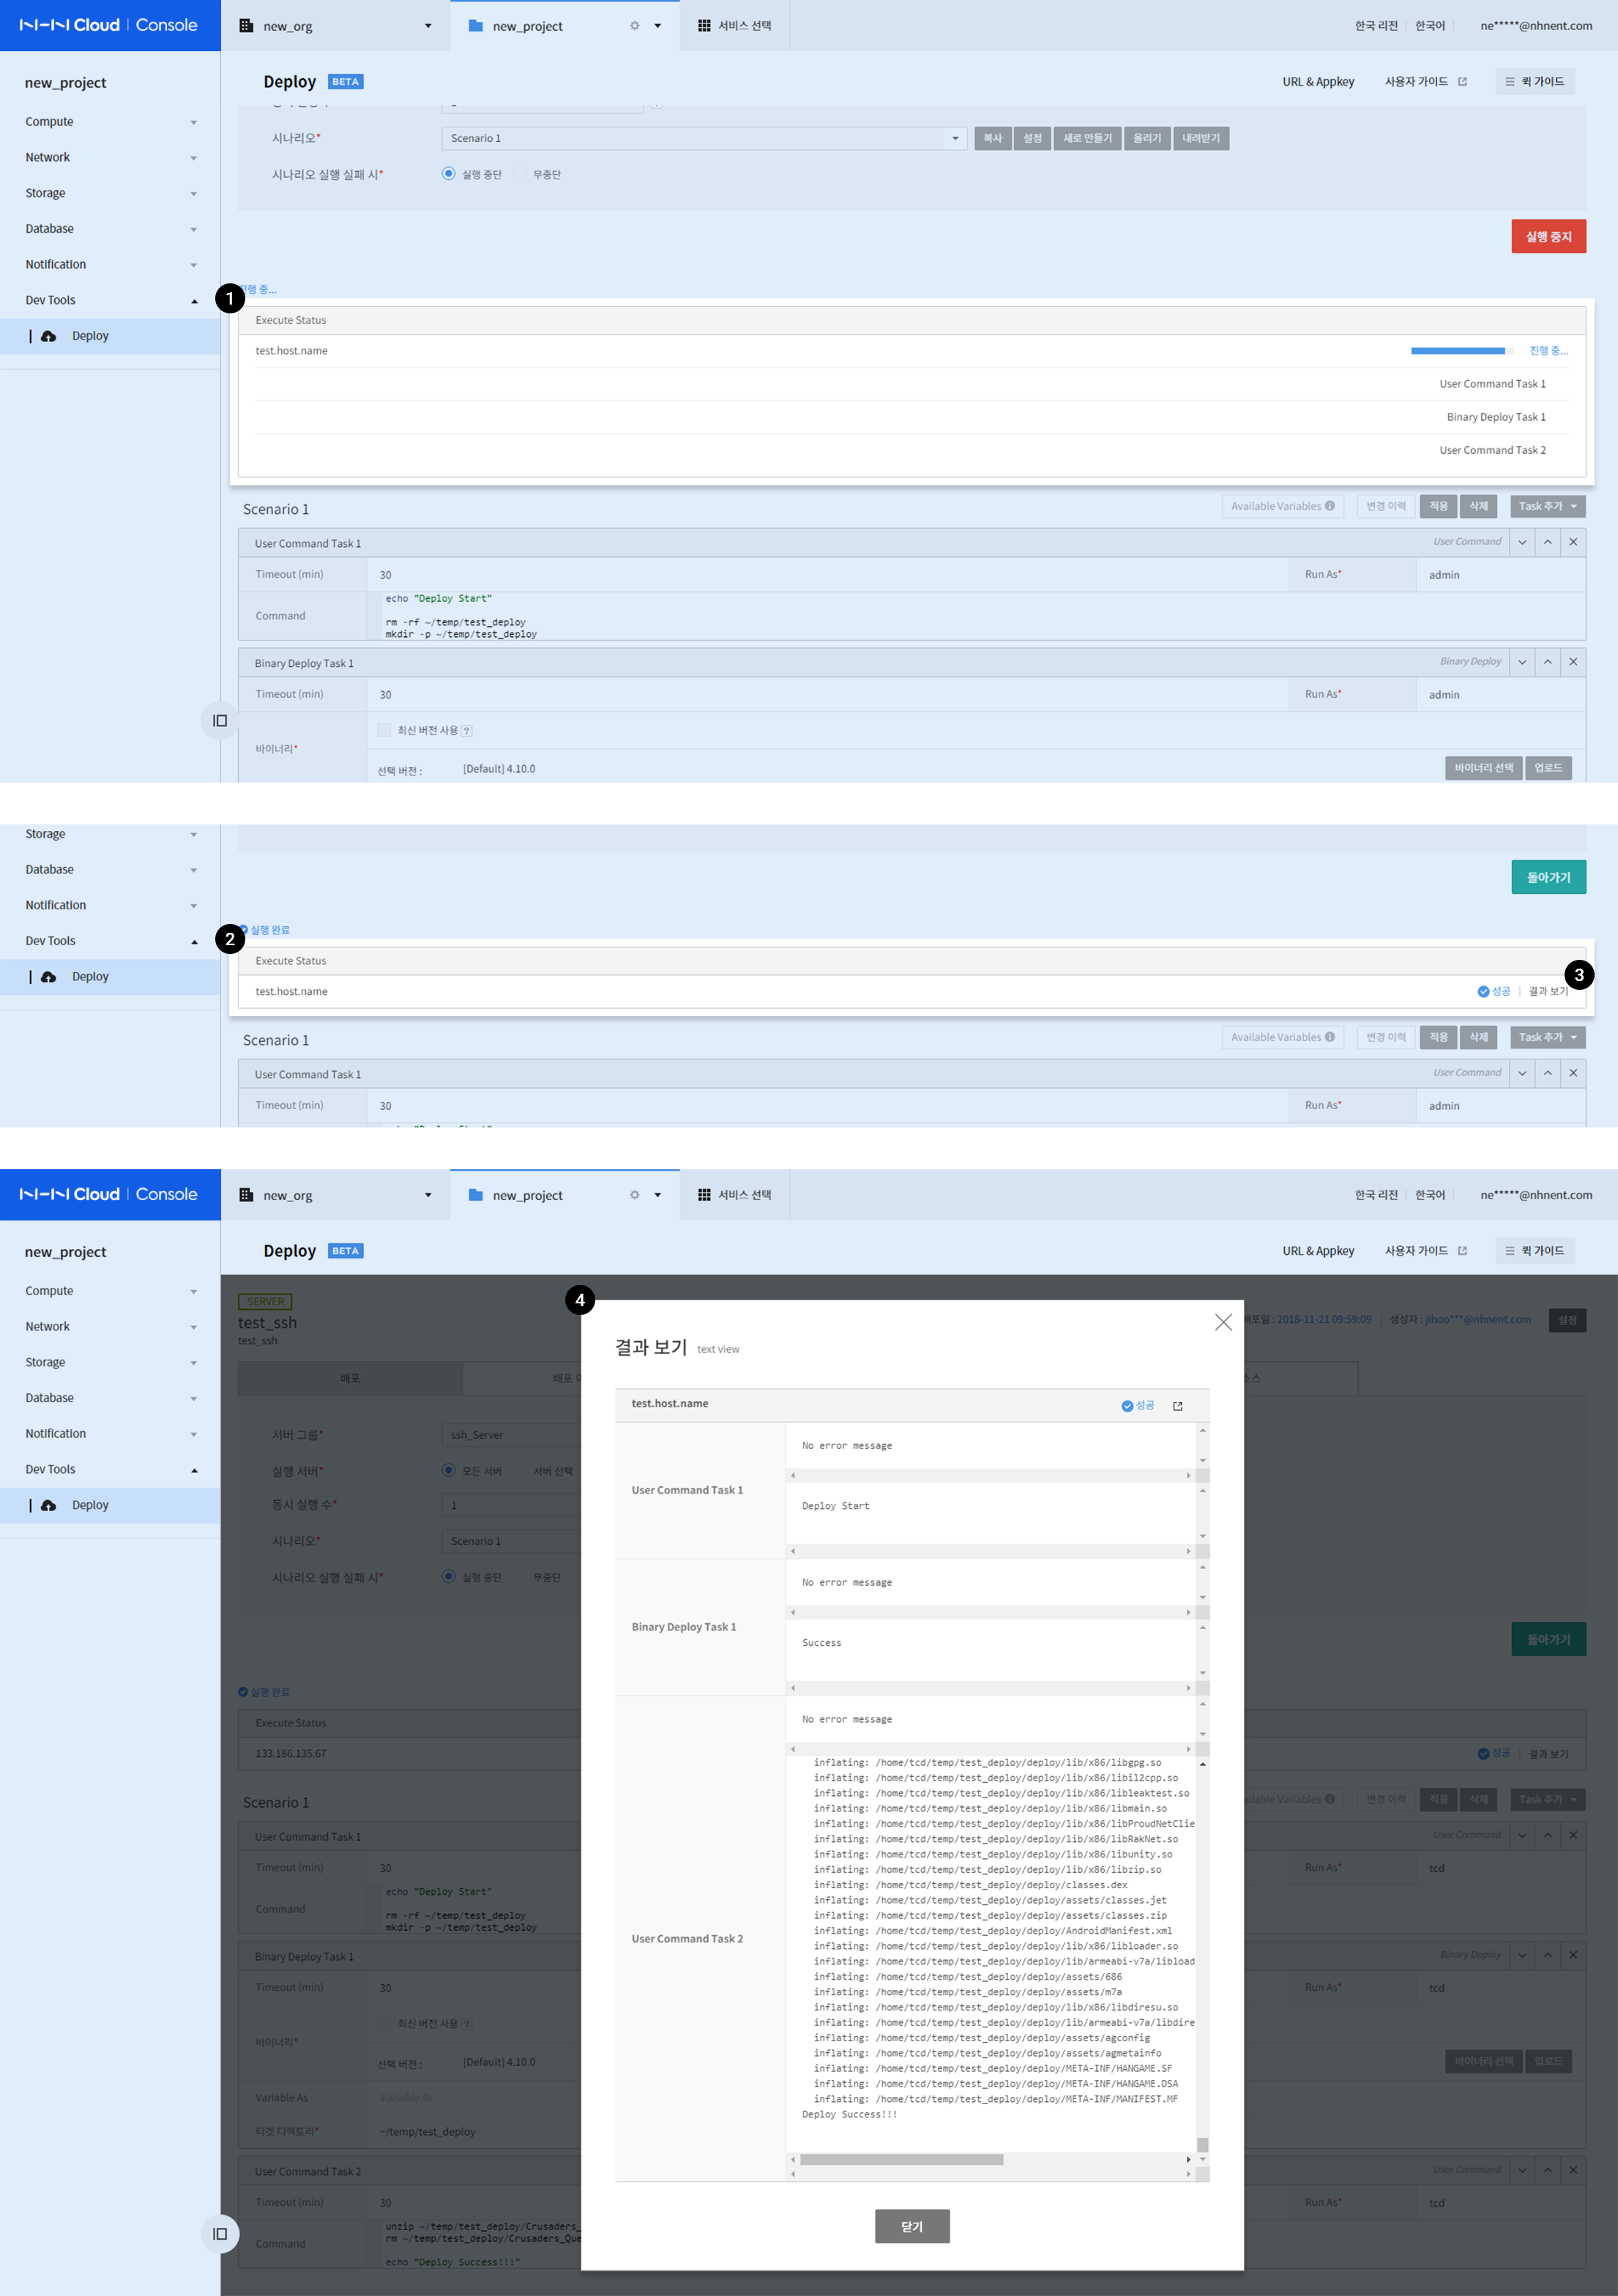
- You can find the progress of deployment.
- Check deployment is completed.
- Use exit code to see if each task is normally executed.
- To find detail results, click See Results.
- Check deployment result on the window of See Results.
- You can find details on the execution of each task (return value, exit code, error, and etc.).
File has been deployed to the server. NHN Cloud Deploy supports more functions, and find more details in Detail Functional Guide.