Dev Tools > Deploy > Detail Functional Guide
This document contains the following:
Menu Description
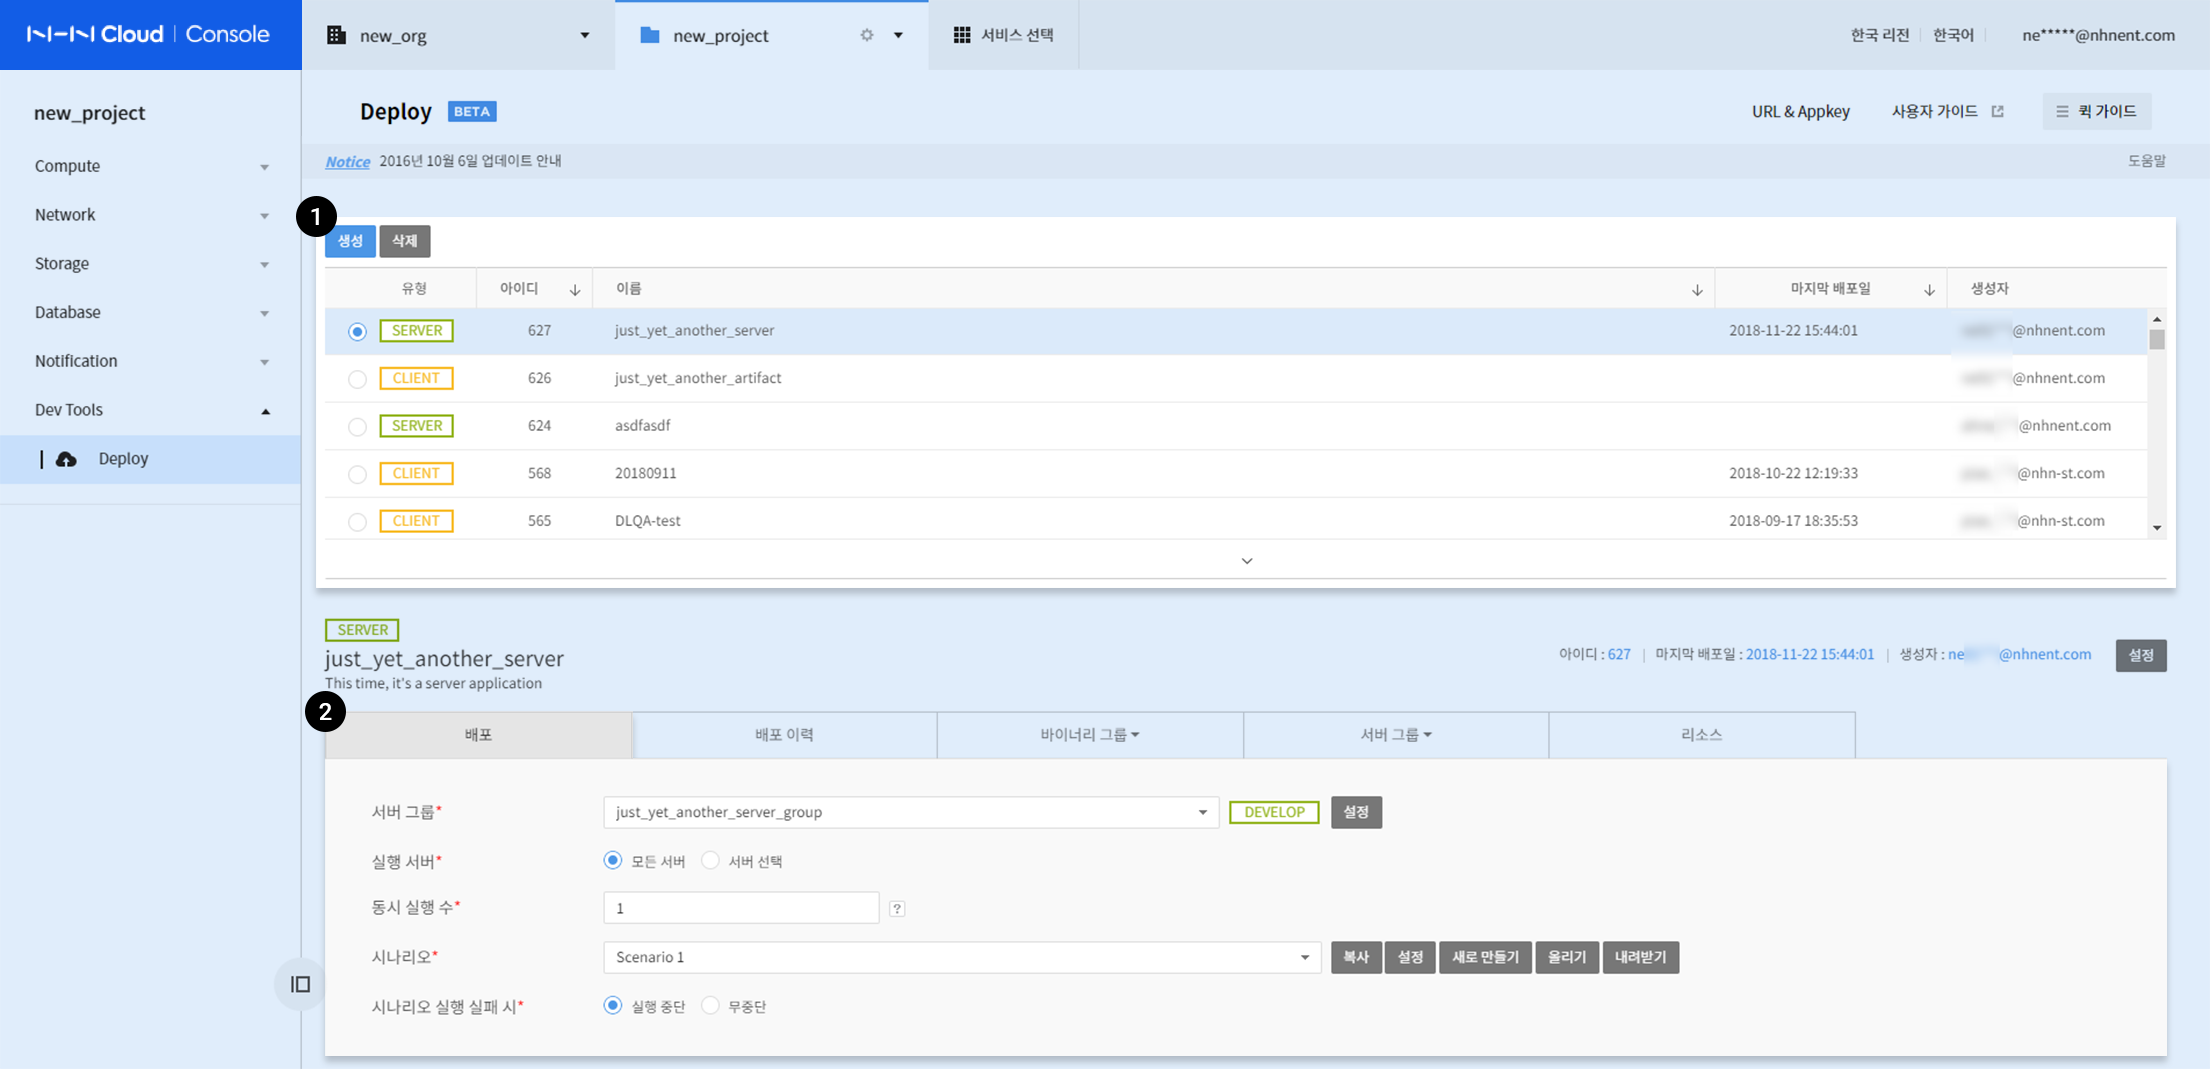
1. Artifact Menu
It is the basic configuration unit of Deploy, to manage deployment. Created artifacts are displayed on the list, on top of the page.
2. Deployment Menu
The page executes deployment, including creating and setting scenario. A scenario is composed of Jenkins-CLI template, binary deployment, and file deployment, and you may enter commands as you need to execute your own script.
- Manage Deployment Scenario
- Copy
- Set
- Create
- Upload/Download
- Import/Export by Scenario
- Select Server Group and Scenario for Deployment
- Concurrent/Individual Server Deployment within Server Group
- Detail deployment information, described on the deployment note, is available on View Result of the Deployment History tab.
Deployment Option
Server Group
- Select a server group to deploy. Server groups can be created from the Server Group tab.
Execution Server
- All Servers
- Deployed to all servers of a specified server group.
- Select Servers
- Select and deploy a part of servers of a specified server group.
Number of Concurrent Execution
Deploy concurrently or individually to servers within a specified server group.
- 0: Concurrent execution
- 1: Deploy one by one
- N: Specify the number of concurrent deployment
When it Fails to Execute Scenario
- Suspend Execution
- Scenario execution is suspended when an error occurs.
- Non-Suspension
- Scenario execution continues, regardless of errors.
View Current Deployment Status
You can check progress of scenario which is under deployment.
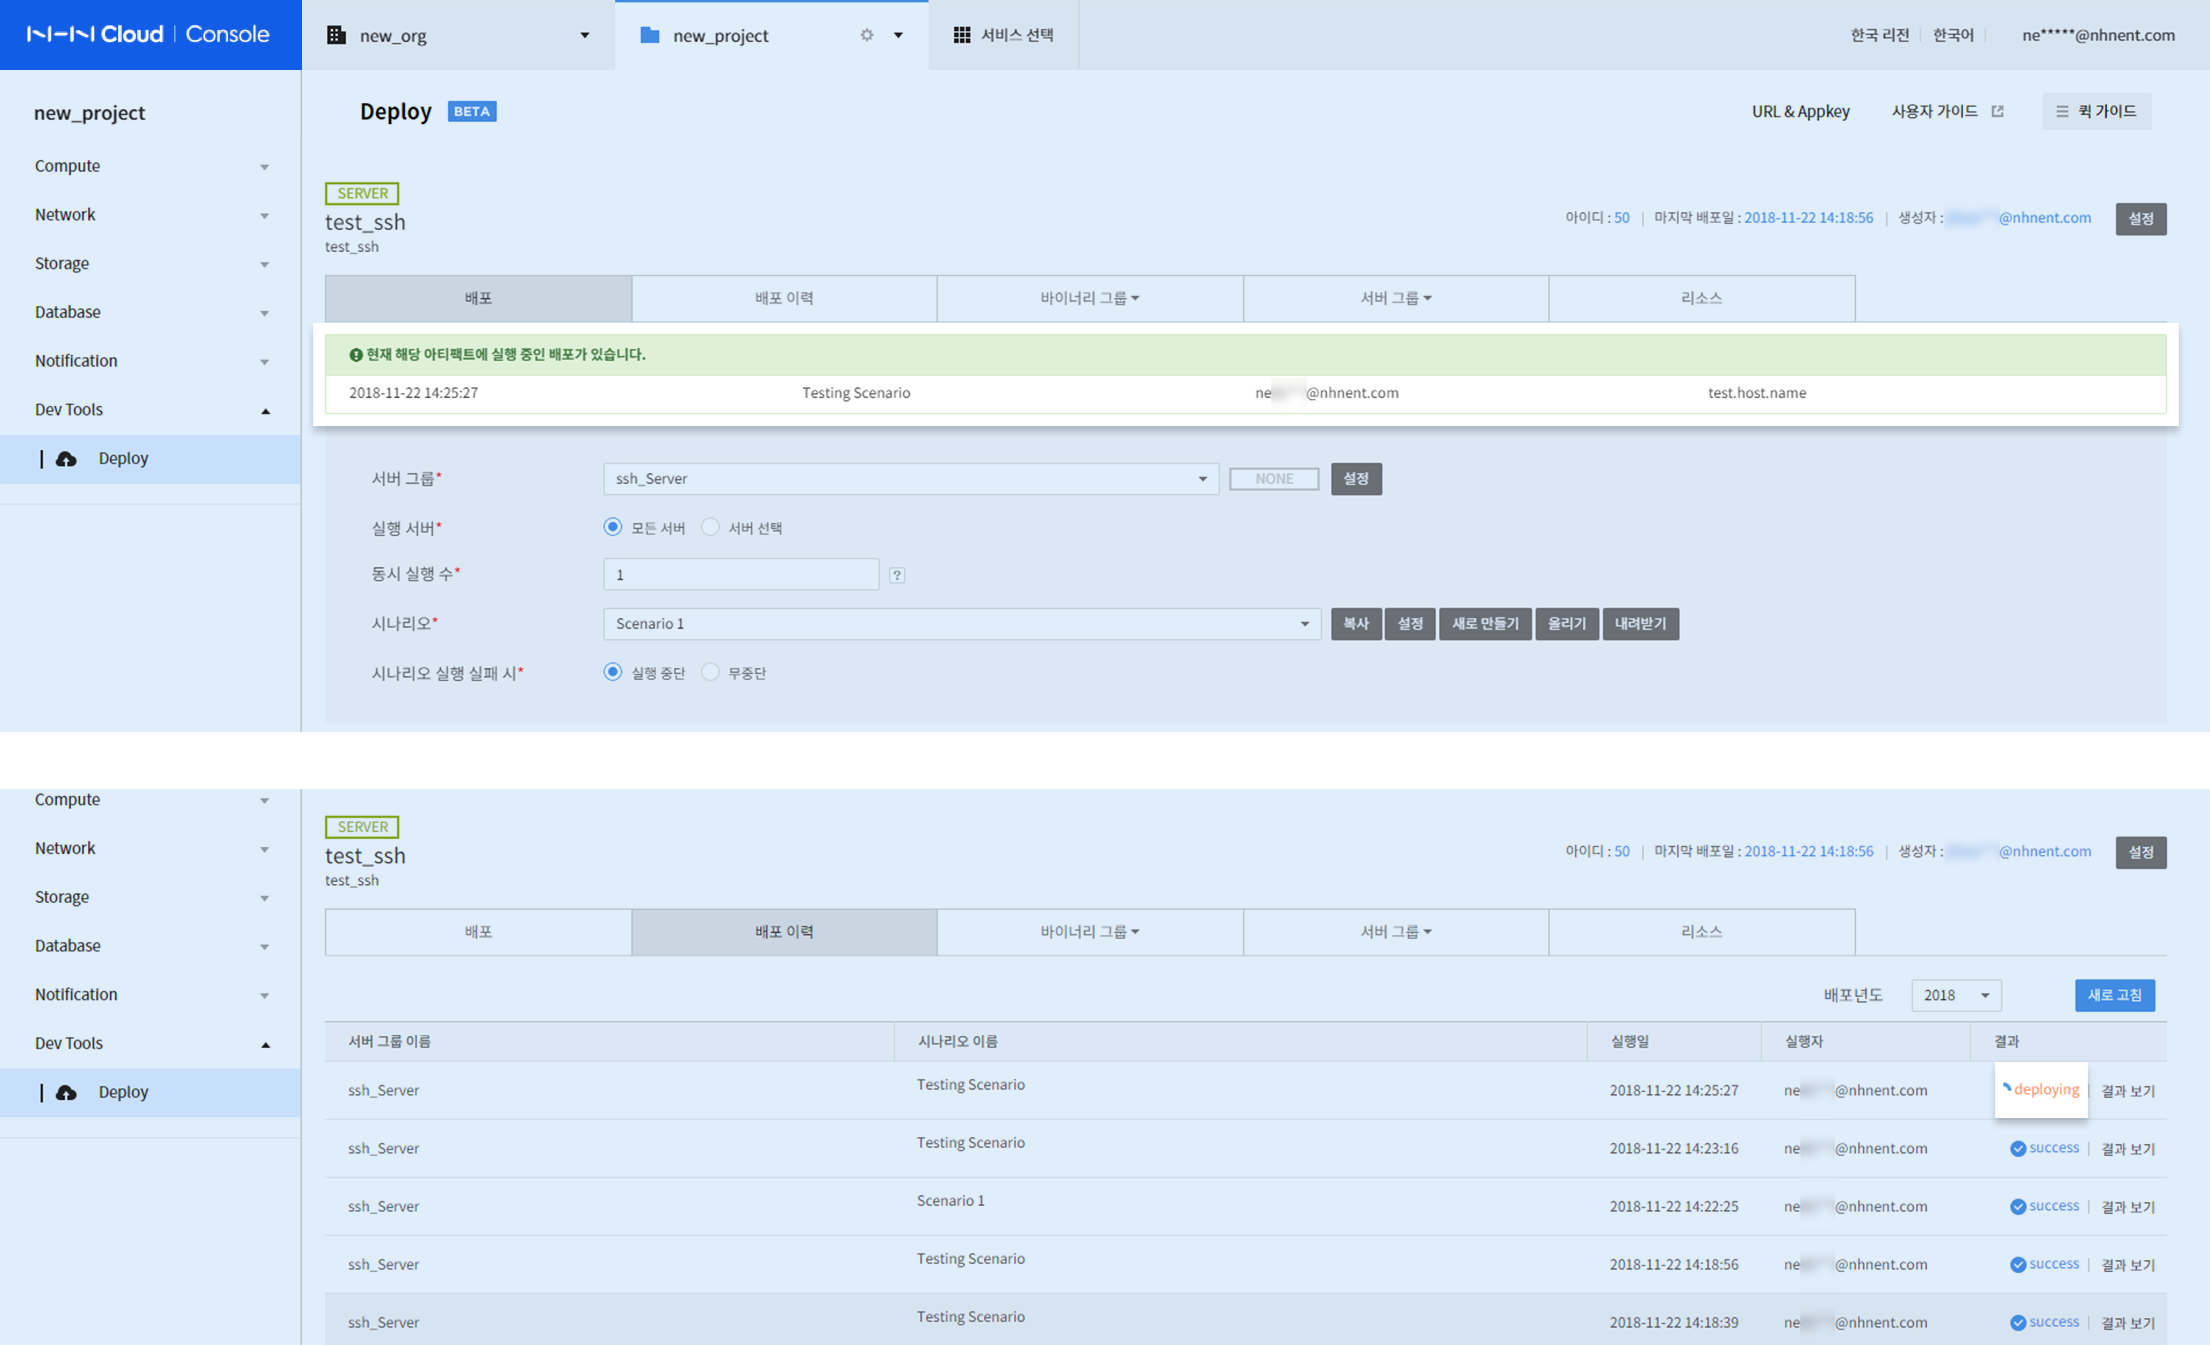
- Click a deployment item at the header which shows by clicking an an artifact under deployment.
- Click 'deploying' status on the deployment history page.
Deployment History
You can see the detailed information on distribution history, settings, and notes.
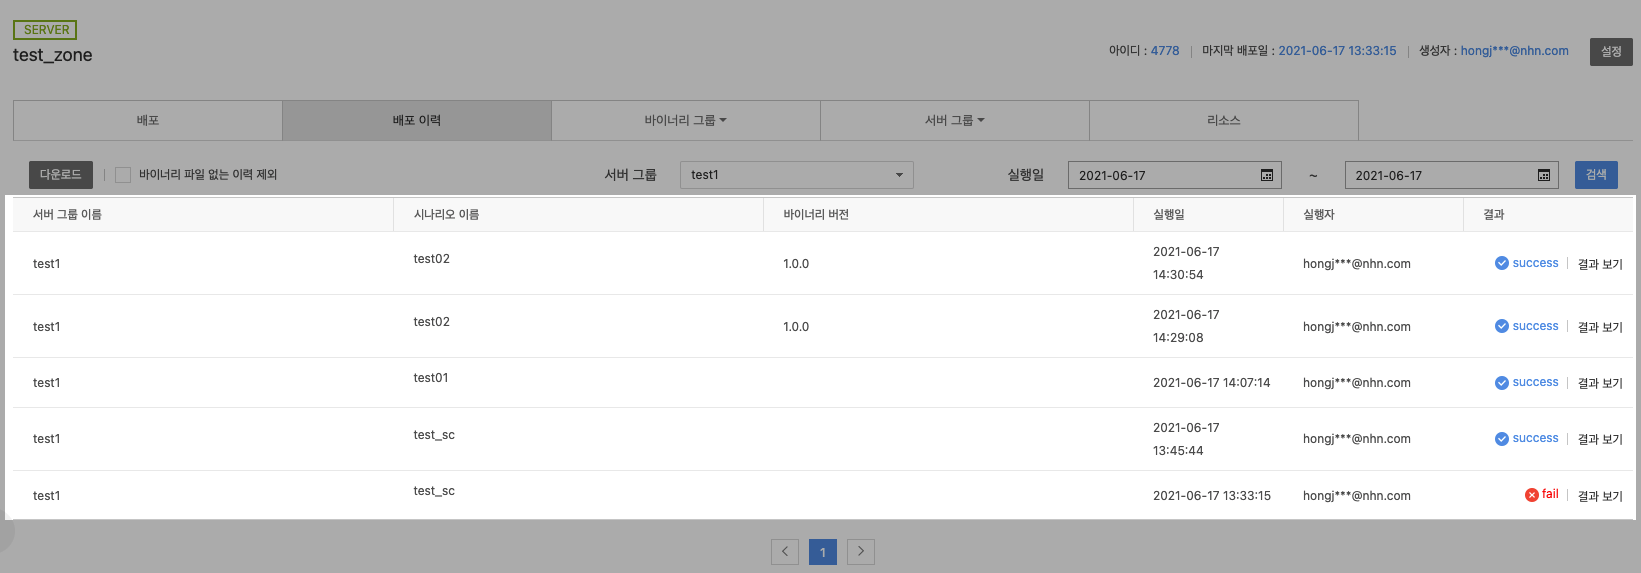
 * Check Deployment History and Its Details
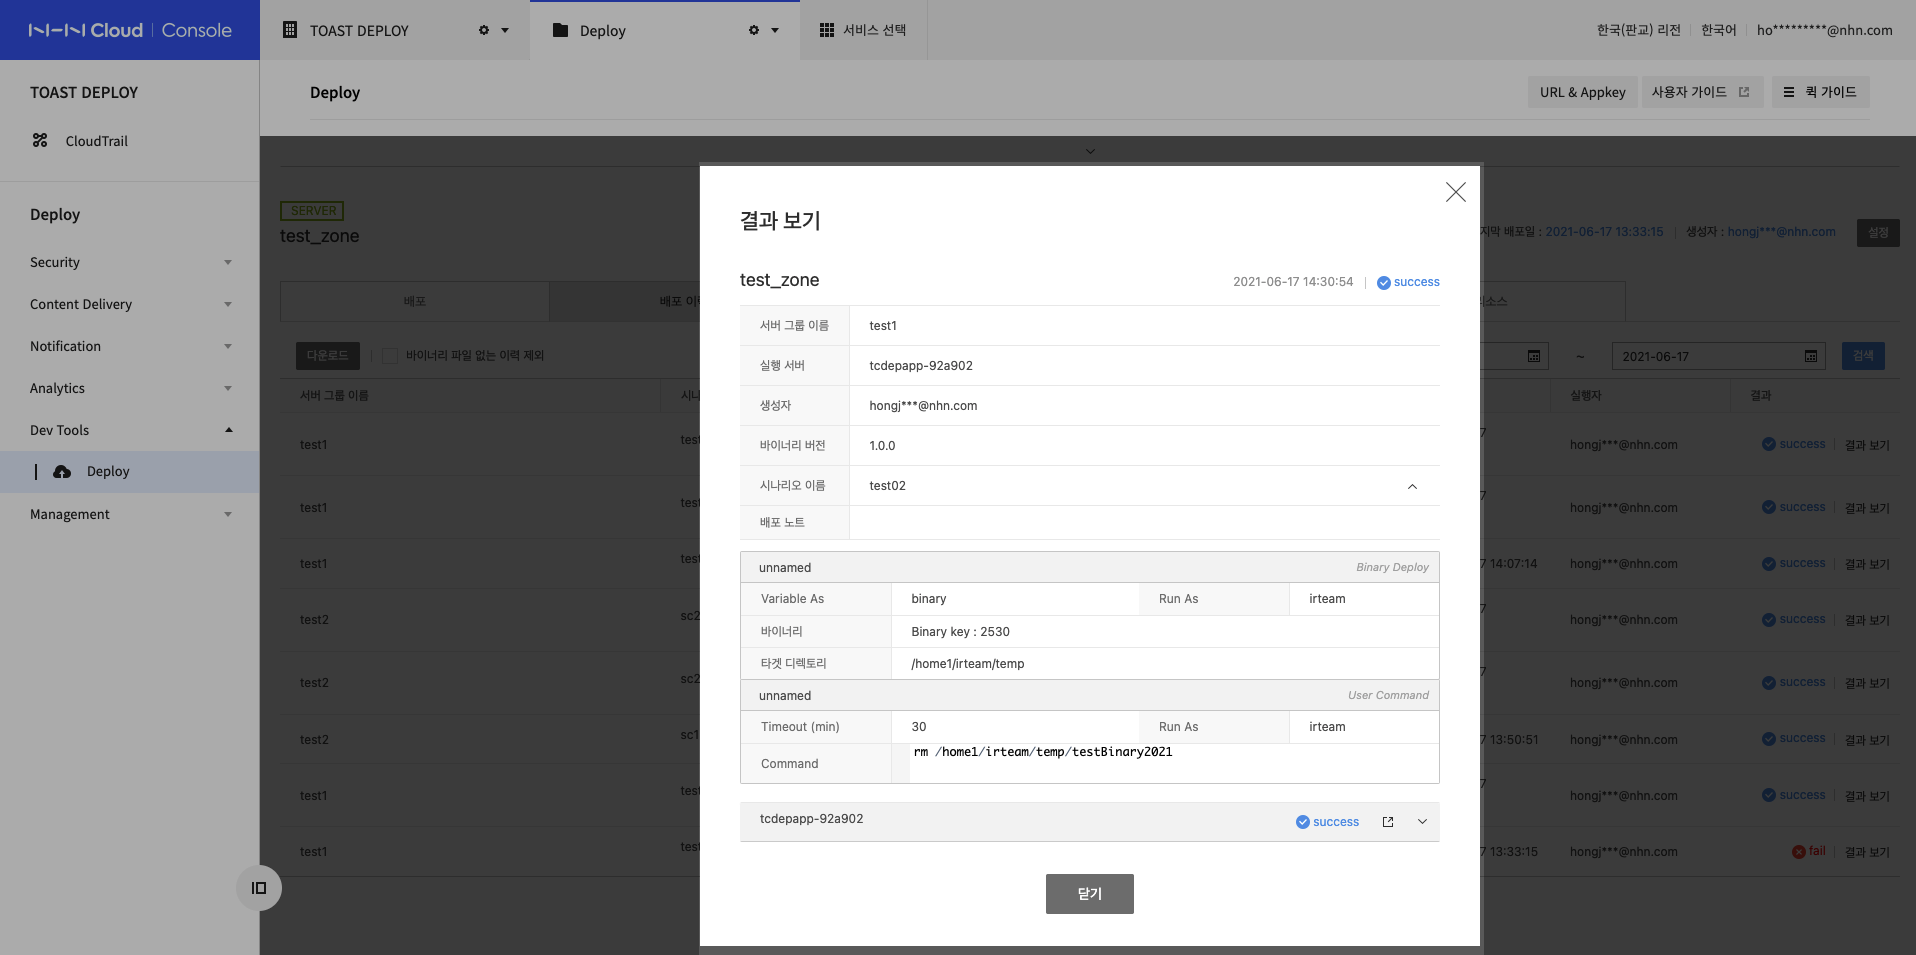
* Deployment Result
* Find setting of each history scenario, task execution results, and deployment note at View Results.
* Click 'deploying' status, and go to view deploying status.
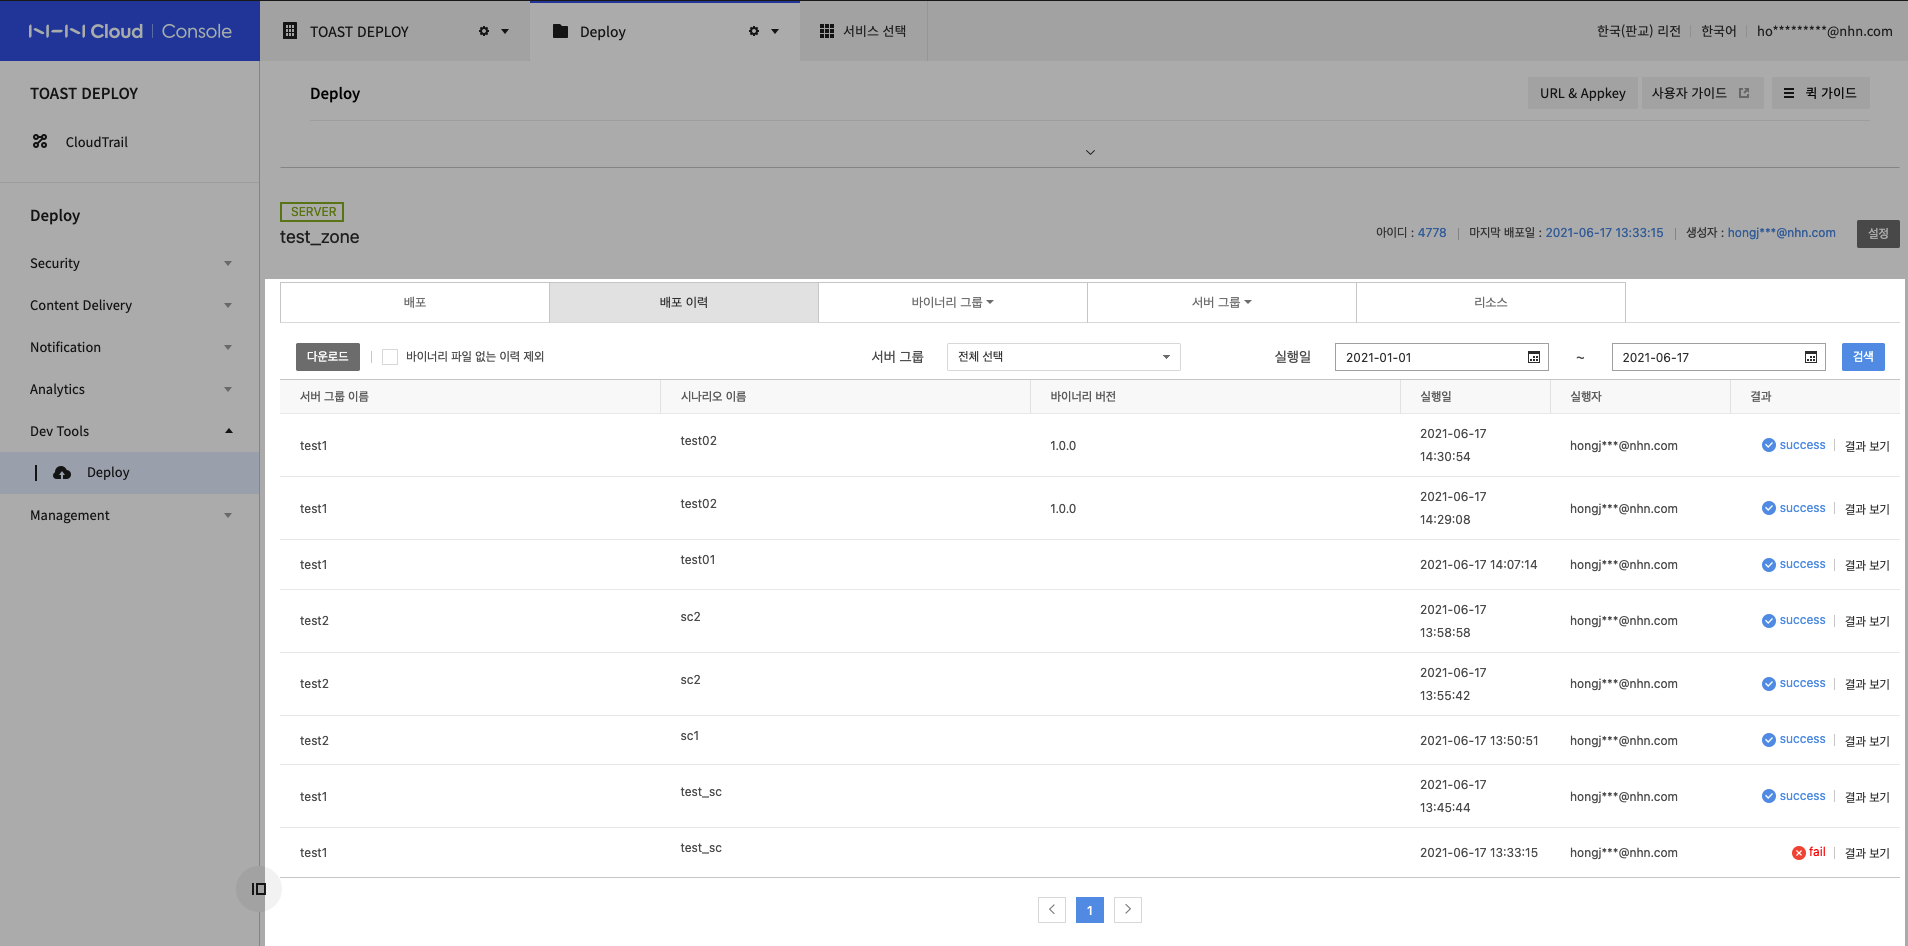
You can search distribution history by date of execution and server group.
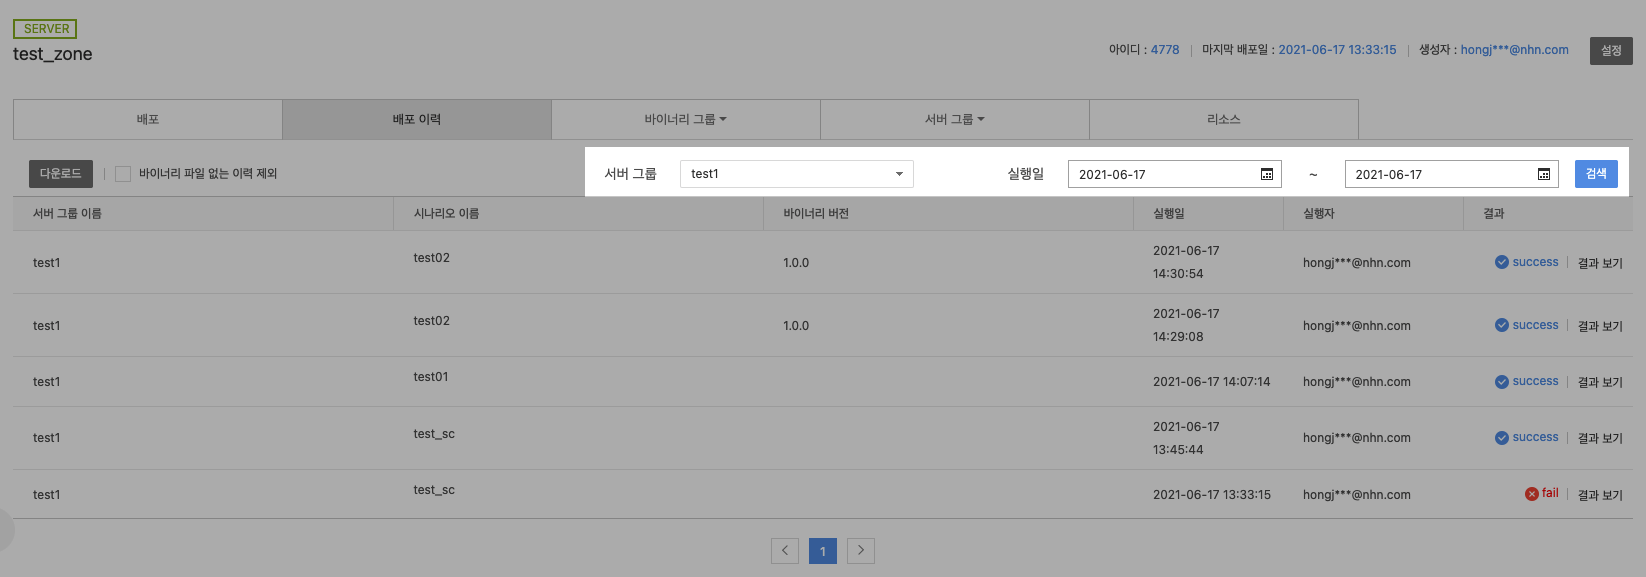
 * You can search distribution history by date of execution and server group
* You can search using the server group selection window and starting and ending dates of execution.
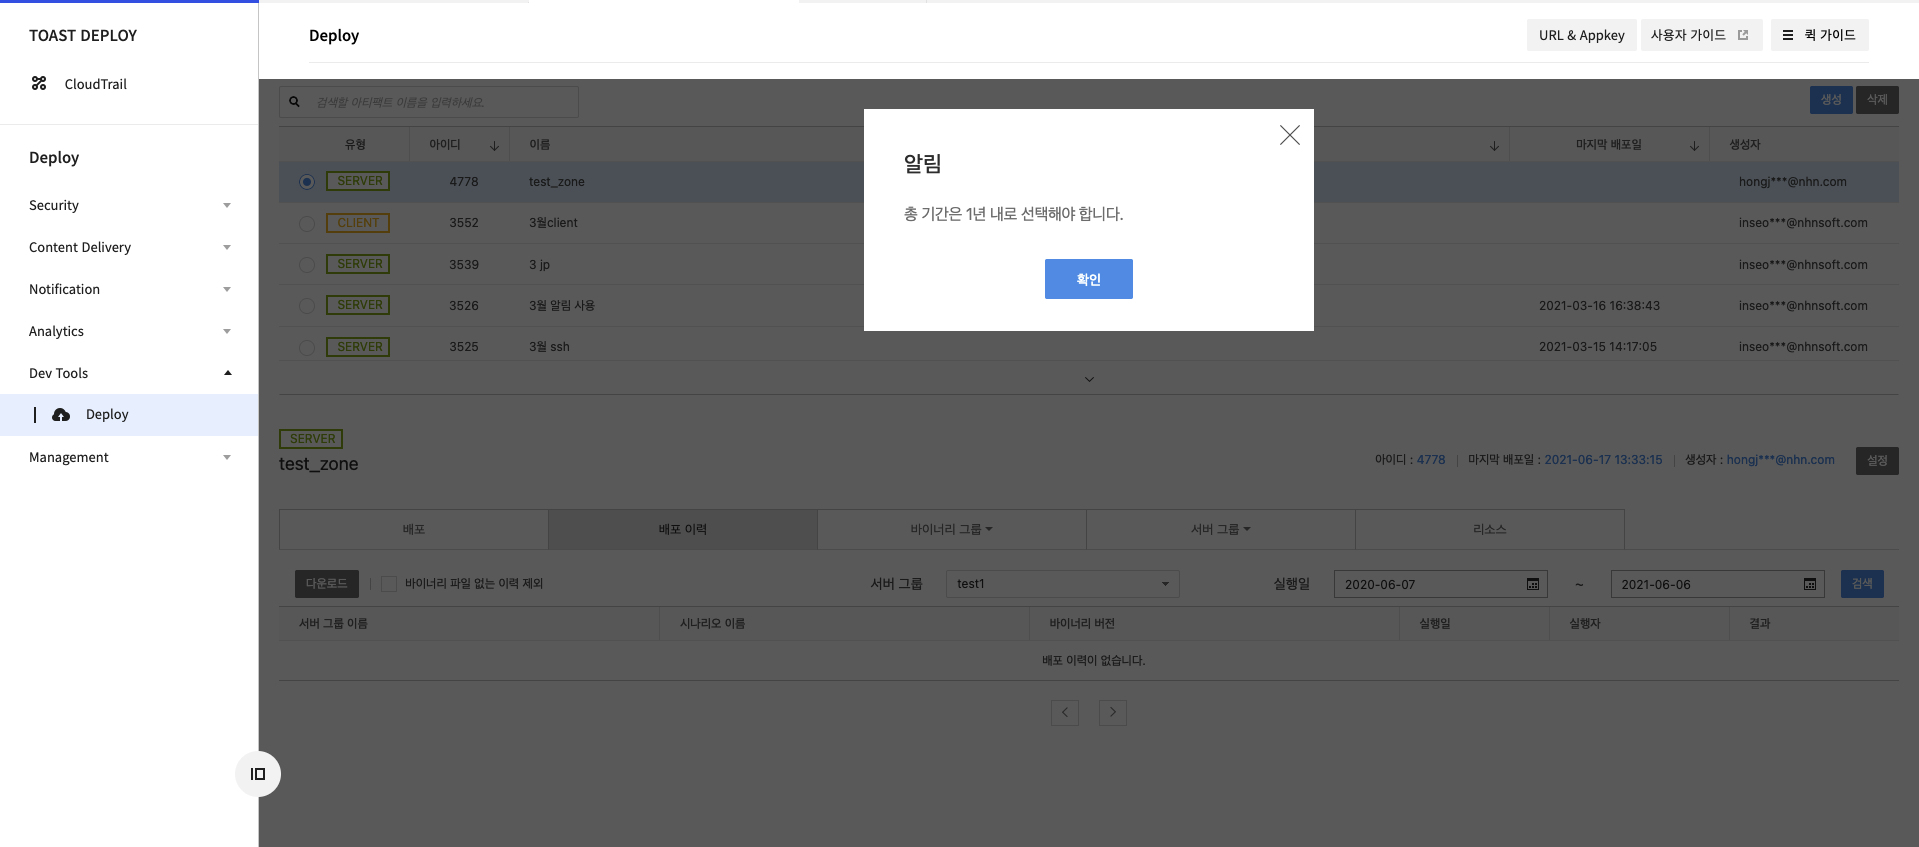
* It cannot be selected because its duration of execution exceeds 1 year. (e.g. 2020-06-07 to 2021-06-17).
* You can search distribution history by date of execution and server group
* You can search using the server group selection window and starting and ending dates of execution.
* It cannot be selected because its duration of execution exceeds 1 year. (e.g. 2020-06-07 to 2021-06-17).
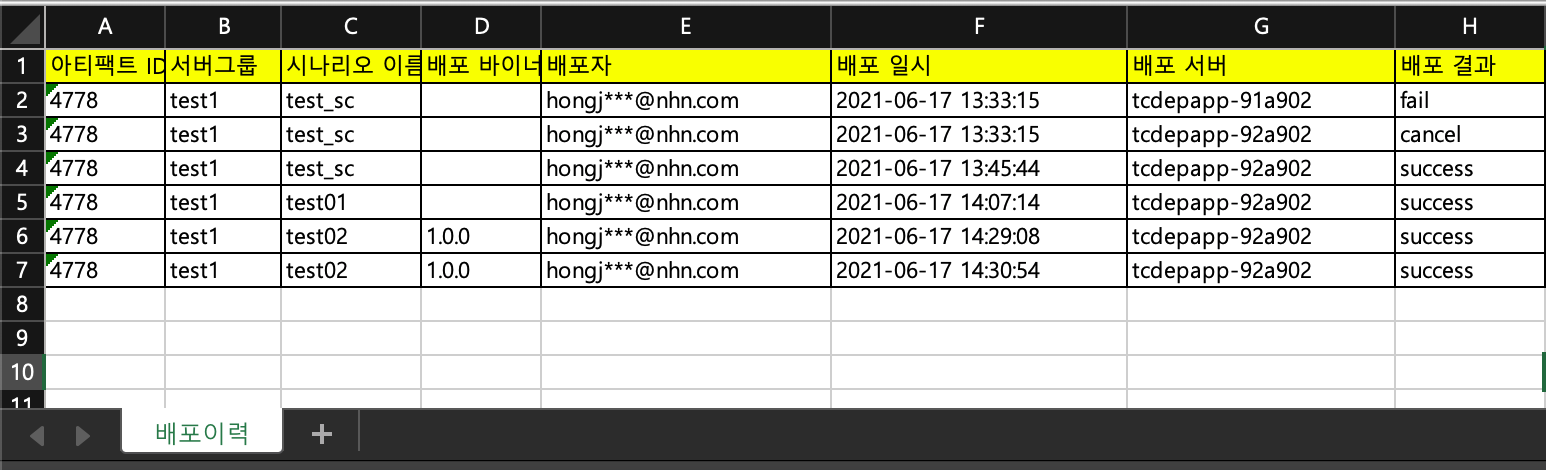
The searched distribution history can be downloaded in an Excel file.
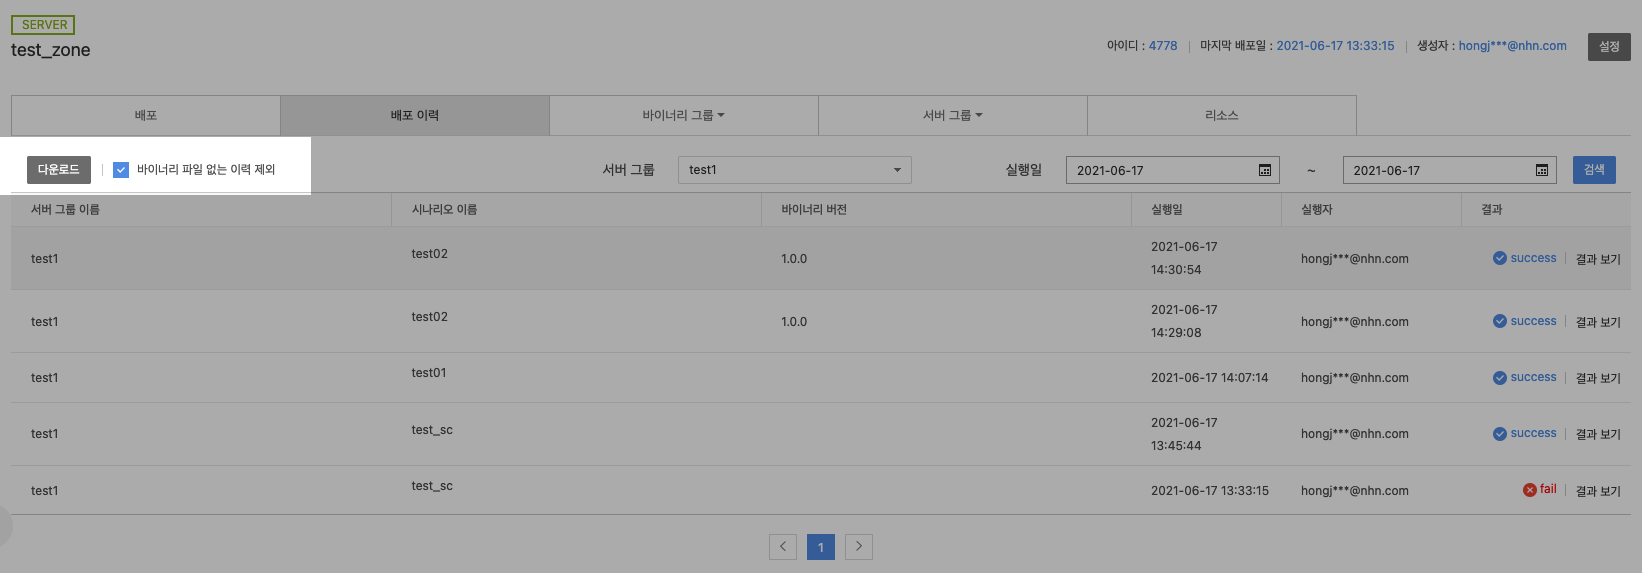 * Download searched distribution history in Excel format
* Select the desired server group and date of execution and click the Download button.
* You can also download the file by selecting the Exclude Histories Without Binary File option.
* When the Download button is clicked without selecting the Exclude Histories Without Binary File option
* Download searched distribution history in Excel format
* Select the desired server group and date of execution and click the Download button.
* You can also download the file by selecting the Exclude Histories Without Binary File option.
* When the Download button is clicked without selecting the Exclude Histories Without Binary File option
 * When the Download button is clicked while the Exclude Histories Without Binary File option is selected

Binary Group
On the Binary Group tab, binaries are managed by group.
Applicable to categorize binaries deployed for each server tool, such as Develop, Staging, and Product.
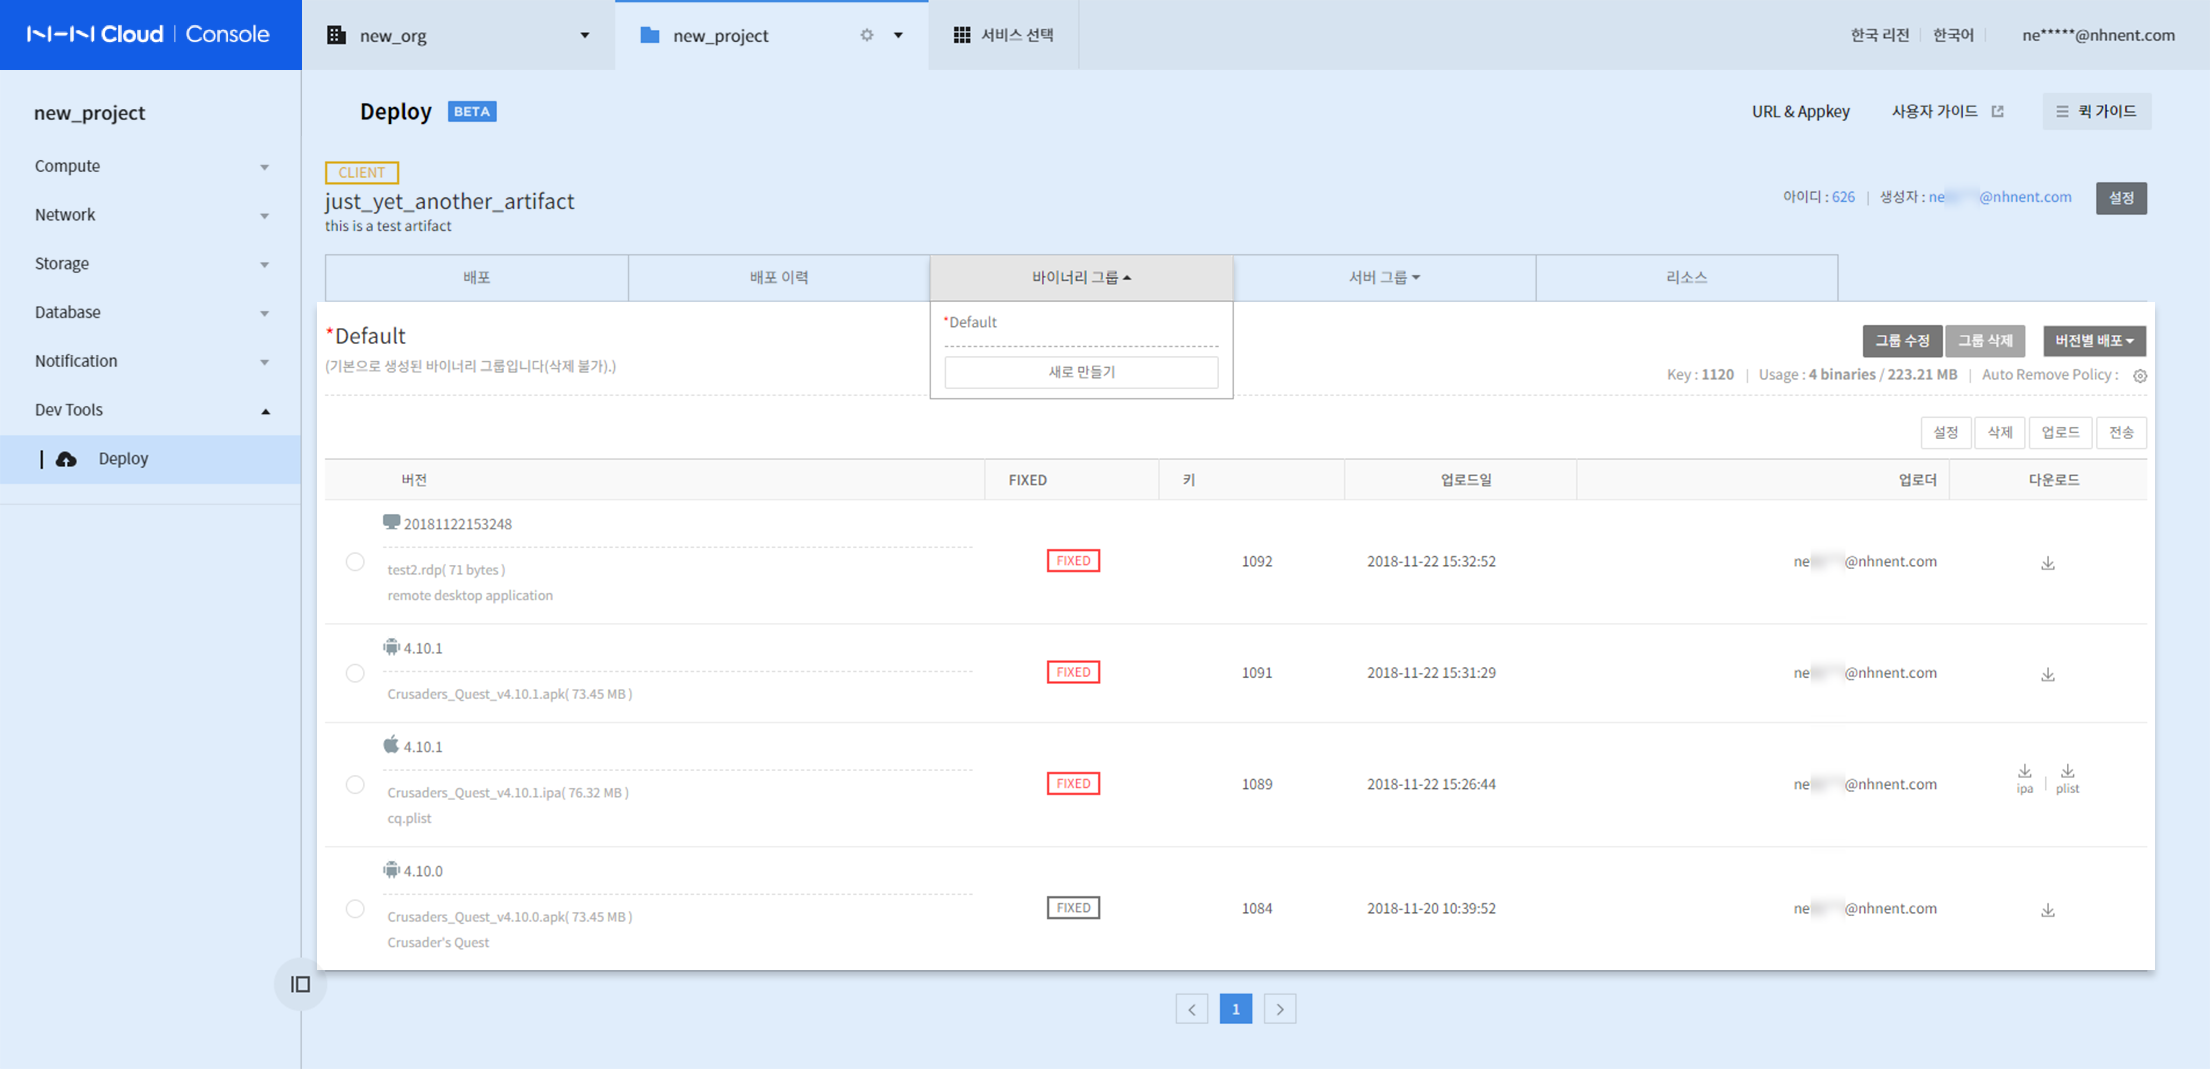
- Groups can be created or modified, while binary files are uploaded or downloaded.
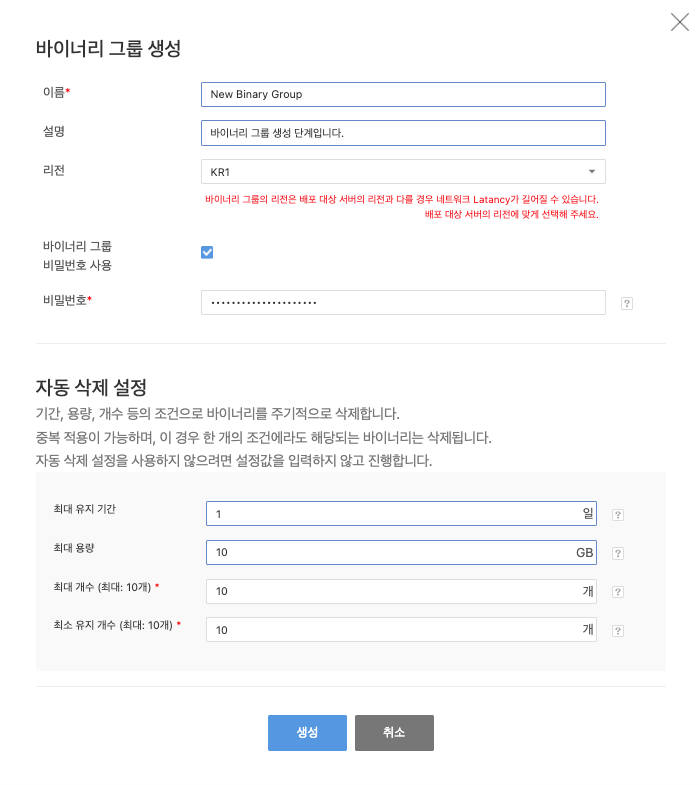 * In the Client type, password can be set for a binary group, and access of shared client download page can be controlled.
* Select Enable Binary Group Password and enter password to create a binary group.
* Access to download page of each group is available only by password without login to NHN Cloud.
* You can set the auto delete policy for the binary group from the auto delete settings.
* If you leave each item in the auto delete setting empty and create a binary group, the auto delete setting will not be applied.
* In the Client type, password can be set for a binary group, and access of shared client download page can be controlled.
* Select Enable Binary Group Password and enter password to create a binary group.
* Access to download page of each group is available only by password without login to NHN Cloud.
* You can set the auto delete policy for the binary group from the auto delete settings.
* If you leave each item in the auto delete setting empty and create a binary group, the auto delete setting will not be applied.
Server Group
Deployment target servers can be managed by group. Based on the phase attribute, it is applicable to categorize server tool, such as Develop, Staging, and Product.
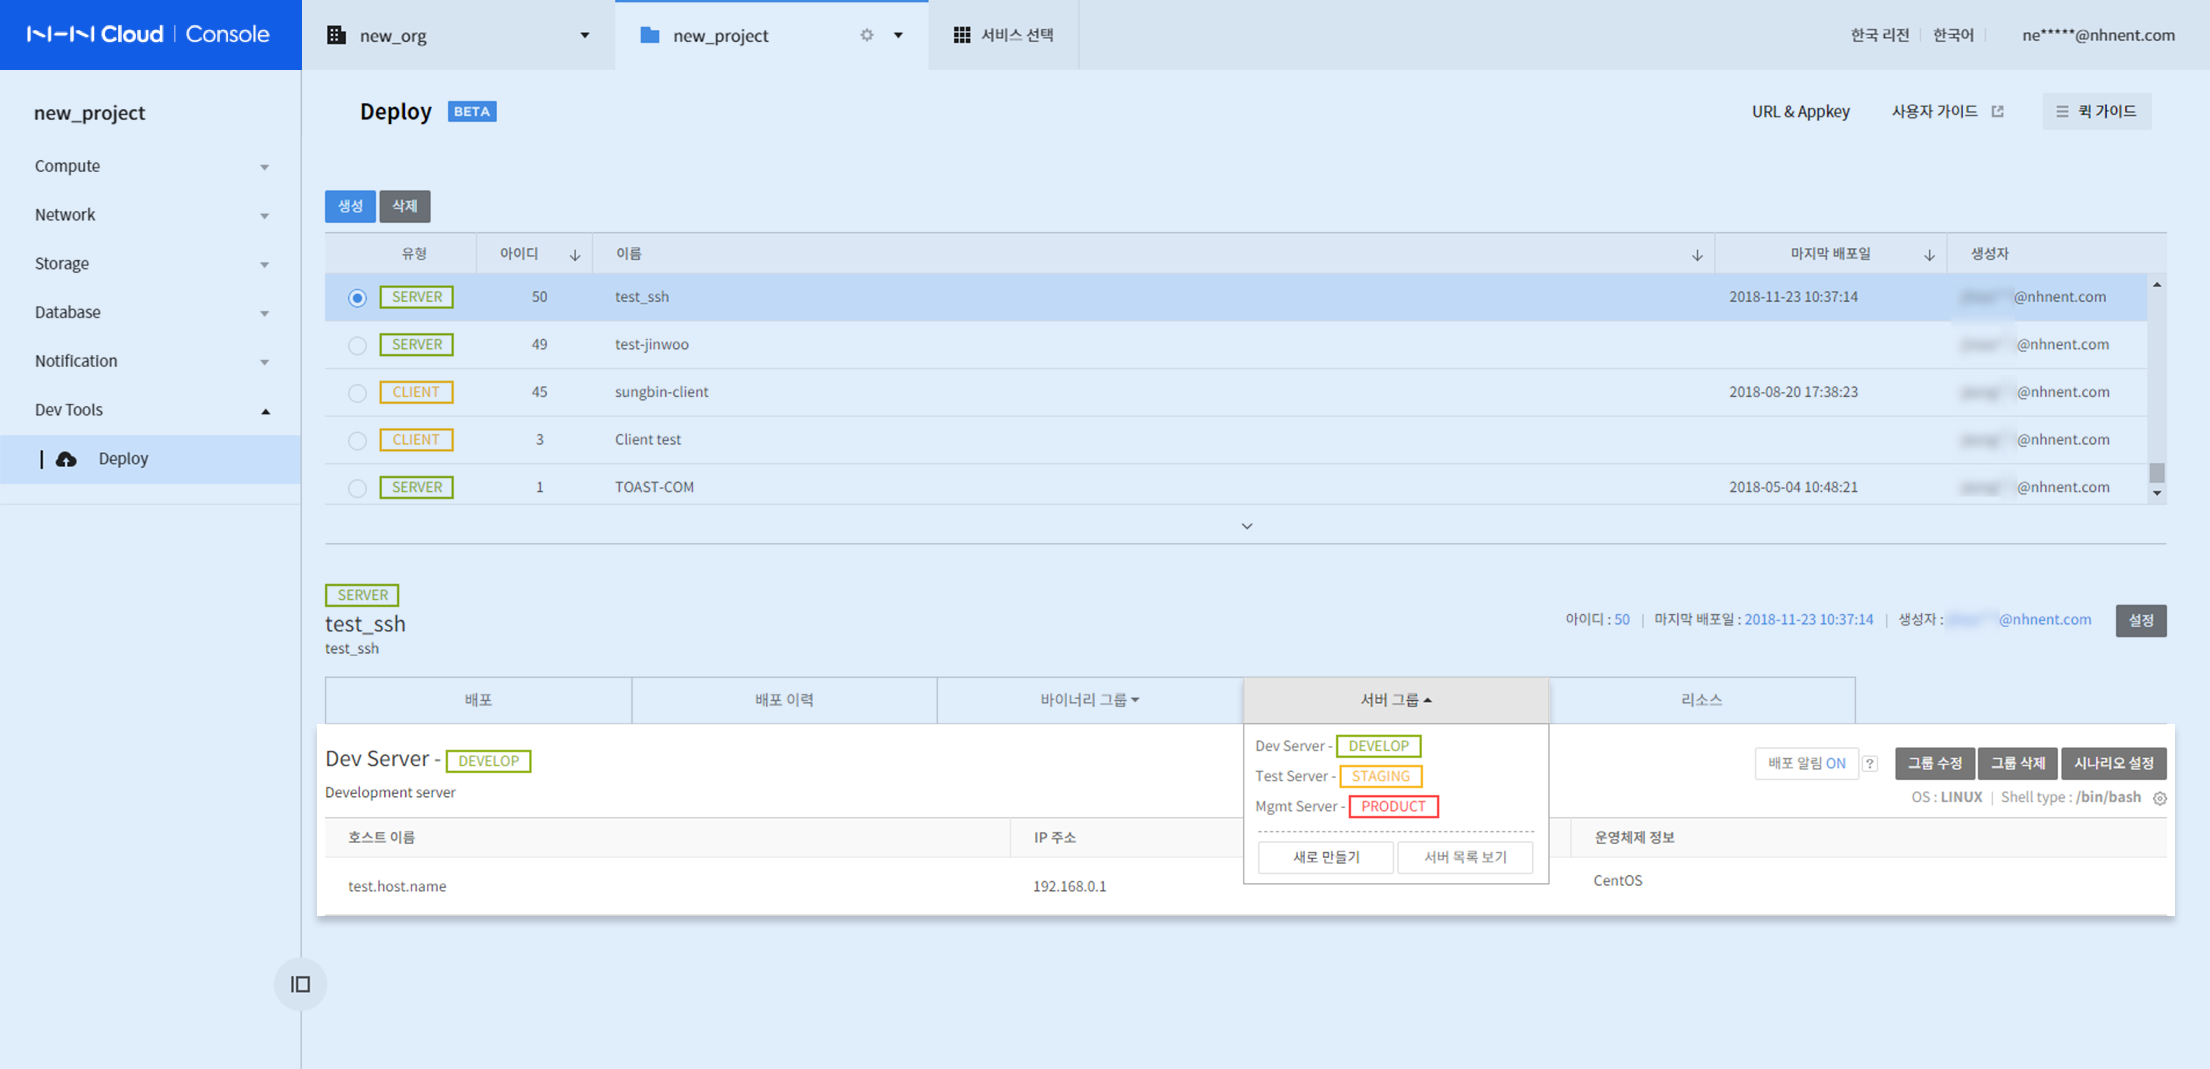
- Group or server information can be modified.
- Scenario for each group can be configured.
Adding Server Group
- Click Deploy > Create Server Group, or click Server Group > Create.
- Enter name (required), and description (optional).
- Select OS and specify Shell Type: select from the list or enter one, directly.
- Select a server tool for Phase: choose NONE, if you don't need to specify.
- Click Create.
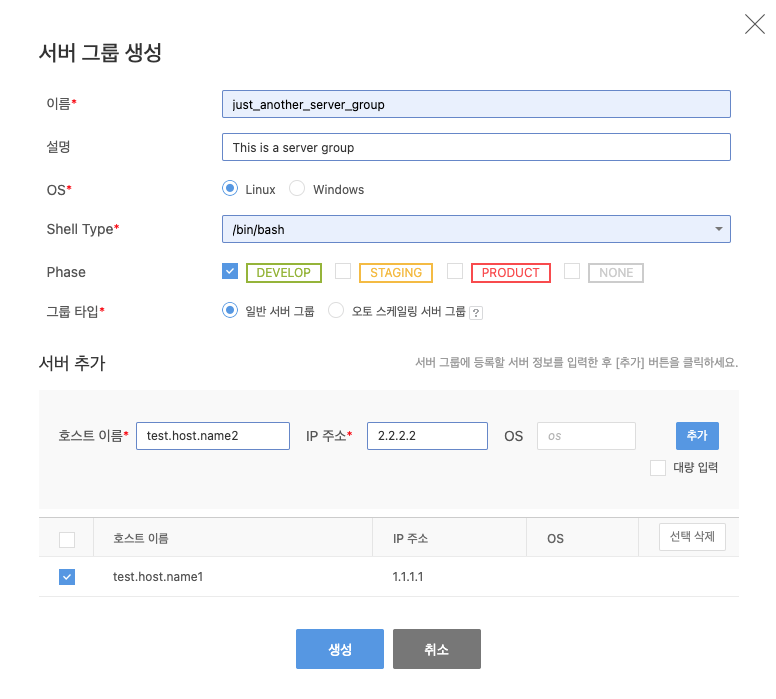
Adding/Deleting Server Information
Server information can be added or deleted from Create (Modify) Server Group.
Add Server Information
- Add Individually
- Enter host name (required), IP address (required), and OS (optional), and click Add.
- Find what is added on the server list below. Only the servers left in the list are registered.
-
Click Create: to modify, click Modify.
-
Add in Mass
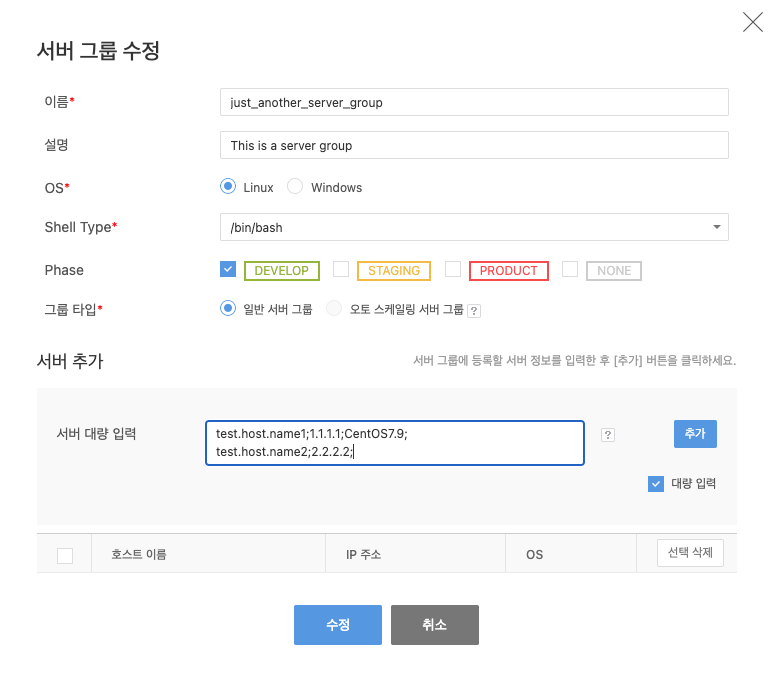
- Check Enter in Mass.
-
Enter server information in the following format:
test.host.name1;1.1.1.1;CentOS7.9; test.host.name2;2.2.2.2; -
Click Add.
- Find two more servers that are added.
- Click Create: to modify, click Modify.
Delete Server Information
- Click the server to delete and click the Delete Selected on the left top.
- Click Create: to modify, click Modify.
Resources
Resources can be managed on the page, by creating, uploading, or modifying files; change history can also be found.
Functional Description
Here, more fundtions that are not described in Getting Started, are described in details, along with additional settings.
Binary
Binaries are uploaded files that are to be deployed.
Uploading
Two methods are available to upload binaries:
- Upload API
- Find more details on uploading API at Guide for Upload Binary API.
- Upload on Console
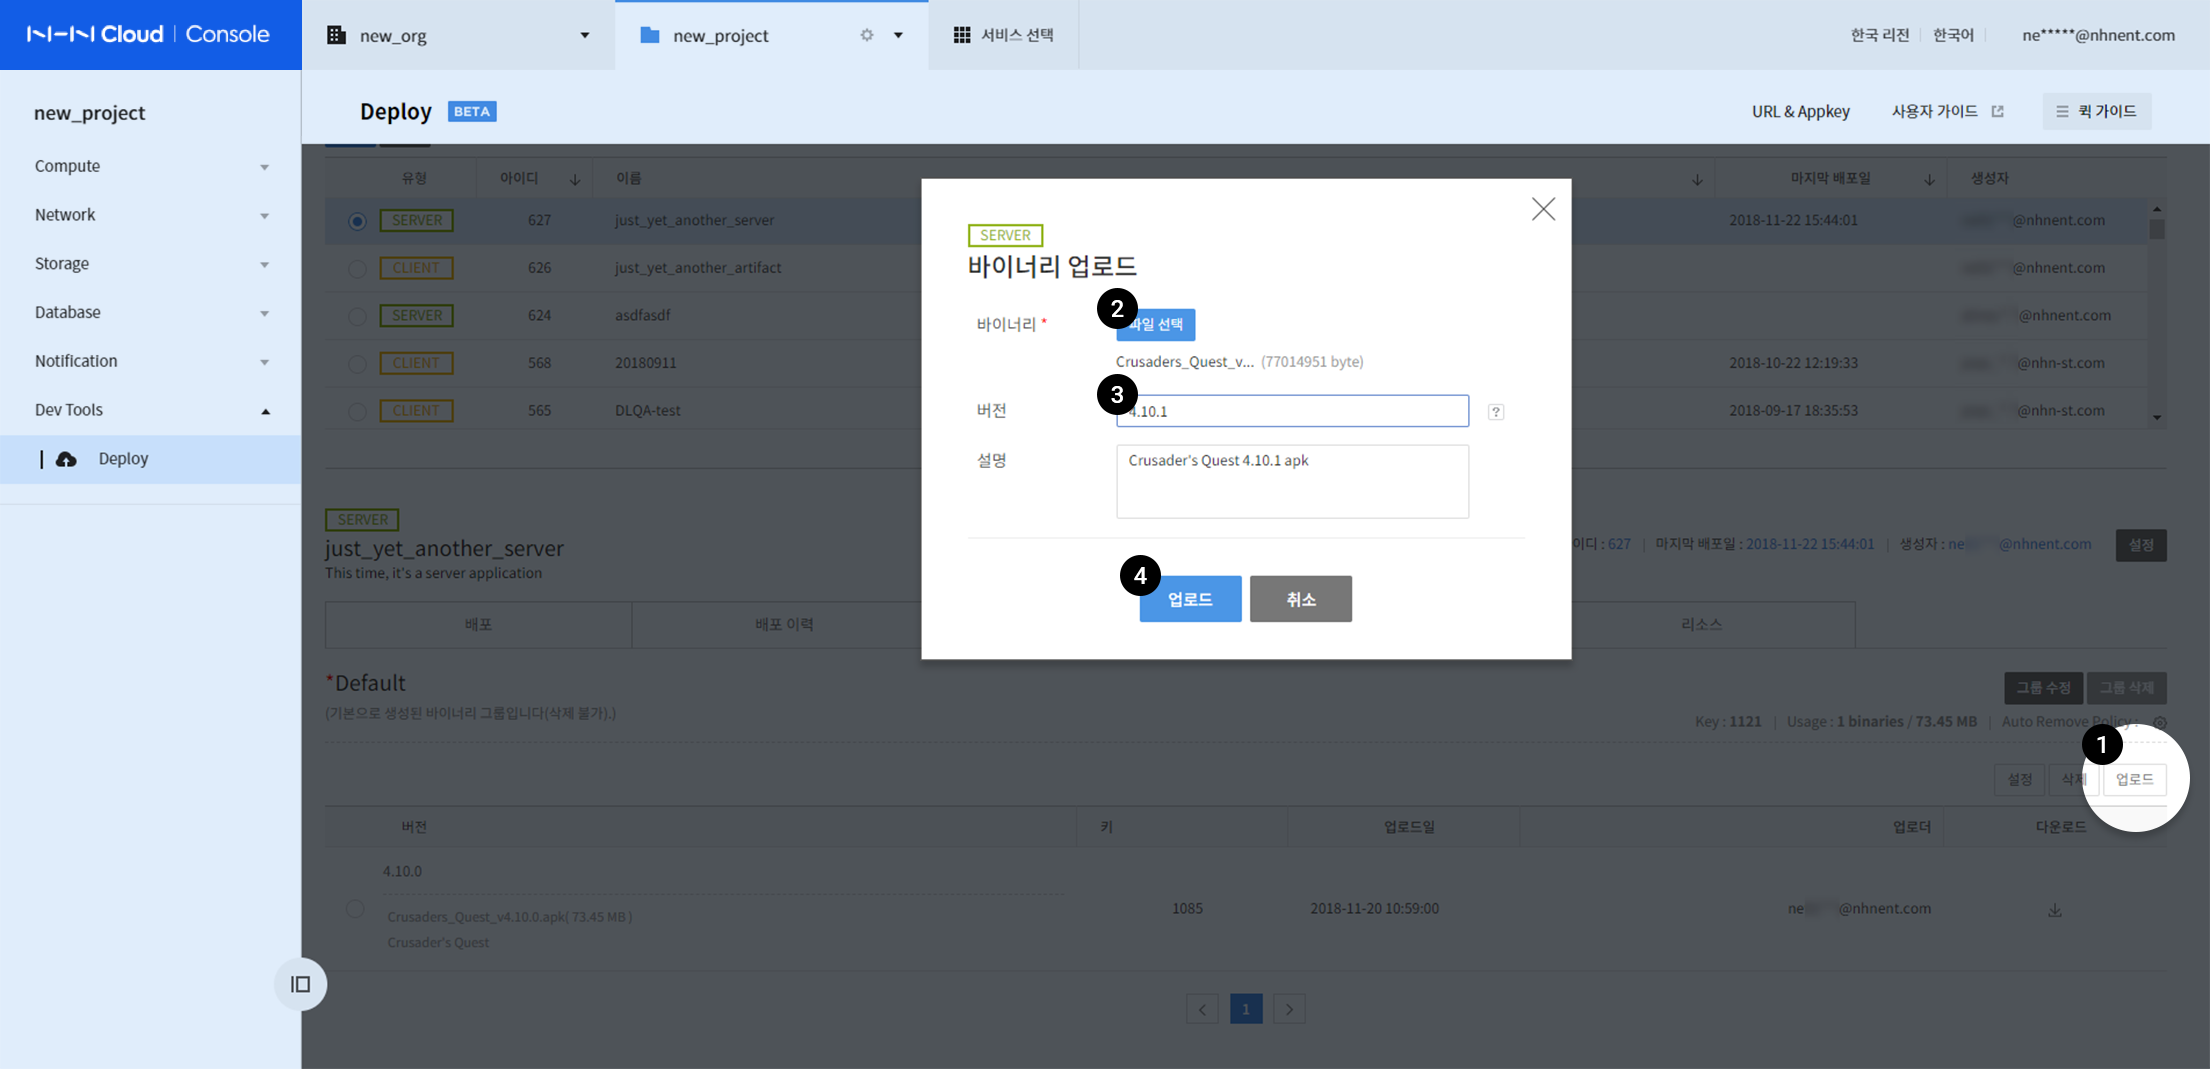
- Click Binary Group under Deploy, and select Upload.
- Click Select Files and select a binary file.
- Enter version (optional) and description (optional).
- Click Upload.
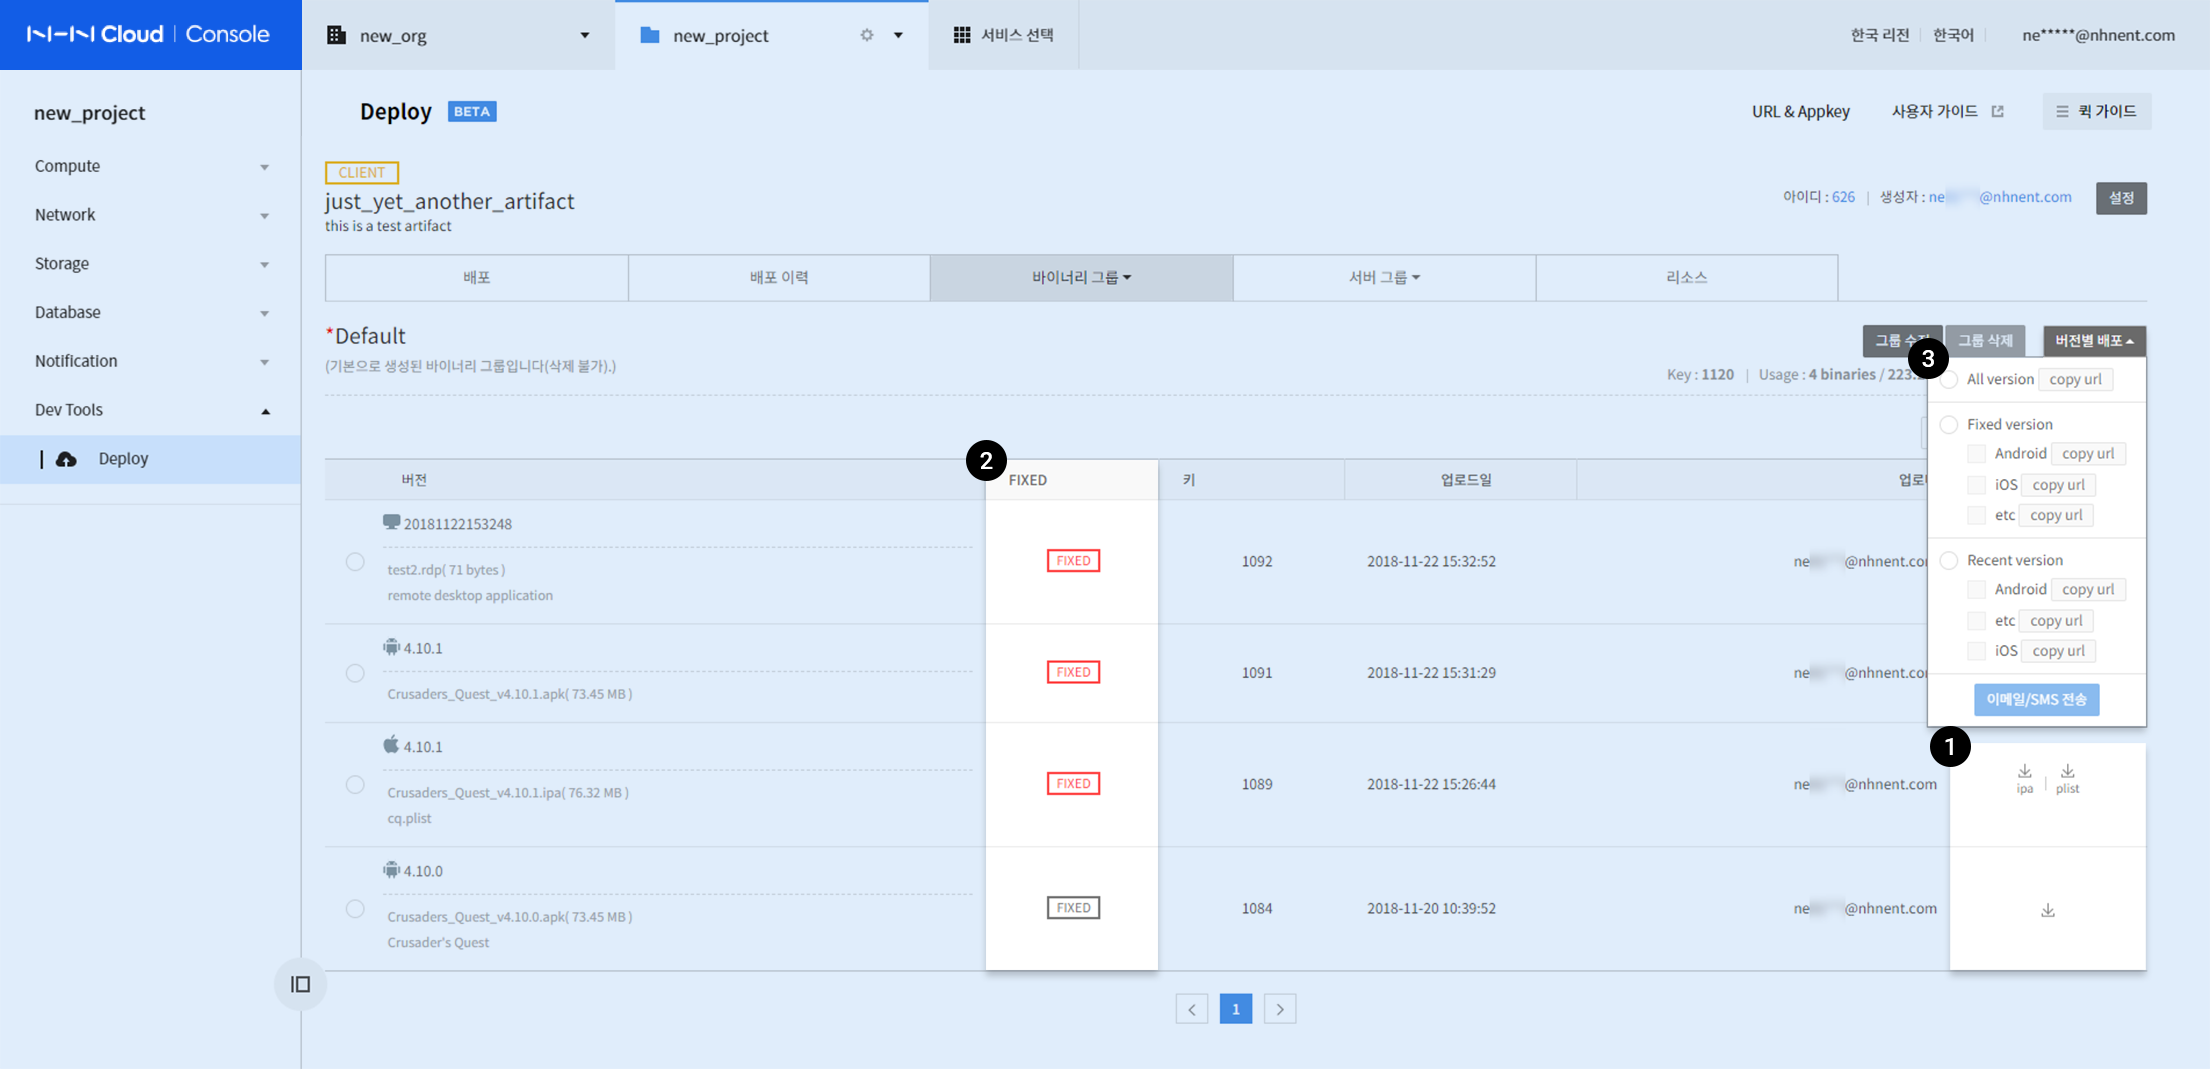
1. Download
Click Download on the right of the list.
2. Fix Versions
Each client OS allows one version to be fixed.
- Status
- FIXED(on)
- Click to unfix the version.
- FIXED(off)
- Click to fix the version.
- FIXED(on)
3. Deploy
Deploy by Version
All, Fixed, or Recent versions of client binary can be deployed in the method you need.
- Provide links for downloading binaries
-
Provide notification for download links
- Send SMS or email to members registered at each project
-
Types
- All Version List
- Download page for all versions
- Fixed Version
- iOS, Android, etc
- Download page for the fixed version (if it is available)
- iOS, Android, etc
- Recent Version
- iOS, Android, etc
- Download page for the recent version
- iOS, Android, etc
- All Version List
- Methods
- SMS, E-Mail
Deploy Selectively
Download page for particular binaries can be sent via SMS or email.

- Select a binary file to deploy on Binary Group below Deploy.
- Click Send on the right.
- Select type of delivery and recipient from Send Download Paths.
- Select either SMS or email, or both.
- Click Send.
Binary download page is sent to recipients in a specified type of delivery.
Tasks
A task is a scenario configuration element which executes individual tasks and controls the order.
- Pre-run Task: Tasks that can be processed before deployment
- Target: May specify a server which is not saved in a server group
- Normal Task: Tasks that are executed during deployment
- Target: Server group or a specified server within a server group
User Guide for Tasks
- Task Types
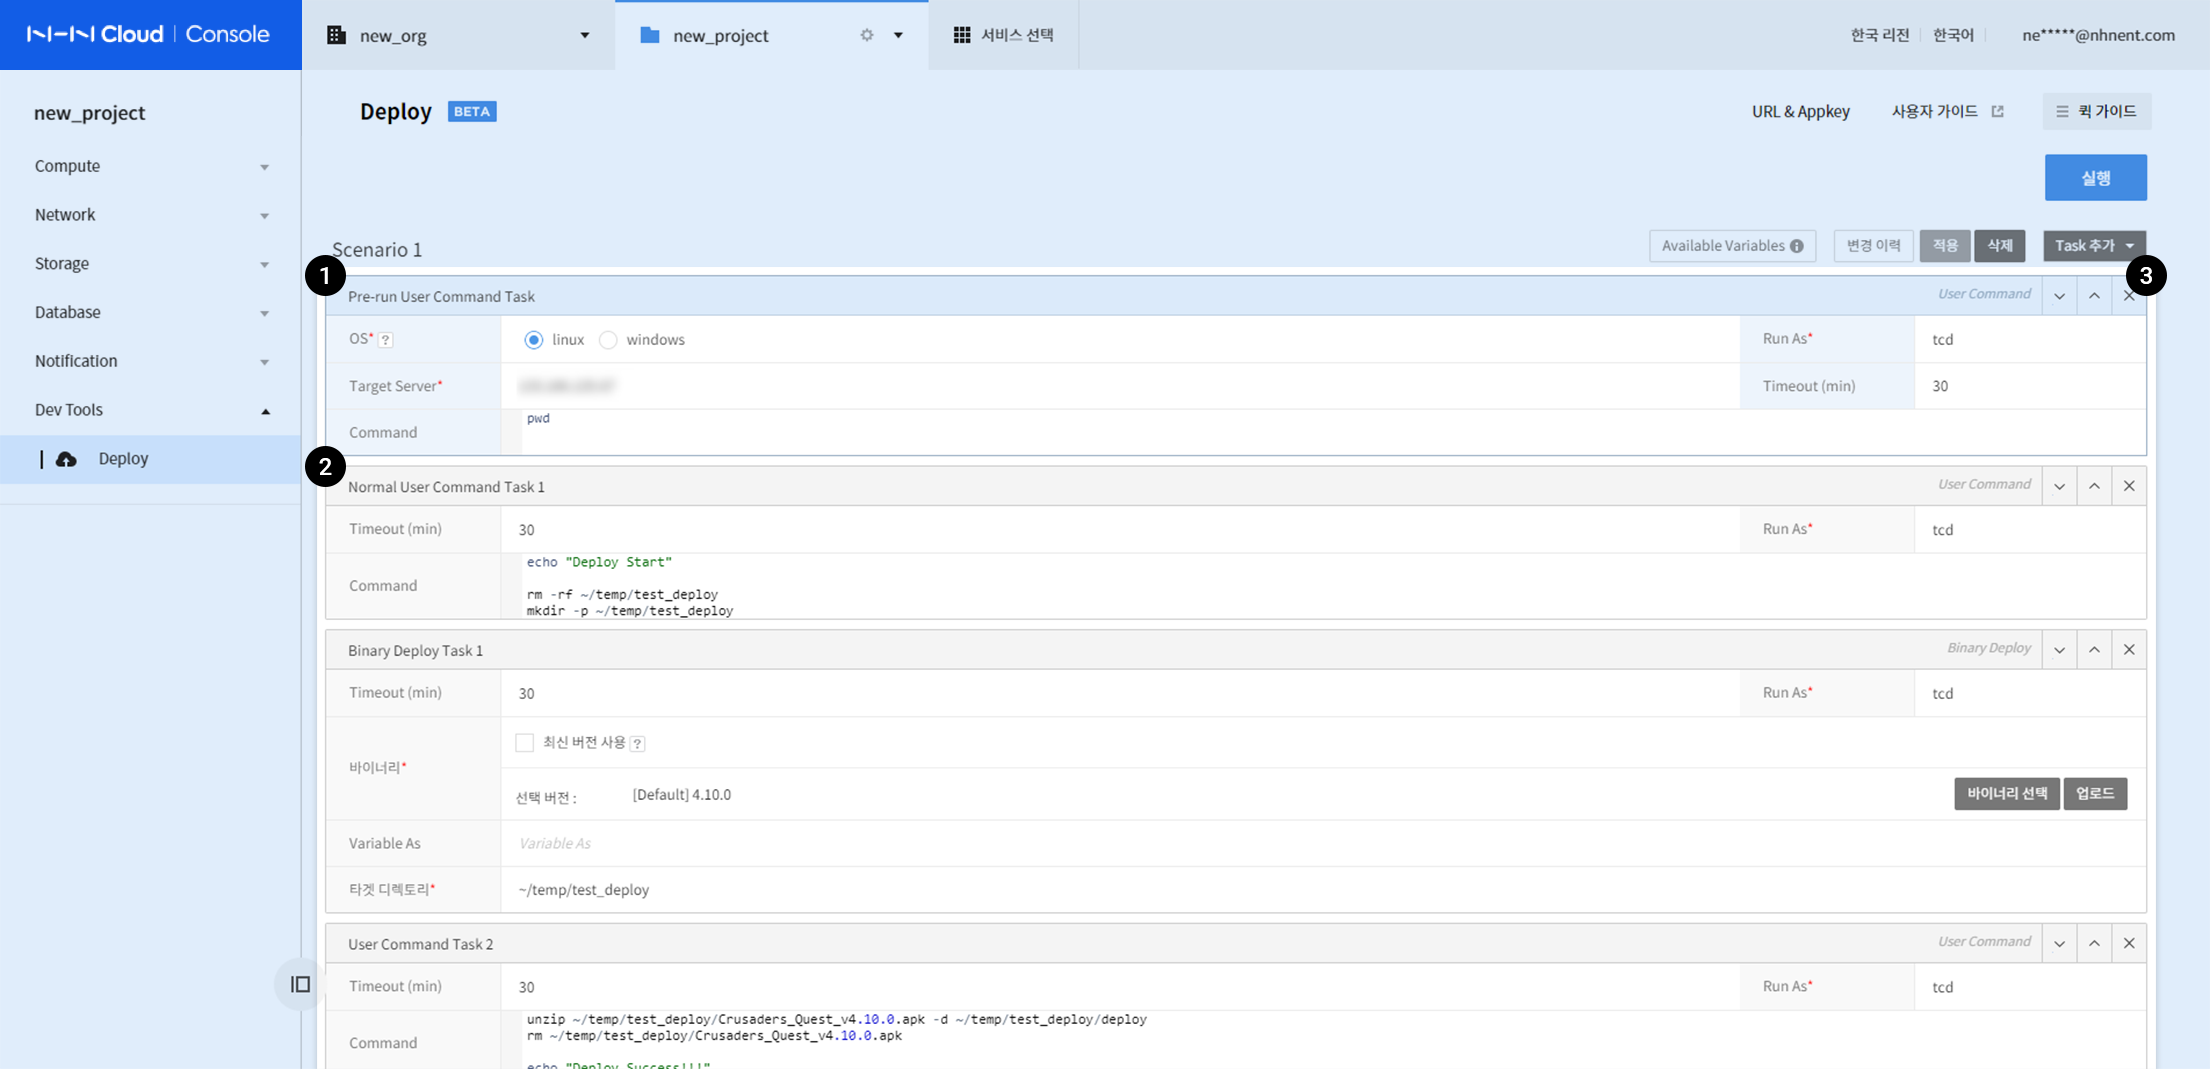
1. Pre-run Task 2. Normal Task
- Order of Tasks
- Pre-run tasks are located in the upper side of the area.
- Locations are free to move within each area of Pre-run Tasks or Normal Tasks.
3. Task Control
- Tasks can be controlled with ∧ (Upwards), ∨ (Downwards), or X** (RemoveTask) buttons located on the right of each task.
- Reserved Words
- Find more details on Available Variables, as below.
Pre-run Tasks
- Target Server: One-time processing is available with a target server specified.
Jenkins-CLI Build
- Classified into earlier versions, and later versions, as of ver. 2.46.
- For more details on Jenkins build setting, see Plugin User Guide.
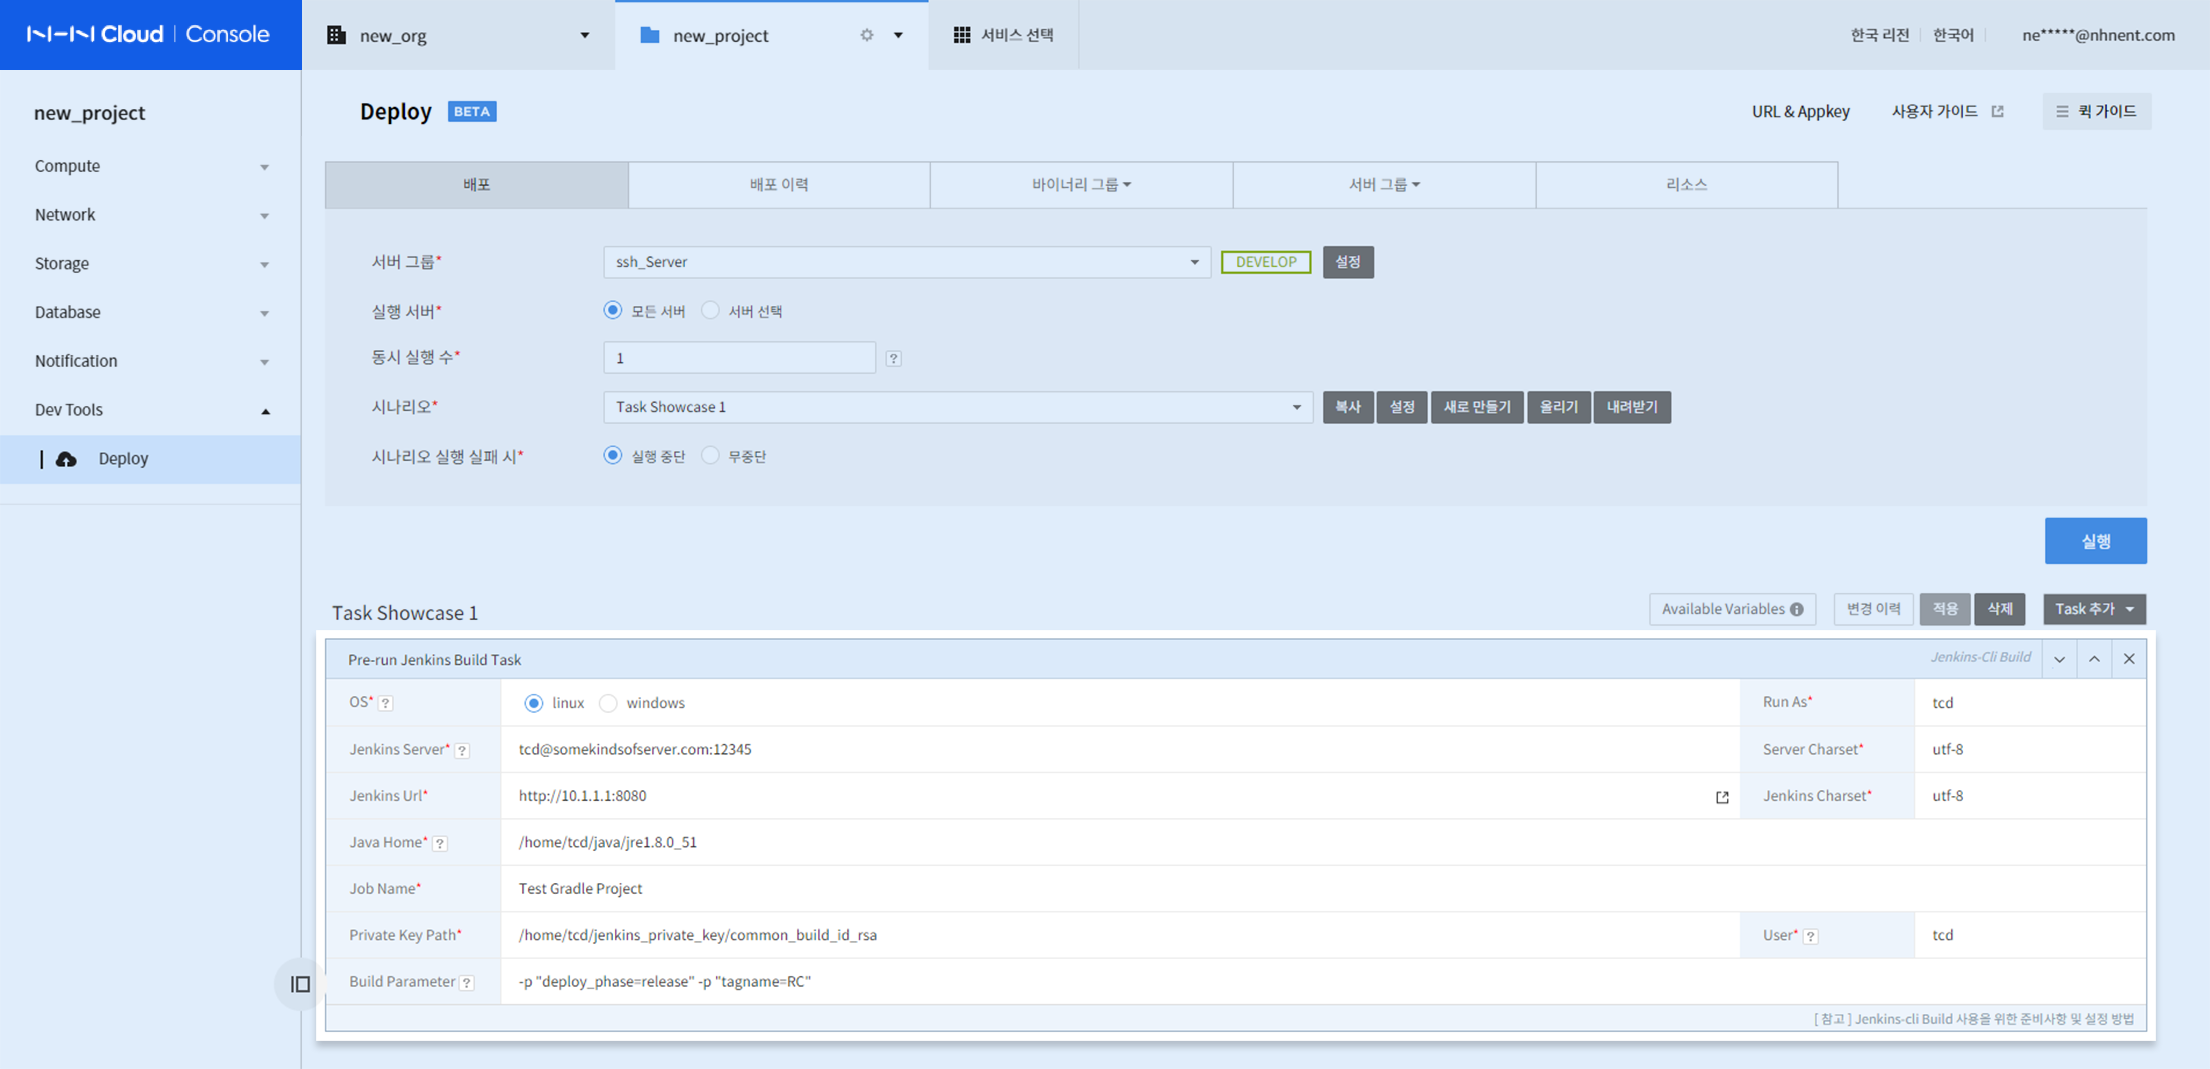
[ User Inputs ]
- Select OS
- Run As
- Enter execution account.
- Jenkins Server
- Enter domain or IP.
- Server Charset
- Enter collection of characters of a server to run Jenkins-CLI: default is UTF-8, if it is left empty.
- Jenkins Url
- Enter Jenkin server address to perform build commands.
- Jenkins Charset
- Enter collection of characters of a Jenkins server: default is UTF-8, if it is left empty.
- Java Home
- To perform Jenkins-CLI, enter home path of JDK or JRE.
- Job Name
- Enter name of a build job to perform.
- Private Key Path
- Enter saving path of the SSH private key file to authenticate Jenkins user with SSH public key setting.
- User (required value for 2.46 or higher versions)
- Enter ID with public key setting.
- Reference
- 2.46 or Earlier Versions
- Automatically authenticated at Jenkins on the public key setting.
- 2.46 or Later Versions
- Added with User (Jenkins admin ID), and authenticated only when public key is set for the ID.
- 2.46 or Earlier Versions
- Reference
- Enter ID with public key setting.
- Build Parameter (optional)
- Enter parameters required for a build.
User Command
- It is a user-defined command task.
- You may use Available Variables (reserved words).
- Deployment is suspended when an error occurs or its occurrence is detected.
- If Suspend Execution is set for When Scenario Execution Fails on the Deployment tab.
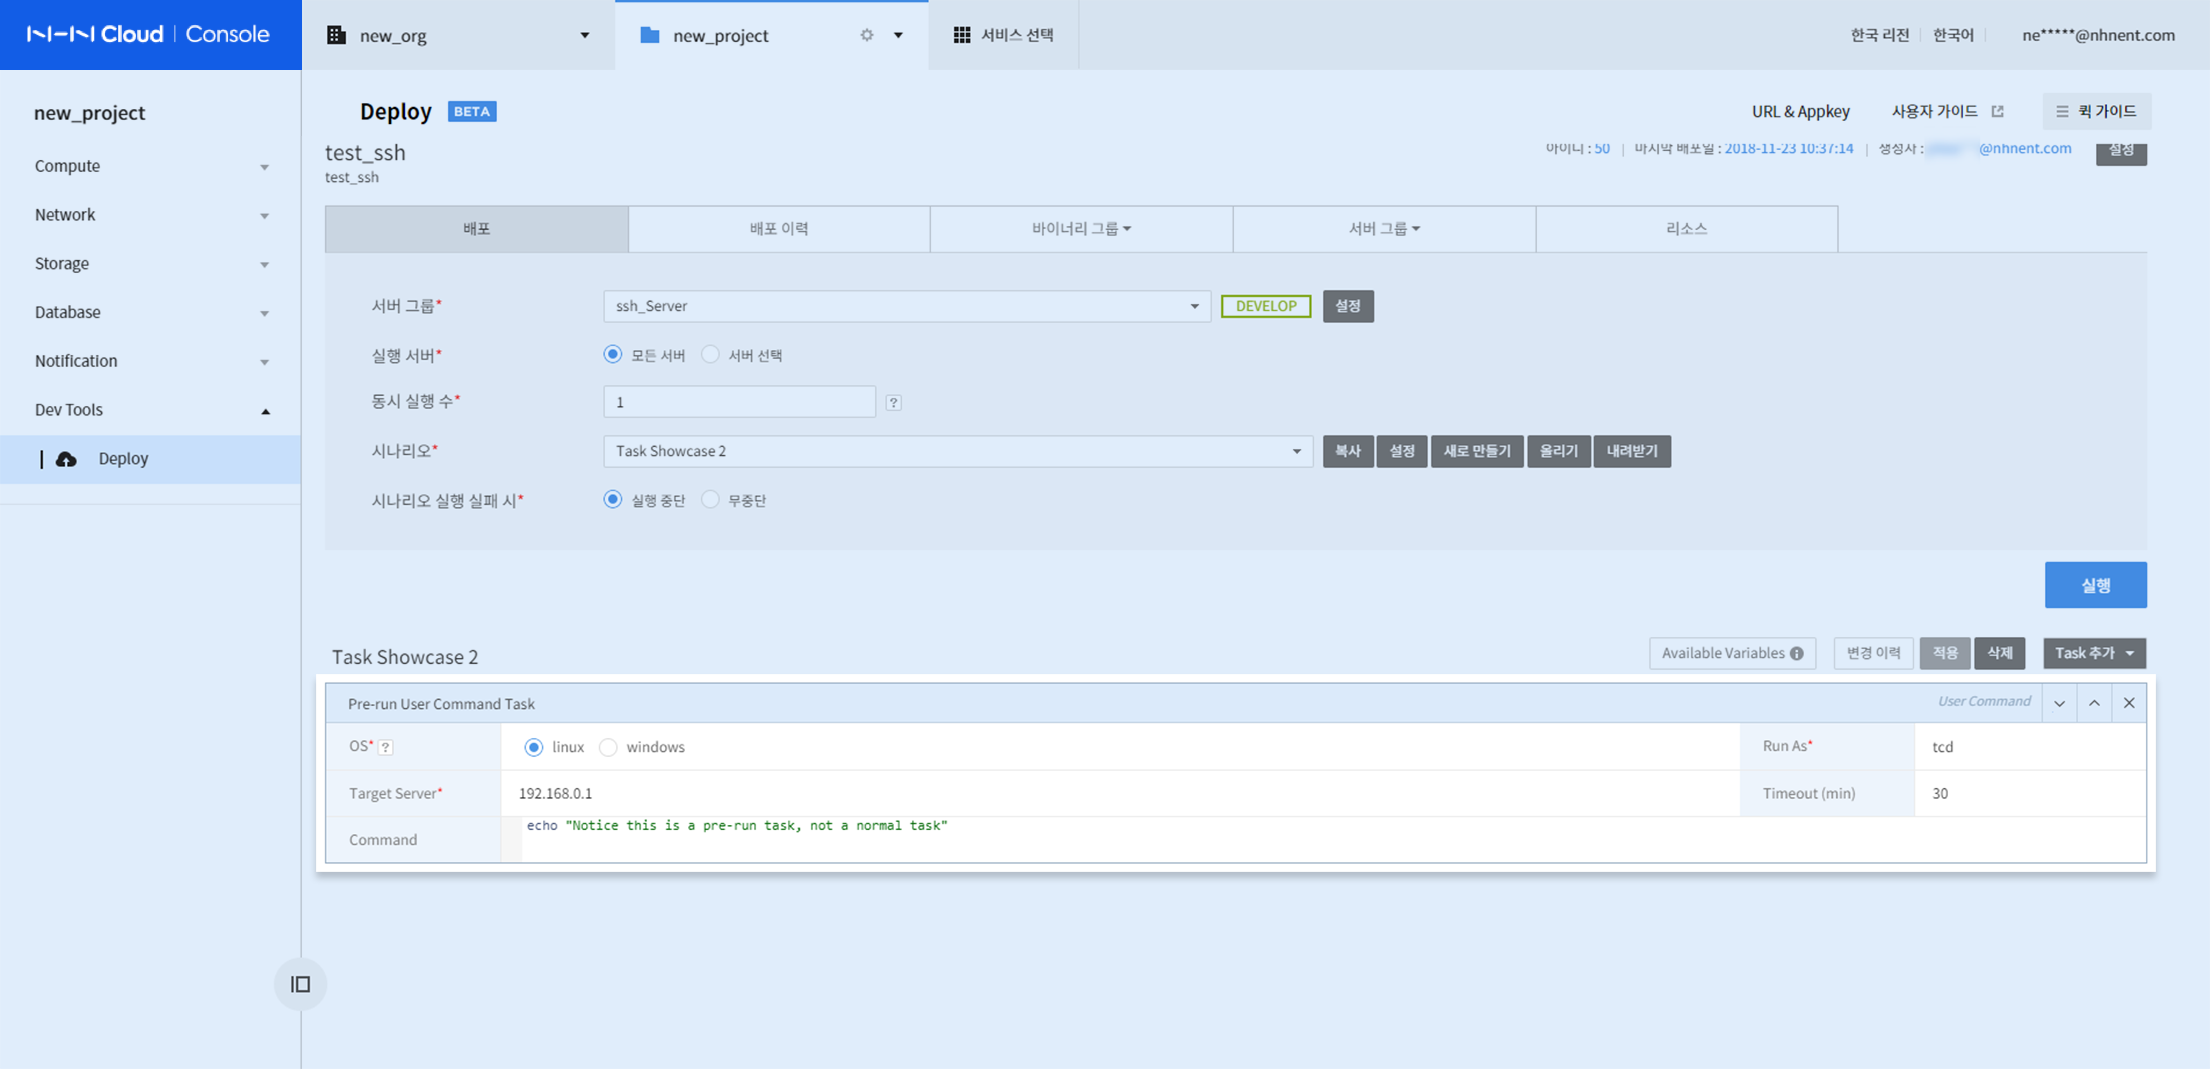
[ User Inputs ]
- Select OS
- Run As
- Enter execution account.
- Target Server
- Fill in target server information: may include server information which is included or not included in a server group.
- Timeout (min)
- Specify timeout to complete task execution: min 1, and max 30 minutes.
- Command
- Enter commands to run.
- Reserved words are available. See Available Variables, as below.
Normal Tasks
- Target Server: No need to enter, but import server information selected from a server group.
Binary Deployment
- Files under the Binary Group tab can be deployed.
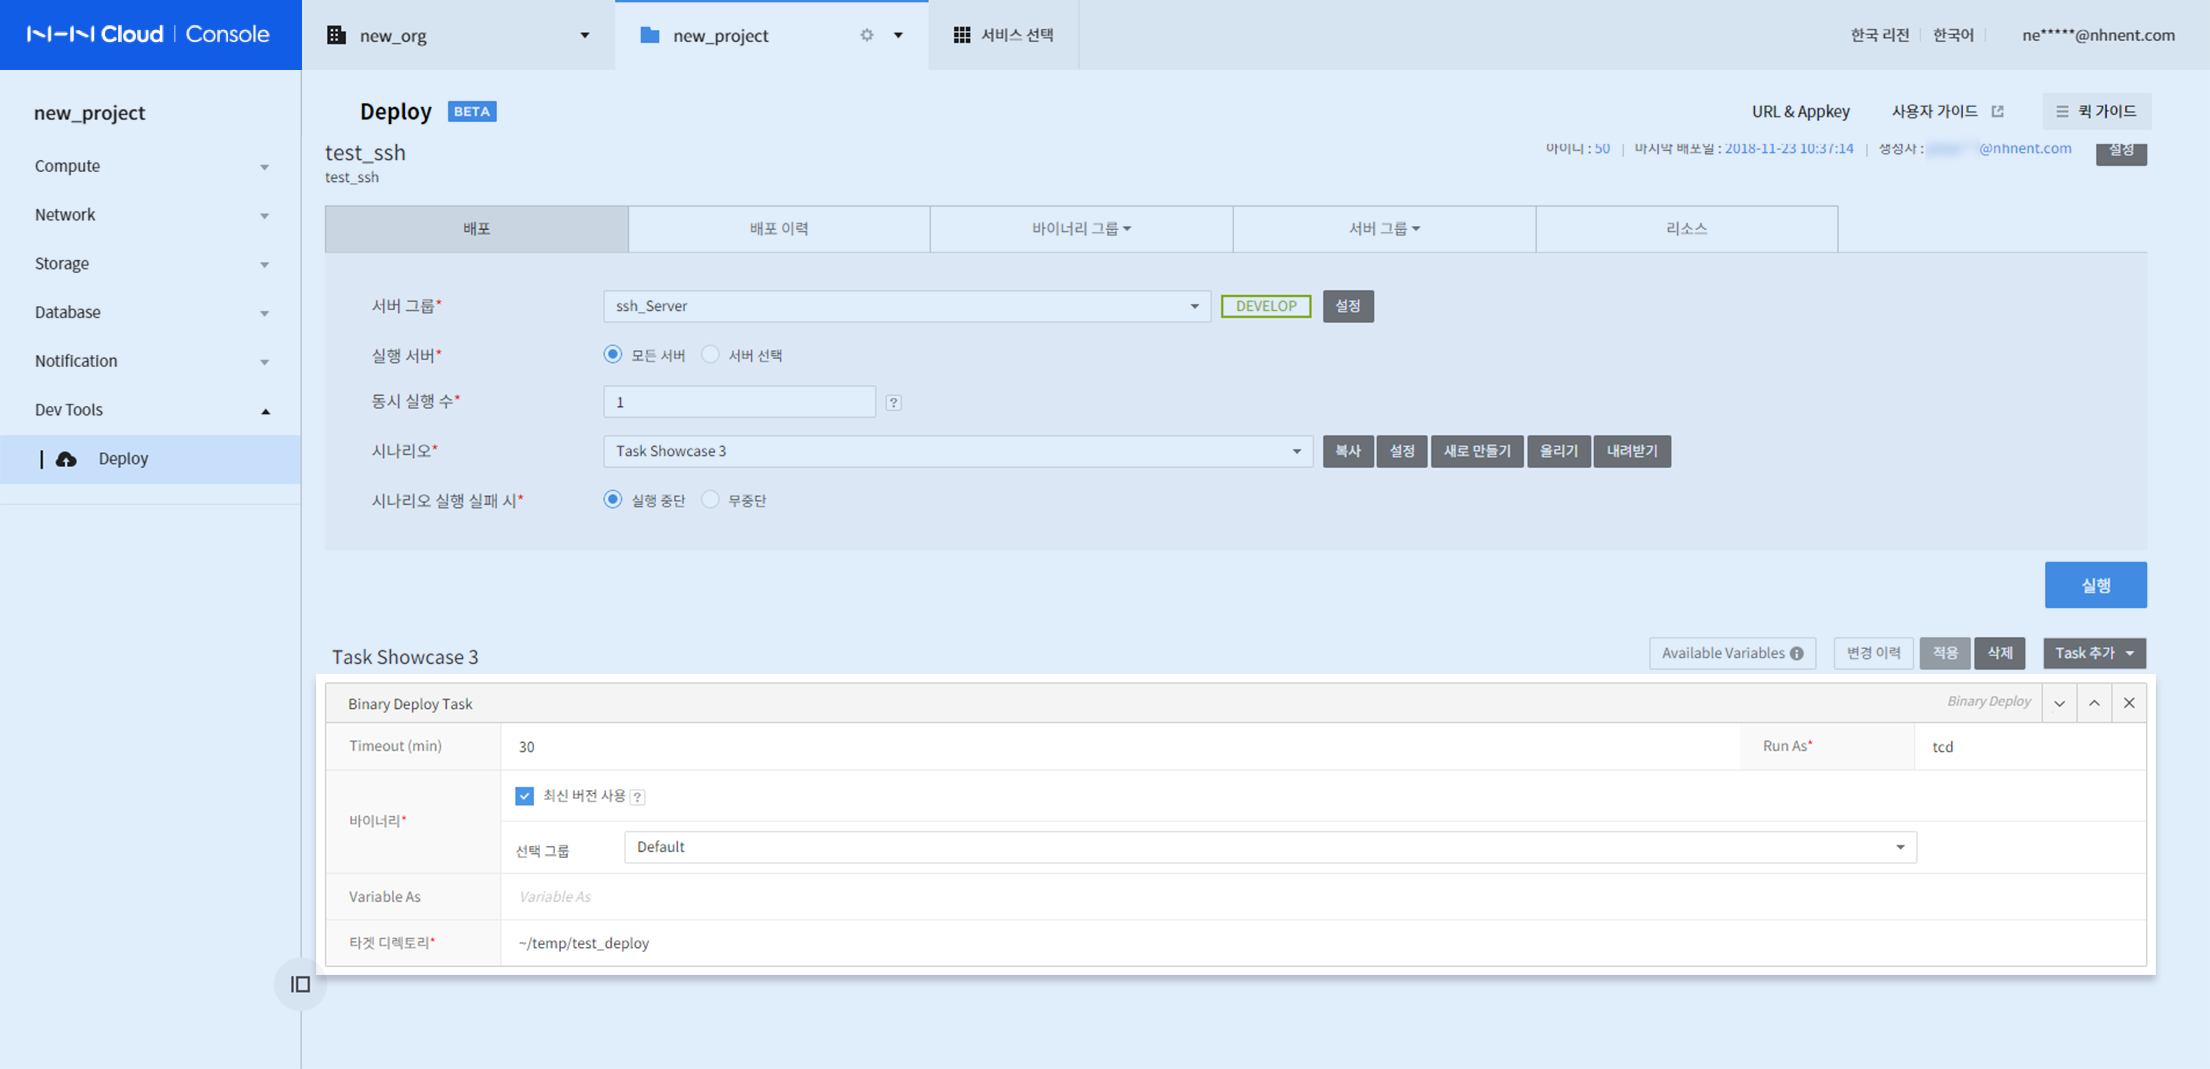
[ User Inputs ]
-
Timeout (min)
- Specify timeout to complete task execution: min 1, and max 30 minutes.
-
Run As
- Enter execution account.
-
Binary
- Binary files to deploy can be selected in three types:
- Recent Version
- Select Enable Recent Version, and the most recent version is automatically selected (if one is available).
- You can select a binary group (in the recent version of the selected group).
- Selected Version
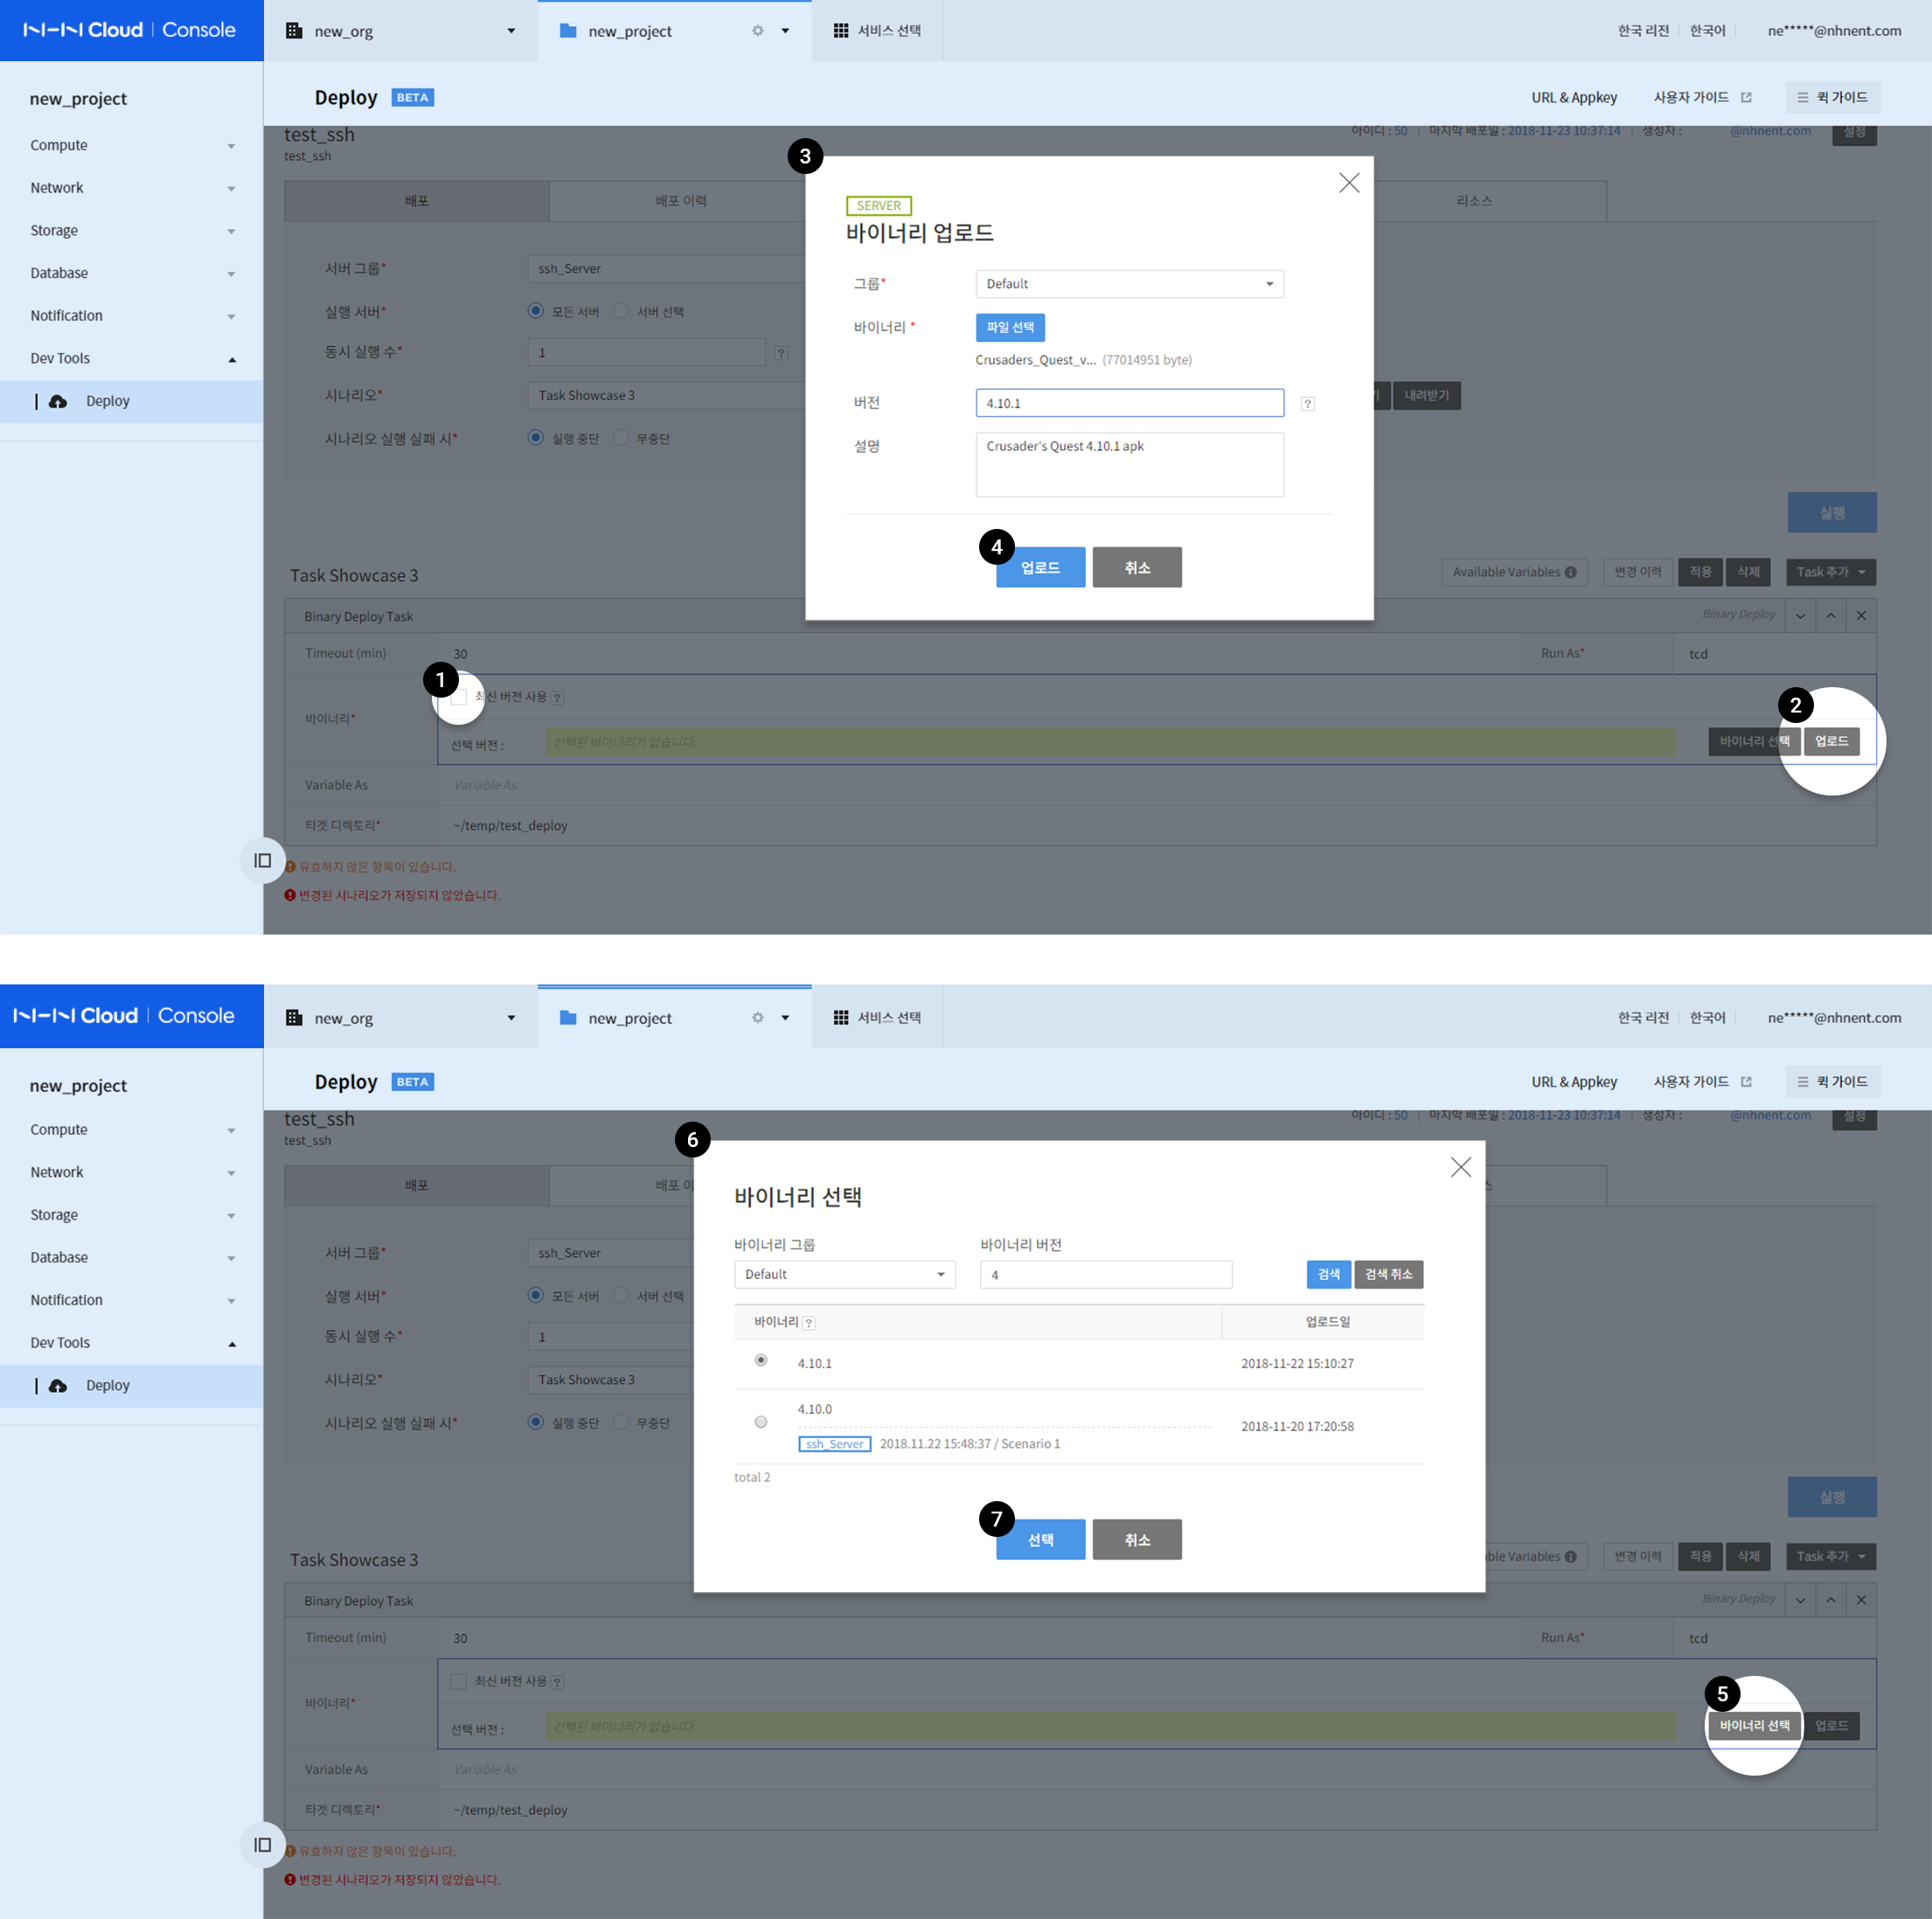
- Uncheck Enable Recent Version.
- Click Upload.
- Click Select Files and select a binary file.
- When it is completed, click Upload.
- When it is uploaded, click Select Binaries.
- Search and select a binary version to deploy.
- Click Select.
- Recent Version
- Binary files to deploy can be selected in three types:
-
Variable As
- Specify variable name of the binary: Available Variables are available for Commands.
-
Target Directory
- Specify a target directory to deploy binaries.
File Deployment
- Files from the Resource tab can be deployed in the most recent version.
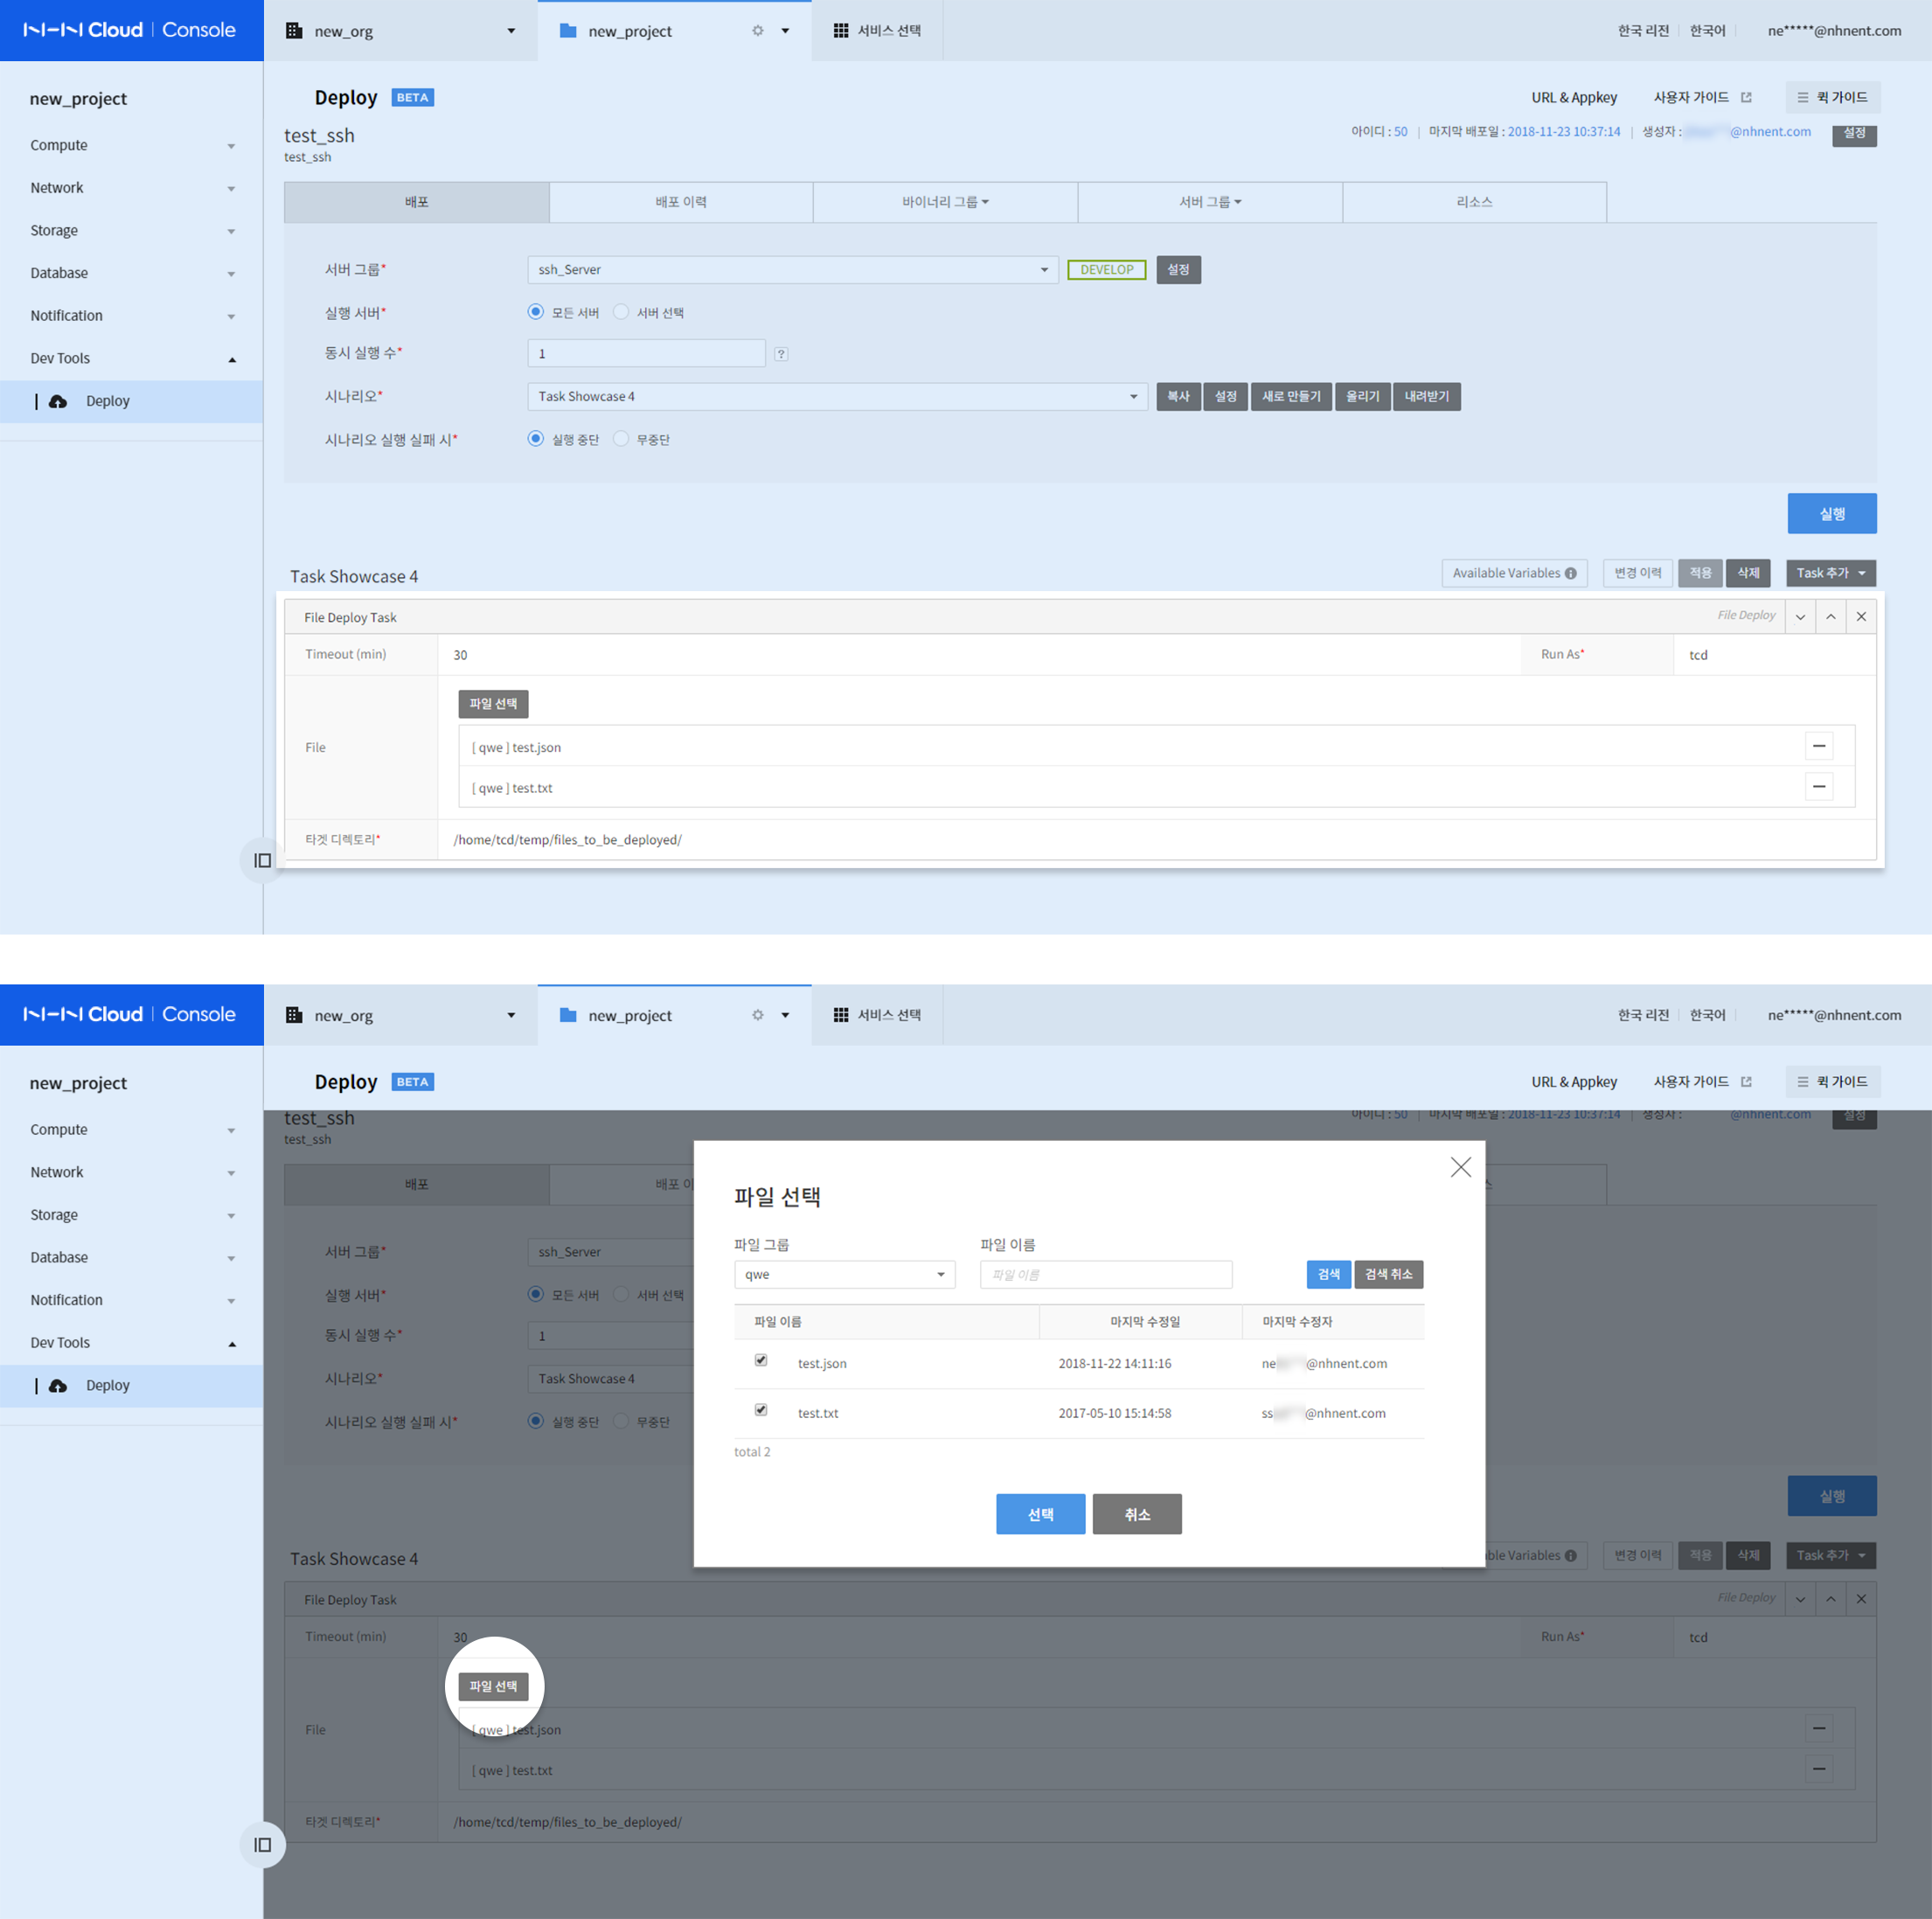
[ User Inputs ]
-
Timeout (min)
- Specify timeout to complete task execution: min 1, and max 30 minutes.
-
Run As
- Enter execution account.
-
File
- Click Select Files and select files.
-
Target Directory
- Specify a target directory to deploy files.
User Commands
- It is a user-defined command task.
- You may use Available Variables (reserved words).
- Deployment is suspended when an error occurs or its occurrence is detected. .
- If Suspend Execution is set for Deployment > When Scenario Execution Fails.
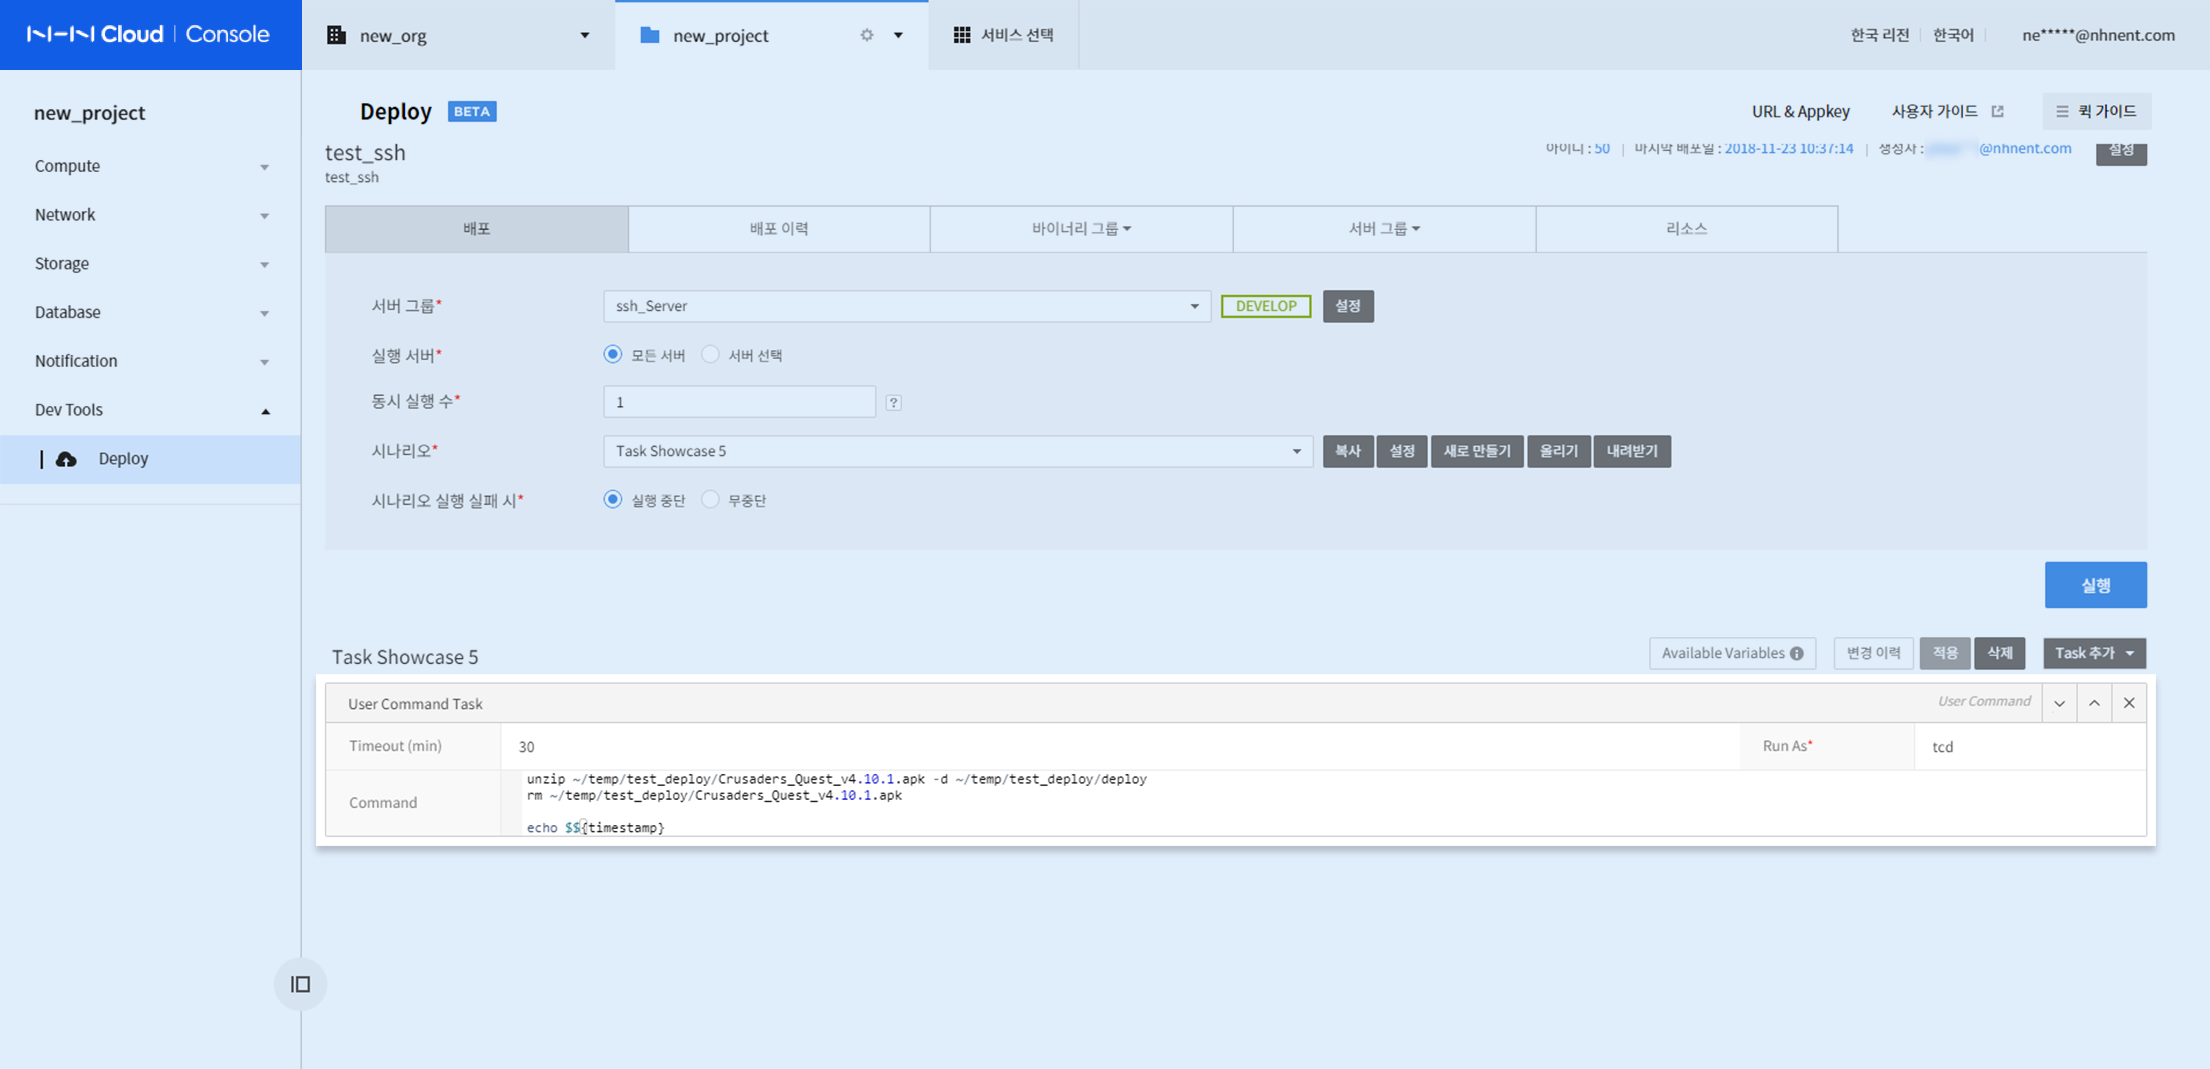
[ User Inputs ]
- Timeout (min)
- Specify timeout to complete task execution: min 1, and max 30 minutes.
- Run As
- Enter execution account.
- Enter commands to run.
- You may use Available Variables.
$${binary.Enter specified Variables As.binaryGroupName}: Name of binary group selected as variable name set for a binary
- You may use Available Variables.
Available Variables
Reserved words as below are available for tasks:
[Available Variables]

* Basic Types
$${artifact.name}: Artifact name
$${artifact.id}: Artifact ID
$${serverGroup.name}: Server group name
$${serverGroup.id}: Server group ID
$${executor.account}: Executor ID
$${executor.maskedAccount}: Masked ID of Executor
$${timestamp}: Timestamp
$${timestamp.date pattern}: Timestamp in a specified pattern

* Types for Variable As of Binary Deploy
$${binary.binary variable as value.version}: Binary version selected as variable name set for binary
$${binary.binary variable as value.key}: Binary key selected as variable name set for binary
$${binary.binary variable as value.name}: Binary name selected as variable name set for binary
$${binary.binary variable as value.targetDir}: Binary target path selected as variable name set for binary
$${binary.binary variable as value.binaryGroupKey}: Binary group key selected as variable name set for binary
$${binary.binary variable as value.binaryGroupName}: Binary group name selected as variable name for binary
- Examples
- Basic Types
$${timestamp} : 1514987008
- Types for Variable As of Binary Deploy
$${binary.Enter specified Variables As.binaryGroupName}: Name of binary group
- Basic Types
Resources
Resources refer to optional file management functions.
- Create File Groups
- Add Files
- Modify Files
- File History
- Manage File History
Creating File Groups
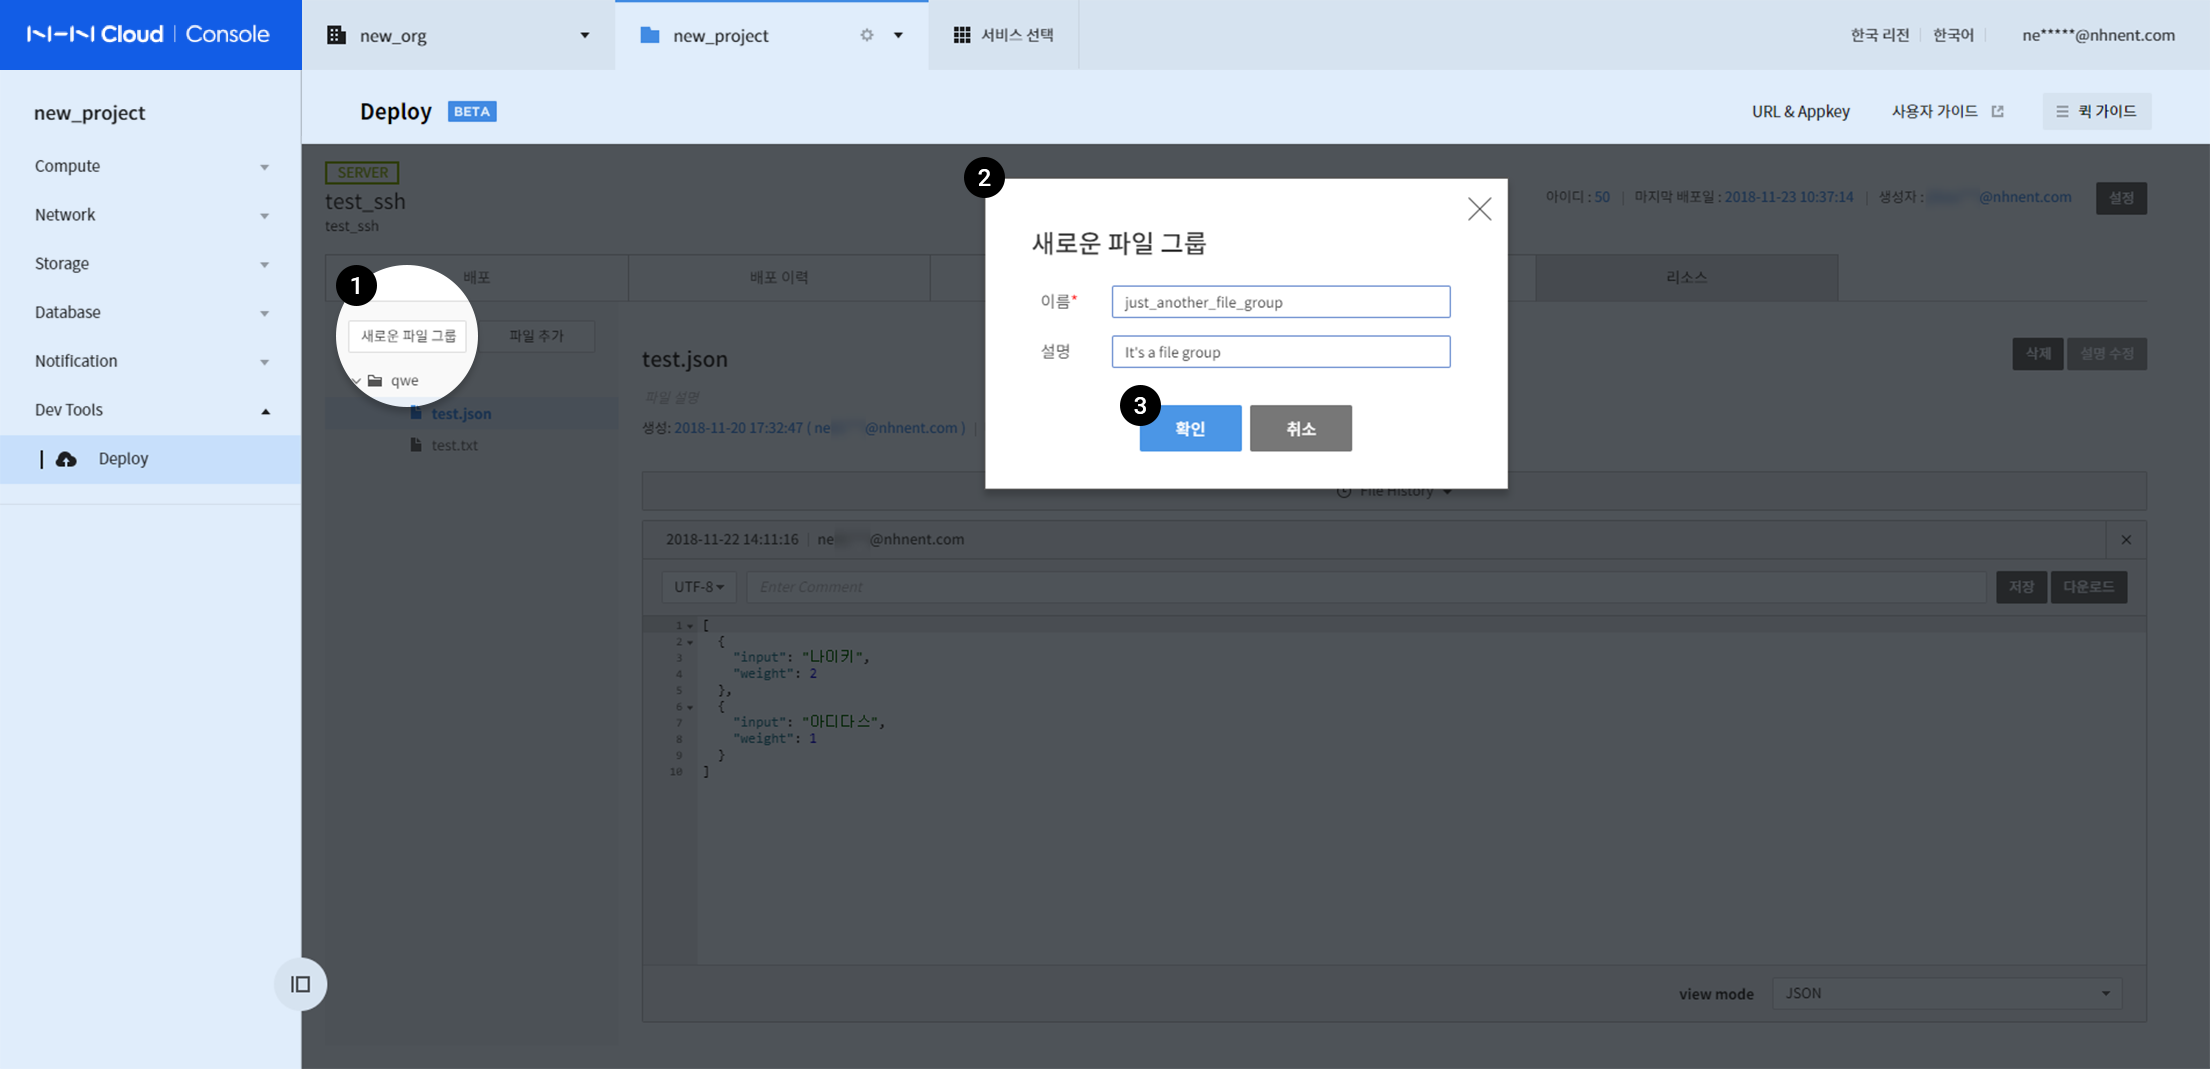
-
Click New File Group.
-
Enter name (required) and description (optional).
- Click Confirm.
Adding Files
Upload Files
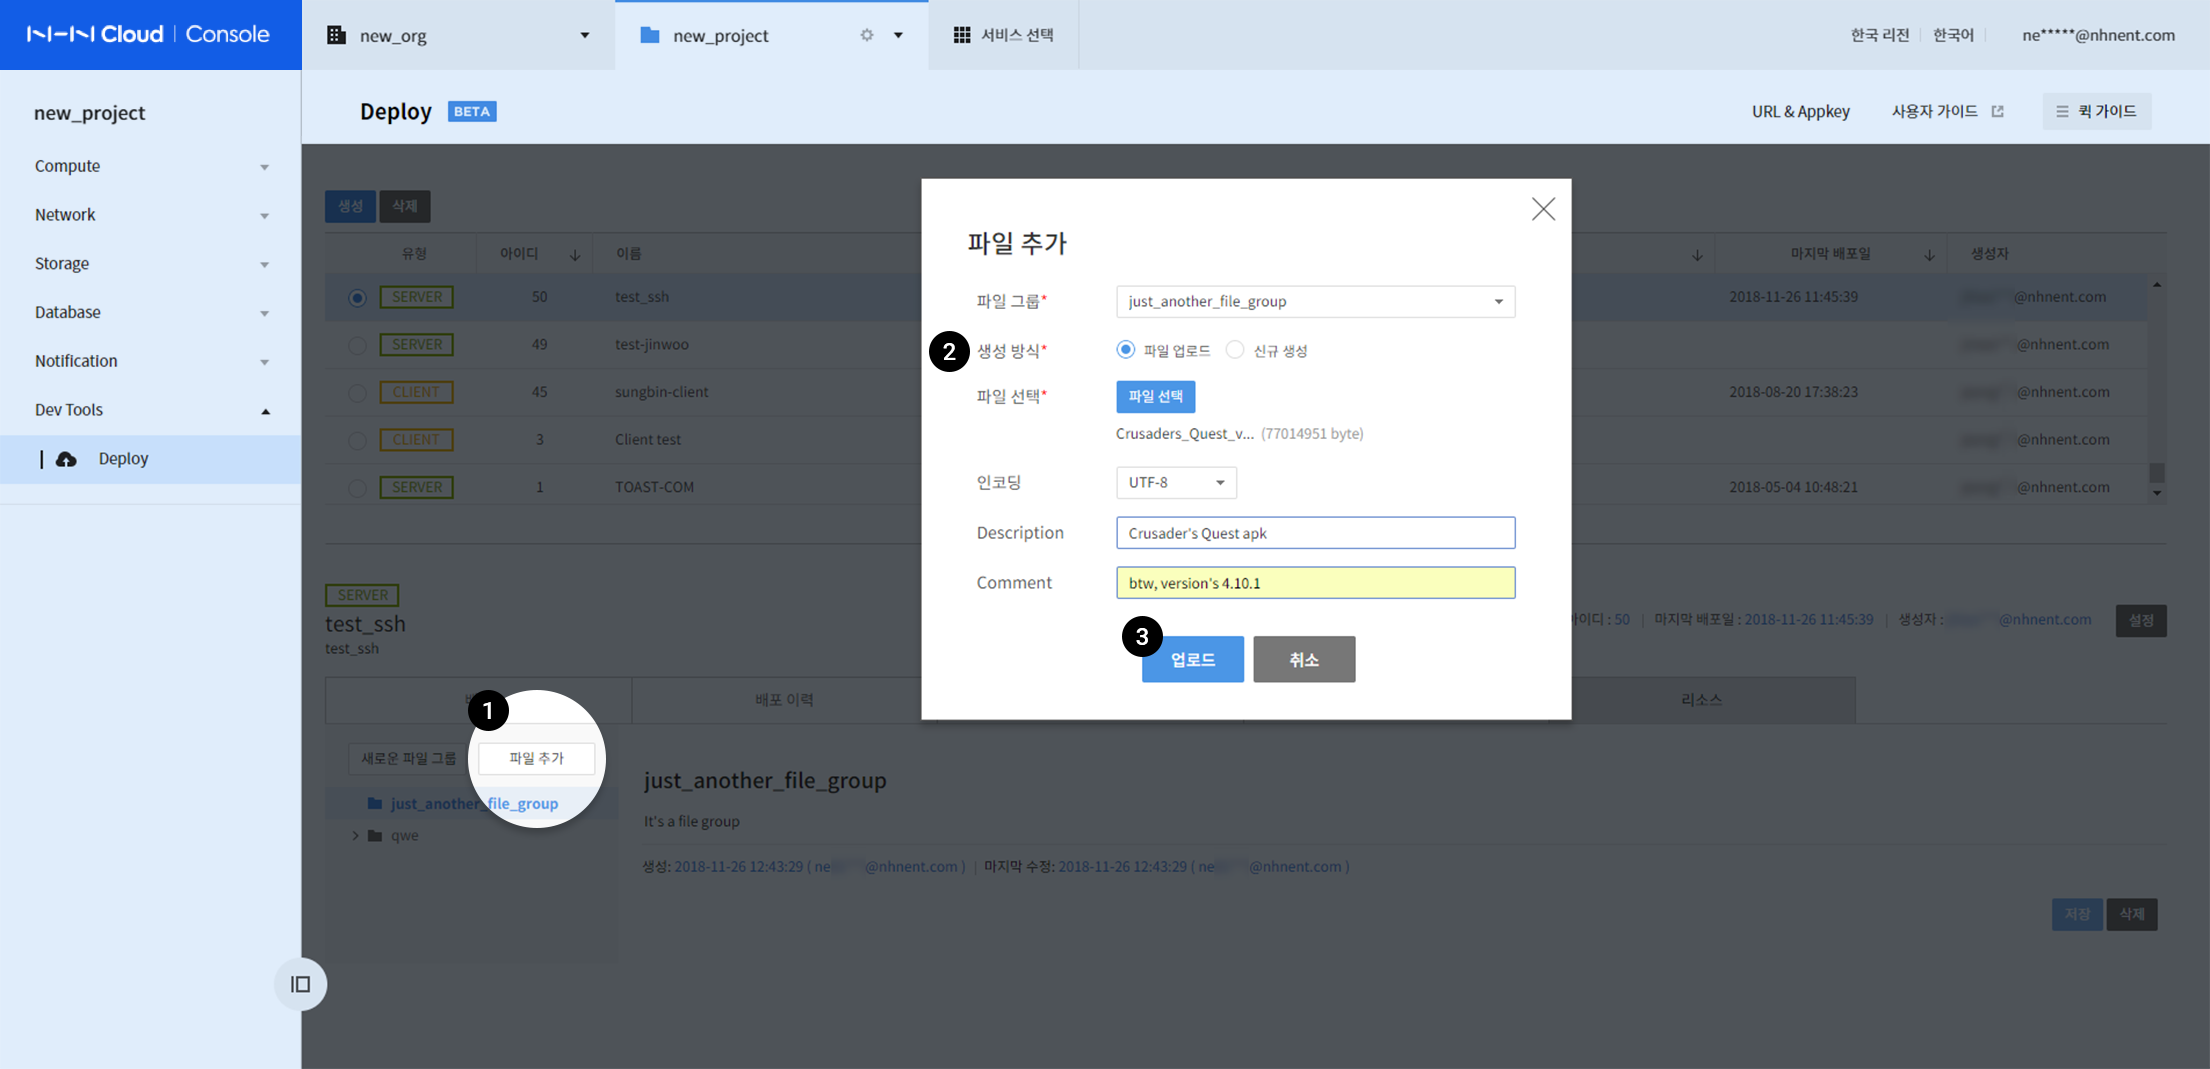
- Click Add Files.
- Select a method of creation for Upload Files.
- Select a file and enter information, and click Upload.
If a file name is redundant in a file group, it cannot be properly uploaded.
Create
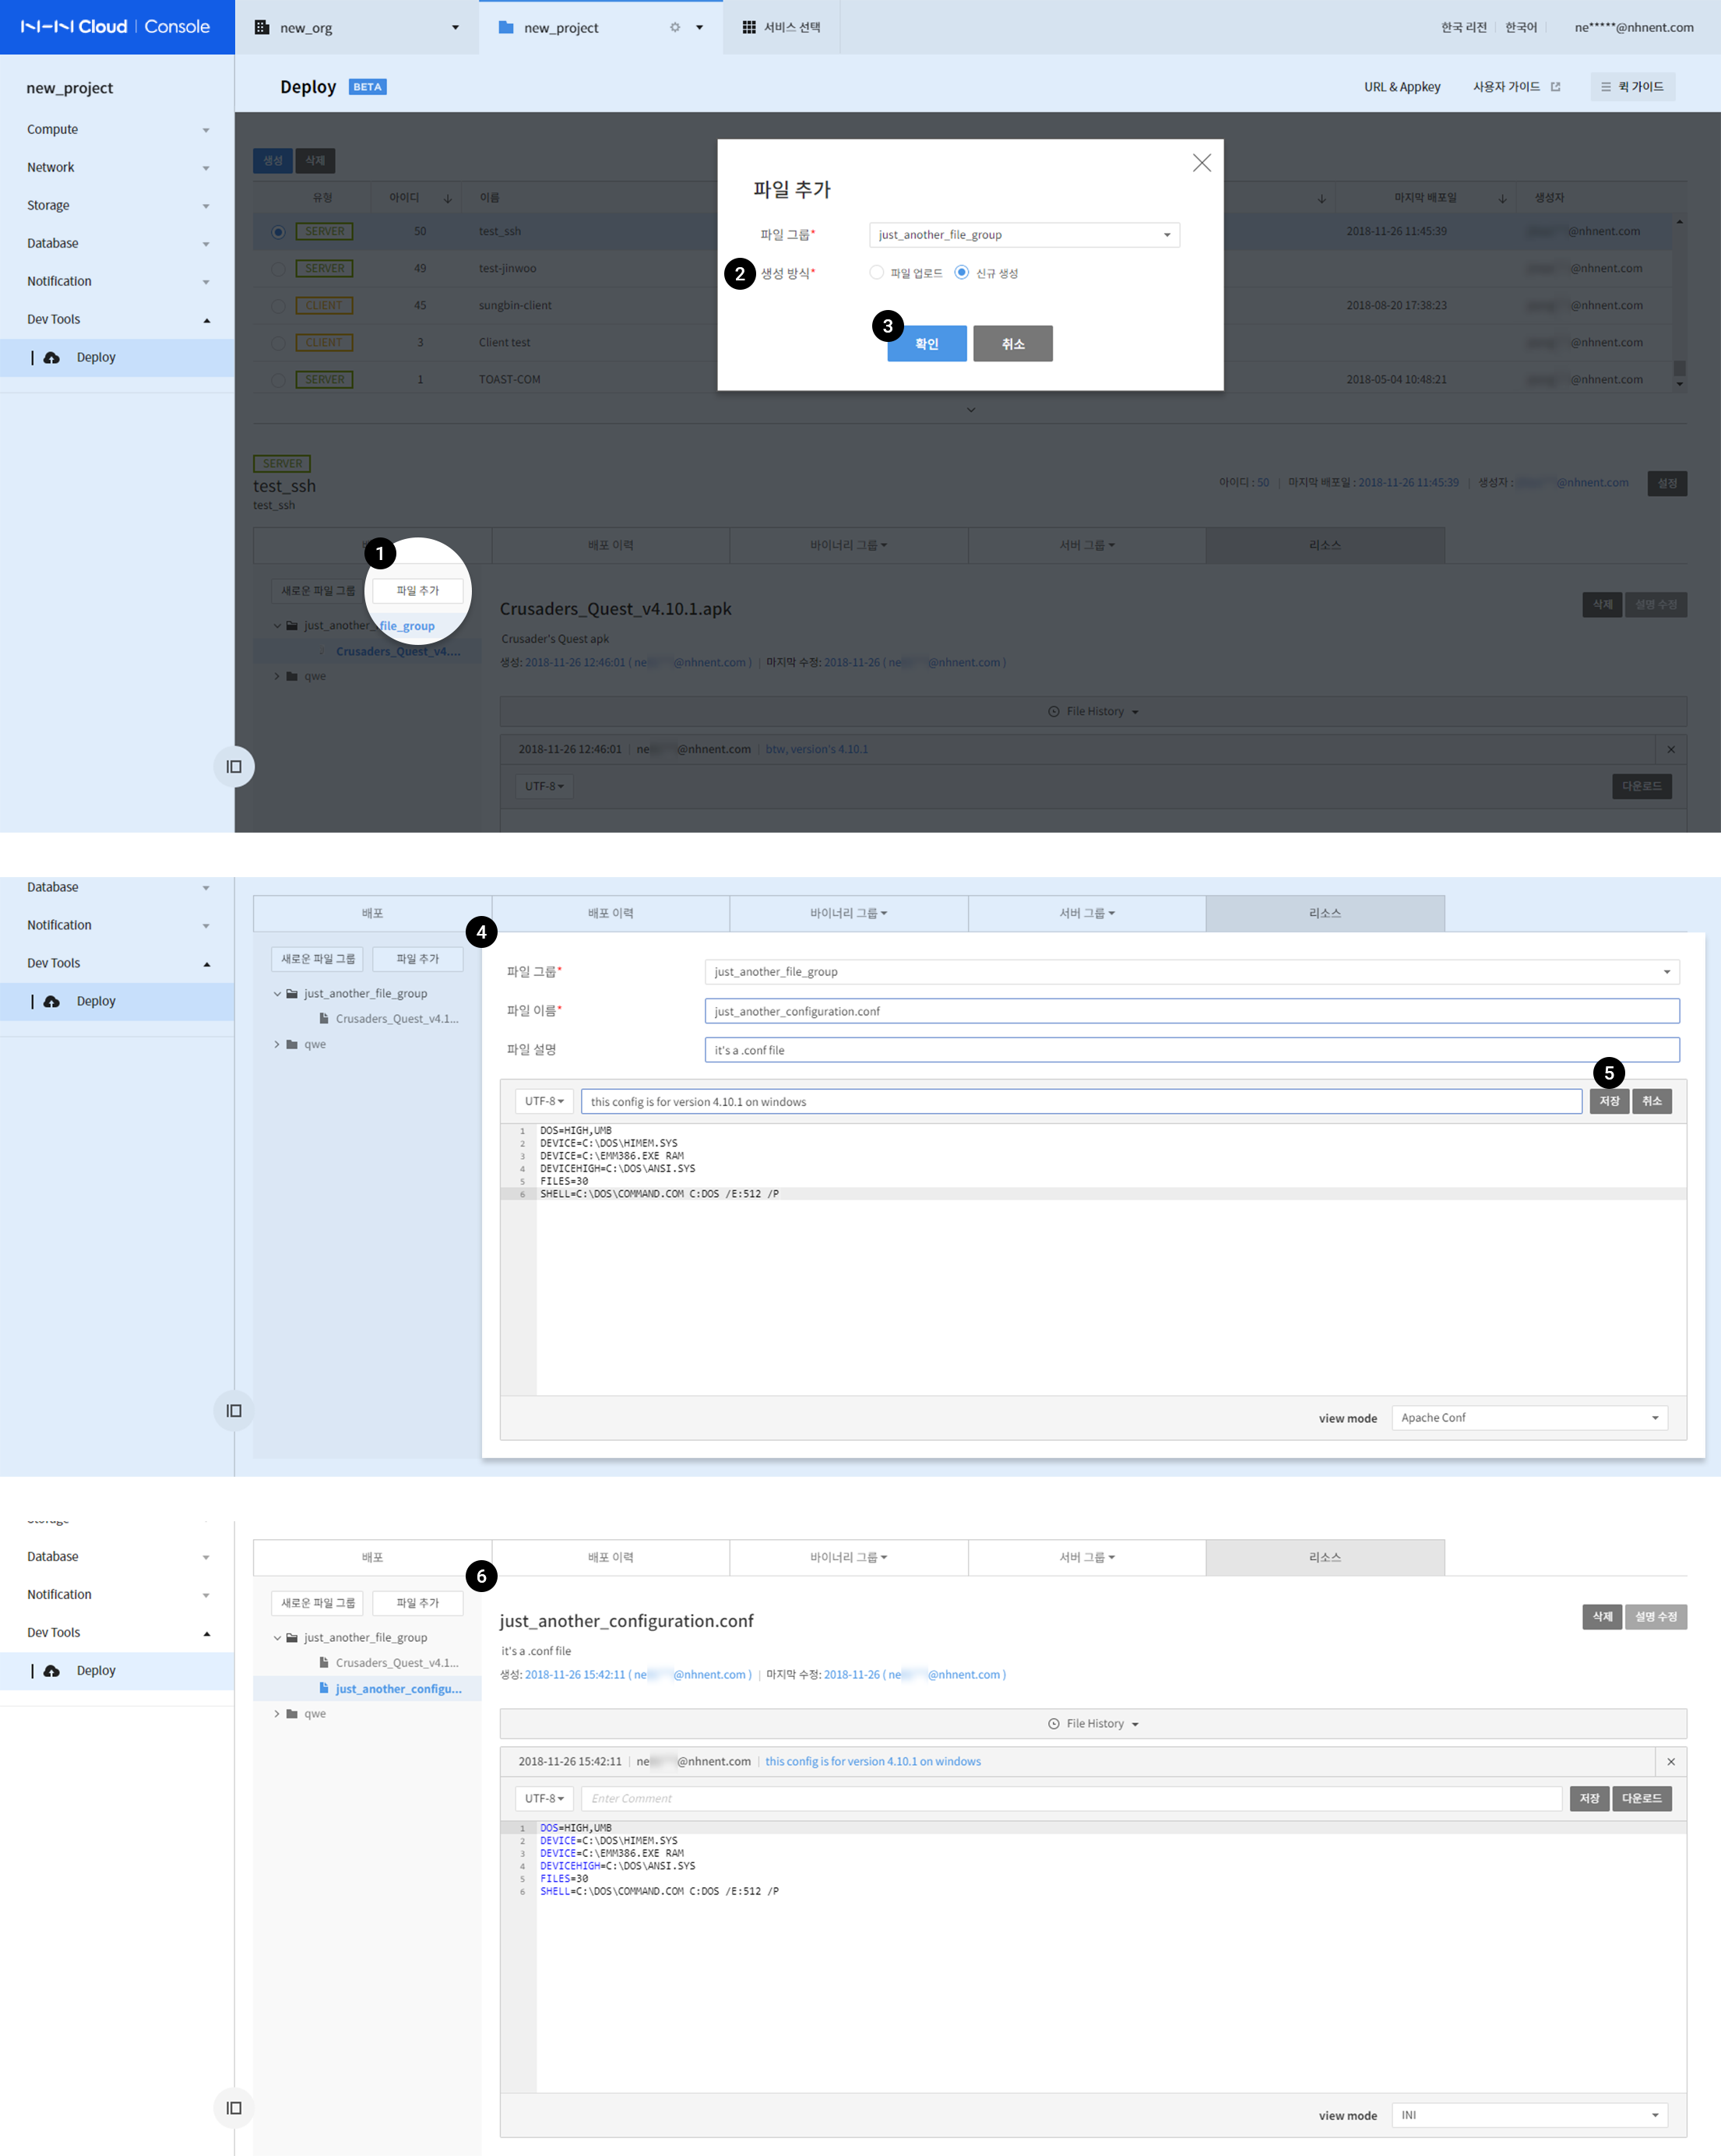
- Click Add Files.
- Select the method of creation for Create.
- Click Confirm.
- Fill in information for a new file.
- When it is completed, click Save.
- It is newly created.
Modifying Files
- Modify File Description
- Modify File Content
- Modify to File History
- Manage File History
Modify File Description
File description can be modified.
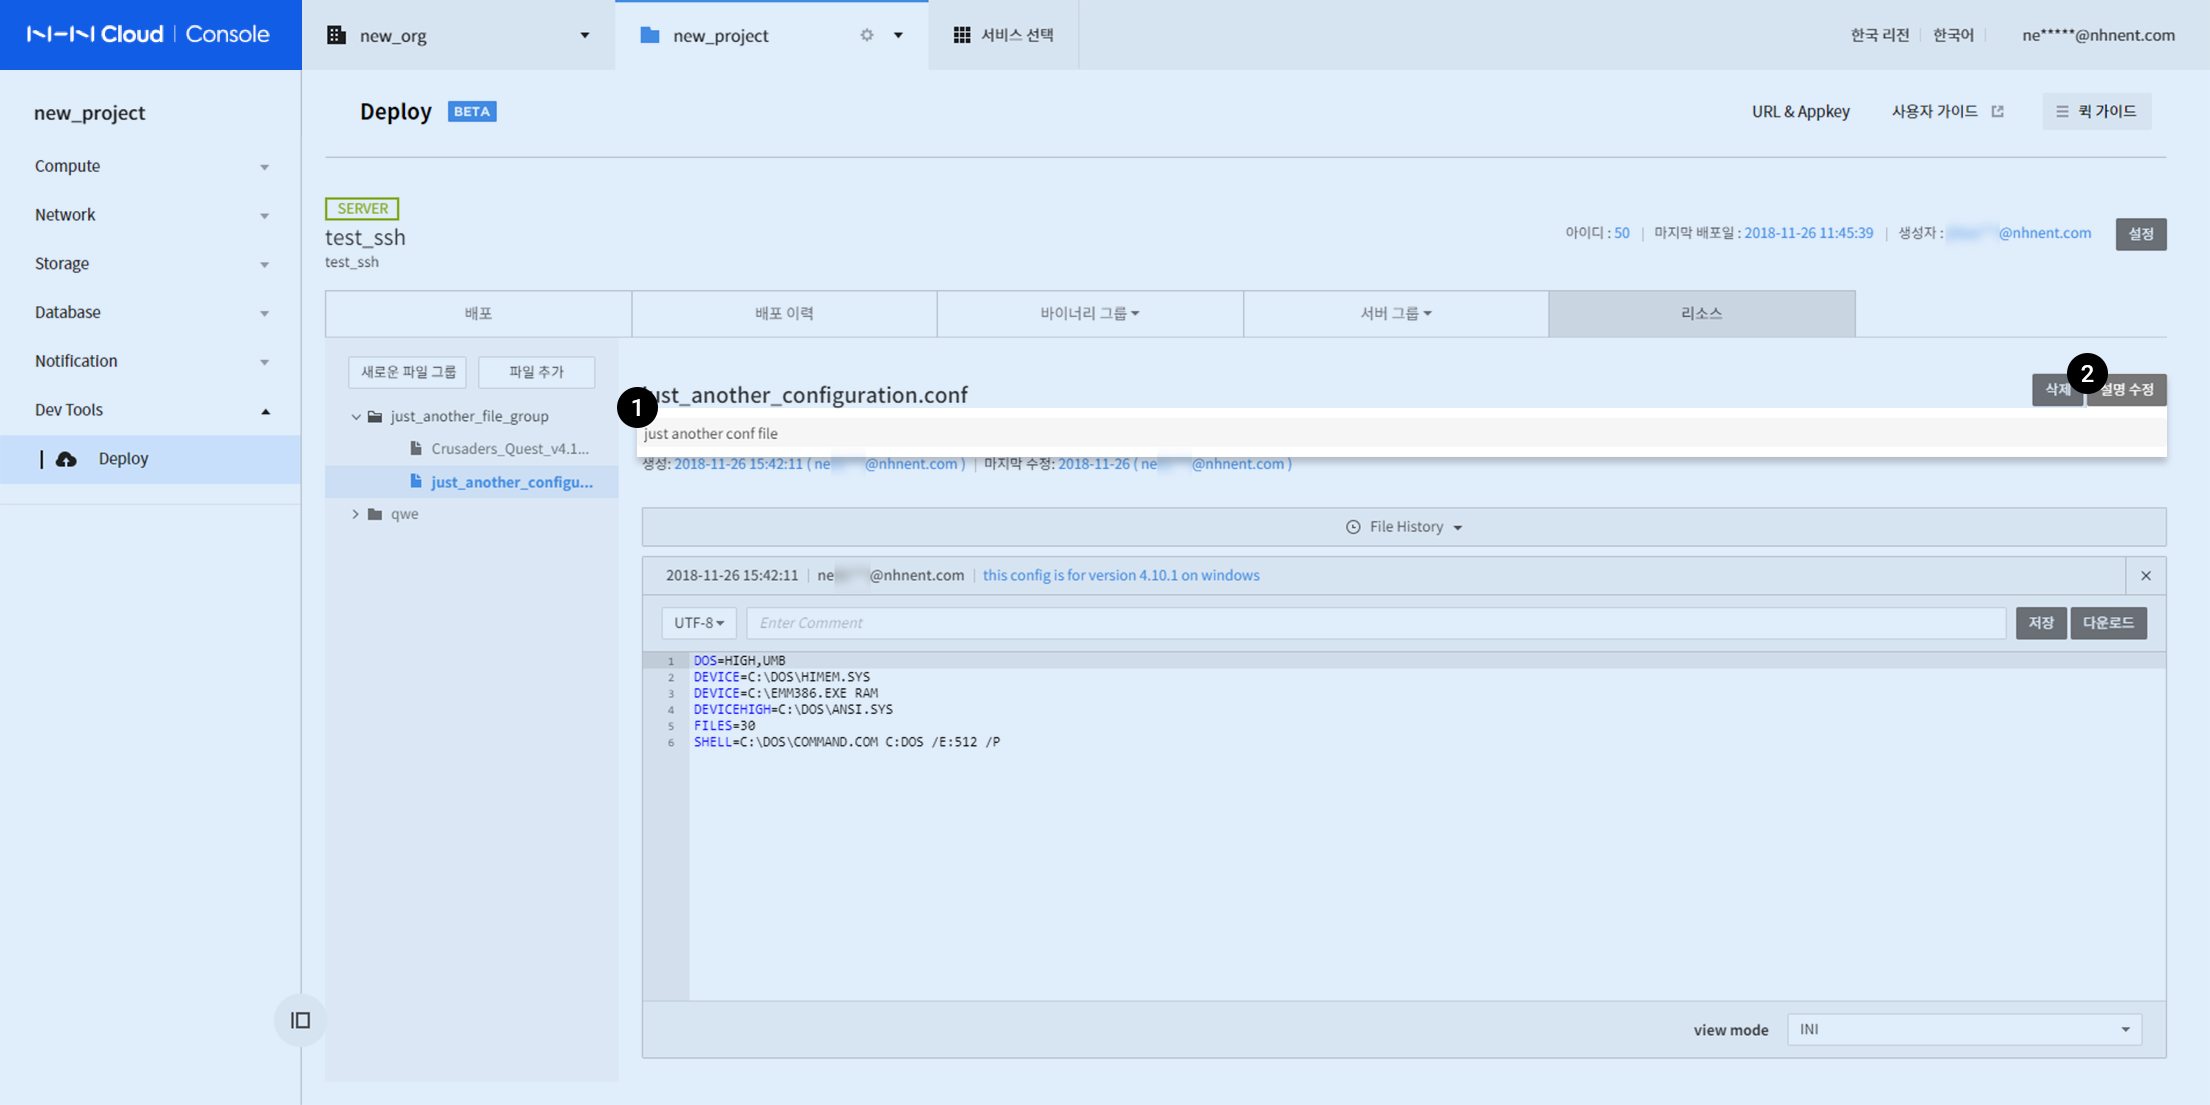
- Click File Description and modify.
- Click Modify Description.
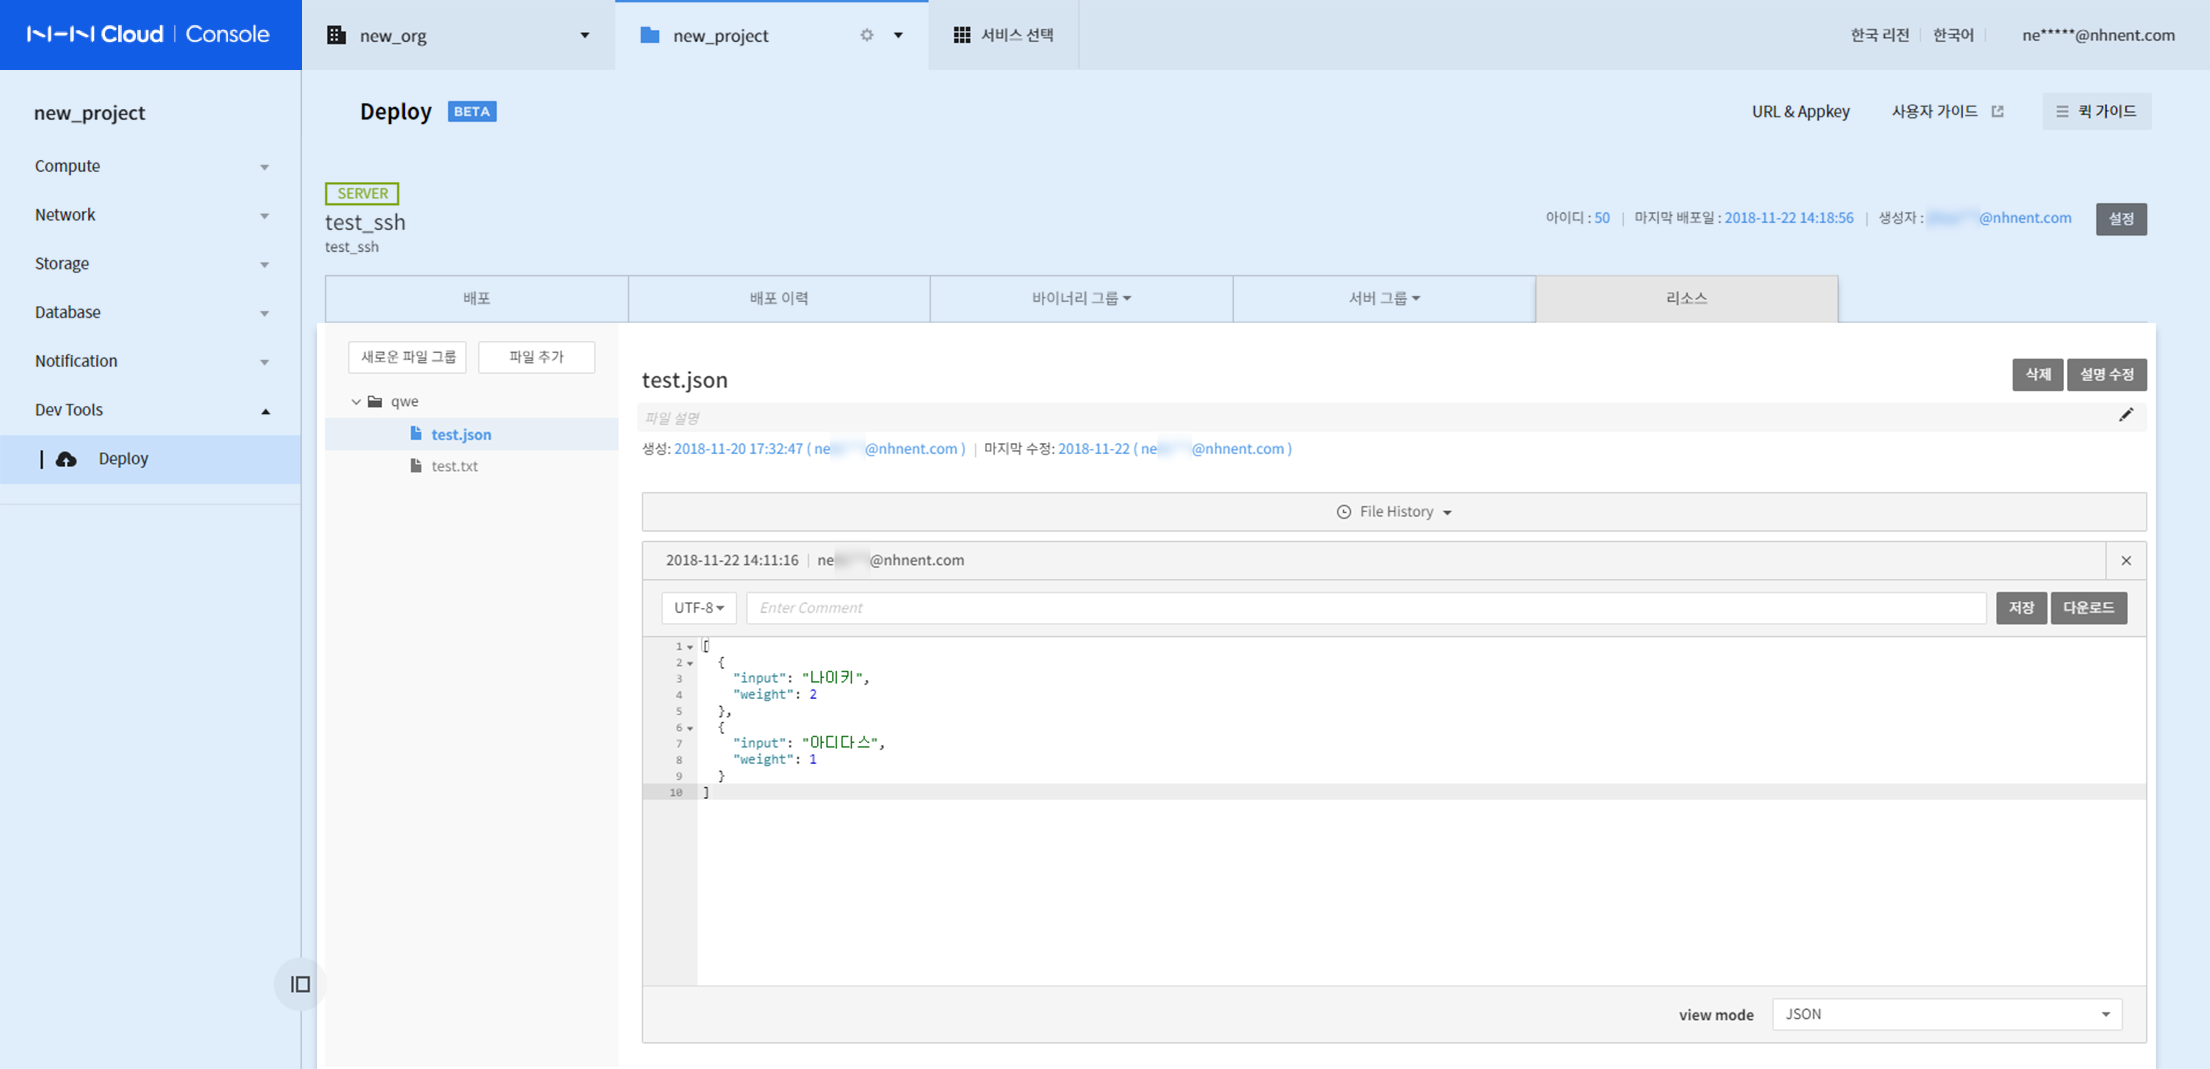
Modify File Content
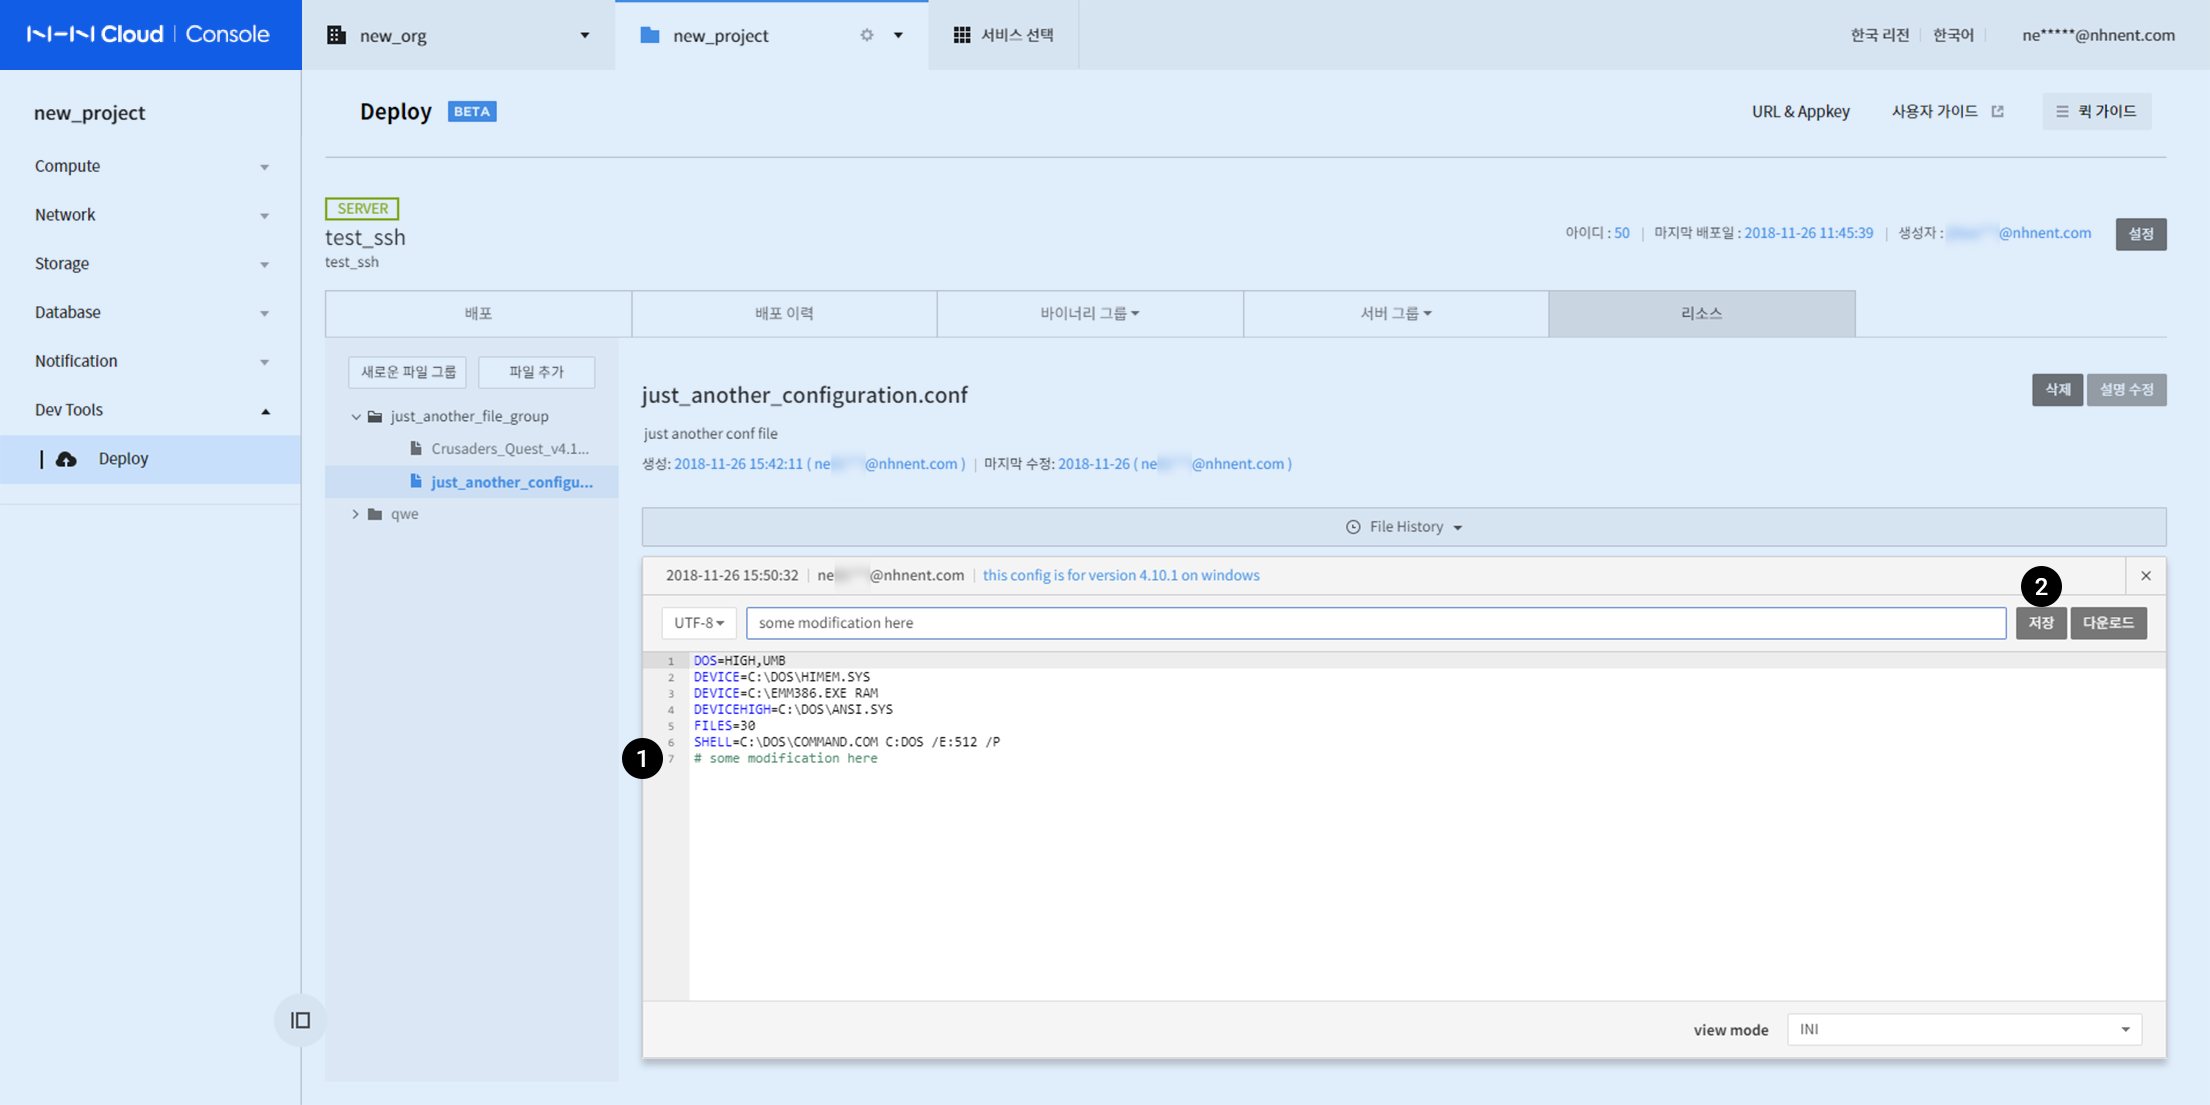
- Modify file content.
- Click Save.
File History
You can find history of file creation and modification.
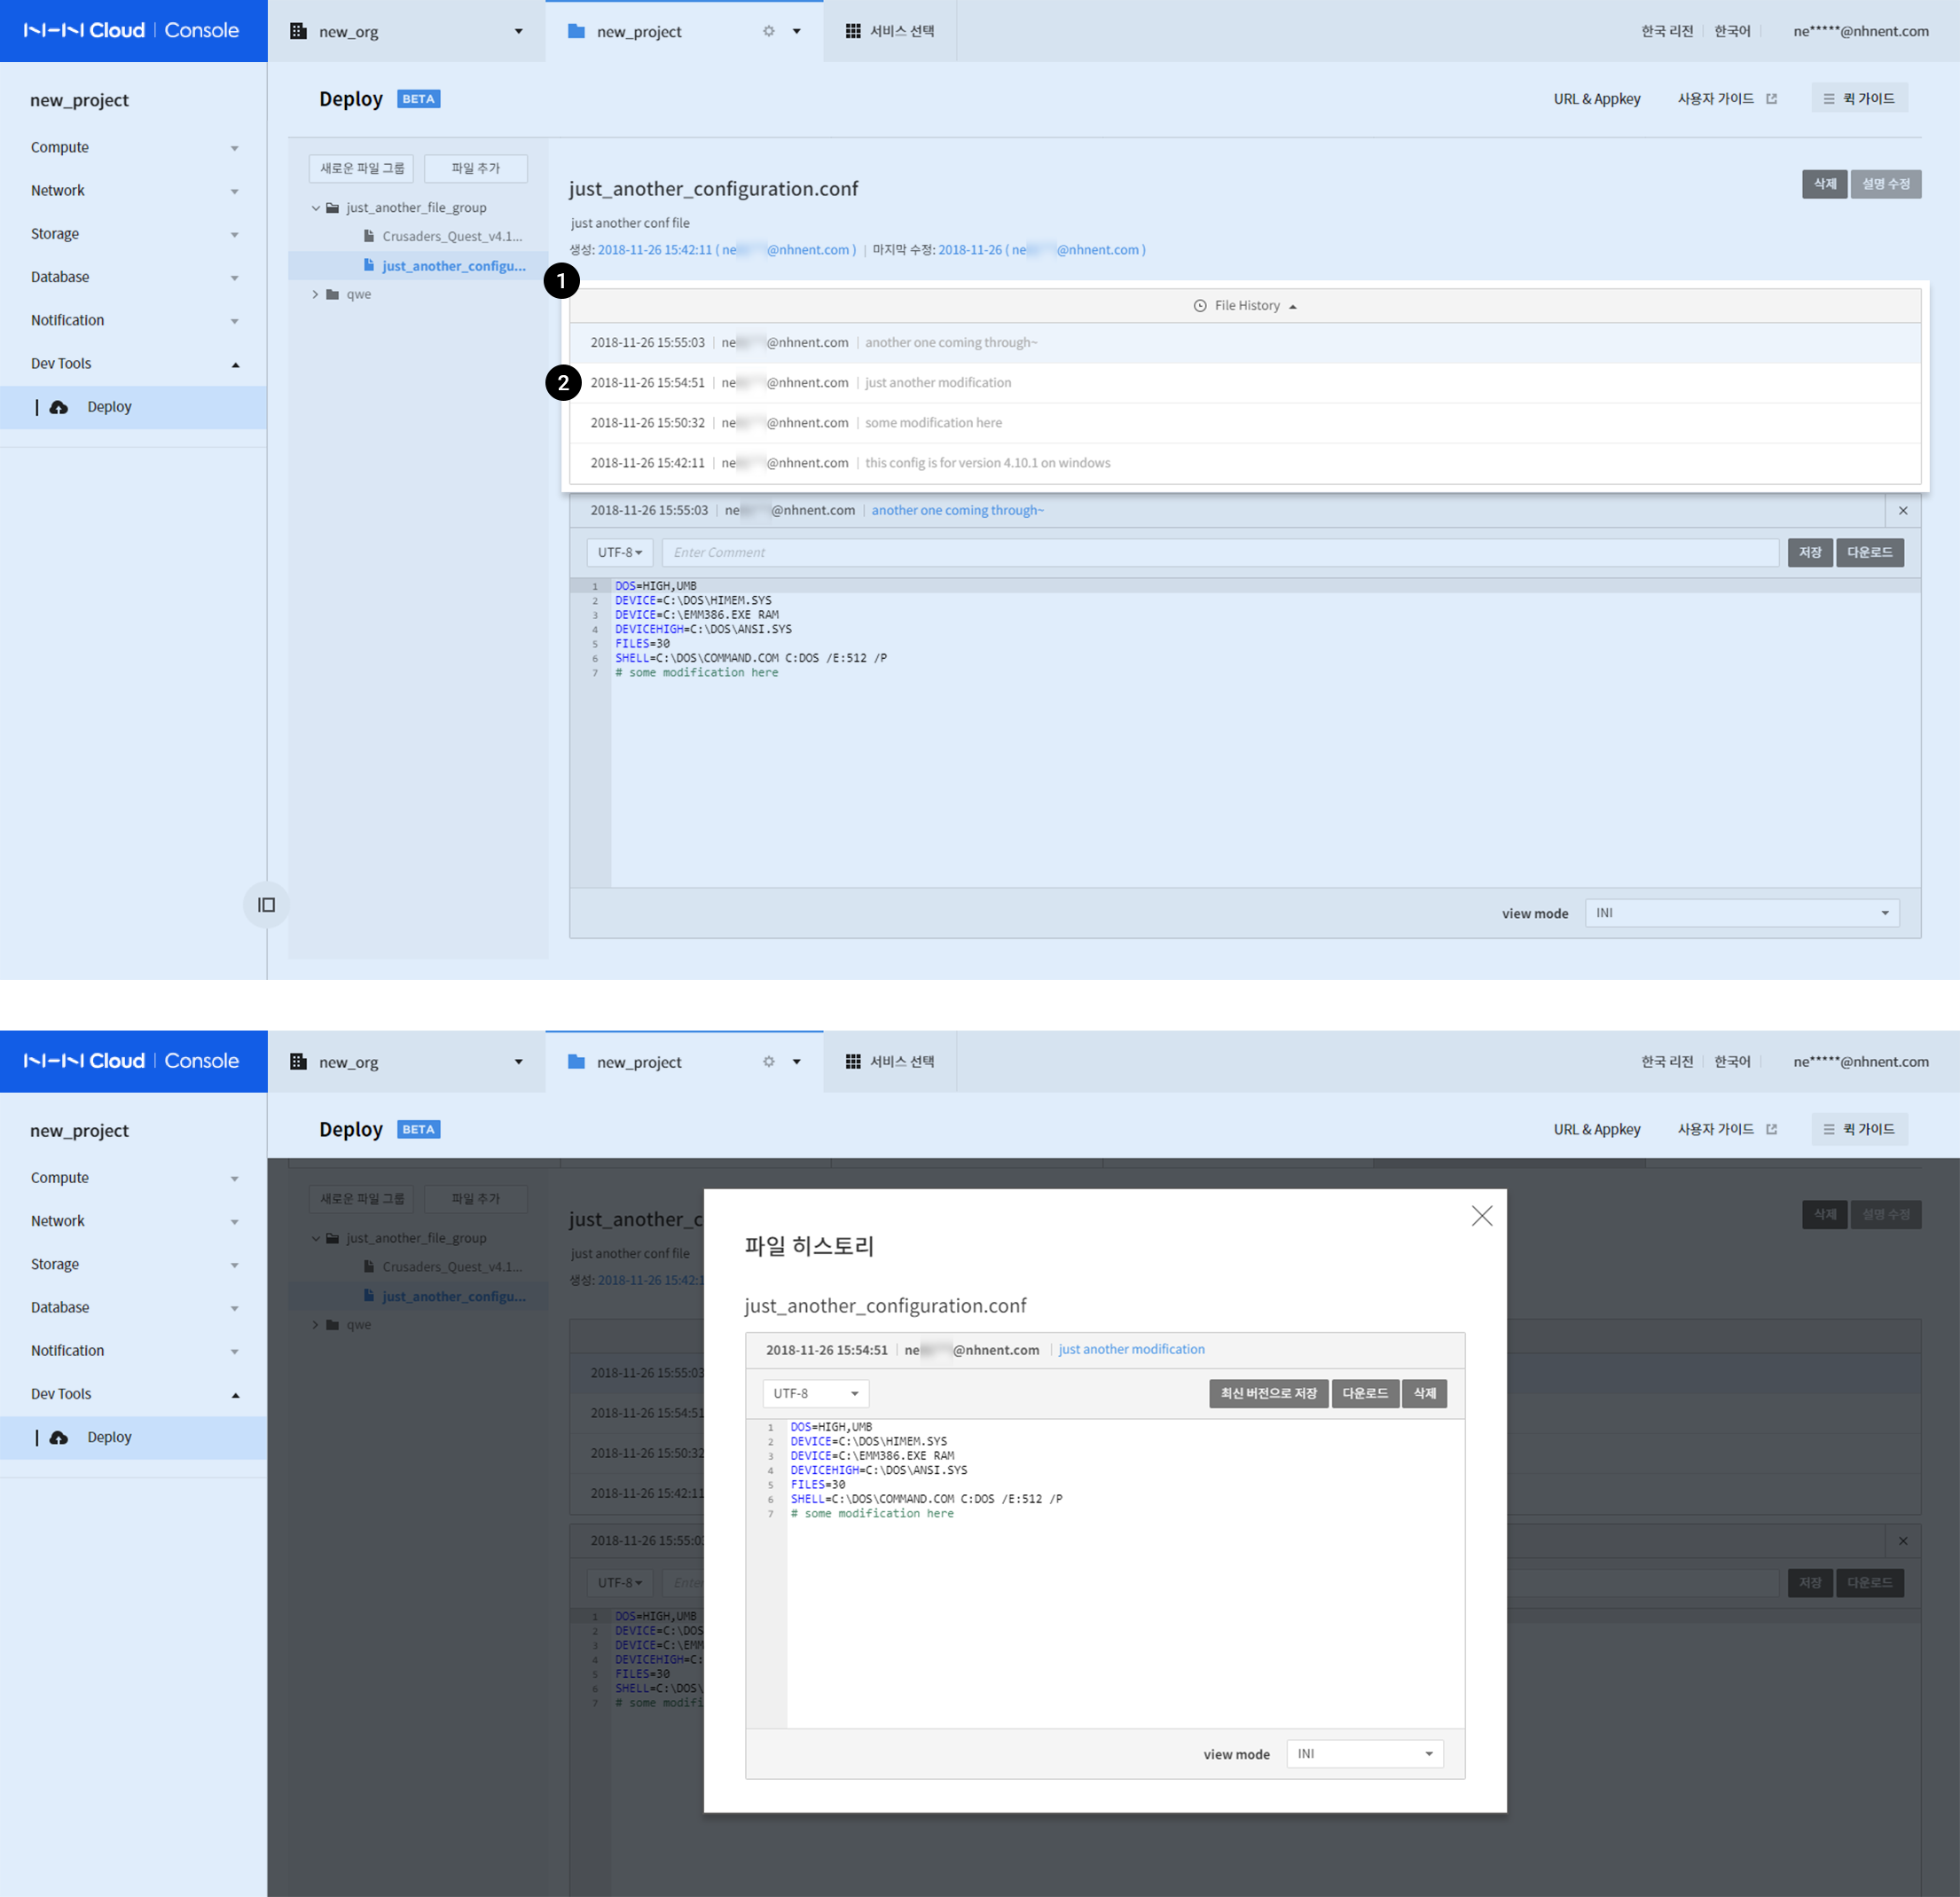
-
Click File History and extend the list.
- Check List
- First History: Current version
- Later History: Previous versions, which are clicked to show details.
- Check List
-
Click an item to check and find its details for each version.
Manage File History
Following is provided from file history details:
- Click Save in the Recent Version and the version is saved in the most recent version.