Game > GameAnvil > Test Development Guide > Scenario Test Development Guide
Large-scale load testing and writing scenarios for it
GameHammer provides a feature that can be used to simultaneously process a large number of connections for a large scale load test. It also provides scenario tests based on states for more convenient testing.
Example of writing a scenario test
This covers the following example of creating a simple scenario test.
First, define ScenarioActor, which is the main agent of each scenario.
public static class TestActor extends ScenarioActor<TestActor> {
}
For each state, define a class that inherits from State.
public class StateA extends State<TestActor> {

    @Override
    protected void onScenarioTestStart(TestActor scenarioActor) {
        System.out.println("ScenarioActor " + scenarioActor.getIndex() + " - onScenarioTestStart " + getStateName());
    }

    @Override
    protected void onEnter(TestActor scenarioActor) {
        System.out.println("ScenarioActor " + scenarioActor.getIndex() + " - onEnter " + getStateName());
    }

    @Override
    protected void onExit(TestActor scenarioActor) {
        System.out.println("ScenarioActor " + scenarioActor.getIndex() + " - onExit " + getStateName());
    }
}
public class StateB extends State<TestActor> {

    @Override
    protected void onEnter(TestActor scenarioActor) {
        System.out.println("ScenarioActor " + scenarioActor.getIndex() + " - onEnter " + getStateName());
    }

    @Override
    protected void onExit(TestActor scenarioActor) {
        System.out.println("ScenarioActor " + scenarioActor.getIndex() + " - onExit " + getStateName());
    }
}
public class StateC extends State<TestActor> {

    @Override
    protected void onEnter(TestActor scenarioActor) {
        System.out.println("ScenarioActor " + scenarioActor.getIndex() + " - onEnter " + getStateName());
    }

    @Override
    protected void onExit(TestActor scenarioActor) {
        System.out.println("ScenarioActor " + scenarioActor.getIndex() + " - onExit " + getStateName());
    }
}
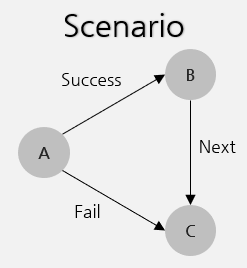
Create ScenarioMachine to be used to manage states. And create the StateA, StateB, and StateC objects that are defined earlier and add them to ScenarioMachine.
ScenarioMachine<TestActor> scenario = new ScenarioMachine<>("Sample A");
scenario.addState(new StateA());
scenario.addState(new StateB());
scenario.addState(new StateC());

sceanrio.editState(StateA.class) // In StateA
    .addActionOnEnter(changeState(StateB.class), (sceanrioActor) -> new Random().nextBoolean()) // Move to StateB by random
    .addActionOnEnter(changeState(StateC.class)) // The rest move to StateC
    .endEdit();

scenario.
    .editState(StateB.class) // In StateB
    .addActionOnEnter(changeState(StateC.class)) // Always move to StateC
    .endEdit();

scenario
    .editState(StateC.class) // In StateC
    .addActionOnEnter(finishWithSuccess(), (scenarioActor) -> new Random().nextBoolean()) // Randomly treated as a successful end
    .addActionOnEnter(finishWithFail()) // The rest is treated as a failure termination
    .endEdit();
Now, run the scenario test.
Tester tester = Tester.newBuilder()
    .setUserCount(2)
    .setScenarioLoopCount(1)
    .Build();

ScenarioTest<TestActor> scenarioTest = new ScenarioTest<>(scenario);
scenarioTest.start(tester,
                   TestActor.class,
                   StateA.class
                  );
The run results may vary as they use Random, they are similar to the below:
ScenarioActor 0 - onScenarioTestStart StateA
ScenarioActor 0 - onEnter StateA
ScenarioActor 0 - onExit StateA
ScenarioActor 0 - onEnter StateC
ScenarioActor 0 - onExit StateC
ScenarioActor 1 - onScenarioTestStart StateA
ScenarioActor 1 - onEnter StateA
ScenarioActor 1 - onExit StateA
ScenarioActor 1 - onEnter StateB
ScenarioActor 1 - onExit StateB
ScenarioActor 1 - onEnter StateC
ScenarioActor 1 - onExit StateC
Basic Concepts of Scenario Test
Scenario test is a concept used to support large load tests. It specifies the number of ScenarioActors to be concurrently run, starting state, maximum run time and run them.
ScenarioActor
The concurrently run agents are ScenarioActors. If the number of concurrent runs is set to 100, 100 ScenarioActor objects are created and they run each scenario. Because ScenarioActor has one Connection, it can be used to run the features of the GameAnvil server. While inheriting and implementing ScenarioActor, the features and settings that are needed to run scenarios can be added and used. The current state can be changed using changeState() and the scenario can be closed using finish().
public static class TestActor extends ScenarioActor<TestActor> {
    private int value1;
    private String value2;

    public void funcion() {
        // some code
    }
}
ChangeState
Change ScenarioActor to a different state. Note that the state does not change immediately when ChangeState() is called. The actual state change is the start of the next message loop, where onExit() of the State object implementing the current state and onEnter() of the State object implementing the following state are called sequentially.
scenarioActor.changeState(NextState.class);
Finish
ScenarioActor ends the running scenario. Similar to ChangeState(), it is run when the next message loop starts after Finish() is called. At that time, the onExit() of the State object that implements the current state is called. If the number of ScenarioActor runs is less than the number of ScenarioLoopCount, the scenario is run again until the number matches to the number of ScenarioLoopCounts. If ScenarioLoopCount<=0, it is repeated for the specified TestTime default: 30 seconds. It receives boolean value to determine whether the scenario is successfully ended or erroneously ended and records the result as statistics.
scenarioActor.finish(true);
Connection
As ScenarioActor has one Connection, it can be used to run the features of the GameAnvil server.
Connection connection = scenarioActor.getConnection();
When the user writes test code using Future, like the functionality test, in a scenario test, it is blocked from Future.get(). For this reason, multiple tests cannot be run at the same time. Instead, run multiple tests using the API with the callback method. In functionality test, APIs with callback method for all the APIs introduced by functionality test are provided. In a scenario test, use APIs using this method.
Connection connection = scenarioActor.getConnection();
connection.connect(new RemoteInfo("127.0.0.1", 11200), resultConnect -> {
    if (ResultCodeConnect.CONNECT_SUCCESS == resultConnect.getResultCode()) {
        System.out.println("Connect success.");
        scenarioActor.changeState(NextState.class);
    } else {
        System.out.println("Connect success.");
        scenarioActor.finish(false);
    }
});
State
Inherit and implement State to define the State presenting each state.
public class StateA extends State<TestActor> {

    @Override
    protected void onScenarioTestStart(RPSActor scenarioActor) {
    }

    @Override
    protected void onEnter(ScenarioActor<STATE, EVENT> scenarioActor) {
    }

    @Override
    protected void onExit(ScenarioActor<STATE, EVENT> scenarioActor) {
    }
}
Whenever the state of ScenarioActor changes, the onEnert() of the State that represents each state and the ScenarioActor changed to the corresponding state is passed. onExit() is called when leaving from each state and the left ScenarioActor is passed as a factor.
ScenarioMachine
We define one scenario with ScenarioMachine, which is defined as multiple states and transitions between states.
ScenarioMachine<STATE, EVENT> scenario = new ScenarioMachine("Sample A");
scenario.addState(new StateA());
scenario.addState(new StateB());
scenario.addState(new StateC());
ScenarioTest
First, create Tester. At this time, the user can specify the number of ScenarioActors to be run, number of repeats, and test time as an option. Take ScenarioMachine as a factor and create ScenarioTest. Pass the State of the previously created Tester and ScenarioActor and run them. The test is repeated until ScenarioActor is repeated to the specified number or the specified test time is met.
Tester tester = Tester.newBuilder()
    .setActorCount(3)
    .setScenarioLoopCount(2)
    .Build();

ScenarioTest<TestActor> scenarioTest = new ScenarioTest<>(scenario);
scenarioTest.start(tester,
                   TestActor.class,
                   StateA.class
                  );
Once the test is done, printStatistics() can be used to get the test results.
logger.info(scenarioTest.printStatistics("Finished"));
## State - Statistics ##
                                         StateC                      StateA                      StateB
Total   |                             6                           6                           3
##################

## Packets - Statistics ##
TPS
    Total   0
    Avg 0
    Max 0
    Time    0
PPS
    Total   0
    Avg 0
    Max 0
    Time    0
Heap Memory Avg : NaN MBytes
## Timeout Total : 0
##################
## Packet Count
## total : 0

## Success : 6
## Fail : 0
## Disconnected : 0
## ForceDisconnected : 0
## SocketException : 0
Enhanced callback registration feature
Unlike listeners registered through the User Agent, listeners registered this way are automatically organized at the end of the state, eliminating the need for onExit to remove listeners.
The example code registered a callback for the request and set the callback to process a response to return the string. The returned value will be used to determine the next state to move on the Scanario Machine.
public class EchoState extends State<TestActor> {
    EchoReq.Builder echoReq = EchoReq.newBuilder();

    @Override
    protected String onEnter(TestActor scenarioActor) {
        int random = (int)Math.ceil(Math.random() * 100);
        echoReq.setData("EchoReq" + random);

        scenarioActor.request(echoReq.build(), this::echoResListener);
        return null;
    }

    public String echoResListener(PacketResult res, ScenarioActor actor) {
        TestActor scenarioActor = (TestActor)actor;
        if (res.isSuccess()) {
            return "Success";
        } else {
            return "Fail";
        }
    }

    @Override
    protected void onExit(TestActor scenarioActor) {
    }
}
Alternatively, if you receive a message from the server unilaterally, it is convenient to register a callback in an annotated manner. You can use the @Listener annotation to define how to handle a particular packet.
Set the class of messages that are expected to be received as a factor in the annotation and attach them to the corresponding handler.
@Listener(SendFromServer.class)
@SuppressWarnings("unused")
public void sendFromServerListener(PacketResult packetResult, TestActor scenarioActor) {
    try {
        SendFromServer send = SendFromServer.parseFrom(packetResult.getStream());
    } catch (IOException e) {
        throw new RuntimeException(e);
    }
}
Annotation is also available when registering response handlers for requests. In this case, the packet sent from the server is forwarded as a callback, but you specify the request type as the request factor for the annotation. The type that the server receives is not specified in the annotation.
@Listener(request = RequestToServer.class)
@SuppressWarnings("unused")
public void requestToServerListener(PacketResult res, TestActor scenarioActor) {
    if (!res.isSuccess()) {
        scenarioActor.finish(false);
    }
}
Most of the other features supported by the User Agent are available in ScenarioActor using an annotation attachment or callback registration using method reference as follows.
@Listener
@SuppressWarnings("unused")
public String connectListener(ResultConnect resultConnect, TestActor scenarioActor) {
    if (ResultCodeConnect.CONNECT_SUCCESS == resultConnect.getResultCode()) {
        System.out.println("Connect Success!");
        return "Success";
    } else {
        System.out.println("Connect Fail!");
        return "Fail";
    }
}
Below is a list of supported listeners. Declare a method with the signature below to the State and attach the @Listener annotation.
- connect
public void listener(ResultConnec result, ScenarioActor actor);
- authentication
public void listener(ResultAuthentication result, ScenarioActor actor);
- login
public void listener(ResultLogin result, ScenarioActor actor);
- matchUserStart
public void listener(ResultMatchUserStart result, ScenarioActor actor);
- logout
public void listener(ResultLogout result, ScenarioActor actor);
- logout
public void listener(ResultLogout result, ScenarioActor actor);
- leaveRoom
public void listener(ResultLeaveRoom result, ScenarioActor actor);
- leaveRoom
public void listener(ResultLeaveRoom result, ScenarioActor actor);
- createRoom
public void listener(ResultCreateRoom result, ScenarioActor actor);
- namedRoom
public void listener(ResultNamedRoom result, ScenarioActor actor);
- joinRoom
public void listener(ResultJoinRoom result, ScenarioActor actor);
- matchUserCancel
public void listener(ResultMatchUserCancel result, ScenarioActor actor);
- matchPartyStart
public void listener(ResultMatchPartyStart result, ScenarioActor actor);
- matchPartyCancel
public void listener(ResultMatchPartyCancel result, ScenarioActor actor);
- matchRoom
public void listener(ResultMatchRoom result, ScenarioActor actor);
- getChannelInfo
public void listener(ResultChannelInfo result, ScenarioActor actor);
- getAllChannelInfo
public void listener(ResultAllChannelInfo result, ScenarioActor actor);
- getChannelCountInfo
public void listener(ResultChannelCountIn result, ScenarioActor actor);
- getAllChannelCountInfo
public void listener(ResultAllChannelCoun result, ScenarioActor actor);
- moveChannel
public void listener(ResultMoveChannel result, ScenarioActor actor);
- snapshot
public void listener(ResultSnapshot result, ScenarioActor actor);
- request
public void listener(PacketResult result, ScenarioActor actor);