Security > Network Firewall > Console User Guide
This guide describes the procedure for creating Network Firewall and how to use the console after creation.
Get Started
To use Network Firewall, first enable the Network Firewall service.
Create Network Firewall
Prerequisites
The minimum network service resources needed to create a Network Firewall are as follows.
[Note] See the Network Firewall service diagramin Network Firewall > Overview.
[Preparations for Configuring 1 Project].
- 1 project
- 2 VPCs (Hub VPC, Spoke VPC)
- 3 subnets in the Hub VPC (Network Firewall subnet, NAT subnet, and external transport subnet)
- At least one subnet in the Spoke VPC
- Internet gateway connected to Routing in the Hub VPC
[Preparations for Configuring 2 Spoke VPCs within One Project].
- 1 project
- 3 VPCs (Hub VPC, Spoke1 VPC, Spoke2 VPC)
- 3 subnets in the Hub VPC (Network Firewall subnet, NAT subnet, and external transport subnet)
- At least one subnet each in the Spoke1 VPC and Spoke2 VPC
- Internet gateway connected to Routing in the Hub VPC
[Preparations for configuring more than one project].
- 2 projects
- 2 VPCs (Hub VPC and Spoke VPC for each project)
- 3 subnets in the Hub VPC (Network Firewall subnet, NAT subnet, and external transport subnet)
- At least one subnet in the Spoke VPC
- Internet gateway connected to Routing in the Hub VPC
[Preparations for configuring cross-region projects].
- 1 project
- 2 VPCs (Hub VPC in KR1 region and Spoke VPC in KR2 region)
- 3 subnets in the Hub VPC (Network Firewall subnet, NAT subnet, and external transport subnet)
- At least one subnet in the Spoke VPC
- Internet gateway connected to Routing in the Hub VPC
[Preparations for configuring multiple subnets within a single VPC].
- 1 project
- 1 VPC
- 3 hub subnets (Network Firewall subnet, NAT subnet, and external transport subnet)
- At least one spoke subnet
- Internet gateway connected to Routing in the VPC
[Note] * The above service resources can be created in the [Network] category.
- Only one network firewall can be created per project.
Create Network Firewall
- Go to Security > Network Firewall.
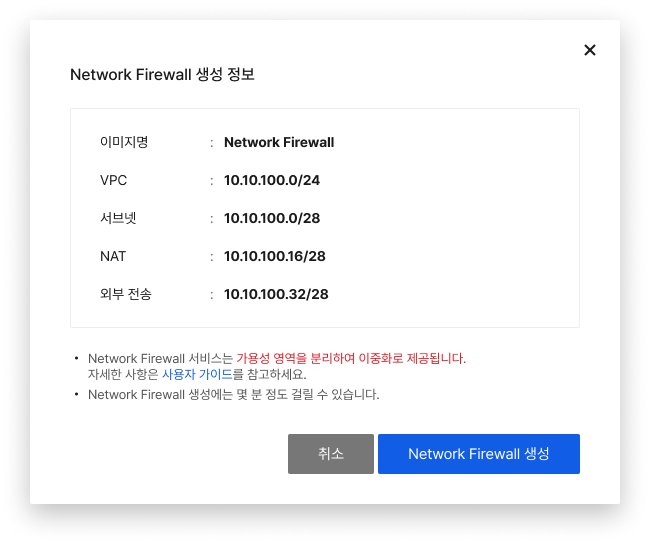
- Select all required items and click Create Network Firewall at the bottom.
- RBAC: Grant API permissions to query instance objects and provide the Network Firewall service
- VPC: VPC that Network Firewall will use
- Subnet: Subnet that Network Firewall uses to control internal traffic
- NAT: Subnet that Network Firewall uses to control external traffic
- External transmission: Subnet that sends traffic and logs created by Network Firewall
[Note]
- The created Network Firewall is not exposed in users’ projects.
- It is recommended to create subnets in the minimum unit (28 bits) that can be created in the NHN Cloud console.
- An Internet gateway must be connected to the routing table of the VPC to which the Network Firewall will belong before it can be created.
- Network Firewall is provided with redundancy by separating availability zones.
- If you use the Network Firewall service as a separate service from Security Groups, you must allow both to access the instances.
- The CIDR block owned by Network Firewall and the CIDR block requiring connectivity must not overlap.
- IPs created with the Virtual_IP type in Network > Network Interfaceare used by Network Firewall for redundancy purposes, so deleting them may block communication.
Connection Settings
[Example] When the VPC (Hub) used by Network Firewall is 10.0.0.0/24, and the VPC (Spoke) that needs to be connected to the Network Firewall is 172.16.0.0/24.
-
Go to Network > Routing, select the Spoke VPC, and change the routing table.
- After selecting Spoke VPC, click Change Routing Table to change to the Centralized Virtual Routing (CVR) method.
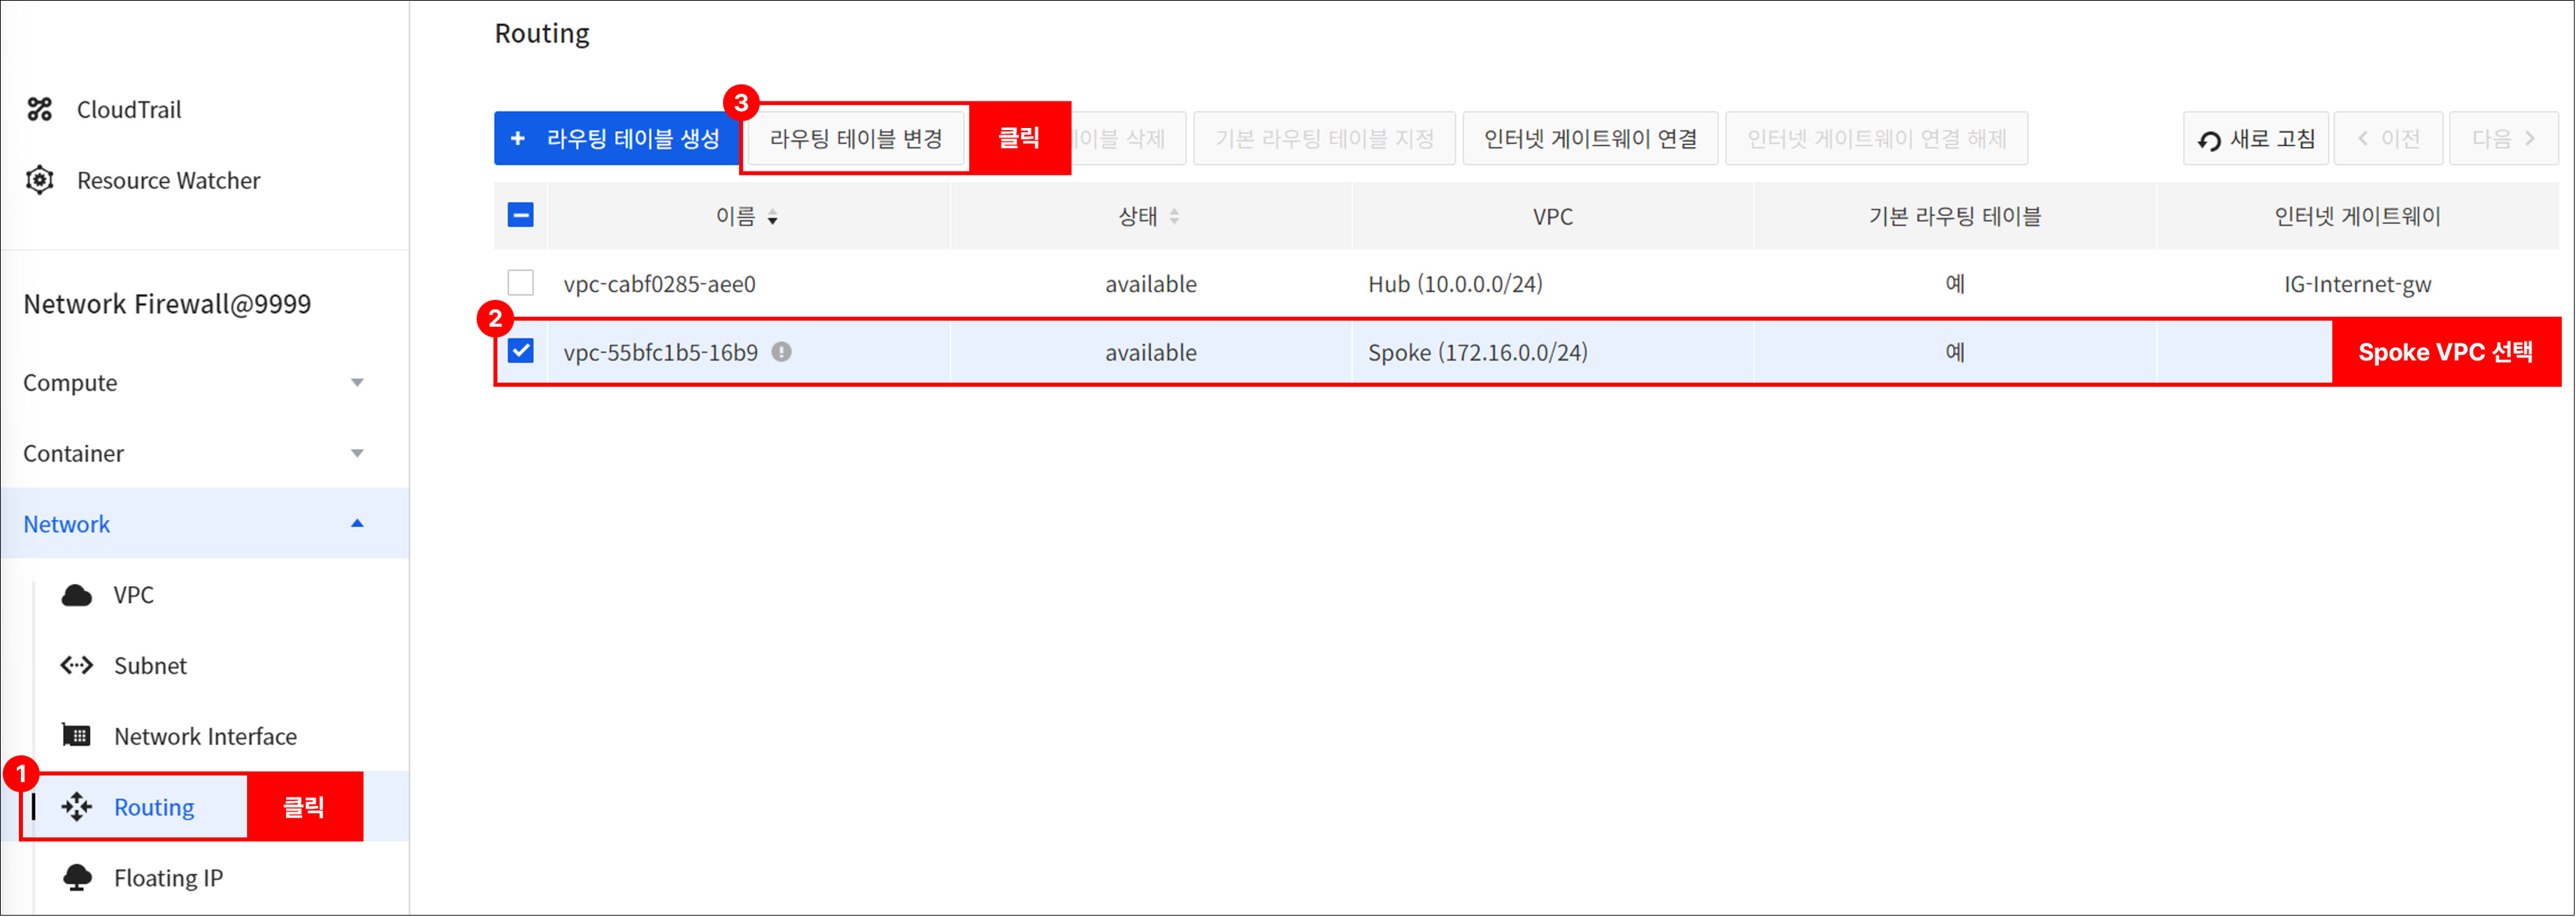
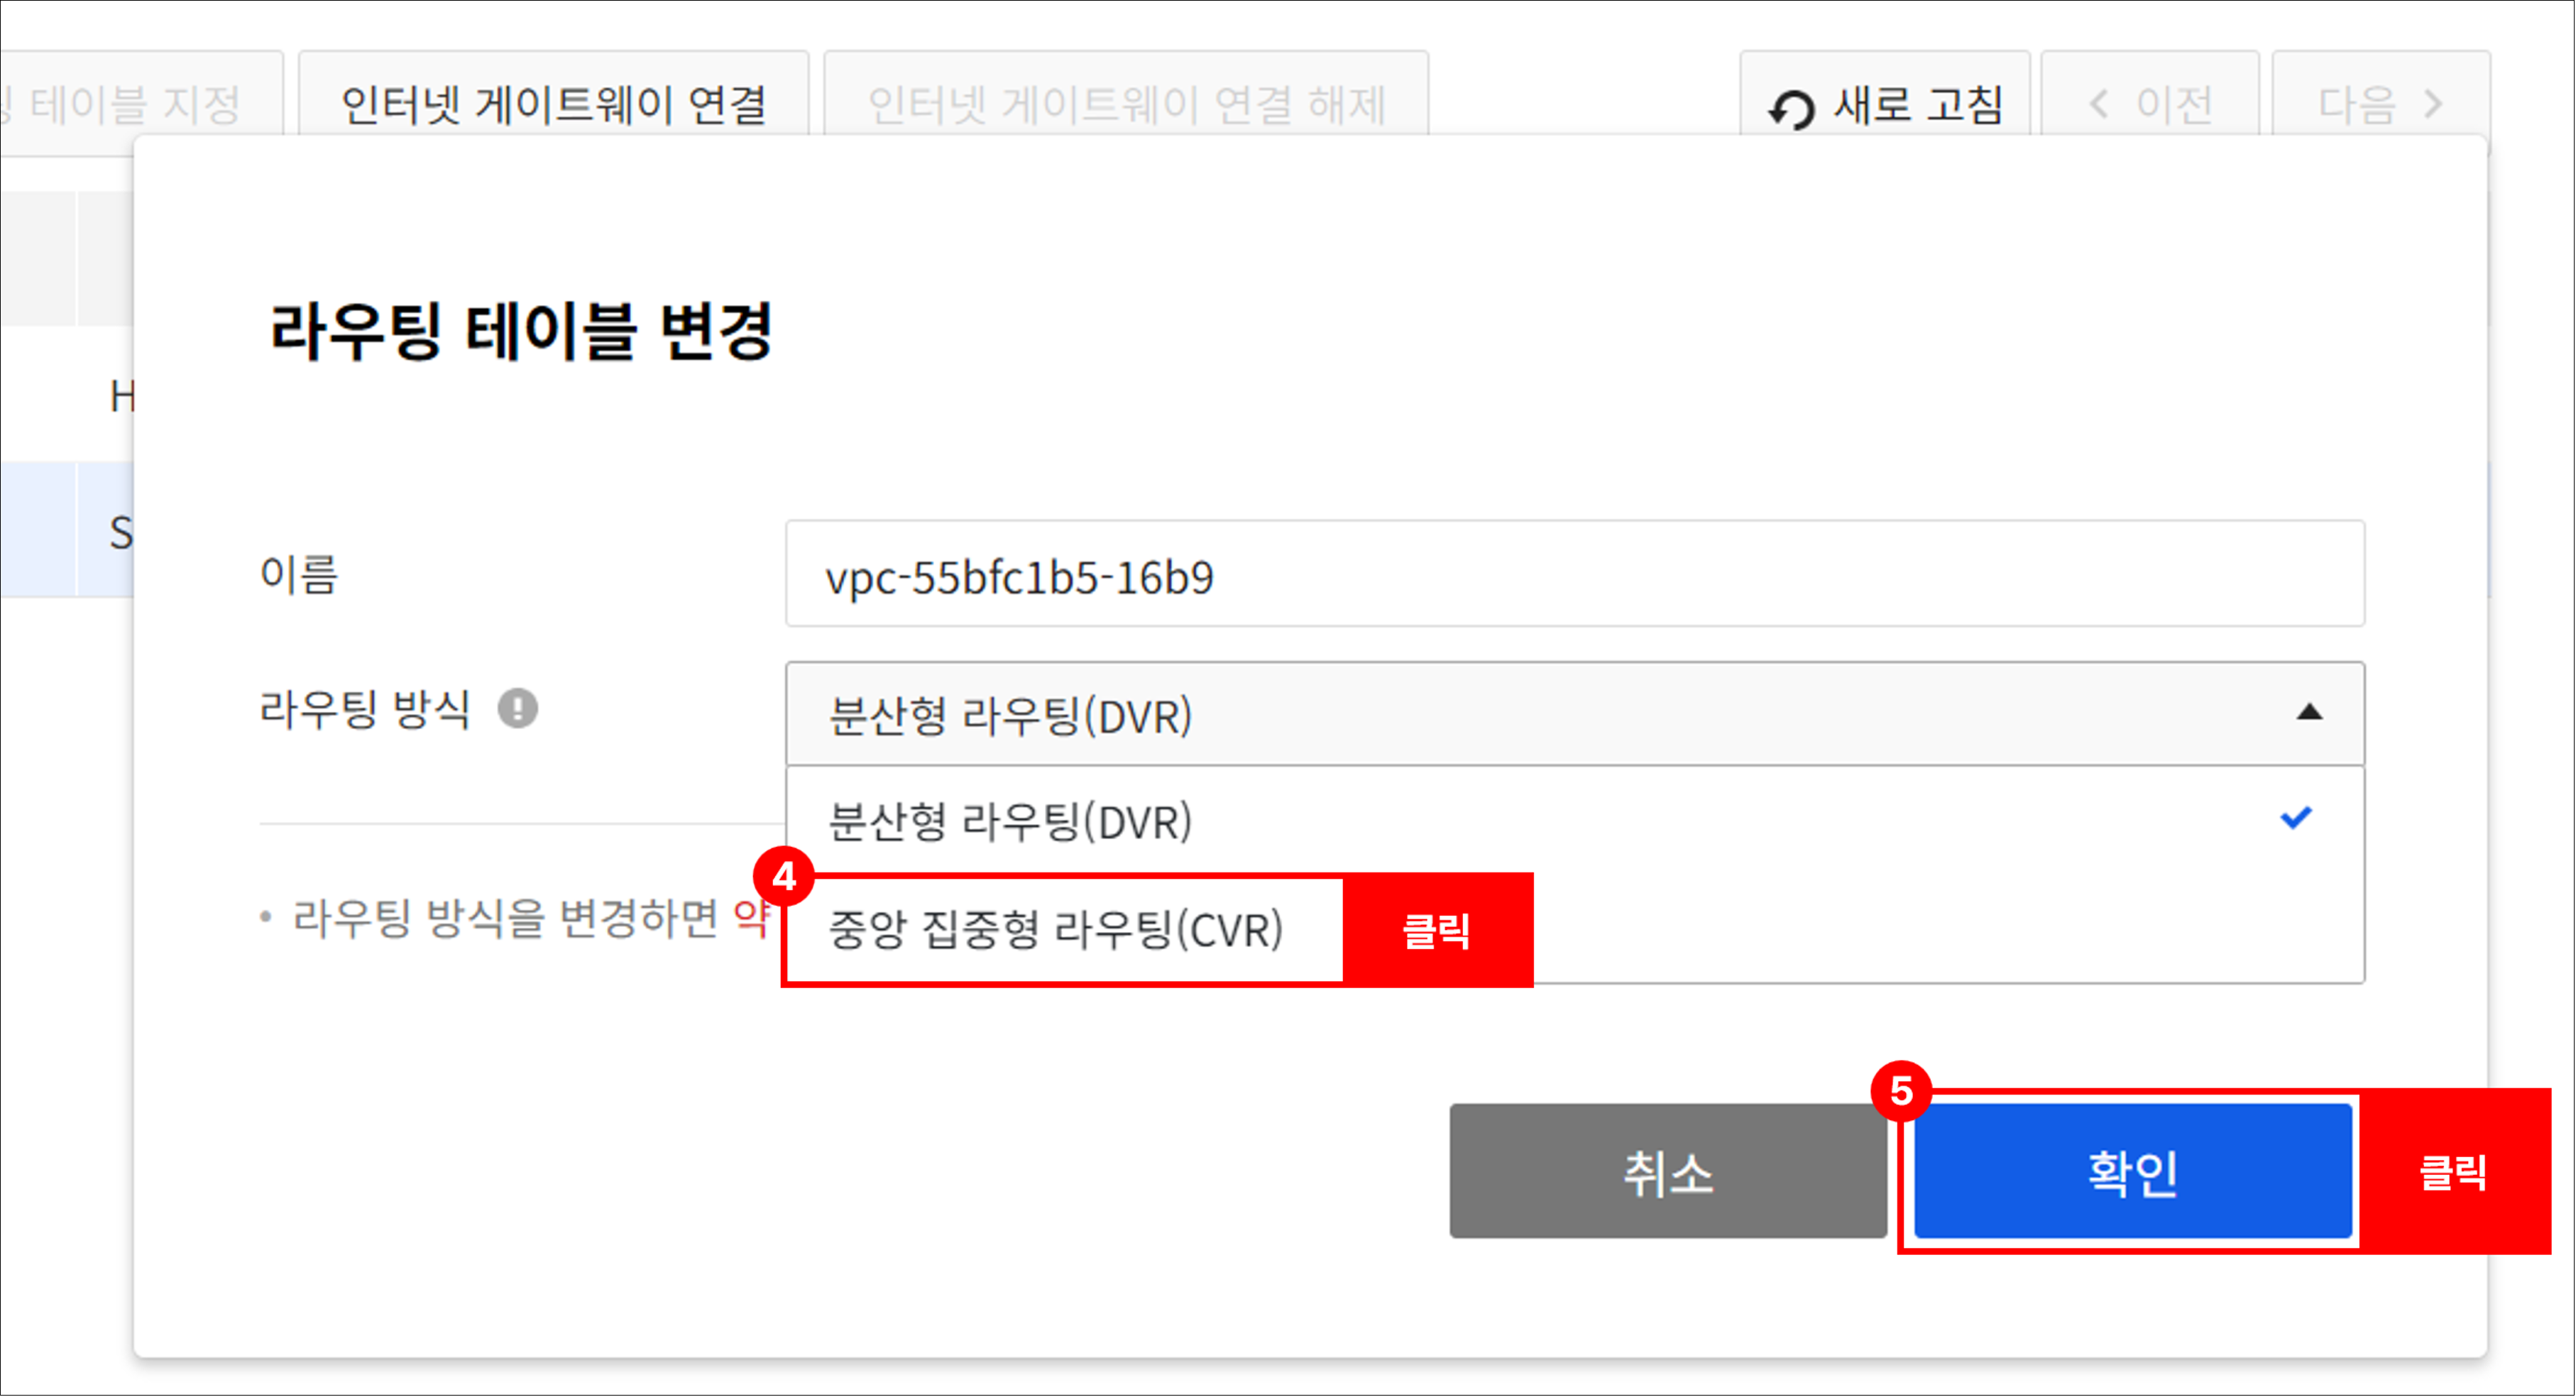
- After selecting Spoke VPC, click Change Routing Table to change to the Centralized Virtual Routing (CVR) method.
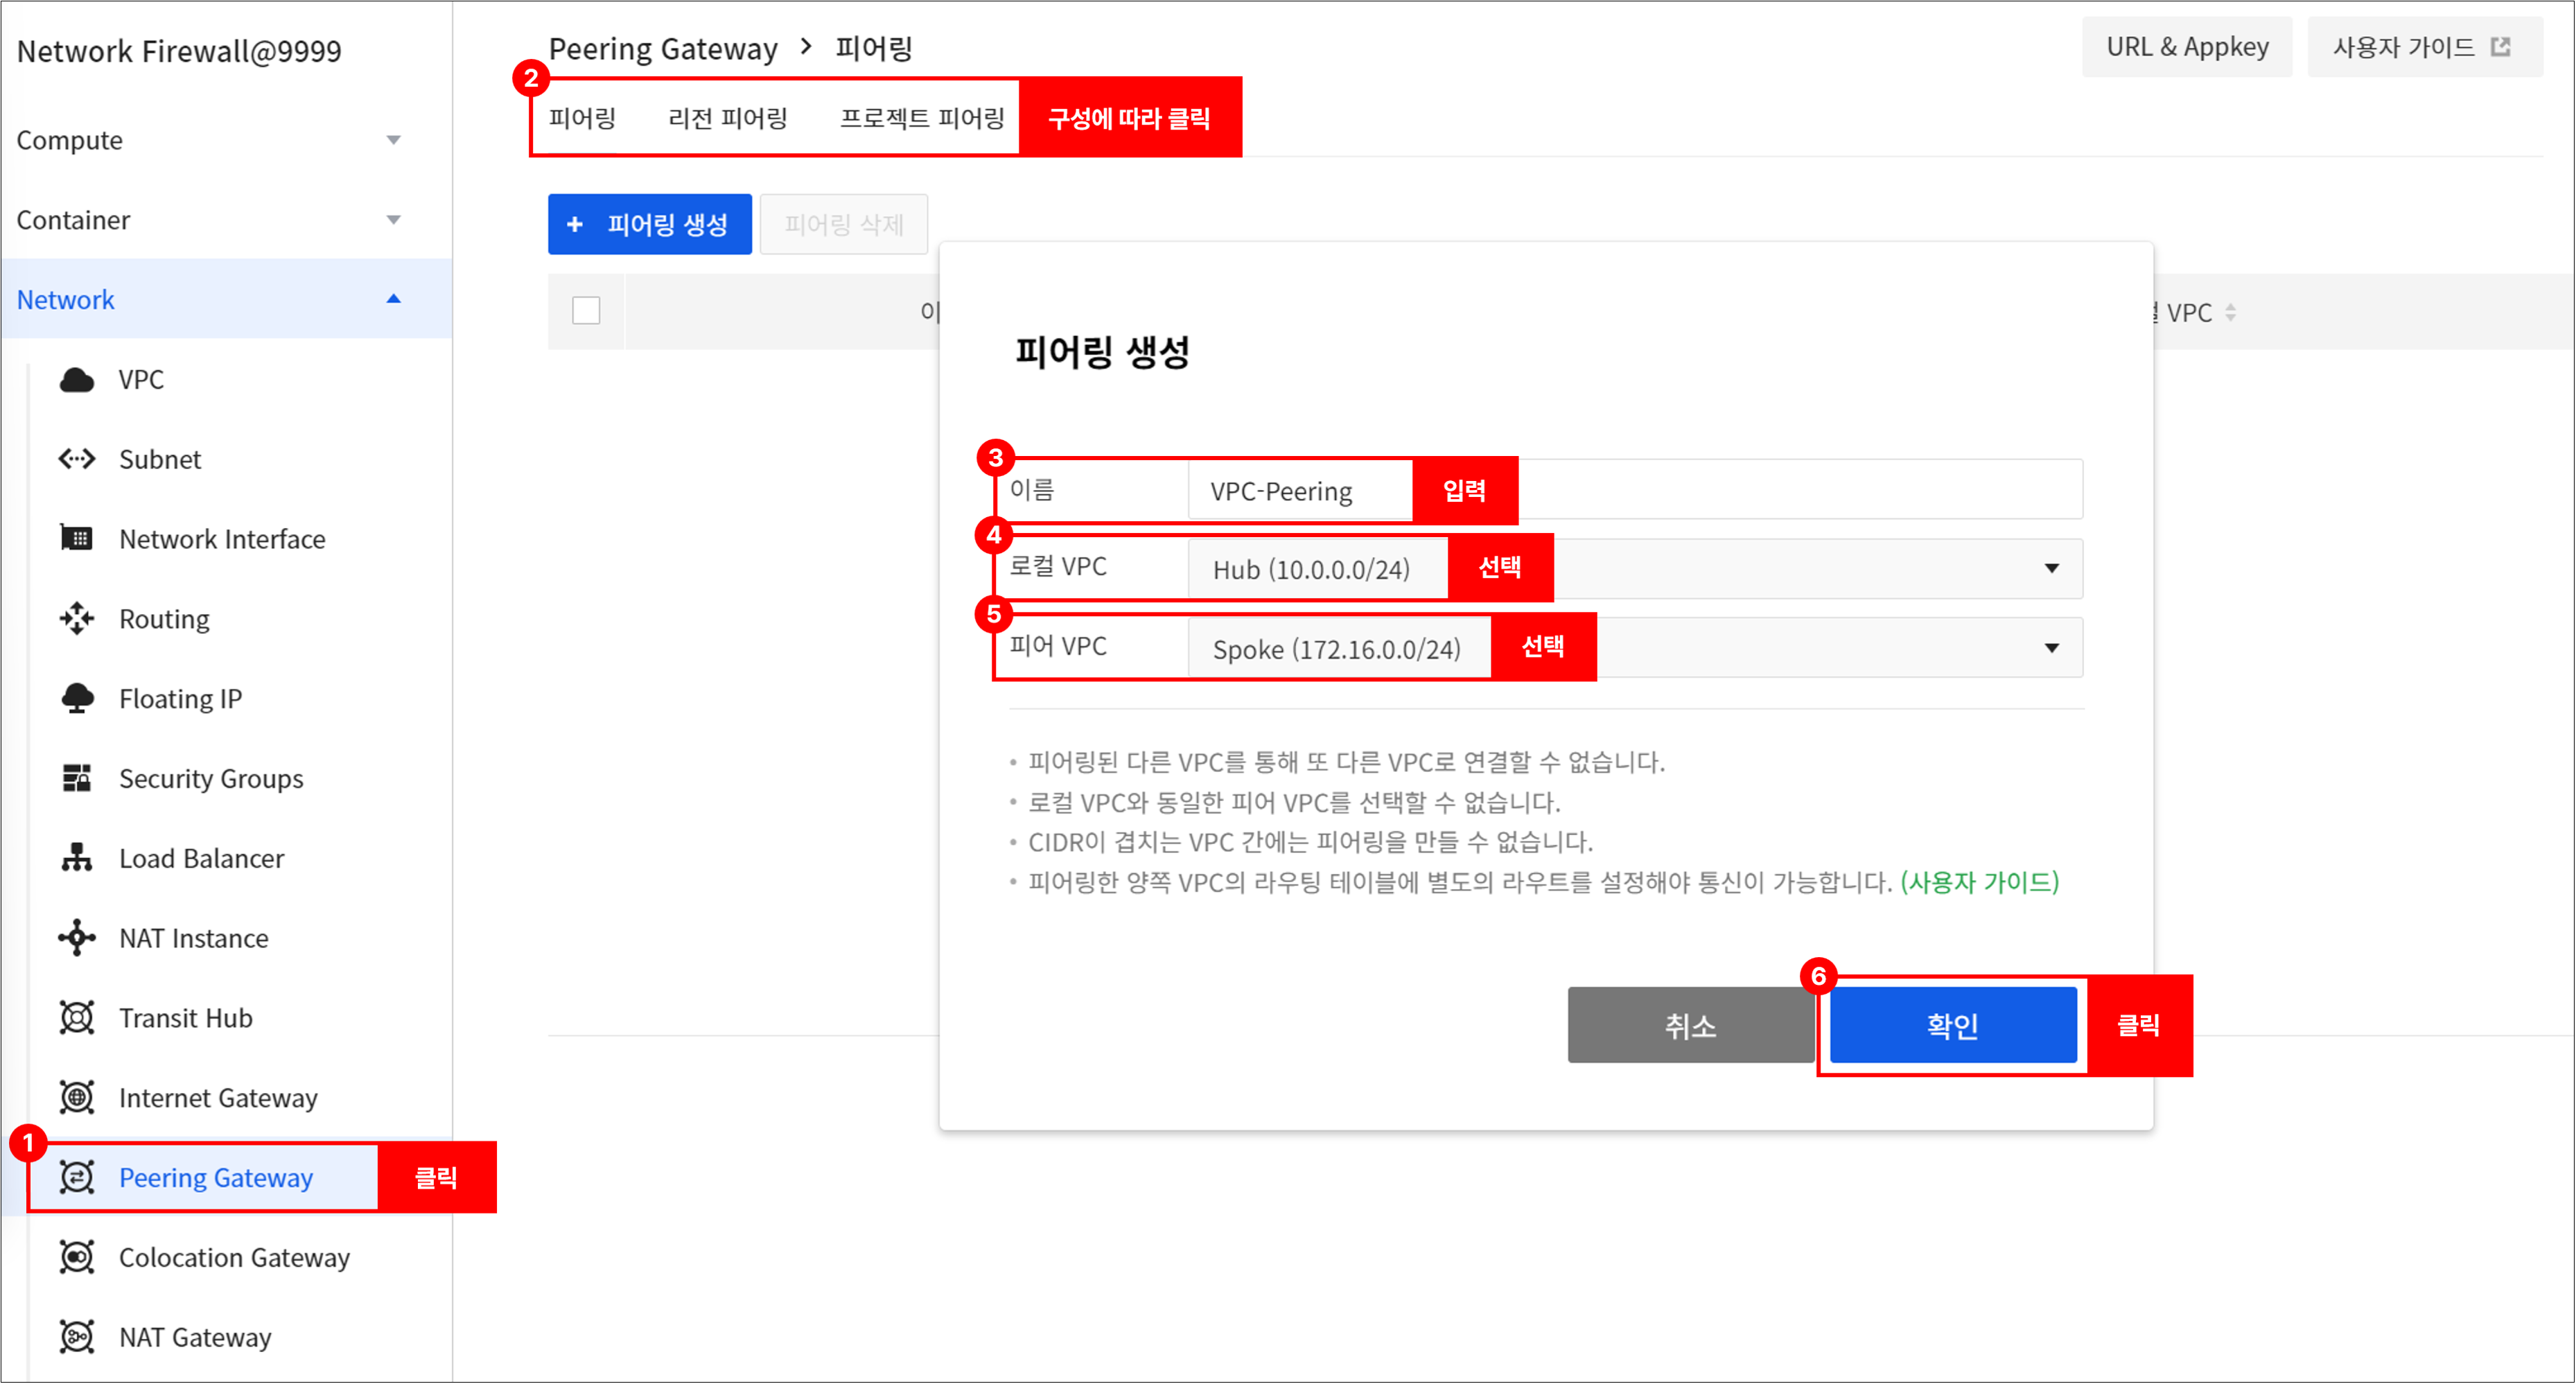
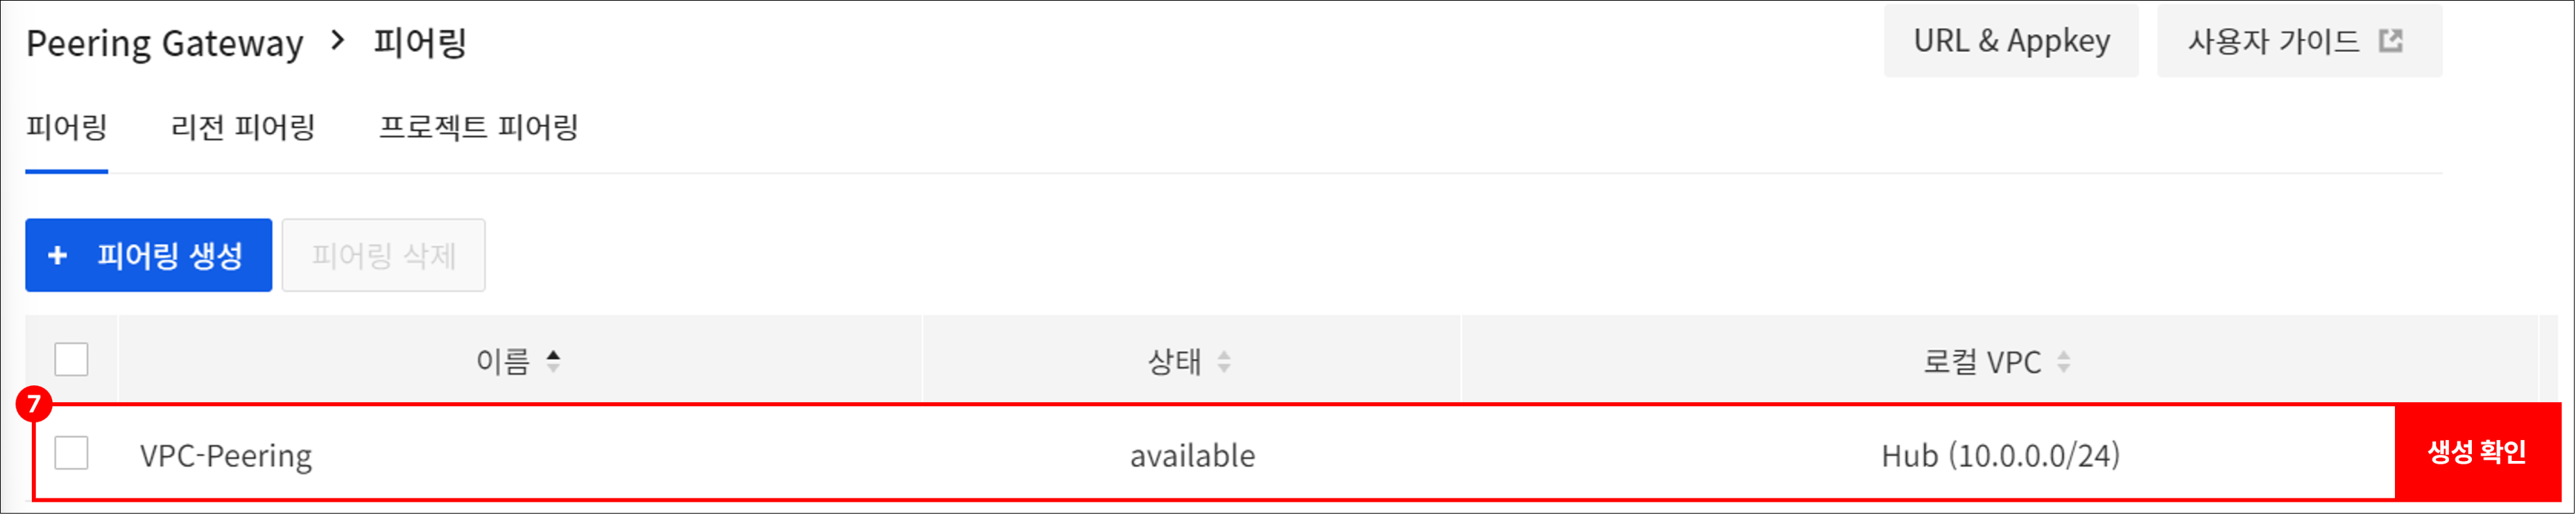
-
Go to Network > Peering Gateway to create a peering.
-
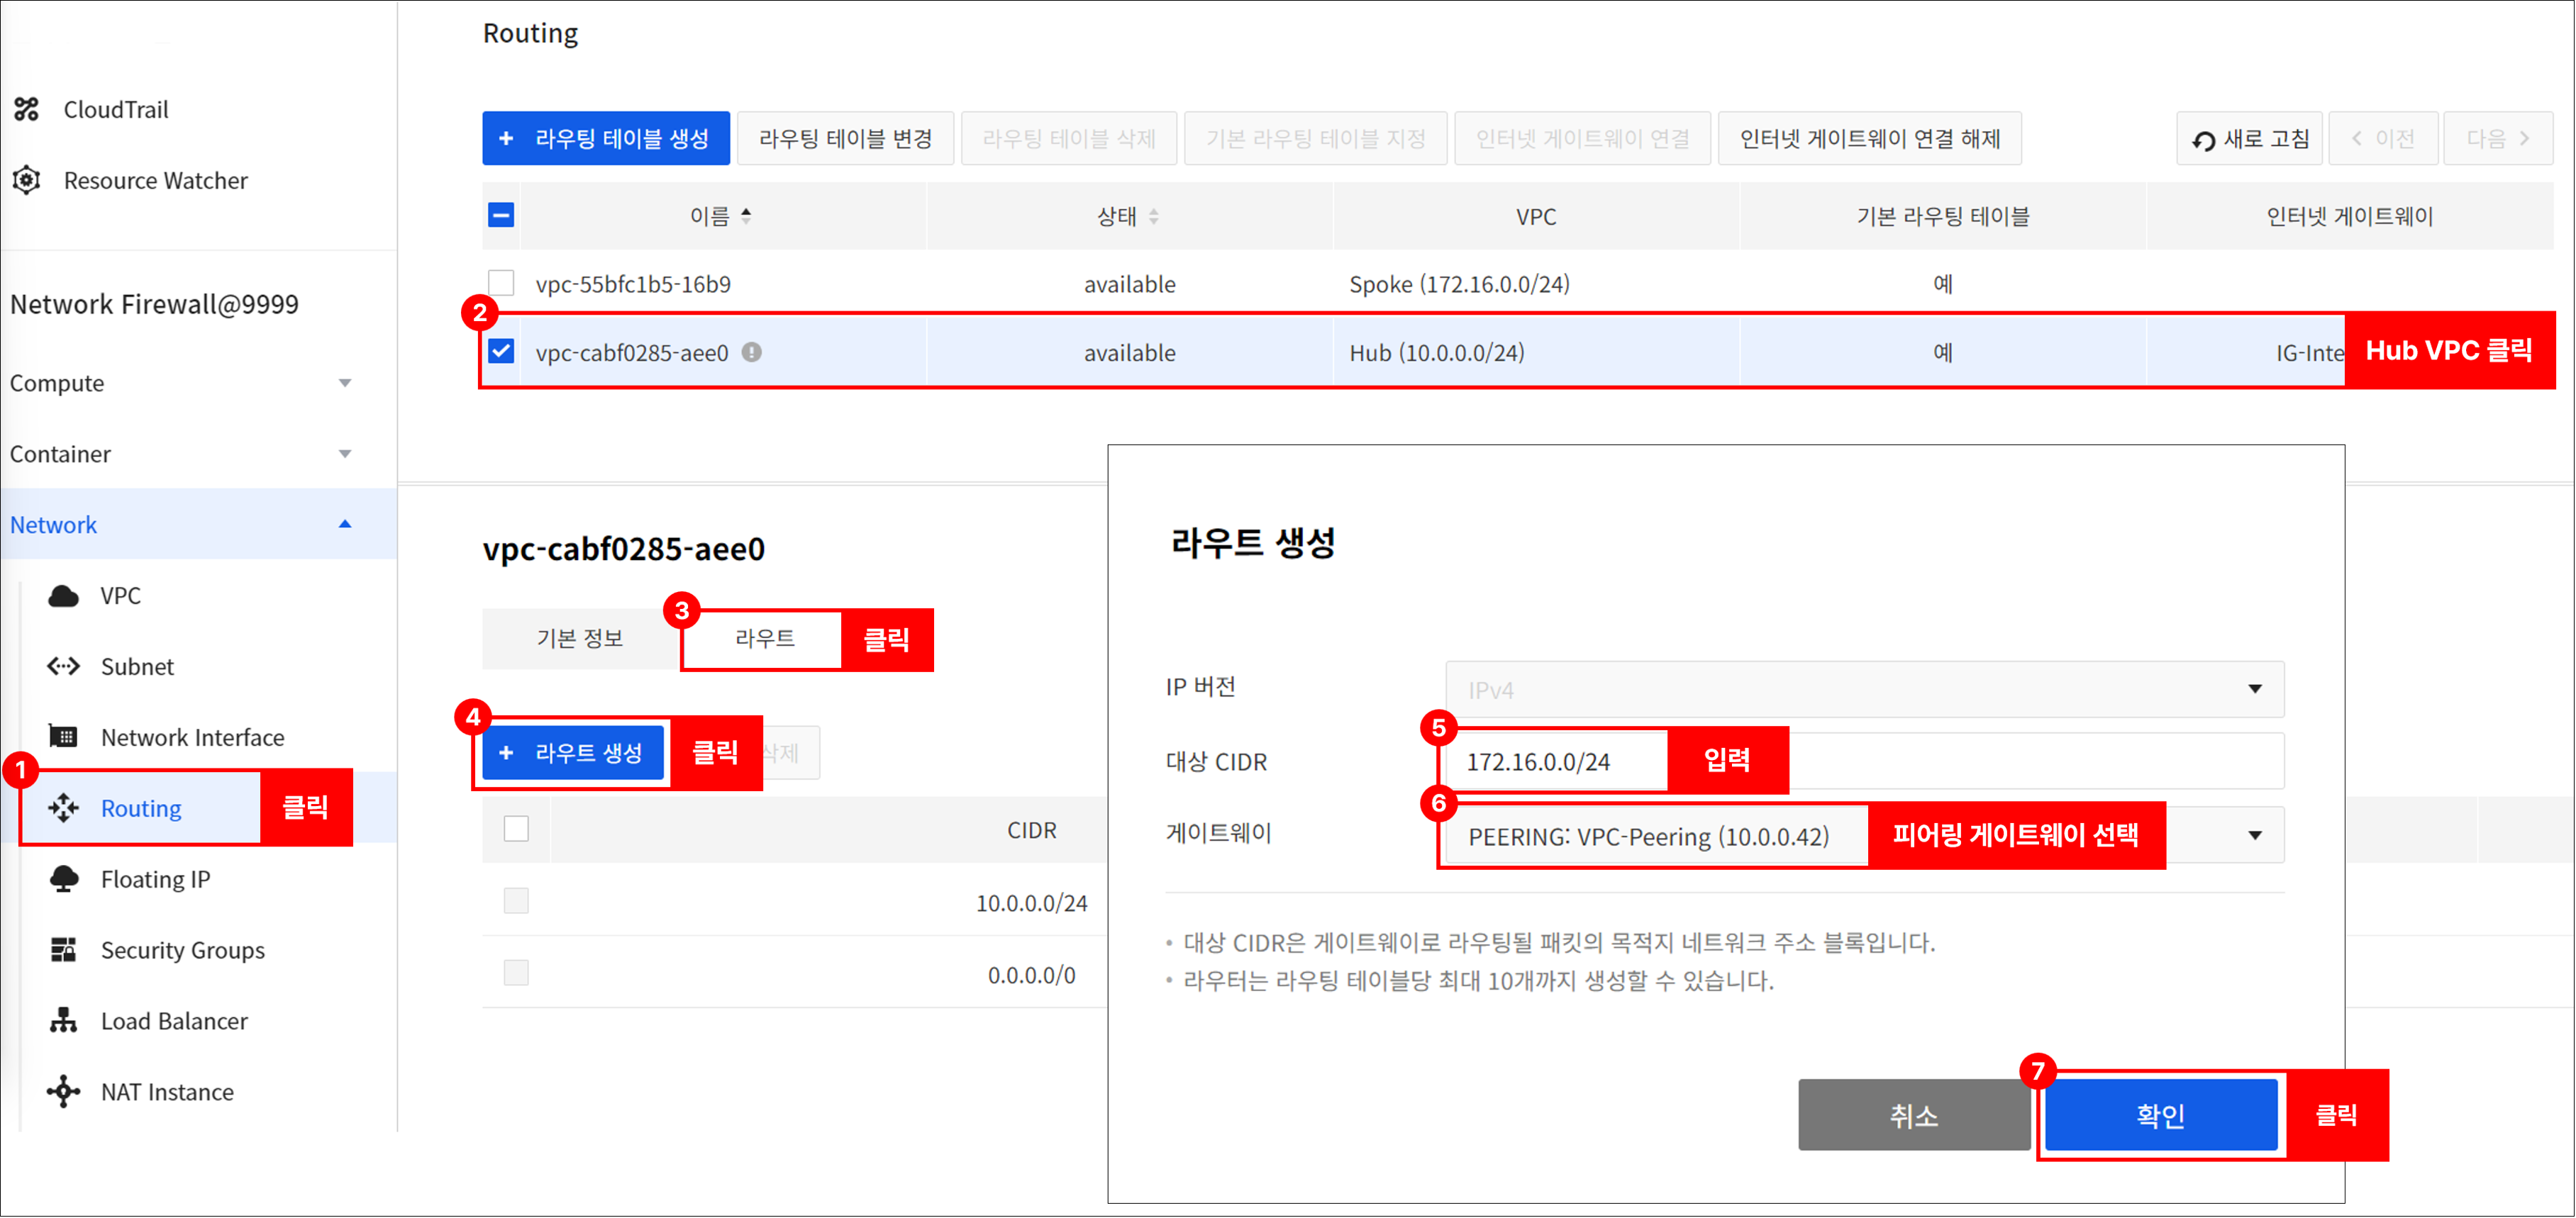
Go to Network > Routing, select a Hub VPC, and set up the routing as follows.
- Destination CIDR: 172.16.0.0/24
- Gateway: Gateway of peering type added after peering connection
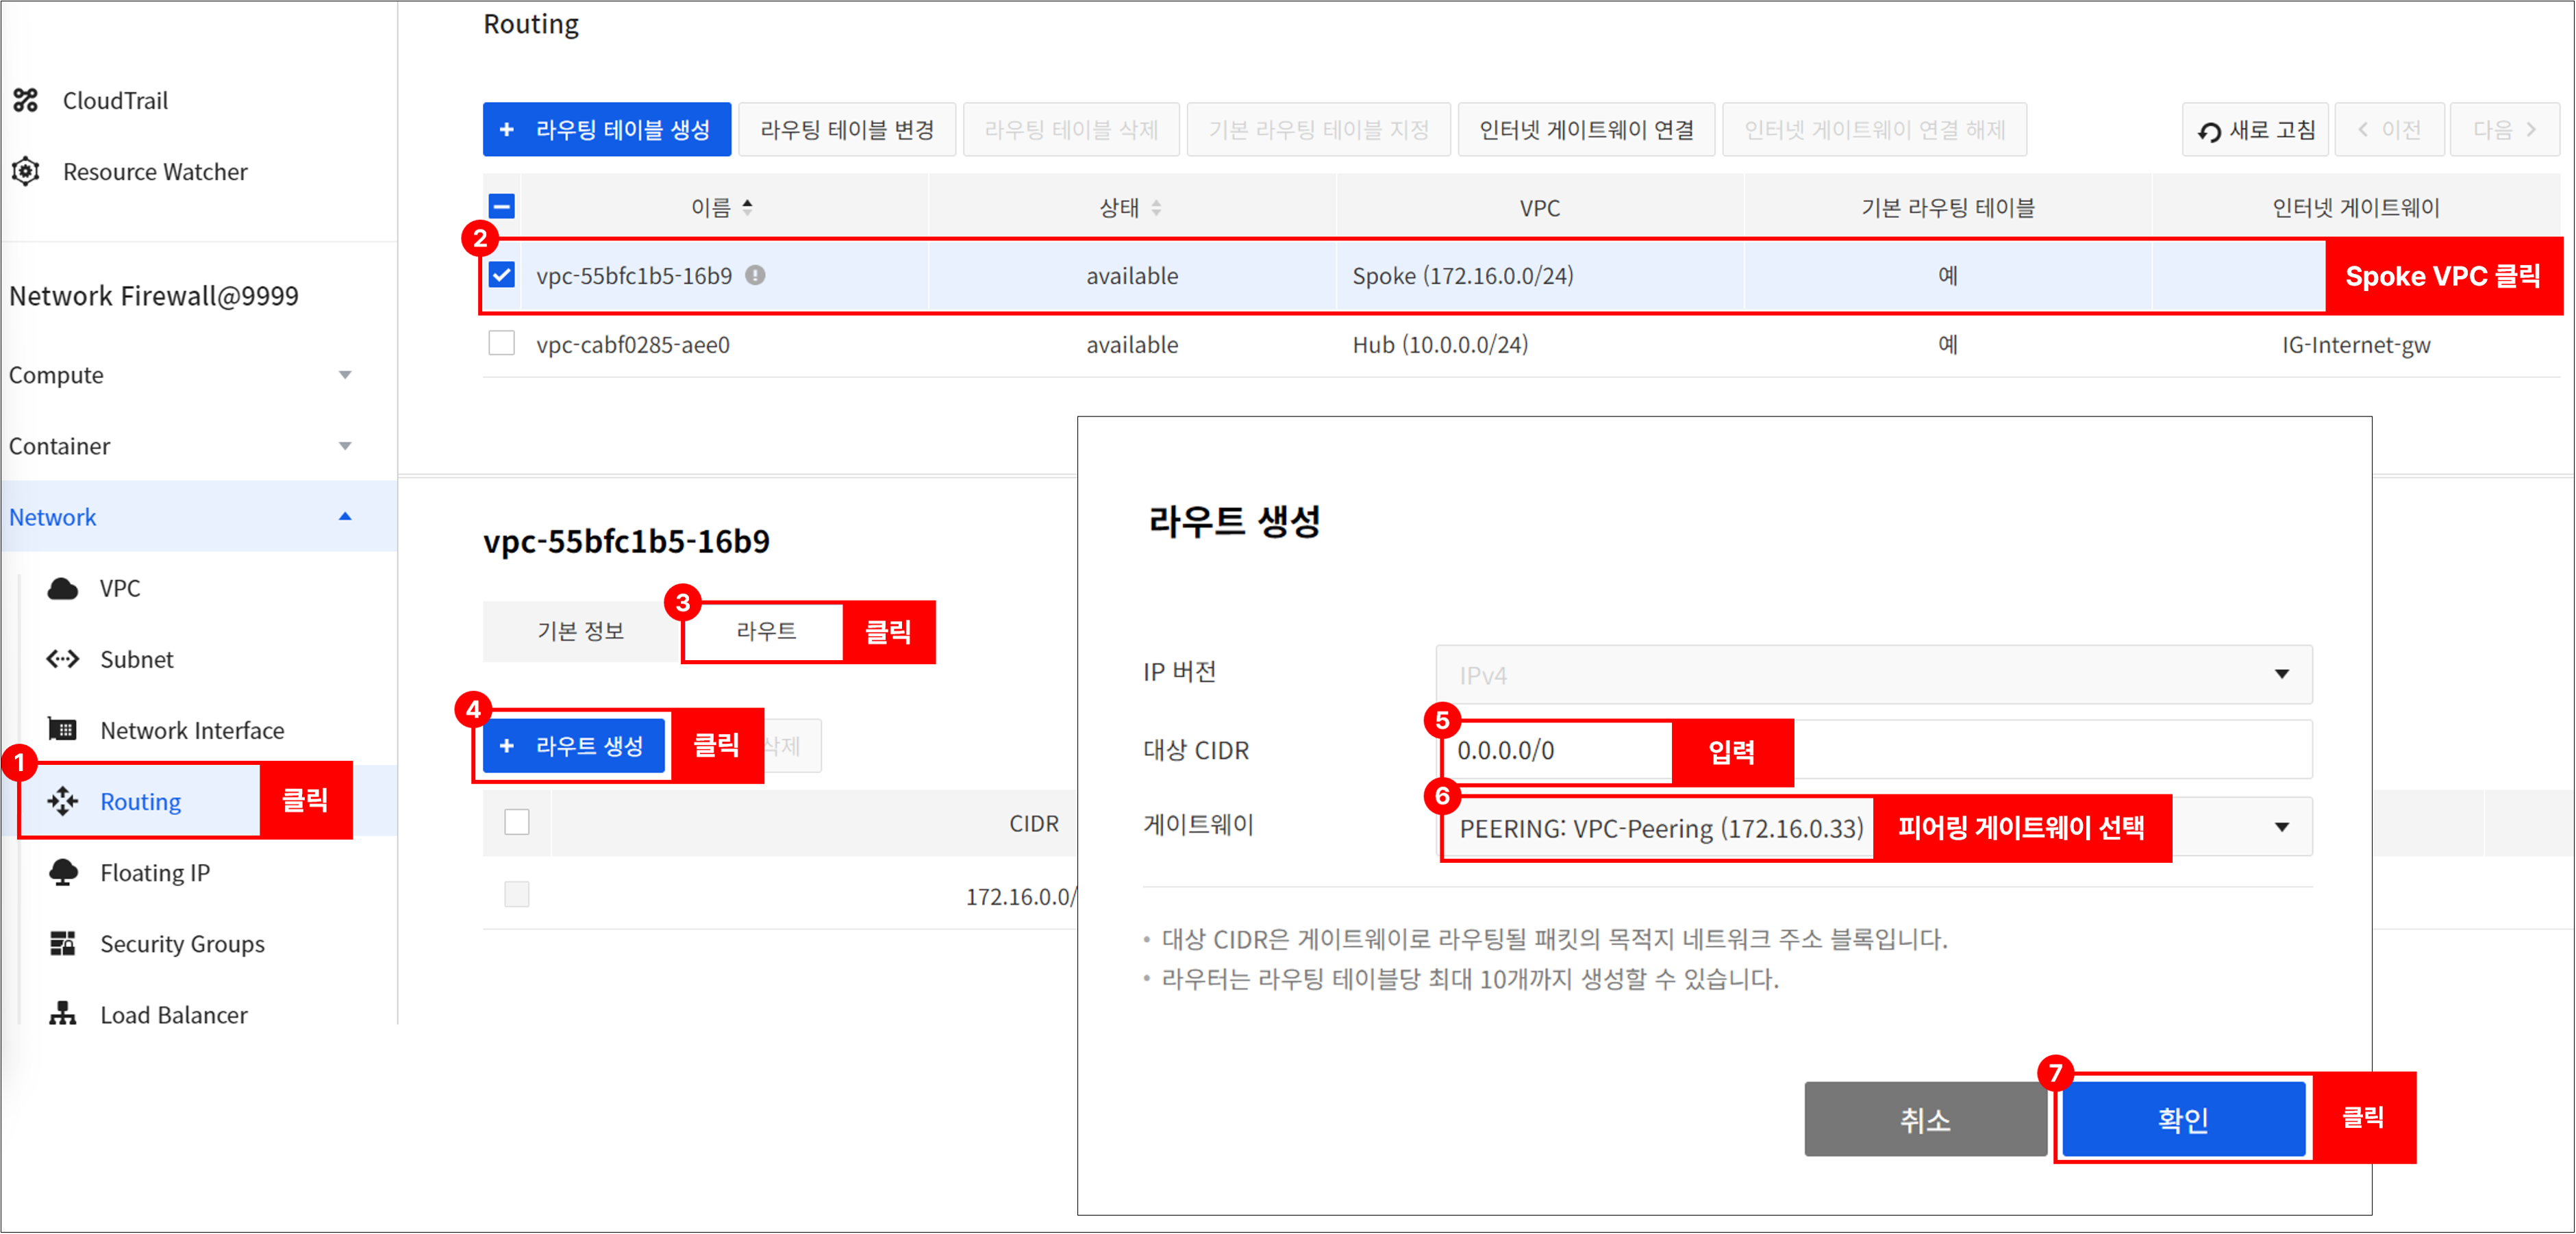
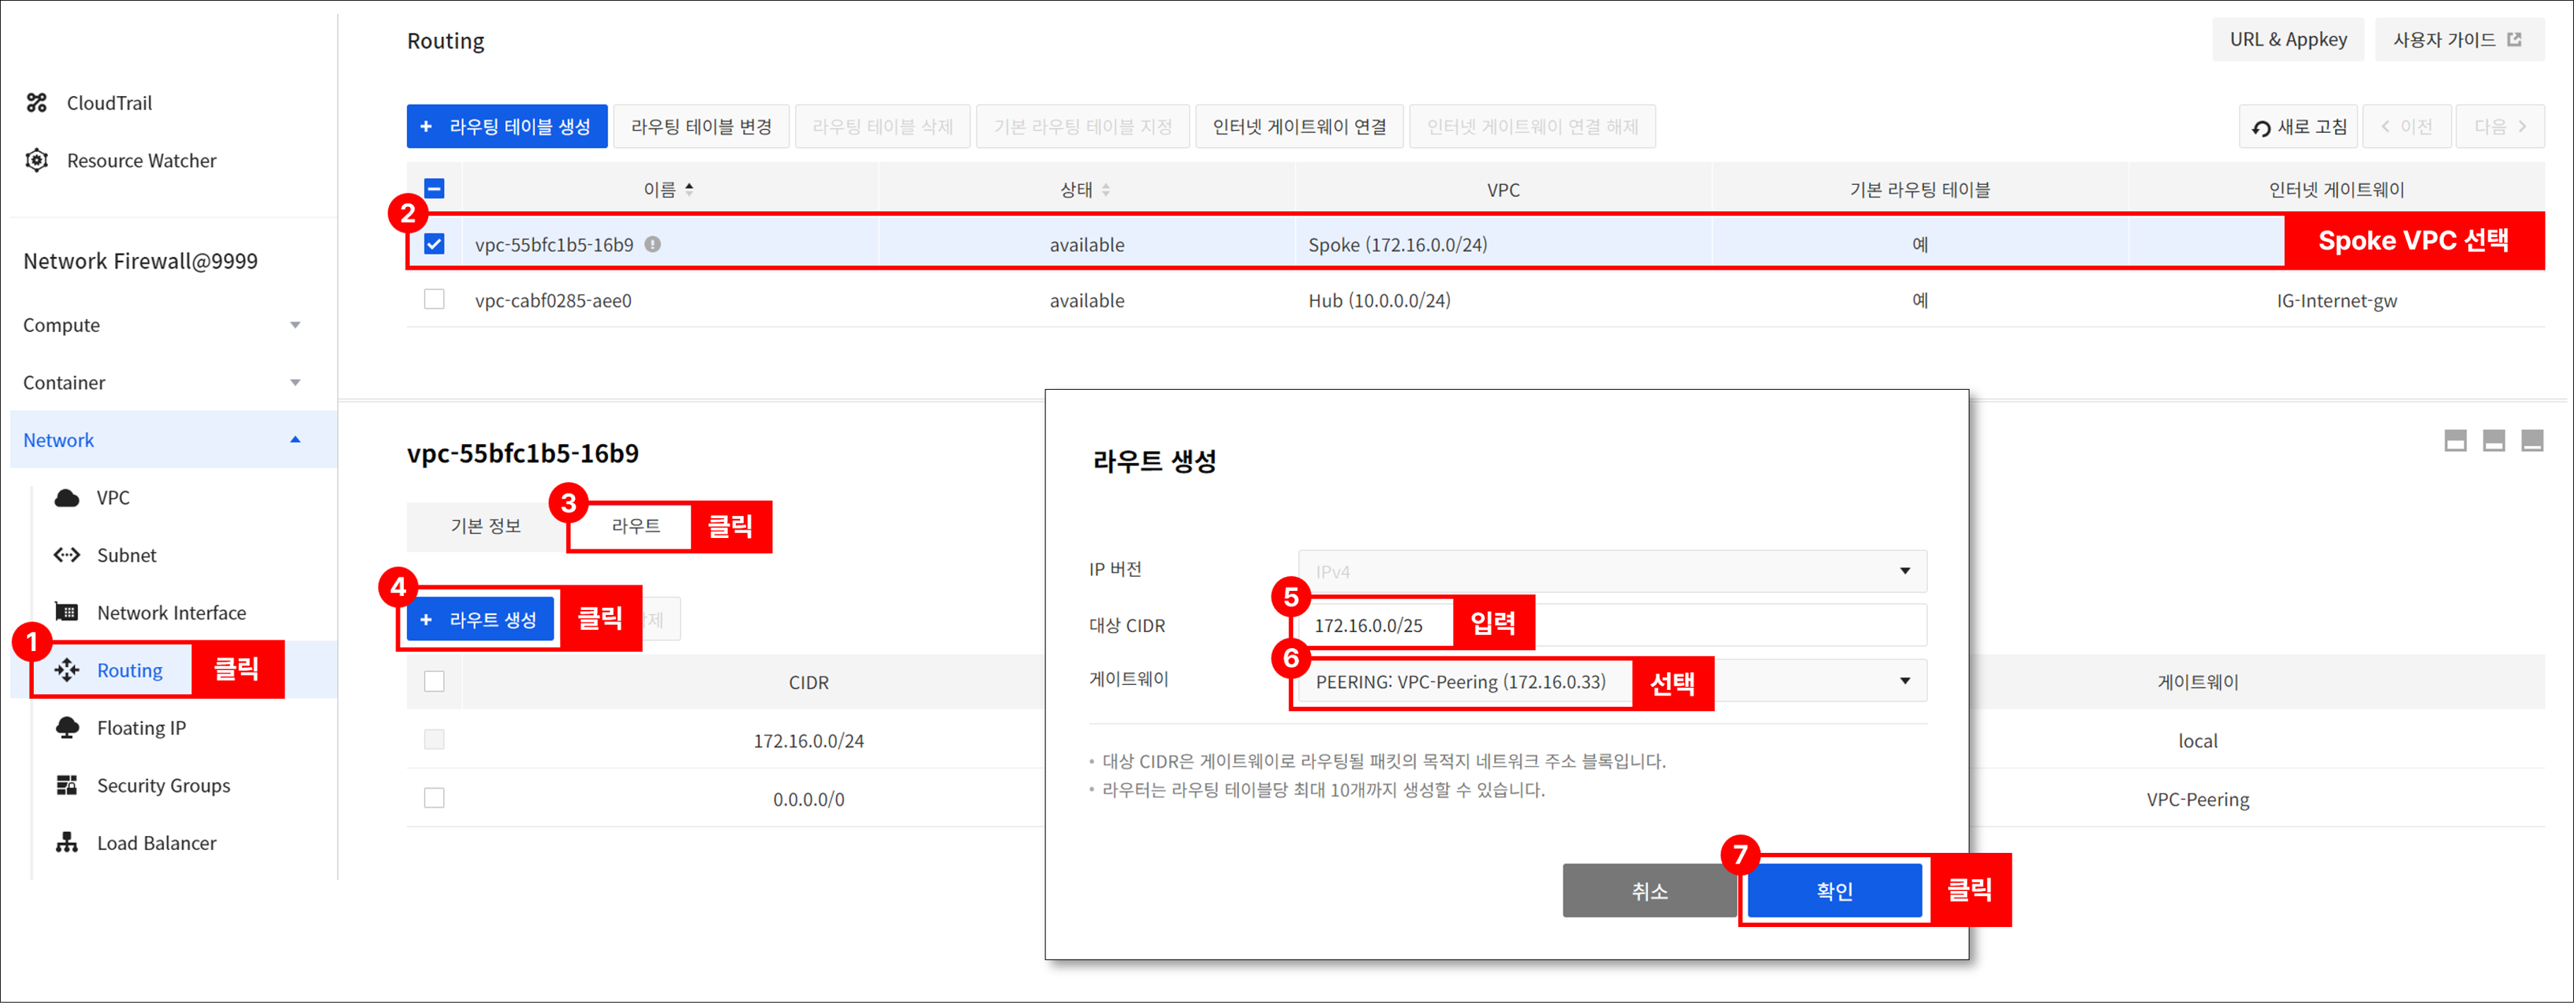
-
Go to *Network > Routing, select a Spoke VPC, and set up the routing as follows.
- Destination CIDR: 0.0.0.0/0
- Gateway: Gateway of peering type added after peering connection
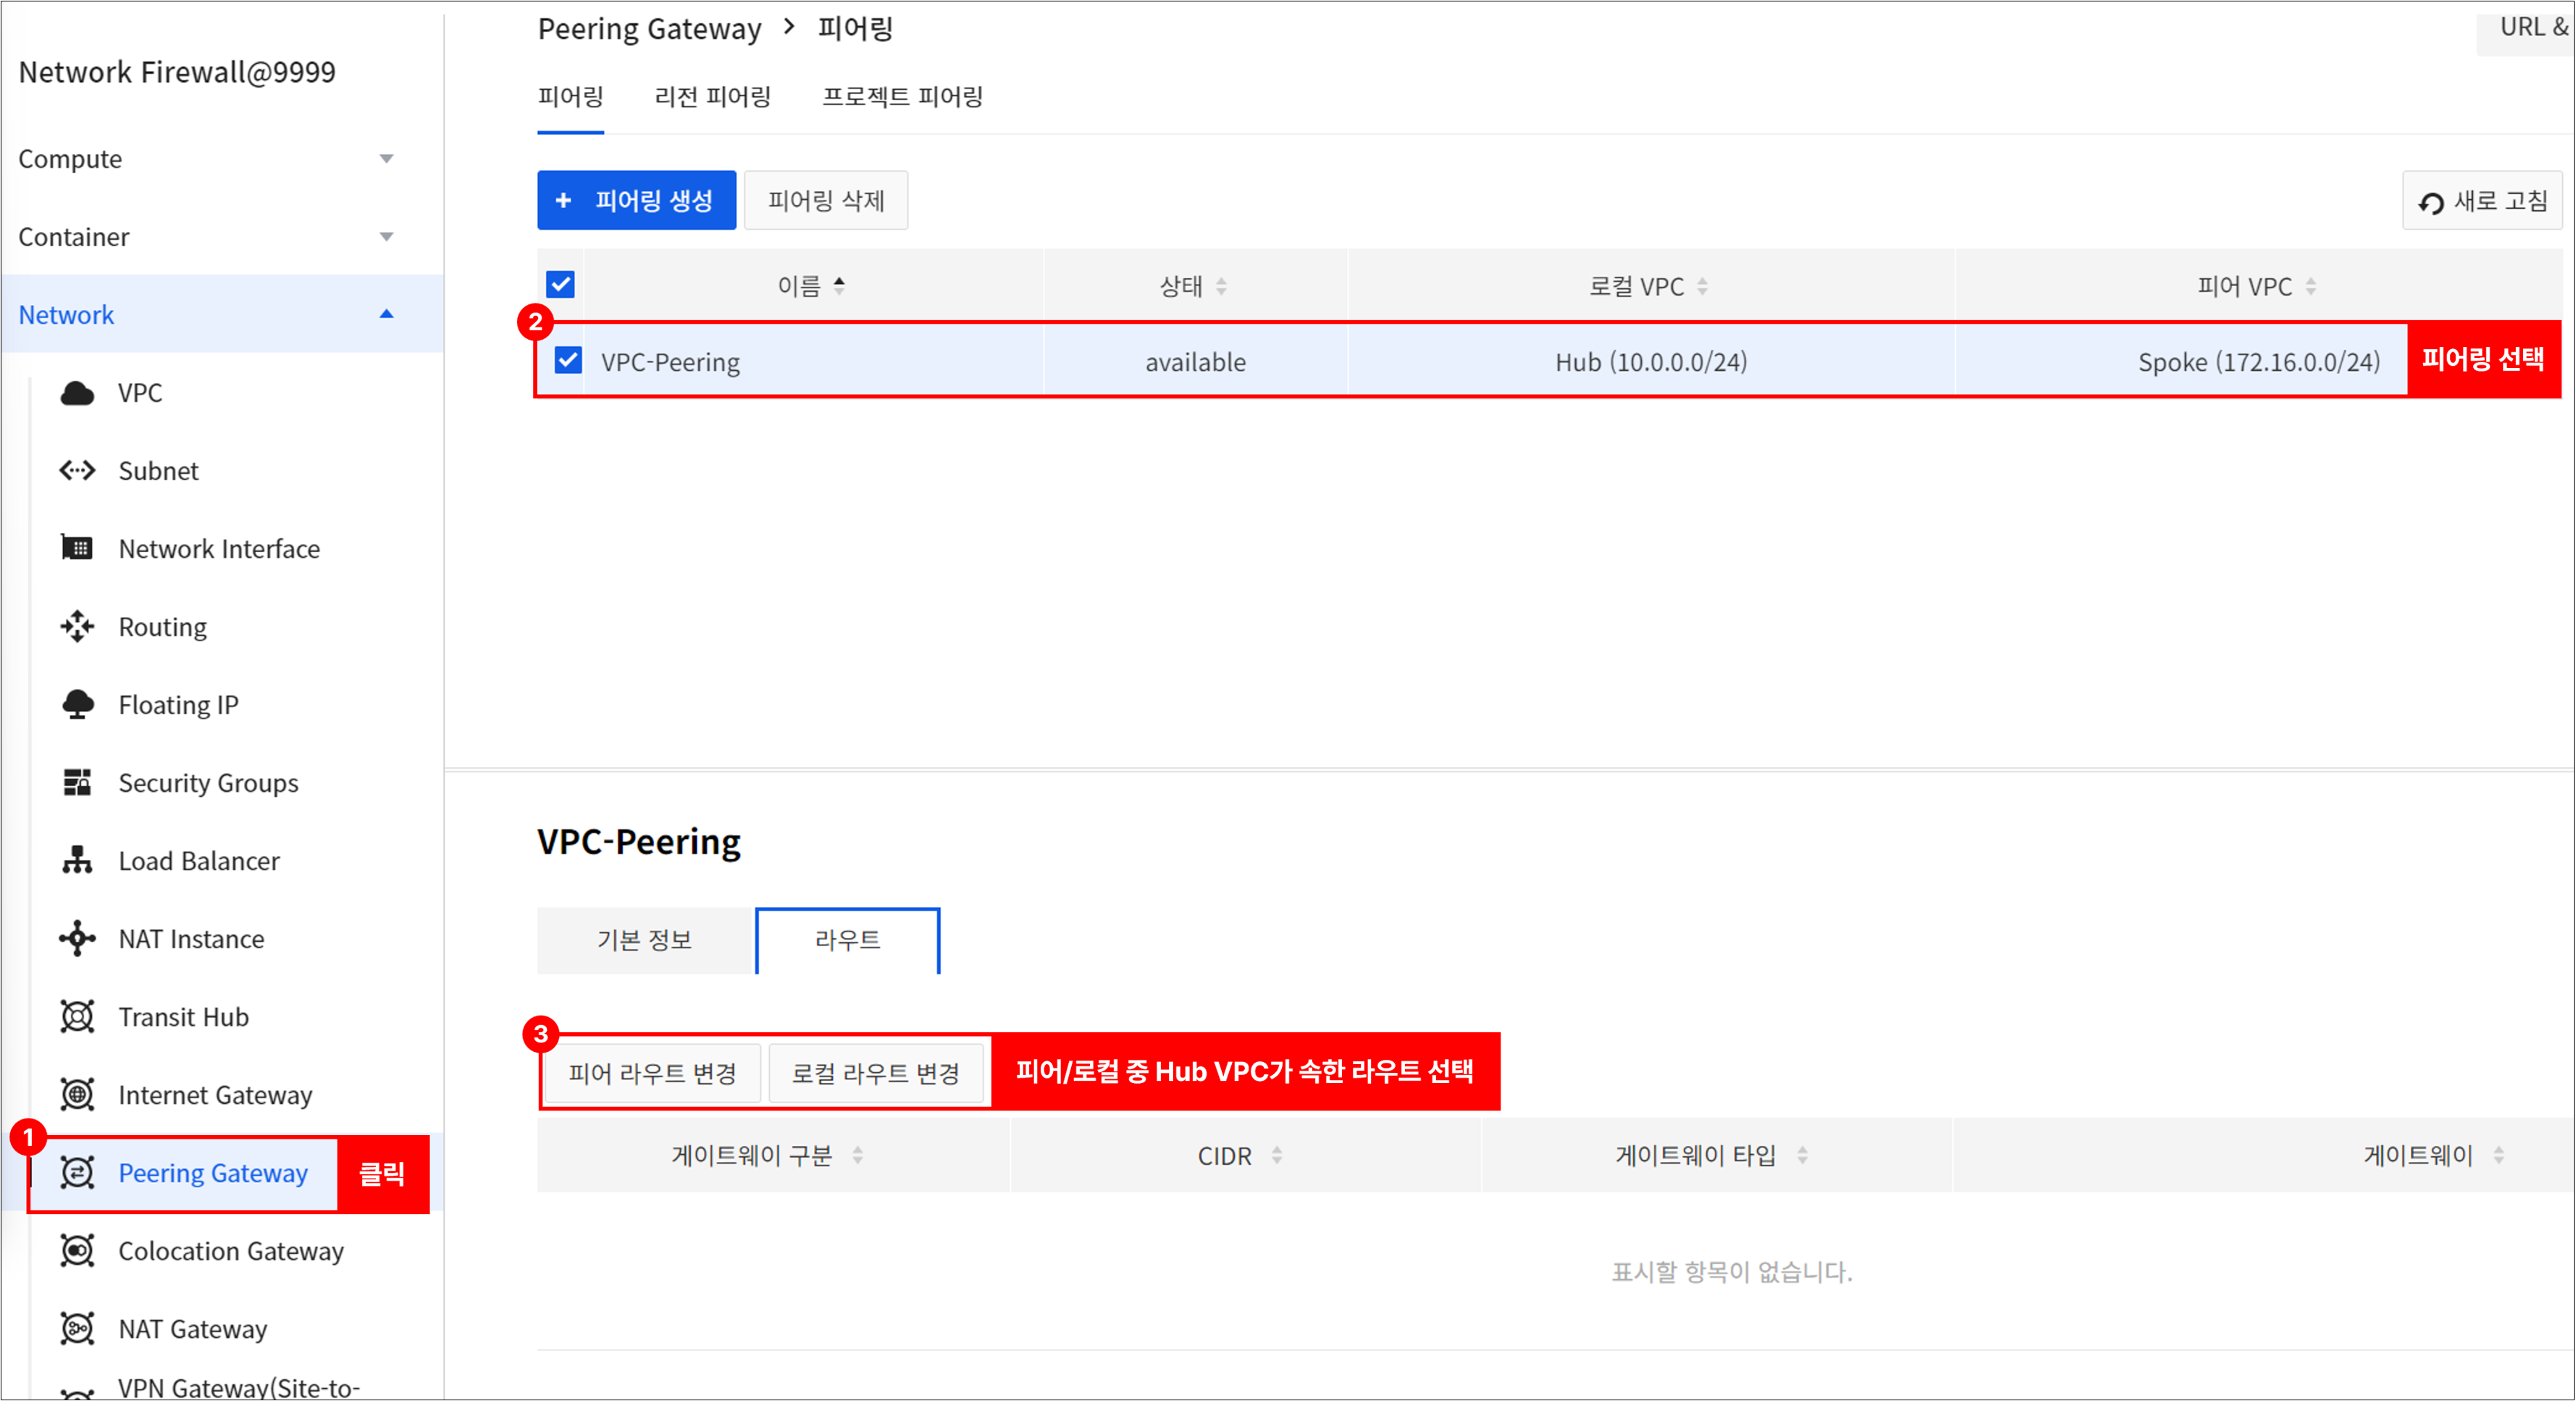
-
Go to Network > Peering Gateway > Project Peering.
- Select the created peering and go to the Route tab.
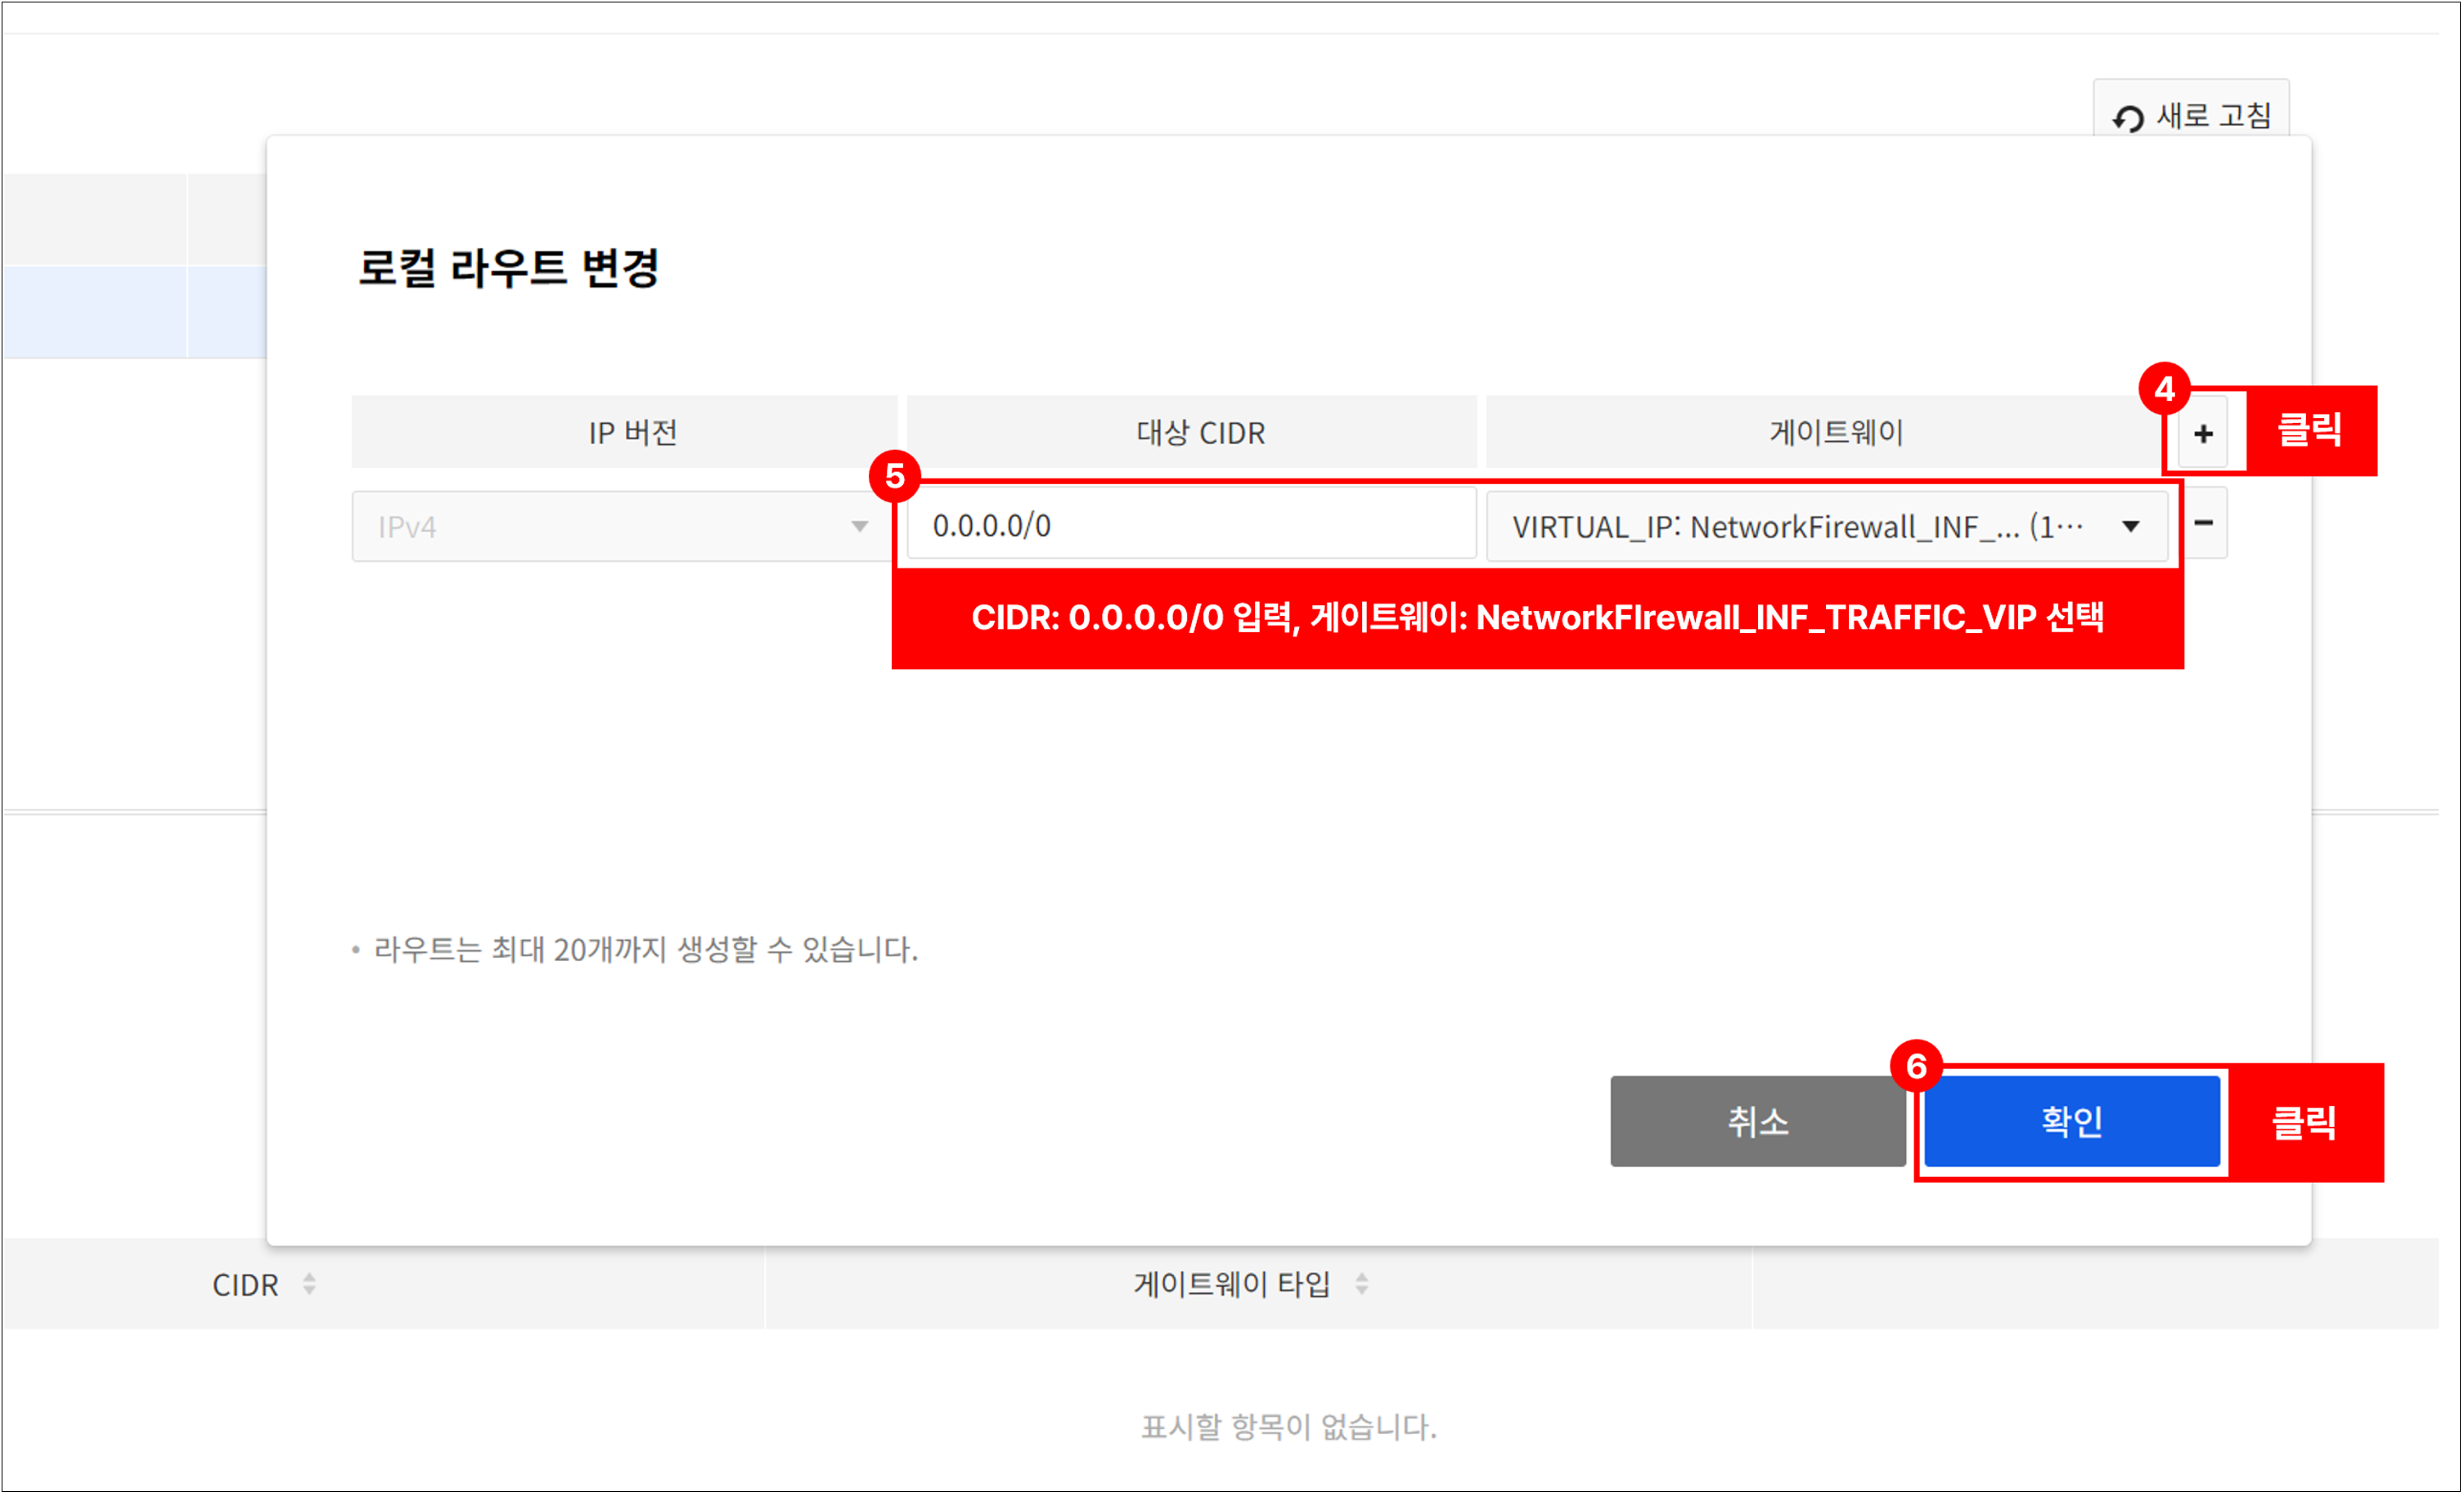
- Click the Peer or Change Local Route to set up routing as follows.
- Destination CIDR: 0.0.0.0/0
- Gateway: NetworkFirewall_INF_TRAFFIC_VIP
Once the above routing settings are complete, instances in the Spoke VPC will be able to communicate publicly through the Network Firewall. (Requires adding NAT in Network Firewall > NAT)
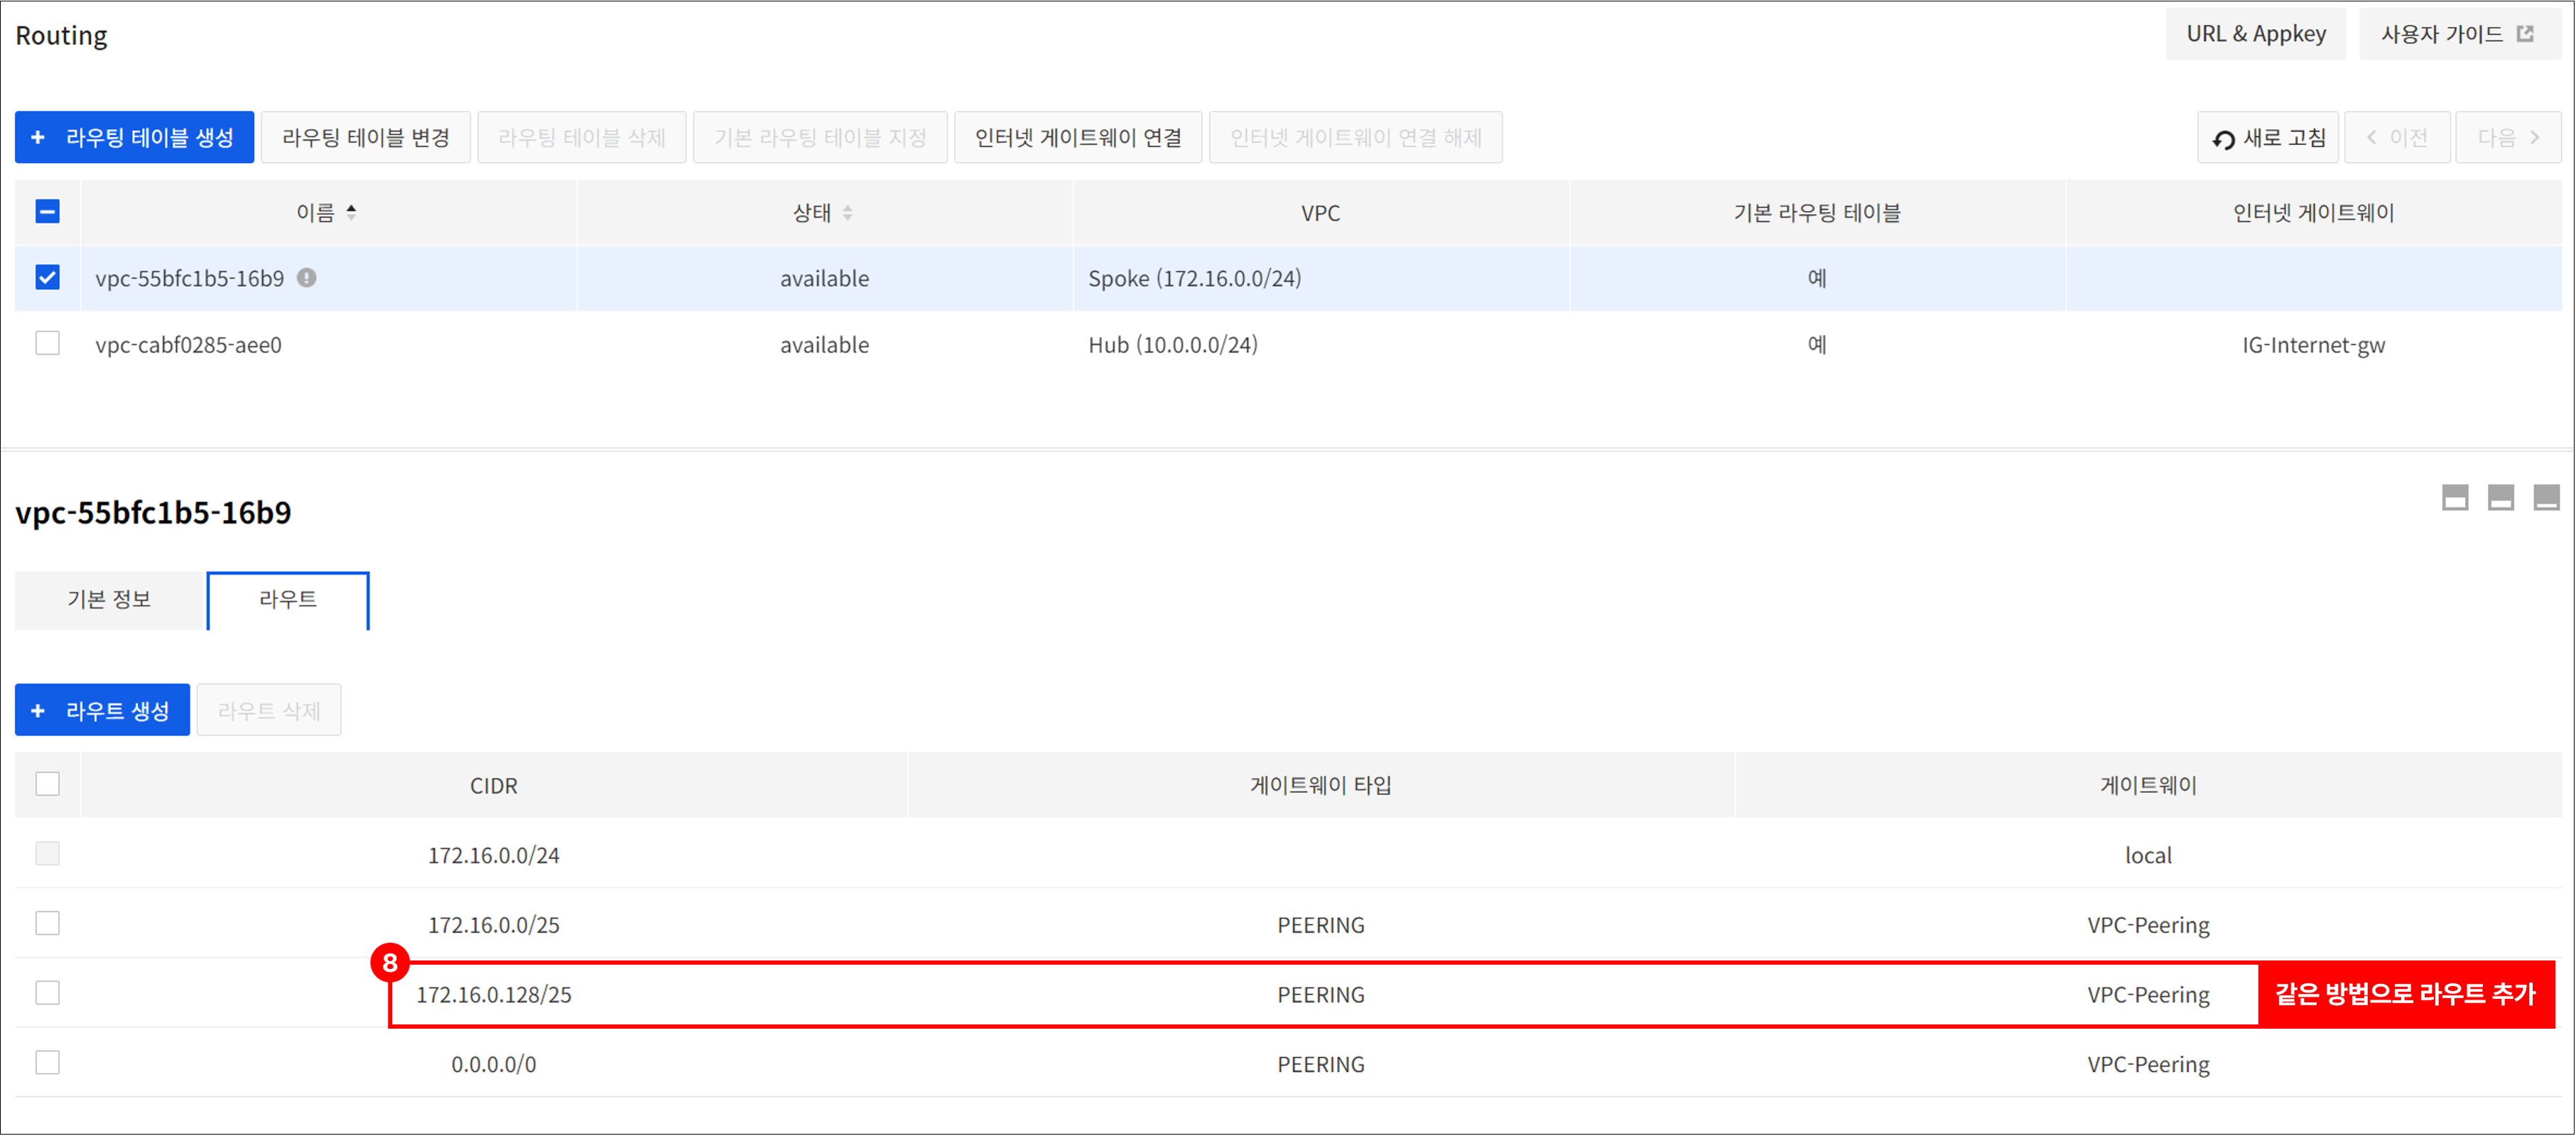
If the Spoke VPC has two or more subnets and traffic control between subnets is required through Network Firewall, add the routing as follows.
[Example] When the subnets of Spoke VPC (172.16.0.0/24) are 172.16.0.0/25 and 172.16.0.128/25
- Go to Network > Routing, and select Spoke VPC and add the two routings as follows.
- Destination CIDR: 172.16.0.0/25 and 172.16.0.128/25
- Gateway: Gateway of peering type added after peering connection
 Once the above routing settings are complete, private communication between subnets within the Spoke VPC can be made through the Network Firewall. (Requires adding a policy inNetwork Firewall > Policies tab)
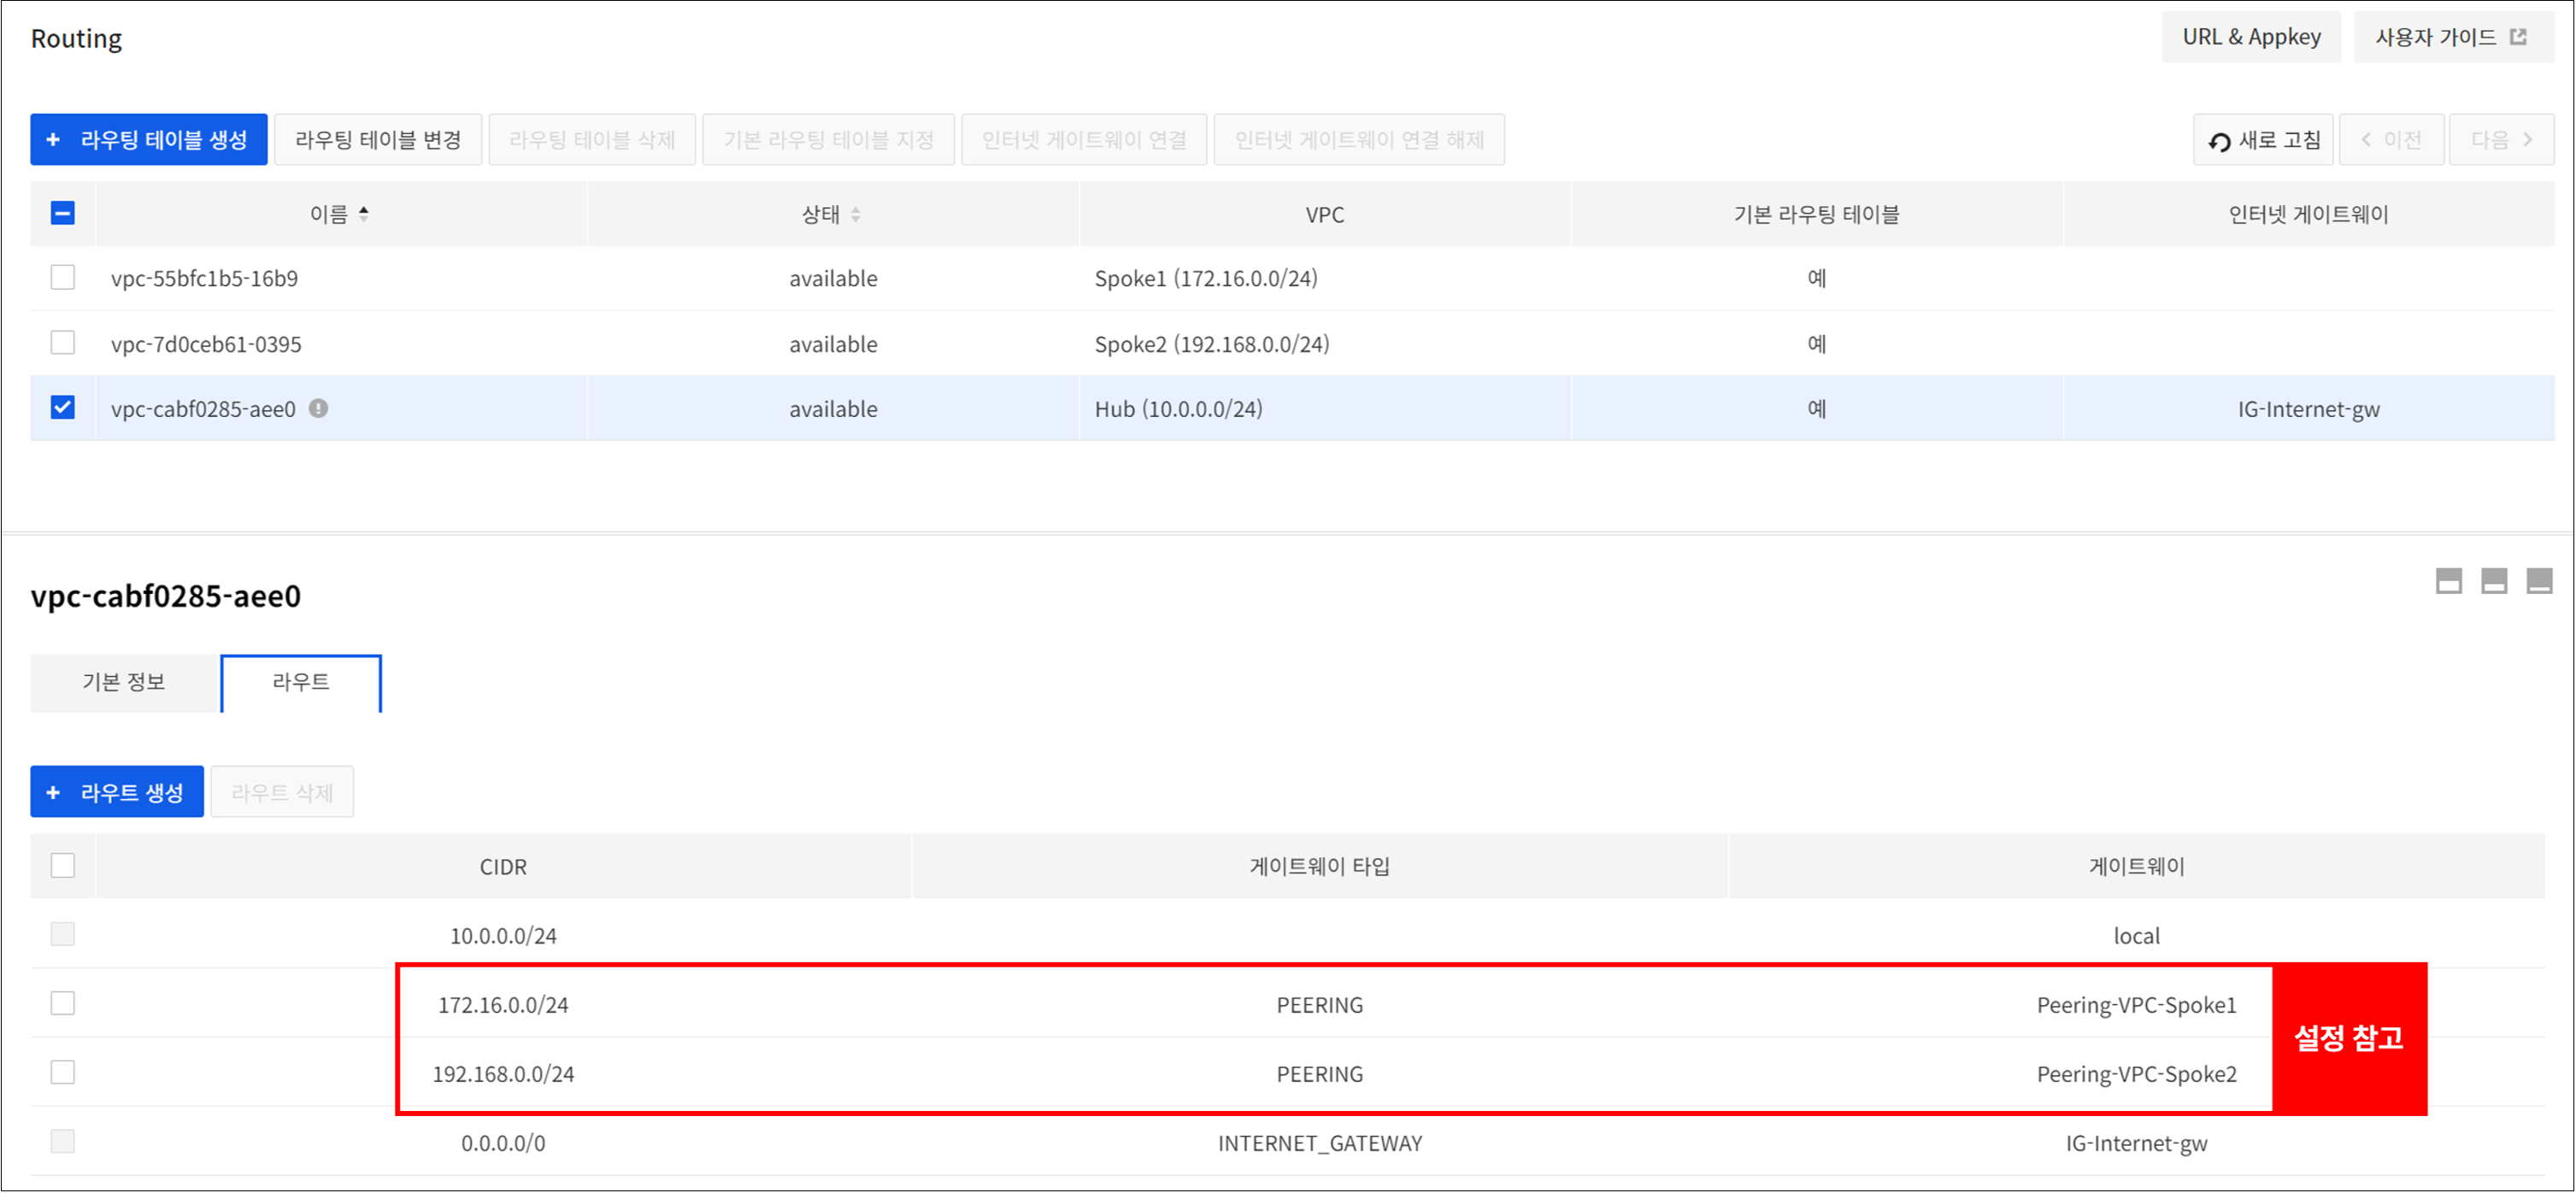
If there are two or more spoke VPCs, add the routing as follows.
[Example] With Spoke VPC1 (172.16.0.0/24) and Spoke VPC2 (192.168.0.0/24)
- Go to Network > Routing to select a Hub VPC, and add the two routings as follows.
- Spoke VPC 1
- Destination CIDR: 172.16.0.0/24
- Gateway: Gateway of peering type added between Hub VPC and Spoke VPC1
- Spoke VPC 2
- Destination CIDR: 192.168.0.0/24
- Gateway: Gateway of peering type added between Hub VPC and Spoke VPC1
- Spoke VPC 1
[Note] VPC peering between Spoke VPC2-Hub also requires the Add Route setting, as shown in 5in Connection Settings.
After the above routing settings are completed, communication between different Spoke VPCs can be private through Network Firewall.(Requires adding a policy in Network Firewall > Policy)
Please refer to the Network Firewall service configuration diagram to set up the connection according to your environment.
Once you've created Network Firewall and established a connection, you can leverage the many features of Network Firewall to configure access control.
Policy
When you create a Network Firewall instance, you will be moved to the initial policy page.
In the Policies tab, you can manage policies to control inbound/outbound traffic and traffic between the VPCs connected to your Network Firewall instance.
Main Page
- The default-deny policy is a required policy and cannot be modified or deleted.
[Note] Logs blocked through the default-deny policy can be viewed on the Log tab after changing the Default Blocking Policy Log Settingto Enableon the Options tab.

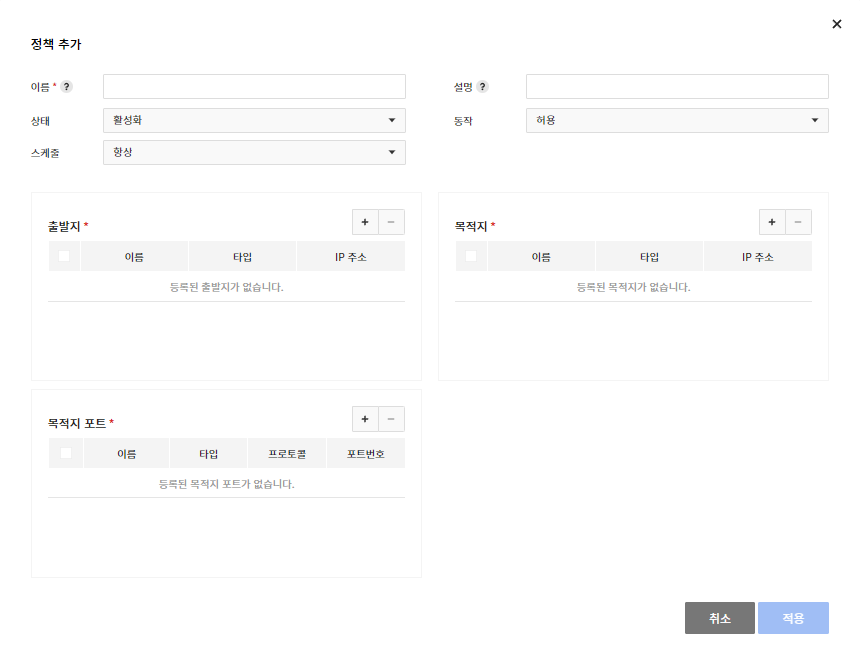
Add Policy
- Add policies based on departure, destination, and destination port.
- Select the departure, destination, and destination port through already created objects.
- Add a policy by selecting the policy's status (enabled/disabled), action (allowed/blocked), and schedule.
- The schedule feature works after enabling the policy's status (If the policy's status is disabled, the schedule feature does not apply).
Copy Policy
- Click Copyto copy the policy.
- Copied policies will be disabled.

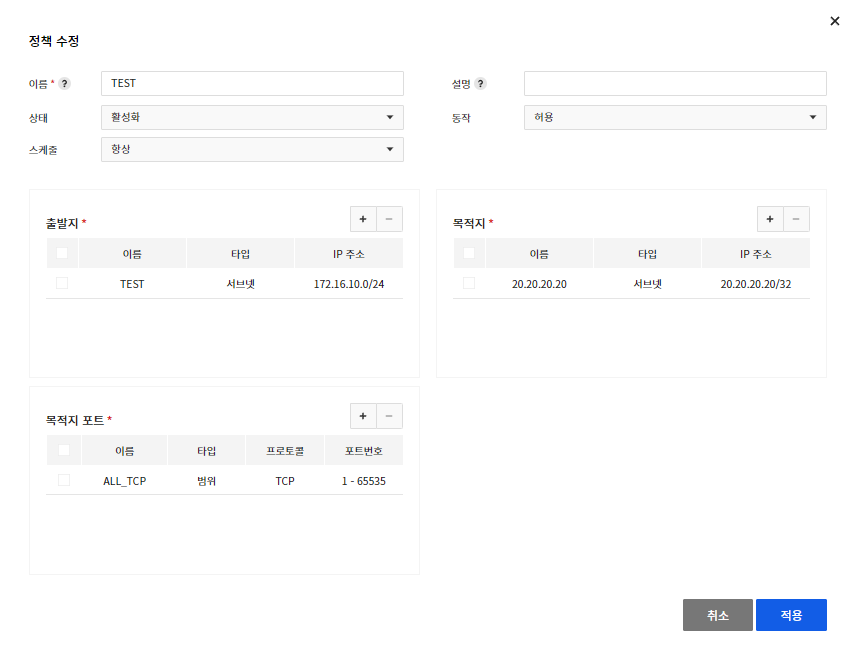
Modify Policy
- You can modify the policy by clicking Edit.
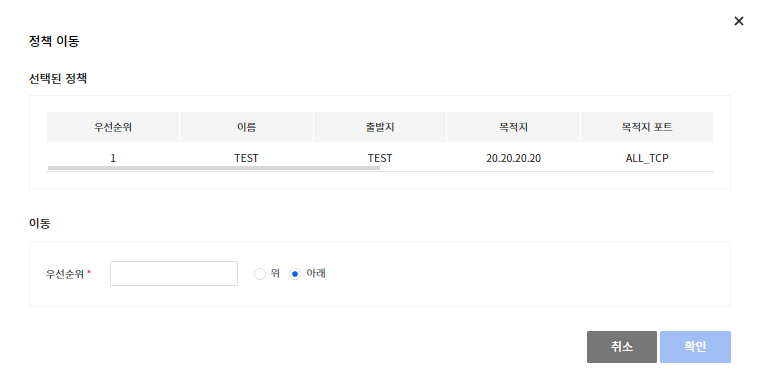
Move Policy
- You can move the policy by clicking Move.
- Name: Could not move below the default-deny policy.
Delete Policy
- You can delete the policy by clicking Delete.
[Caution] Once deleted, a policy cannot be restored, and a policy with name: default-deny cannot be deleted.
Batch Download of Policies
- Download all policies created in the Policies tab at once.
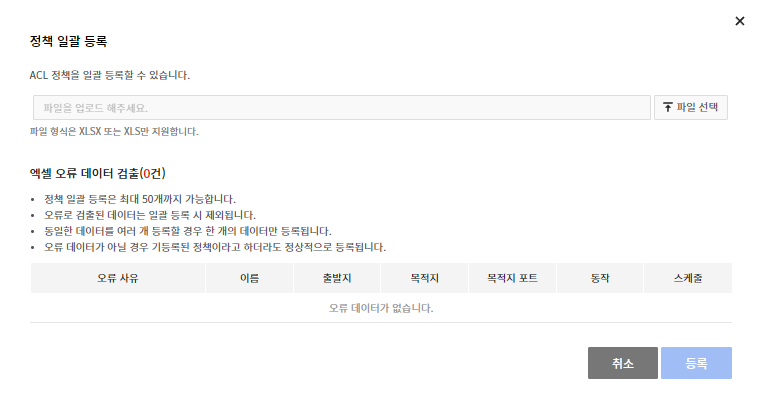
Batch Register Policies
- You can register policies at once using the downloaded template.
Object
In the Object tab, create and manage IPs and ports to use when creating policies.
Add
-
Enter the required fields to create the object. IP and port are required, you can add a type and protocol below.
- IP
- Type: Subnet, Range, Group
- Port
- Type: Port, Range, Group
- Protocol: TCP, UDP, ICMP
- IP
Delete
-
You can delete an object by clicking Delete.
- Objects automatically created by Network Firewall cannot be modified or deleted.
[Note] Objects in use by a policy will be changed to ALL objects after deletion (caution required).
Batch Download of Objects
- Download all IPs and port objects created in the Object tab at once.
NAT
In the NAT (Network Address Translation) tab, create a dedicated public IP by specifying the instance to be accessed from the outside.
- NAT offers only destination-based and 1:1 methods.
- Port-based NAT is not provided.
- The created public IP can be checked in Network > Floating IP.
[Note] After creating a NAT, you must add an allow policy to enable authorized communication.
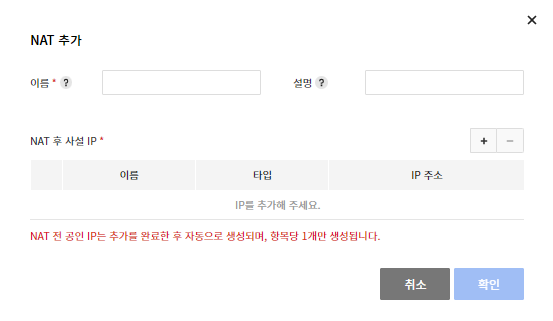
Add
- Click Add (+) to select an object.
- The object you want to select must be created in advance.
- Click Confirm to check the connected public IP before NAT.
- The created public IP before NAT cannot be changed arbitrarily.
Delete
- Click Delete to delete the created NAT.
- After deletion, the public IP before NAT is automatically deleted.
Log
In the Log tab, search logs created in Network Firewall.
Search
-
Traffic: Search traffic logs generated by allow or block policies when passing through the Network Firewall.
- You can search only historical data up to 3 months in 1-month increments.
- The maximum number of stored logs is 8 million, and the amount of logs stored depends on the amount of traffic, so past data may not be retrieved.
- If separate data storage is required, see the log remote transmission settings in the Options tab.
- You can search only historical data up to 3 months in 1-month increments.
-
Audit: Search logs for changes to Network Firewall, including policy creation and deletion.
- You can search for up to one month, and can search through CloudTrail, an organizational service.
Download Excel
- Download traffic and audit log search results through Download Excel.
- The maximum number of downloads in a traffic log is 300,000.
Monitor
In the Monitor tab, check the status of Network Firewall in real time. Searches are only available for up to 24 hours (1 day).
Search
- Sessions: Quantity of sessions currently in use through Network Firewall.
- Network Usage: Inbound/outbound traffic currently passing through Network Firewall
Options
In the Options tab, set options required for operation of Network Firewall.
Log Settings
- Default blocking policy log settings: Select whether to save the default blocking policy log that is required after creating a Network Firewall.
- When enabled, you can search logs created with the default blocking policy in the traffic log.
- Log remote transmission settings: Select the option to save traffic logs remotely.
- Syslog: Send logs with up to 2 remote addresses
- Two remote locations can be configured individually (IP address, protocol, port number)
- Object Storage: Send logs with the Object Storage service provided by NHN Cloud
- Log & Crash Search: Send logs with the Log&Crash Search service provided by NHN Cloud
- Syslog: Send logs with up to 2 remote addresses
General Settings
- Maximum transmission unit (MTU) size setting: Set the MTU size of the Ethernet associated with Network Firewall.
- Traffic: Ethernet used for internal NHN Cloud communication (including peering communication)
- NAT: Ethernet used for external communication
[Note] The default MTU size for traffic, NAT Ethernet is 1450 bytes.
Disable Service
You can disable the Network Firewall service in Project Management > Services in Use.
[Precautions]
- Disabling the Network Firewall service applies to both the Pangyo and Pyeongchon regions. For example, if you enable the Network Firewall service for both the Pangyo and Pyeongchon regions of the same project, you cannot disable the Network Firewall service for only one of the two regions. (Improvement scheduled)
Table of Contents
- Security > Network Firewall > Console User Guide
- Get Started
- Create Network Firewall
- Prerequisites
- Create Network Firewall
- Connection Settings
- Policy
- Main Page
- Add Policy
- Copy Policy
- Modify Policy
- Move Policy
- Delete Policy
- Batch Download of Policies
- Batch Register Policies
- Object
- Add
- Delete
- Batch Download of Objects
- NAT
- Add
- Delete
- Log
- Search
- Download Excel
- Monitor
- Search
- Options
- Log Settings
- General Settings
- Disable Service