Security > Vaccine > 콘솔 사용 가이드
여기에서는 Vaccine Agent 활성화 및 비활성화 절차와 서비스 사용법을 설명합니다.
보안 그룹(Security Group) 설정
백신 서버와 통신하려면 보안 그룹에 아래 내용을 추가합니다.
| 방향 | 포트 | 리전 | CIDR |
|---|---|---|---|
| Egress | 4119, 4120, 4122 | 한국(판교), 한국(평촌) | 106.249.21.88/32 |
Vaccine Agent 활성화 절차
인스턴스의 이미지 OS에 따라 백신 설치 스크립트를 불러옵니다.
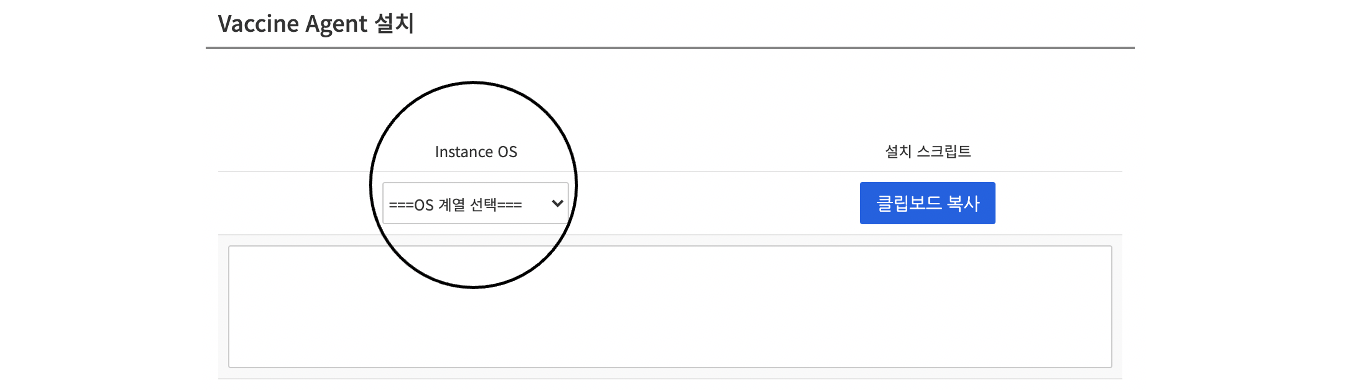
Linux 계열 Agent
1. 설치 스크립트를 복사하려면 클립보드 복사를 클릭합니다.
2. 설치 대상 인스턴스 터미널에 접속합니다.
3. 관리자 권한으로 Agent 스크립트를 생성하고 실행합니다.
- vi 편집기 등으로 스크립트를 생성합니다.
- 생성한 스크립트 파일의 권한을 변경합니다.
- 파일을 실행합니다.
[root@vaccine-test ~]# cd ~
[root@vaccine-test ~]# vi agent.sh
[root@vaccine-test ~]# chmod 744 agent.sh
[root@vaccine-test ~]# ./agent.sh
/tmp/DownloadInstallAgentPackage: OK
Downloading agent package ...
curl https://106.249.21.88:4119/software/agent/RedHat_EL7/x86_64/ -o /tmp/agent.rpm --insecure --silent
Installing agent package ...
Preparing...                          ################################# [100%]
Updating / installing...
   1:ds_agent-10.0.0-2775.el7         ################################# [100%]
Starting ds_agent (via systemctl):  [  OK  ]
HTTP Status: 200 - OK
Activation will be re-attempted 30 time(s) in case of failure
dsa_control
HTTP Status: 200 - OK
Response:
Attempting to connect to https://106.249.21.88:4120/
SSL handshake completed successfully - initiating command session.
Connected with (NONE) to peer at 106.249.21.88
Received a 'GetHostInfo' command from the manager.
Received a 'GetHostInfo' command from the manager.
Received a 'SetDSMCert' command from the manager.
Received a 'SetAgentCredentials' command from the manager.
Received a 'GetAgentEvents' command from the manager.
Received a 'GetInterfaces' command from the manager.
Received a 'GetAgentEvents' command from the manager.
Received a 'GetAgentStatus' command from the manager.
Received a 'GetAgentEvents' command from the manager.
Received a 'GetHostMetaData' command from the manager.
Received a 'SetSecurityConfiguration' command from the manager.
Received a 'GetAgentEvents' command from the manager.
Received a 'GetAgentStatus' command from the manager.
Command session completed.
[root@vaccine-test ~]#
Windows 계열 Agent
1. 콘솔 스크립트를 복사합니다.
2. 설치 대상 인스턴스 터미널에 접속합니다.
3. 관리자 권한으로 Agent 스크립트를 생성하고 실행합니다.
- 메모장과 같은 텍스트 에디터로 스크립트 파일을 생성합니다.
- 관리자 권한으로 명령 프롬프트(cmd) 창을 활성화합니다.
- powershell -file "파일 경로/파일명" 형태로 실행합니다.
Microsoft Windows [Version 6.3.9600]
(c) 2013 Microsoft Corporation. All rights reserved.

C:\Users\Administrator>powershell -file "agent.ps1"


    디렉터리: C:\Users\Administrator\AppData\Roaming\Trend Micro\Deep Security Agent


Mode                LastWriteTime     Length Name
----                -------------     ------ ----
d----      2018-06-05   오후 2:37            installer
기록이 시작되었습니다. 출력 파일은 C:\Users\Administrator\AppData\Roaming\Trend Micro\Deep Security Agent\installer\dsa_deploy.log입니다.
오후 2:37:23 - DSA download started
오후 2:37:23 - Download Deep Security Agent Package
https://106.249.21.88:4119/software/agent/Windows/x86_64/
오후 2:37:24 - Downloaded File Size:
13897728
오후 2:37:24 - DSA install started
오후 2:37:24 - Installer Exit Code:
0
오후 2:37:32 - DSA activation started
HTTP Status: 200 - OK
Activation will be re-attempted 30 time(s) in case of failure
dsa_control
HTTP Status: 200 - OK
Response:
Attempting to connect to https://106.249.21.88:4120/
SSL handshake completed successfully - initiating command session.
Connected with AES256-SHA256 to peer at 106.249.21.88
Received a 'GetHostInfo' command from the manager.
Received a 'GetHostInfo' command from the manager.
Received a 'SetDSMCert' command from the manager.
Received a 'SetAgentCredentials' command from the manager.
Received a 'GetAgentEvents' command from the manager.
Received a 'GetInterfaces' command from the manager.
Received a 'GetAgentEvents' command from the manager.
Received a 'GetAgentStatus' command from the manager.
Received a 'GetAgentEvents' command from the manager.
Received a 'GetHostMetaData' command from the manager.
Received a 'SetSecurityConfiguration' command from the manager.
Received a 'GetAgentEvents' command from the manager.
Received a 'GetAgentStatus' command from the manager.
Command session completed.
기록이 중지되었습니다. 출력 파일은 C:\Users\Administrator\AppData\Roaming\Trend Micro\Deep Security Agent\installer\dsa_deploy.log입니다.
오후 2:38:29 - DSA Deployment Finished

C:\Users\Administrator>
사용 시작

새로고침을 클릭하면 현황 목록에 설치된 Agent 정보가 표시됩니다. 사용시작 버튼을 클릭하면 서비스 사용이 시작됩니다.
Vaccine Agent 비활성화 절차

1. 웹 콘솔 사용 중지
- 사용종료 버튼을 클릭하여 백신 사용을 중지합니다.
Linux 계열 Agent
- 인스턴스에 접속하여 Vaccine Agent를 삭제합니다.
- CentOS: rpm -e ds_agent 실행
- Debian/Ubuntu: apt-get remove ds-agent 실행
Windows 계열 Agent
- 인스턴스에 접속하여 Vaccine Agent를 삭제합니다.
- 프로그램 및 기능 메뉴에서 Trend Micro Deep Security Agent를 삭제합니다.
Vaccine 서비스 사용법
파일 복원 가이드
1. 파일 복원
- 복원 툴을 다운로드합니다.
- 다운로드한 QFAdminUtil_win32.zip 파일을 Windows OS 환경에서 압축 해제합니다.
- QDecrypt.exe 실행 후 격리된 파일을 열고 파일을 복원합니다.
2. 격리 파일 위치
- Linux : /var/opt/ds_agent/guest/0000-0000-0000/quarantined
- Windows : C:\ProgramData\Trend Micro\AMSP\quarantine
- 격리 파일이 보이지 않으면, 컴퓨터 또는 파일 탐색기 메뉴에서 폴더 및 검색 옵션을 클릭한 후
보기 탭에서 보호된 운영체제 파일 숨기기를 선택 해제하고 숨김 파일, 폴더 및 드라이브 표시를 선택합니다.
- 격리 파일이 보이지 않으면, 컴퓨터 또는 파일 탐색기 메뉴에서 폴더 및 검색 옵션을 클릭한 후
에이전트 상태 체크 가이드
- Linux
- sudo /opt/ds_agent/dsa_query -c GetAgentStatus | grep AgentStatus.agentState
[root@vaccine-test ~]# cd /opt/ds_agent/
[root@vaccine-test ds_agent]# ./dsa_query -c GetAgentStatus | grep AgentStatus.agentState
AgentStatus.agentState: green
[root@vaccine-test ds_agent]#
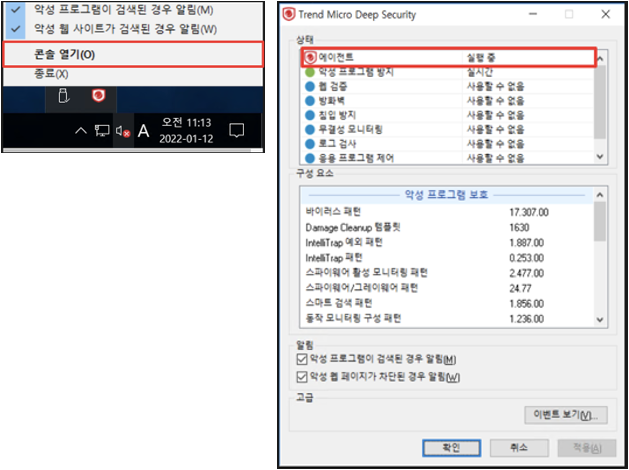
- Windows
- 윈도우 트레이에서 Agent 우클릭 후 콘솔 열기 선택 > "실행중(Running)" 확인
분석 가이드
- 에이전트 오프라인 또는 비활성 상태 시 다음 파일을 수집하여 고객 센터로 분석을 요청합니다.
- Linux
- /opt/ds_agent/dsa_control -d 실행
- /var/opt/ds_agent/diag/랜덤10자리숫자.zip 파일 분석 요청
- 커널 정보 확인: sudo uname -a, OS 정보 확인 : sudo cat /etc/*release 결과 전달
- Windows
- C:\Program Files\Trend Micro\Deep Security Agent\dsa_control -d 실행
- C:\Program Data\Trend Micro\Deep Security Agent\diag\랜덤10자리숫자.zip 파일 분석 요청
- 자세한 분석을 위해 문제 발생 상황에서 디버깅 수행 후 생성된 파일을 추가로 요청할 수 있습니다.
- Linux
삭제 가이드
- Linux 계열 Agent
- 인스턴스에 접속하여 Vaccine Agent를 삭제합니다.
- CentOS: rpm -e ds_agent 실행
- Debian/Ubuntu: apt-get remove ds-agent 실행
- Windows 계열 Agent
- 인스턴스에 접속하여 Vaccine Agent를 삭제합니다.
- 프로그램 및 기능 메뉴에서 Trend Micro Deep Security Agent를 삭제합니다.
이미지 복제 시 사용 가이드
Vaccine Agent가 포함된 Private Image 기반 인스턴스 생성 시 백신 사용 가이드입니다.
- 인스턴스에 접속하여 각각 해당하는 스크립트를 생성 및 실행하여 설치합니다.
- Vaccine Agent 활성화 가이드에 따라 서비스 화면에서 새로고침 및 사용시작 버튼을 클릭하면 사용할 수 있습니다.
※ 주의 사항
- 스크립트 내용 중 "group:앱키"의 앱키는 서비스 화면의 URL & Appkey 메뉴 내 Appkey값으로 변경해야 합니다.
- 사용을 원치 않는 복제 인스턴스는 불필요한 리소스가 낭비되지 않도록 설치된 Agent 삭제를 권장합니다.
- '사용시작' 후 서비스 사용 상태는 즉시 '상품종료' 상태가 활성화되지만, 백신 동작은 최초 설치와 마찬가지로 최대 약 10분 뒤부터 정상 동작합니다.
1. Linux 계열 Agent 스크립트
touch /etc/use_dsa_with_iptables

IP=`ifconfig eth0 | grep -w -o '[0-9]\{1,3\}\.[0-9]\{1,3\}\.[0-9]\{1,3\}\.[0-9]\{1,3\}' | head -1`
uuidInfo=`curl -s 169.254.169.254/openstack/latest/meta_data.json | python -c 'import json,sys;obj=json.load(sys.stdin);print (str(obj["uuid"])+":"+str("user_metadata.server_group" in obj["meta"]))'`
/opt/ds_agent/dsa_control -r
/opt/ds_agent/dsa_control -a dsm://106.249.21.88:4120/ "group:앱키" "displayname:$IP" "description:$uuidInfo"
2. Windows 계열 Agent 스크립트
$idx=(Get-WmiObject -Class Win32_IP4RouteTable | where { $_.destination -eq '0.0.0.0' -and $_.mask -eq '0.0.0.0'} | Sort-Object metric1).interfaceindex[0]

$IP=((Get-WmiObject win32_networkadapterconfiguration | where { $_.interfaceindex -eq $idx} | select ipaddress)| findstr .*[0-9].\.).Split(",")[0].Split("{")[-1].Split("}")[0]
$uuid=((invoke-webrequest -uri 169.254.169.254/openstack/latest/meta_data.json -UseBasicParsing).content | convertfrom-json).uuid
$as="user_metadata.server_group" -in ((invoke-webrequest -uri 169.254.169.254/openstack/latest/meta_data.json -UseBasicParsing).content | convertfrom-json).meta.psobject.properties.name
$uuidInfo=$uuid+":"+$as`

& $Env:ProgramFiles"\Trend Micro\Deep Security Agent\dsa_control" -r
& $Env:ProgramFiles"\Trend Micro\Deep Security Agent\dsa_control" -a dsm://106.249.21.88:4120/ "group:앱키" "displayname:$IP" "description:$uuidInfo"
※ 배치 파일(.bat)로 생성하여 스크립트를 실행해야 합니다.
Auto Scale 사용 가이드
Auto Scale을 이용한 백신 기능 사용 안내는 고객 센터로 문의하시면 자세히 설명드리겠습니다.
운영 문의
문의 대상
1. 특정 파일 및 폴더 예외 처리 2. Agent 설치 실패 문의 3. 백신 이벤트 탐지 관련 문의 4. 정상 파일 오진 신고 및 복원 관련 문의 5. 백신으로 인한 인스턴스 오동작 조치 및 원인 분석 관련 문의
문의 방법
1. 문의 방법: 고객 센터 > 1:1 문의 2. 대응 시간: 평일 09:00~18:00