Compute > Instance > Installation Component Guide
NAT Instance
NAT instance is an instance that allows you to access internet over a specific IP address band in the private network instance. This feature is available only in the Korea (Pangyo) and Korea (Pyeongchon) regions.
Key Features
- The instance of a private network not connect with an internet gateway can access the internet via the NAT instance.
- Accesses the Internet by changing the floating IP of the NAT instance to source IP.
- The packets delivered to the NAT instance are delivered according to the routing setting of the routing table connected to the subnet of NAT instance.
- Do not add a route setting that specifies the NAT instance as a gateway in the routing table connected to the subnet of the NAT instance.
- The instance of a private network cannot receive the inbound traffic coming from the internet.
- Specifies IP address bandwidth of destination to allow Internet access through the NAT instance.
- Allows access to another instance by accessing the NAT instance.
- Sets security group.
- Sets network ACL.
- Redundancy not supported.
- The option of checking network source/target must be disabled in the Network Interface settings for the NAT instance to work.
- If a private image is created with NAT instance, the function might not work normally.
- A NAT instance provides the NAT feature on only one network interface.
[Note] Difference with NAT gateway
Classification NAT gateway NAT instance Availability Redundancy supported Redundancy not supported Maintenance Maintained by NHN Cloud Directly maintained by users Security group Not settable Settable Network ACL Settable Settable SSH Unavailable Available
Source/target check setting
For the NAT instance to work normally, the option of checking network source/target must be disabled in the Network Interface settings.
Routing setting
Specifies the NAT instance as a route gateway. The packets delivered to the NAT instance are delivered according to the routing setting of the routing table connected to the subnet of NAT instance.
Caution on settings
- Using only one network interface for a NAT instance is recommended. Even if you connect multiple network interfaces to a NAT instance, the NAT feature is only available for one interface (eth0).
- Do not add a routing setting that specifies the NAT instance as a gateway in the routing table connected to the subnet of the NAT instance.
- It is strongly recommended to separate the NAT instance subnet from the subnet of an instance that is going to use the NAT instance as a gateway and use a different routing table.
- If the NAT instance subnet and the subnet of an instance that is going to use the NAT instance as a gateway are the same or they are connected to the same routing table, and you have to add a routing setting that specifies the NAT instance as a gateway, then a floating IP must be set for the NAT instance. Also, the target CIDR must be set to IP Prefix 0 (/0). Any other settings will only cause the communication to fail, and might impact the communication of all instances that use the routing table.
[Note] Routing setting for NAT instance
- If the subnet of NAT instance is connected to Routing Table 1 and the instances that are going to use the NAT instance as a gateway are connected to Routing Table 2
- In the routing setting of Routing Table 2, the NAT instance can be specified as a gateway for a specific CIDR (e.g. 8.8.8.8/32).
- You should specify the NAT instance as a gateway in the route setting of Routing Table 1 except in the case of the NAT instance connected to a floating IP, in which case IP prefix 0 (/0) can be set for the target CIDR.
- If the NAT instance subnet and the subnet of instances that are going to use the NAT instance as a gateway are both connected to Routing Table 1
- If NAT instance is connected to a floating IP, IP Prefix 0 (/0) can be set for the target CIDR to route.
- Without using the above settings, you should not specify the NAT instance as a gateway in the routing setting of Routing Table 1.
MS-SQL Instance
Allow Security Group TCP Port 3389 (RDP)
After instance is created, access the instance by using Remote Desktop Protocol (RDP). To that end, an instance must be associated with a floating IP and TCP port 3389 (RDP) must be allowed for security group.
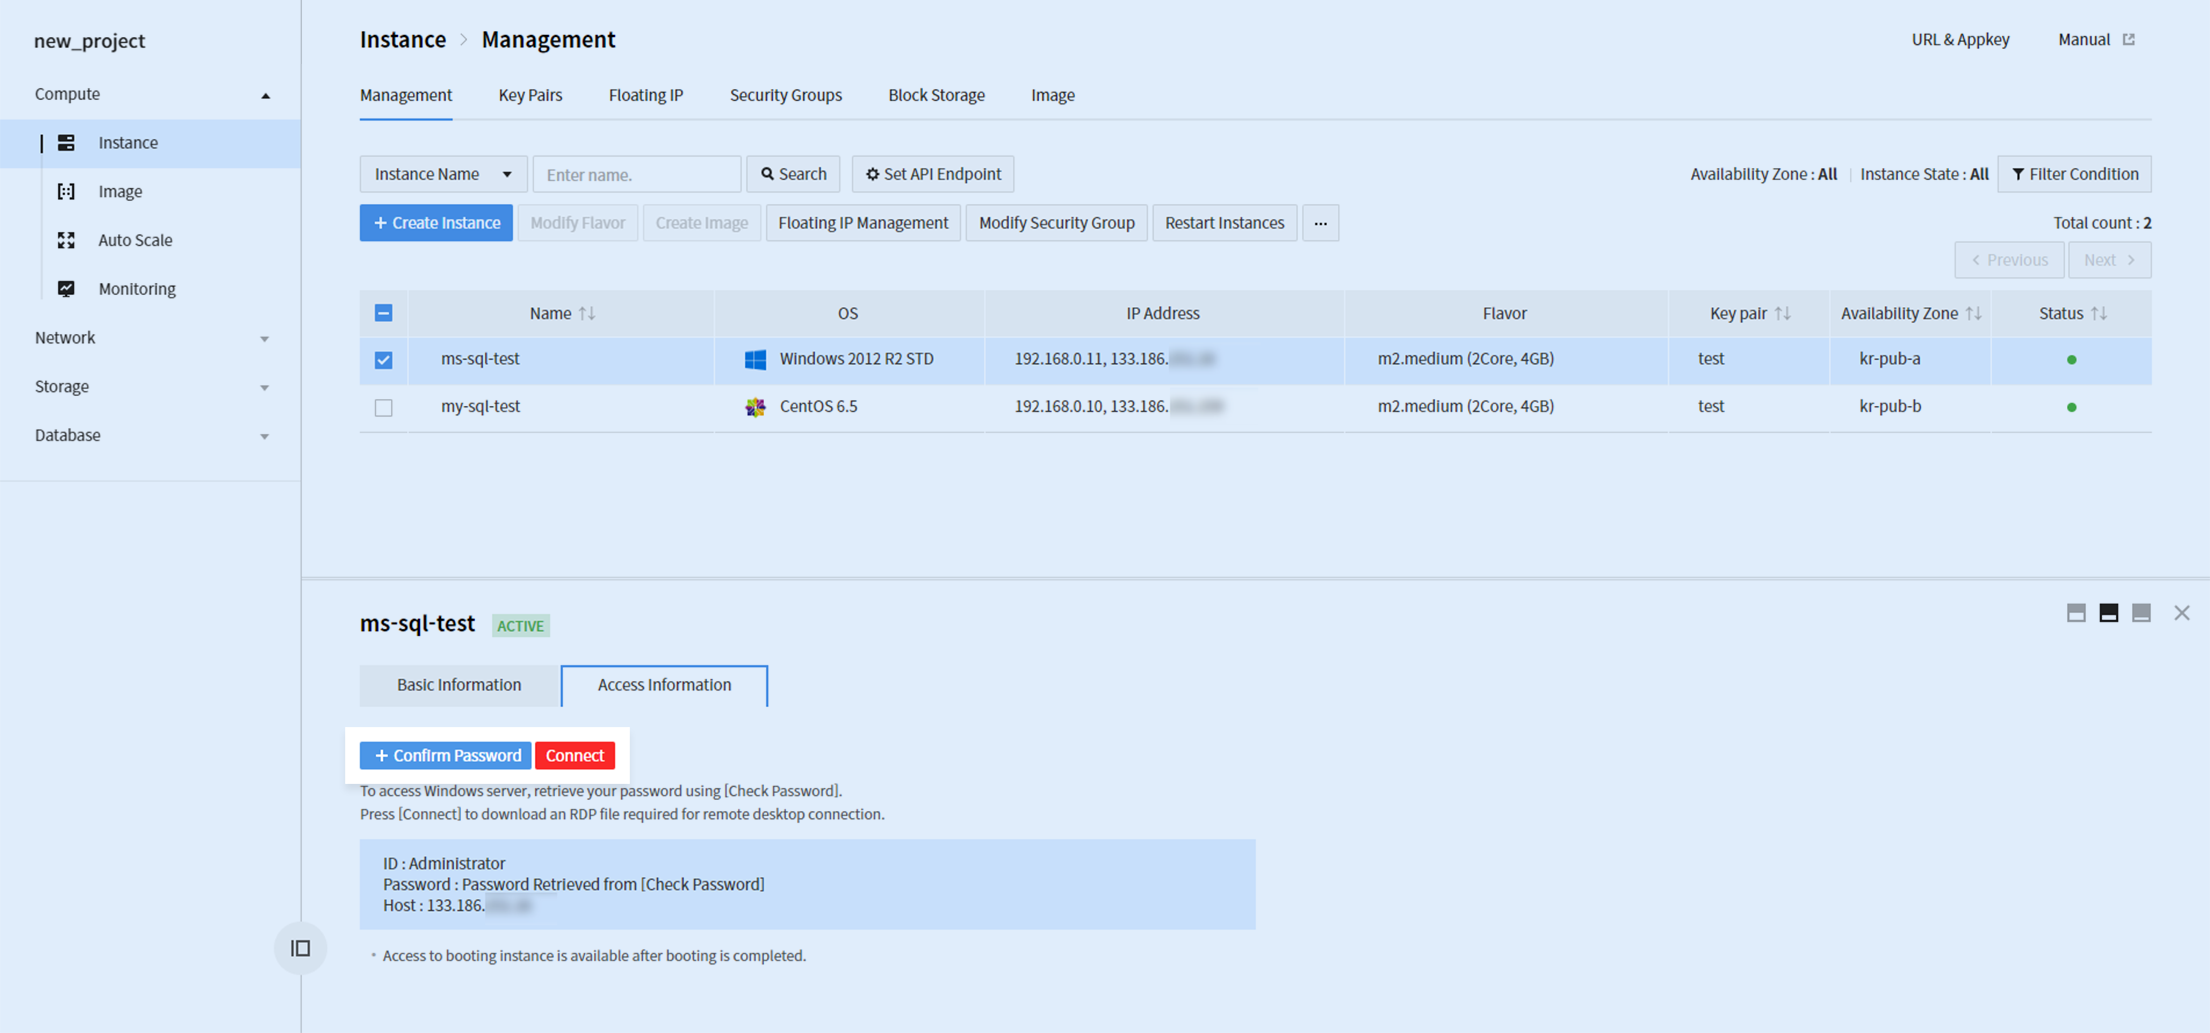
Click + Check Password to check password by using key pair configured along with instance creation. Click Associate and download .rdp file, to access the instance by using the acquired password.
Initial Settings after Microsoft SQL Image is Created
1. Set SQL Certification Mode
The default certification mode of the server is set with "Windows Certification Mode". To use Microsoft SQL database account, the mode must be changed to SQL Certification Mode.
Execute Microsoft SQL Server Management Studio and associate to an object under the instance name.

- Right-click on an object.
- Choose Properties on the menu.
- On Server Properties , click Security.
- Change the Server Certification type into SQL Server and Windows Certification Mode.
※ To apply the changed SQL certification mode, restart Microsoft SQL.
2. Change Microsoft SQL Service Port
The default port 1433 for Microsoft SQL is widely known and might serve as a security vulnerability. A change is recommended to another port. ※ For Express, no default port is specified.
Execute SQL Server configuration manager as below.
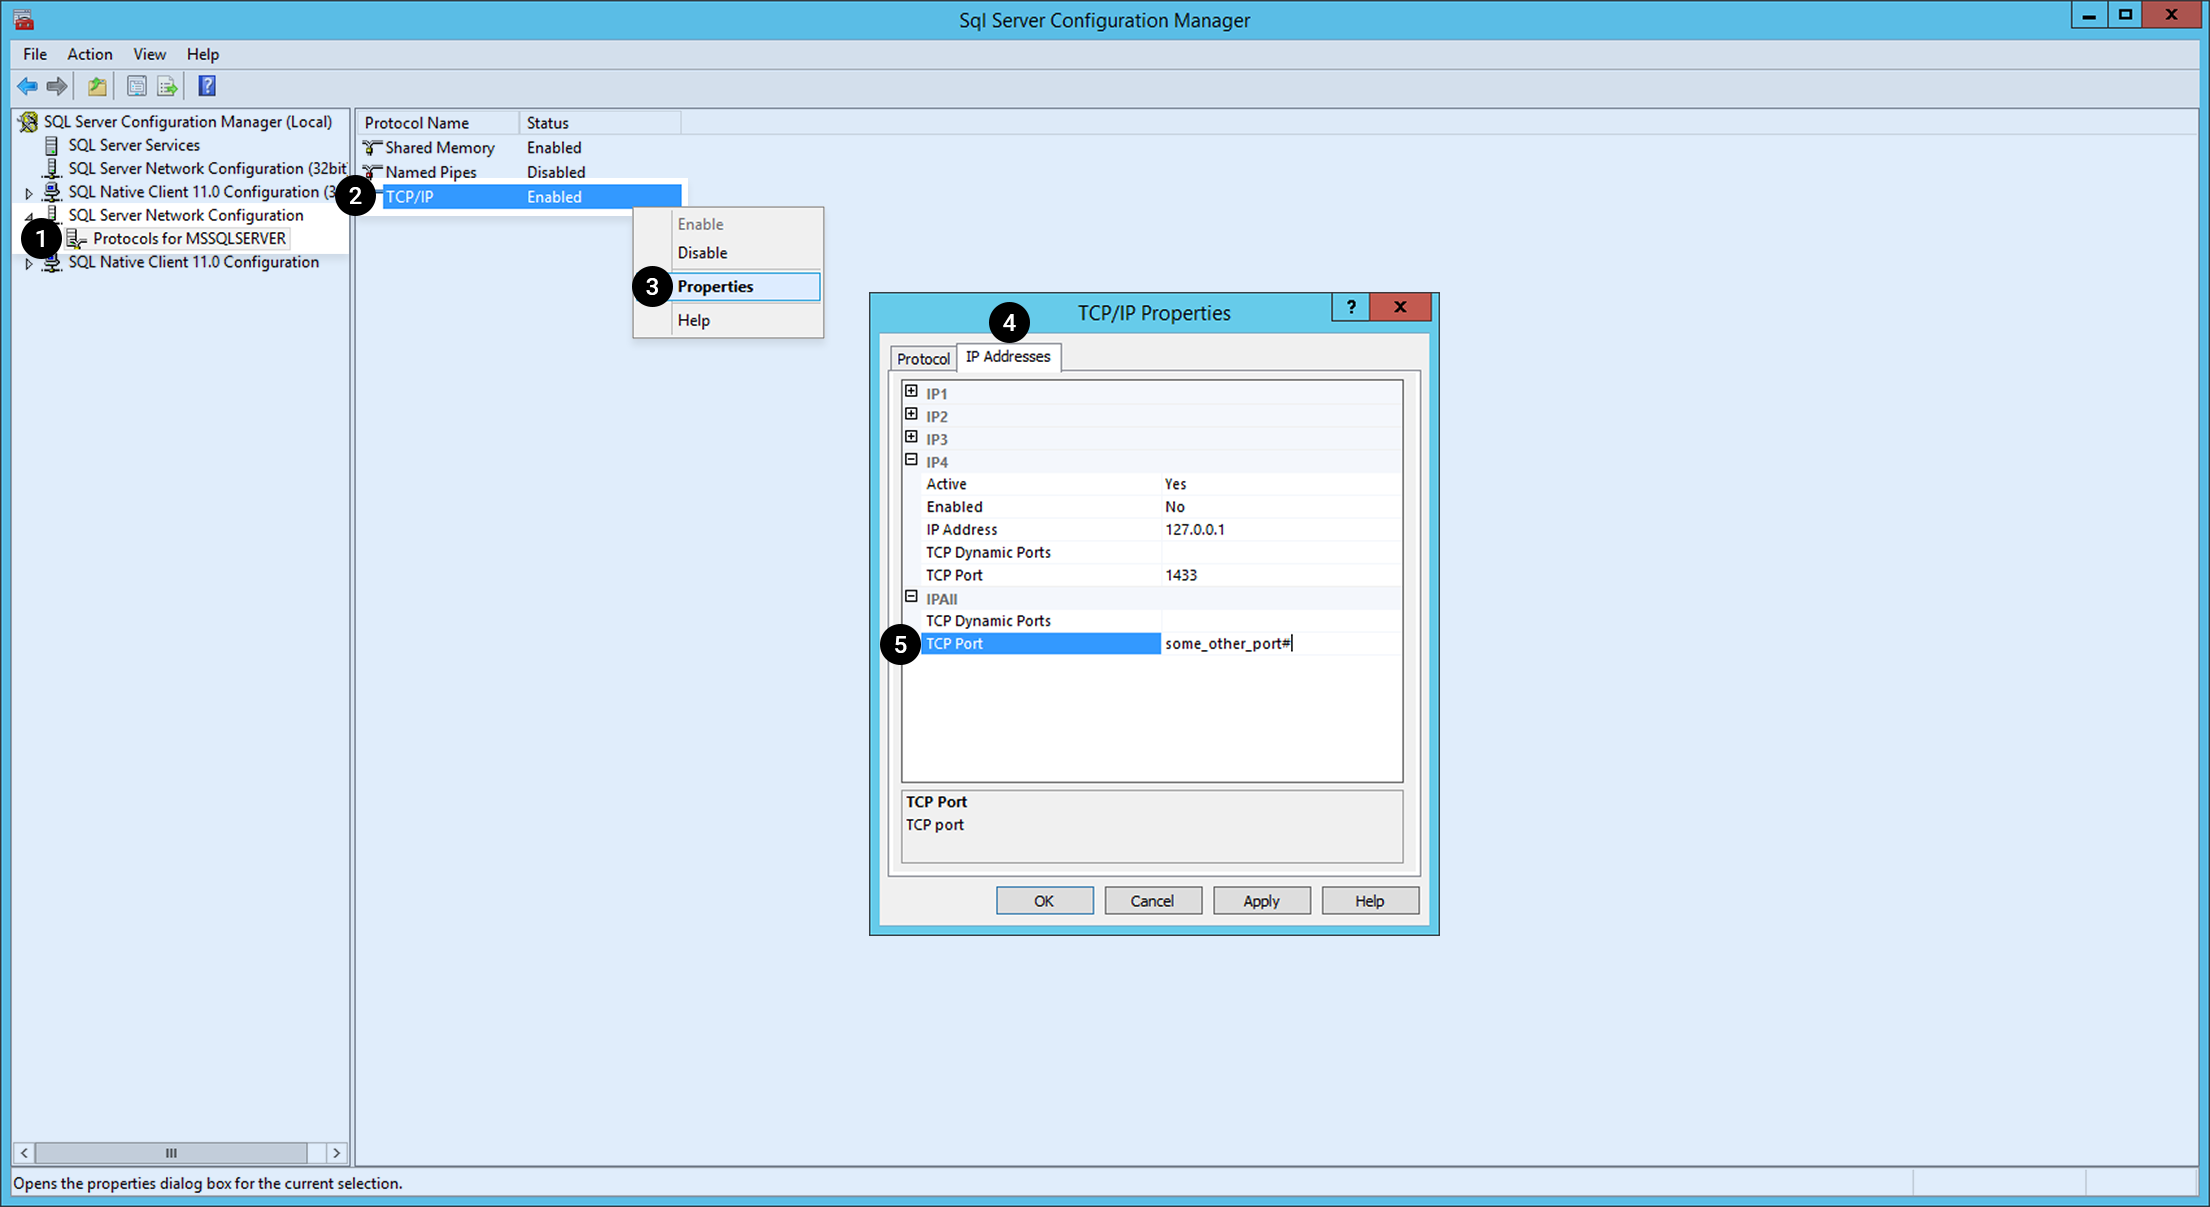
- Click Protocol for MSSQLSERVER below SQL Server Network Configuration from menu on the left.
- Right-click TCP/IP among protocol names.
- Choose Properties on the menu.
- Select the IP Address tab.
- Select IP ALL on the list and change the port number to another.
※ To apply the changed service port, restart Microsoft SQL.
3. Allow External Access to Microsoft SQL Database
To allow external access to Microsoft SQL Database, go to the Security Group tab of Network > VPC and add Microsoft SQL service port for security rules. Also, register Microsoft SQL service port (default port: 1433) to allow access, as well as remote IP.
Data Volume Assignment
Microsoft SQL data/log files (MDF/LDF) and backup files are recommended to be applied with separate block storages.
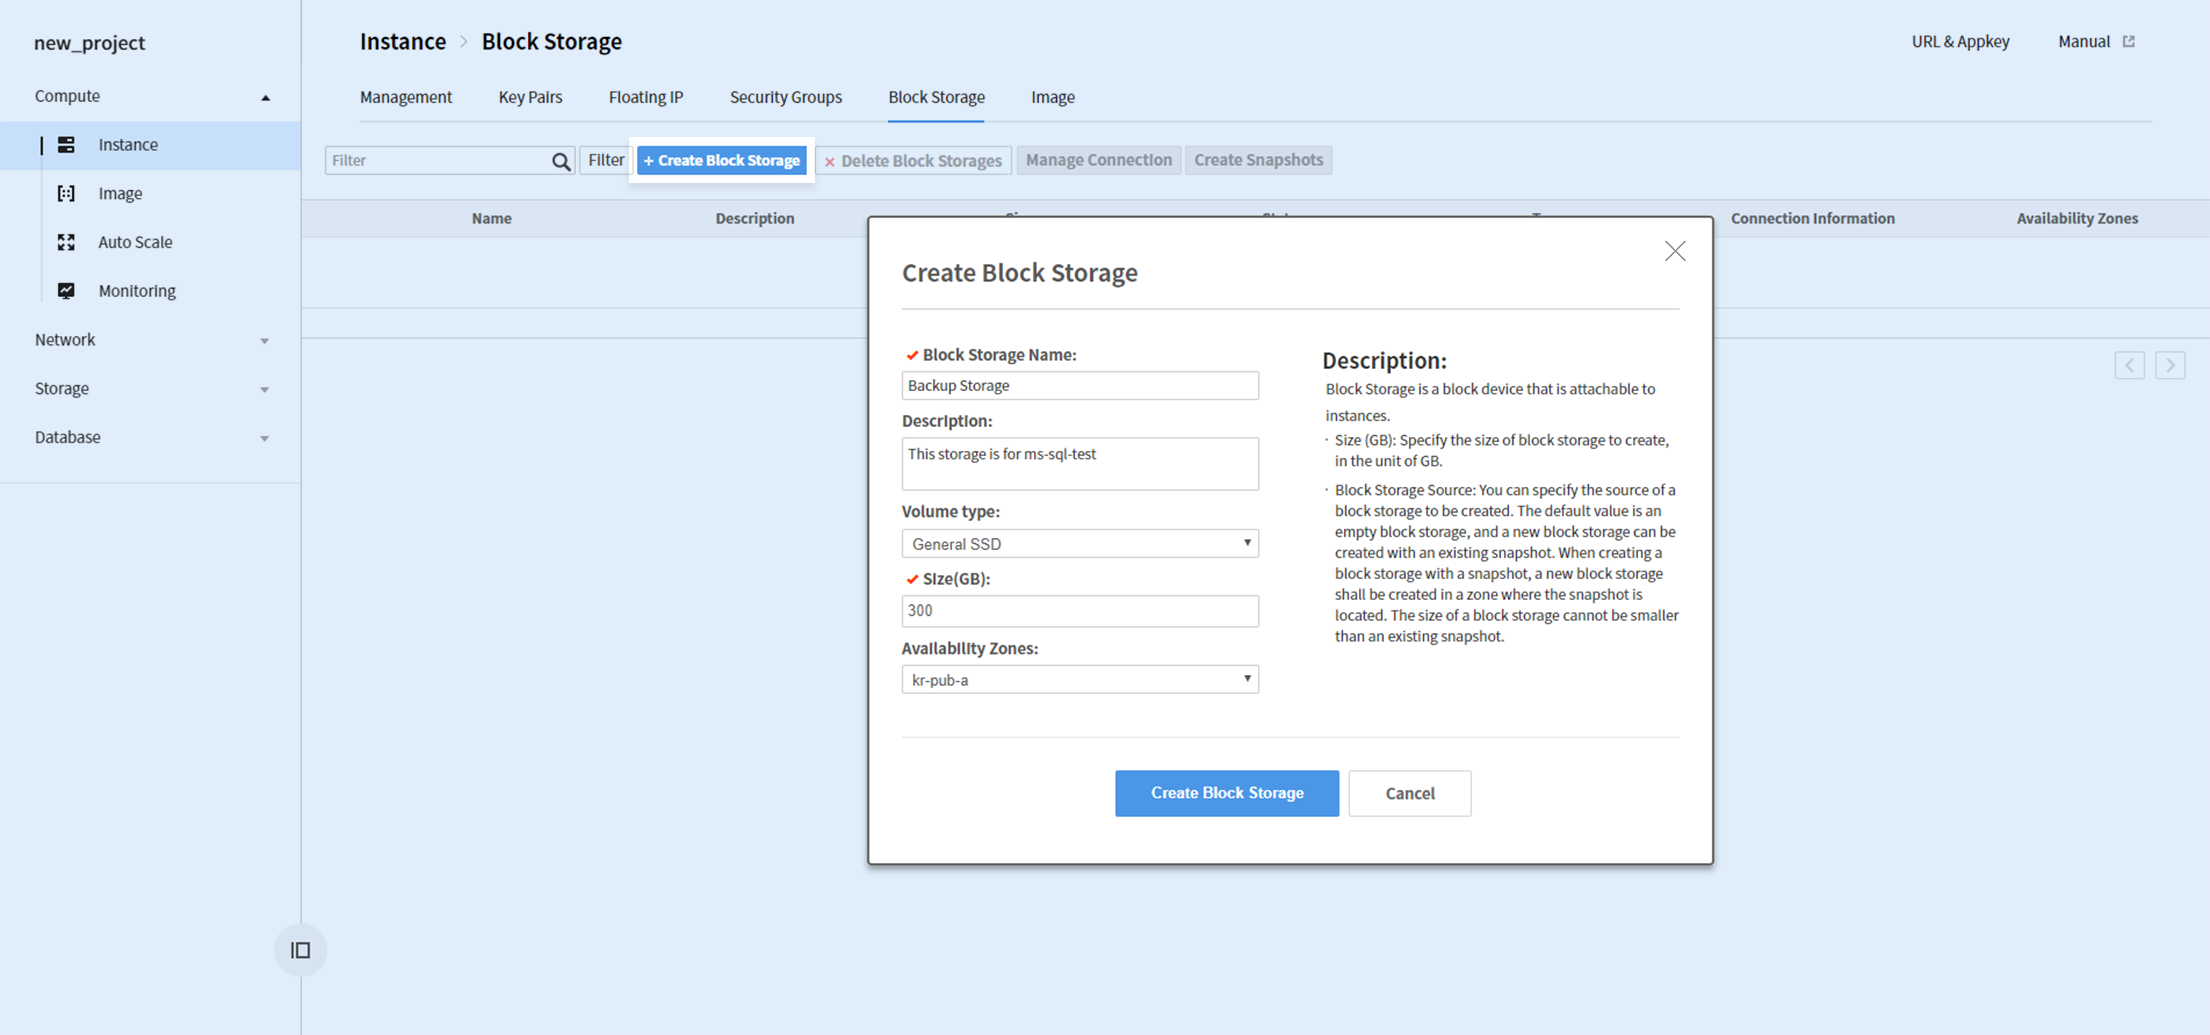
Go to Compute > Instance > Block Storage and create a block storage. Universal SSD is a recommended volume type for improved performance.
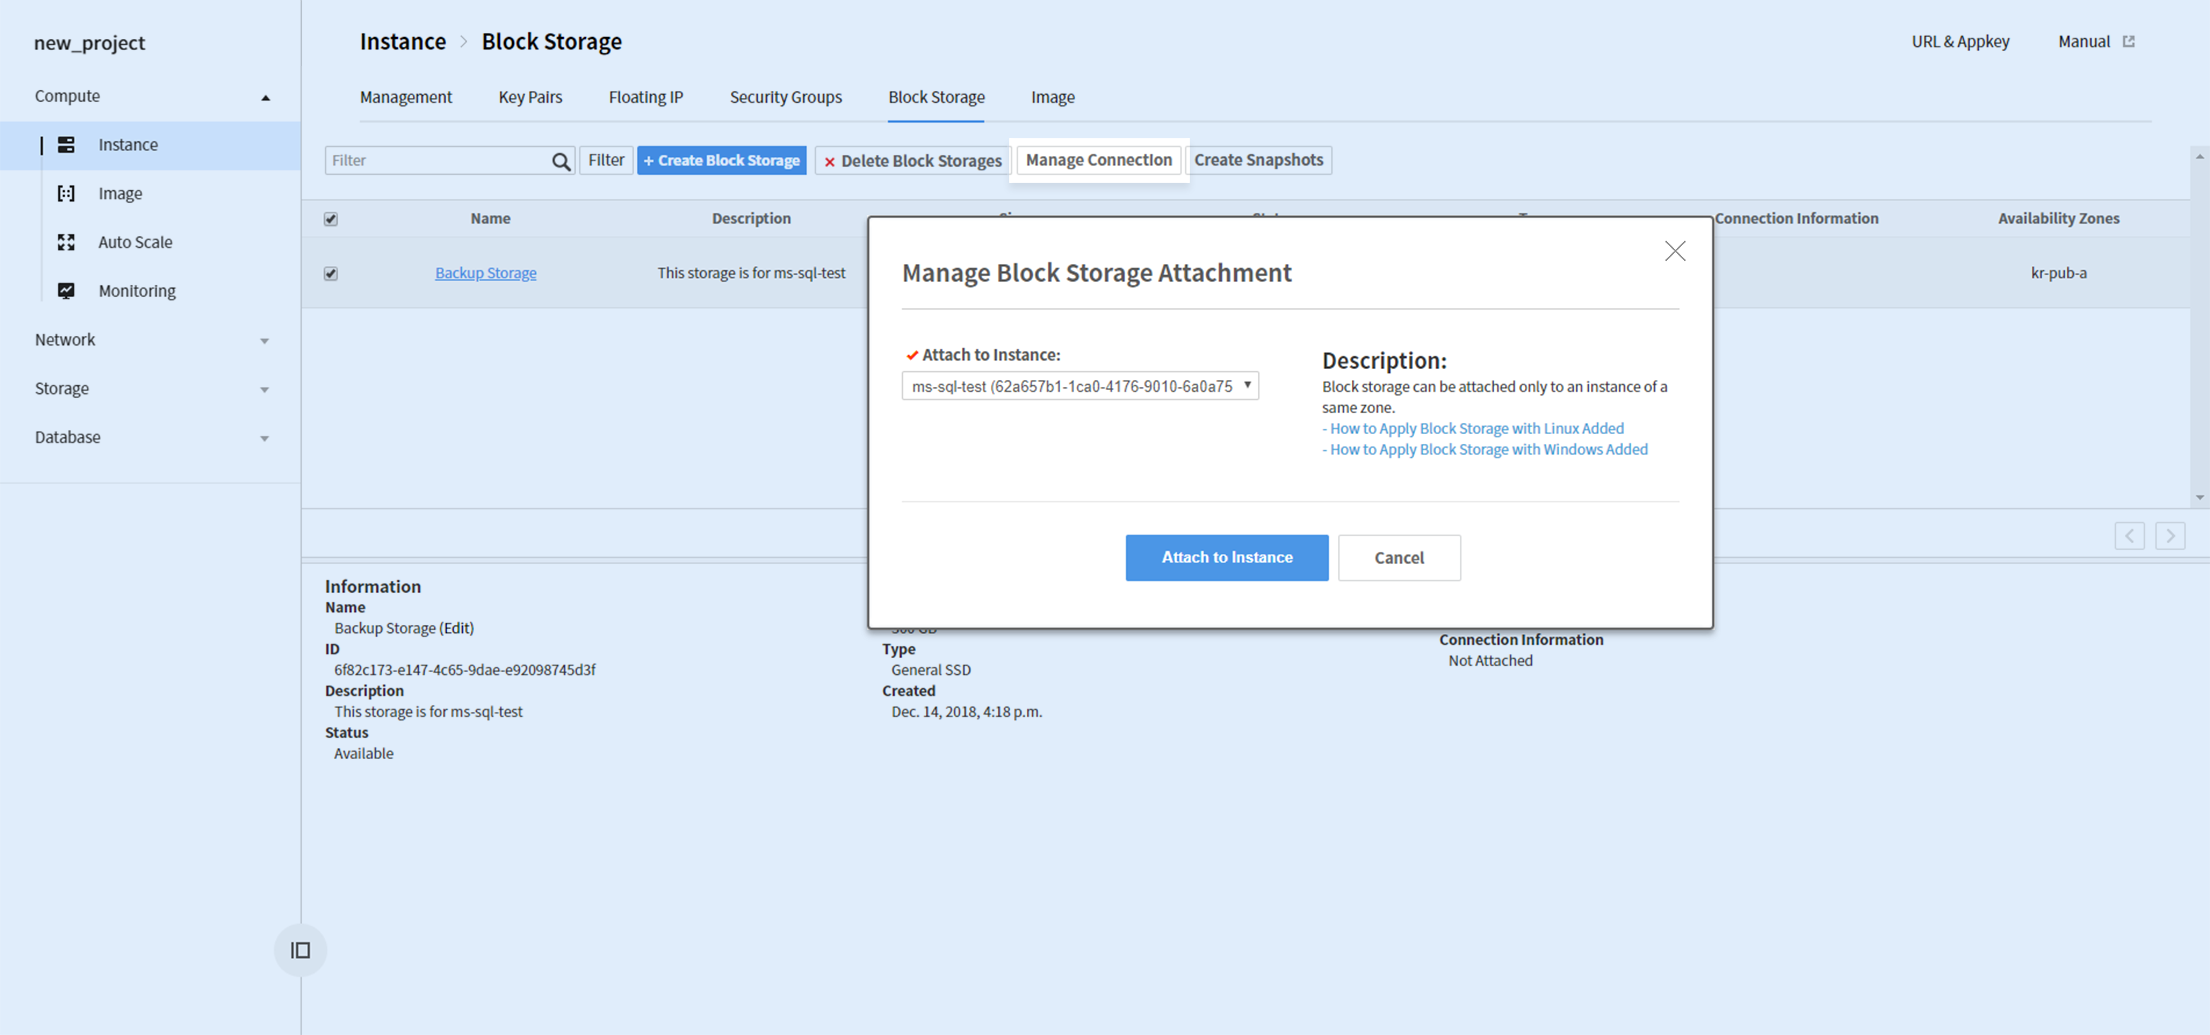
After a block storage is created, select the storage and click Association Management and associate it to an instance.
Access instance with RDP and execute Computer Management, and go to Storage>Disk Management.
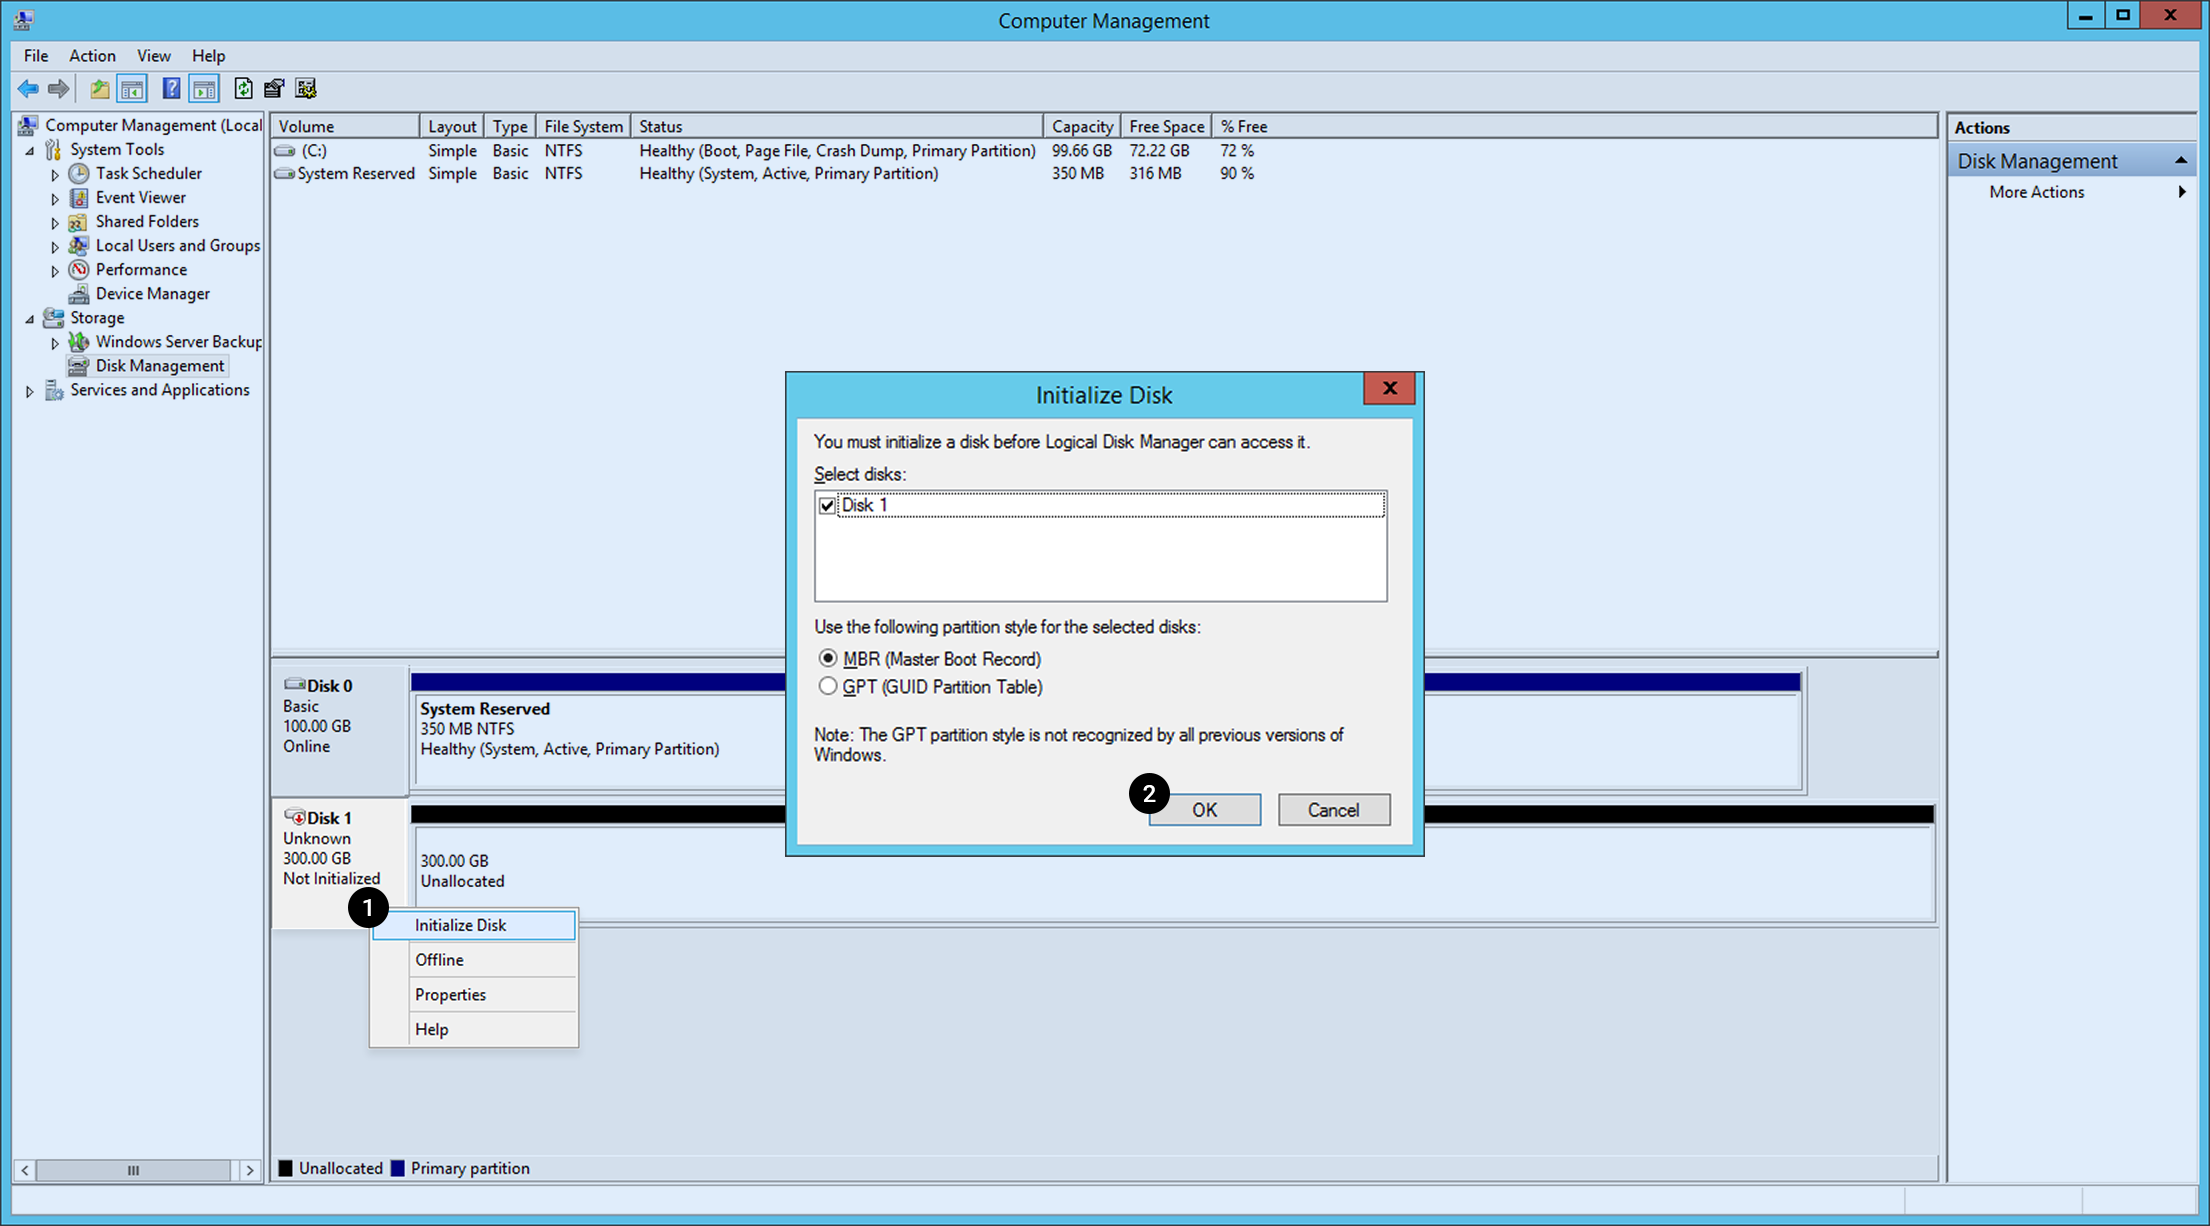
You can find the associated block storage is detected. To use it, initialize disk first. 1. Right-click the Disk 1 block and click Initialize Disk. 2. Select a partition type and click OK.
After initialization is completed, create disk volume.
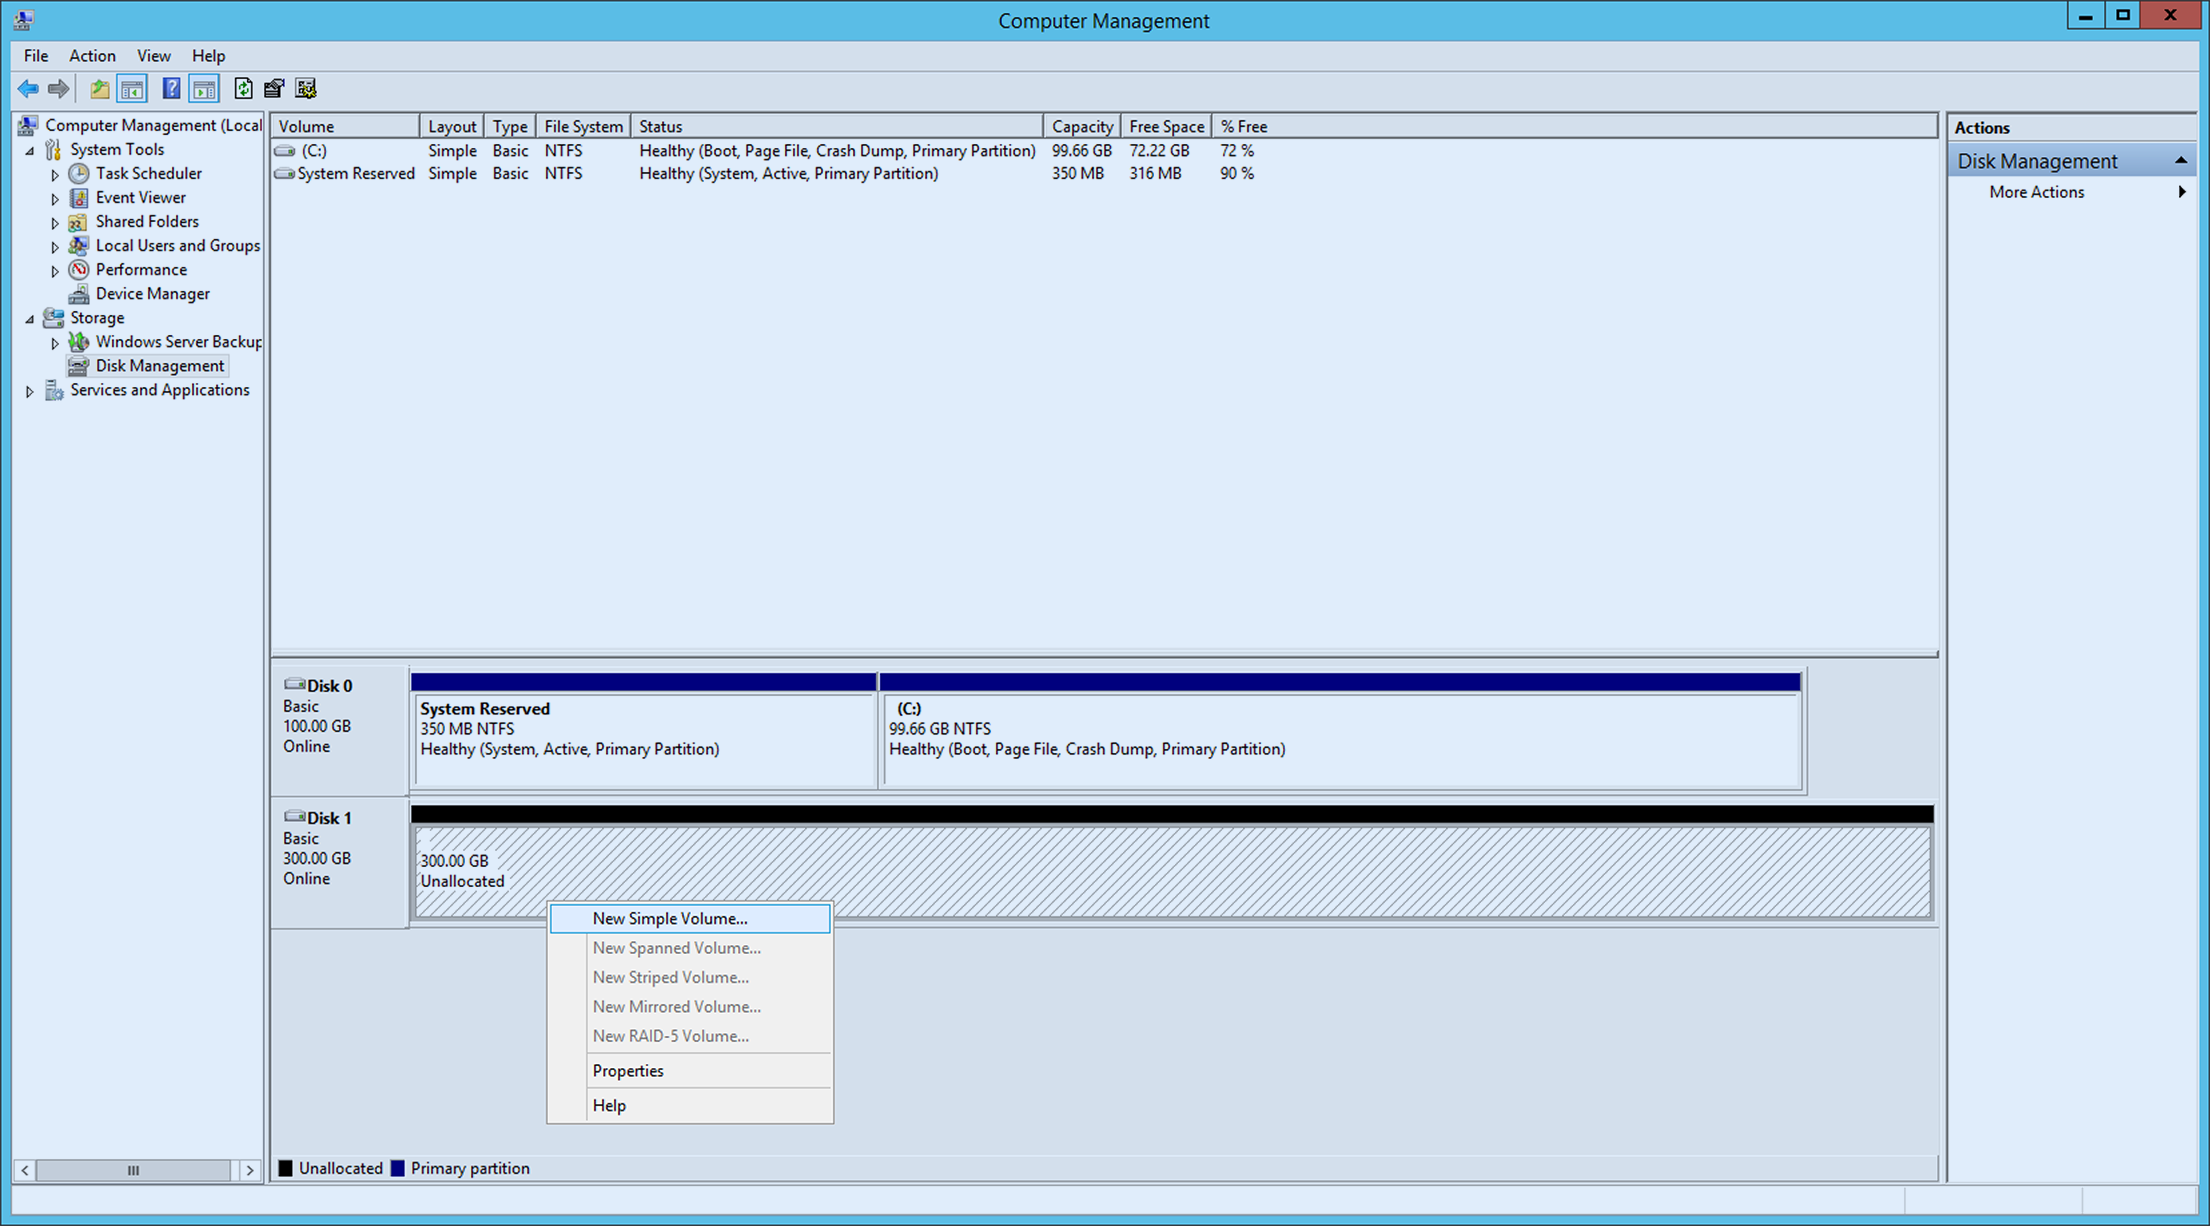
Click unassigned disk and right-click it. Select New Simple Volume and proceed with wizard for new simple volume.
In the Database Setting of Server Properties of Microsoft SQL Server Management Studio, change Default Database Location into the directory where the volume has been created.
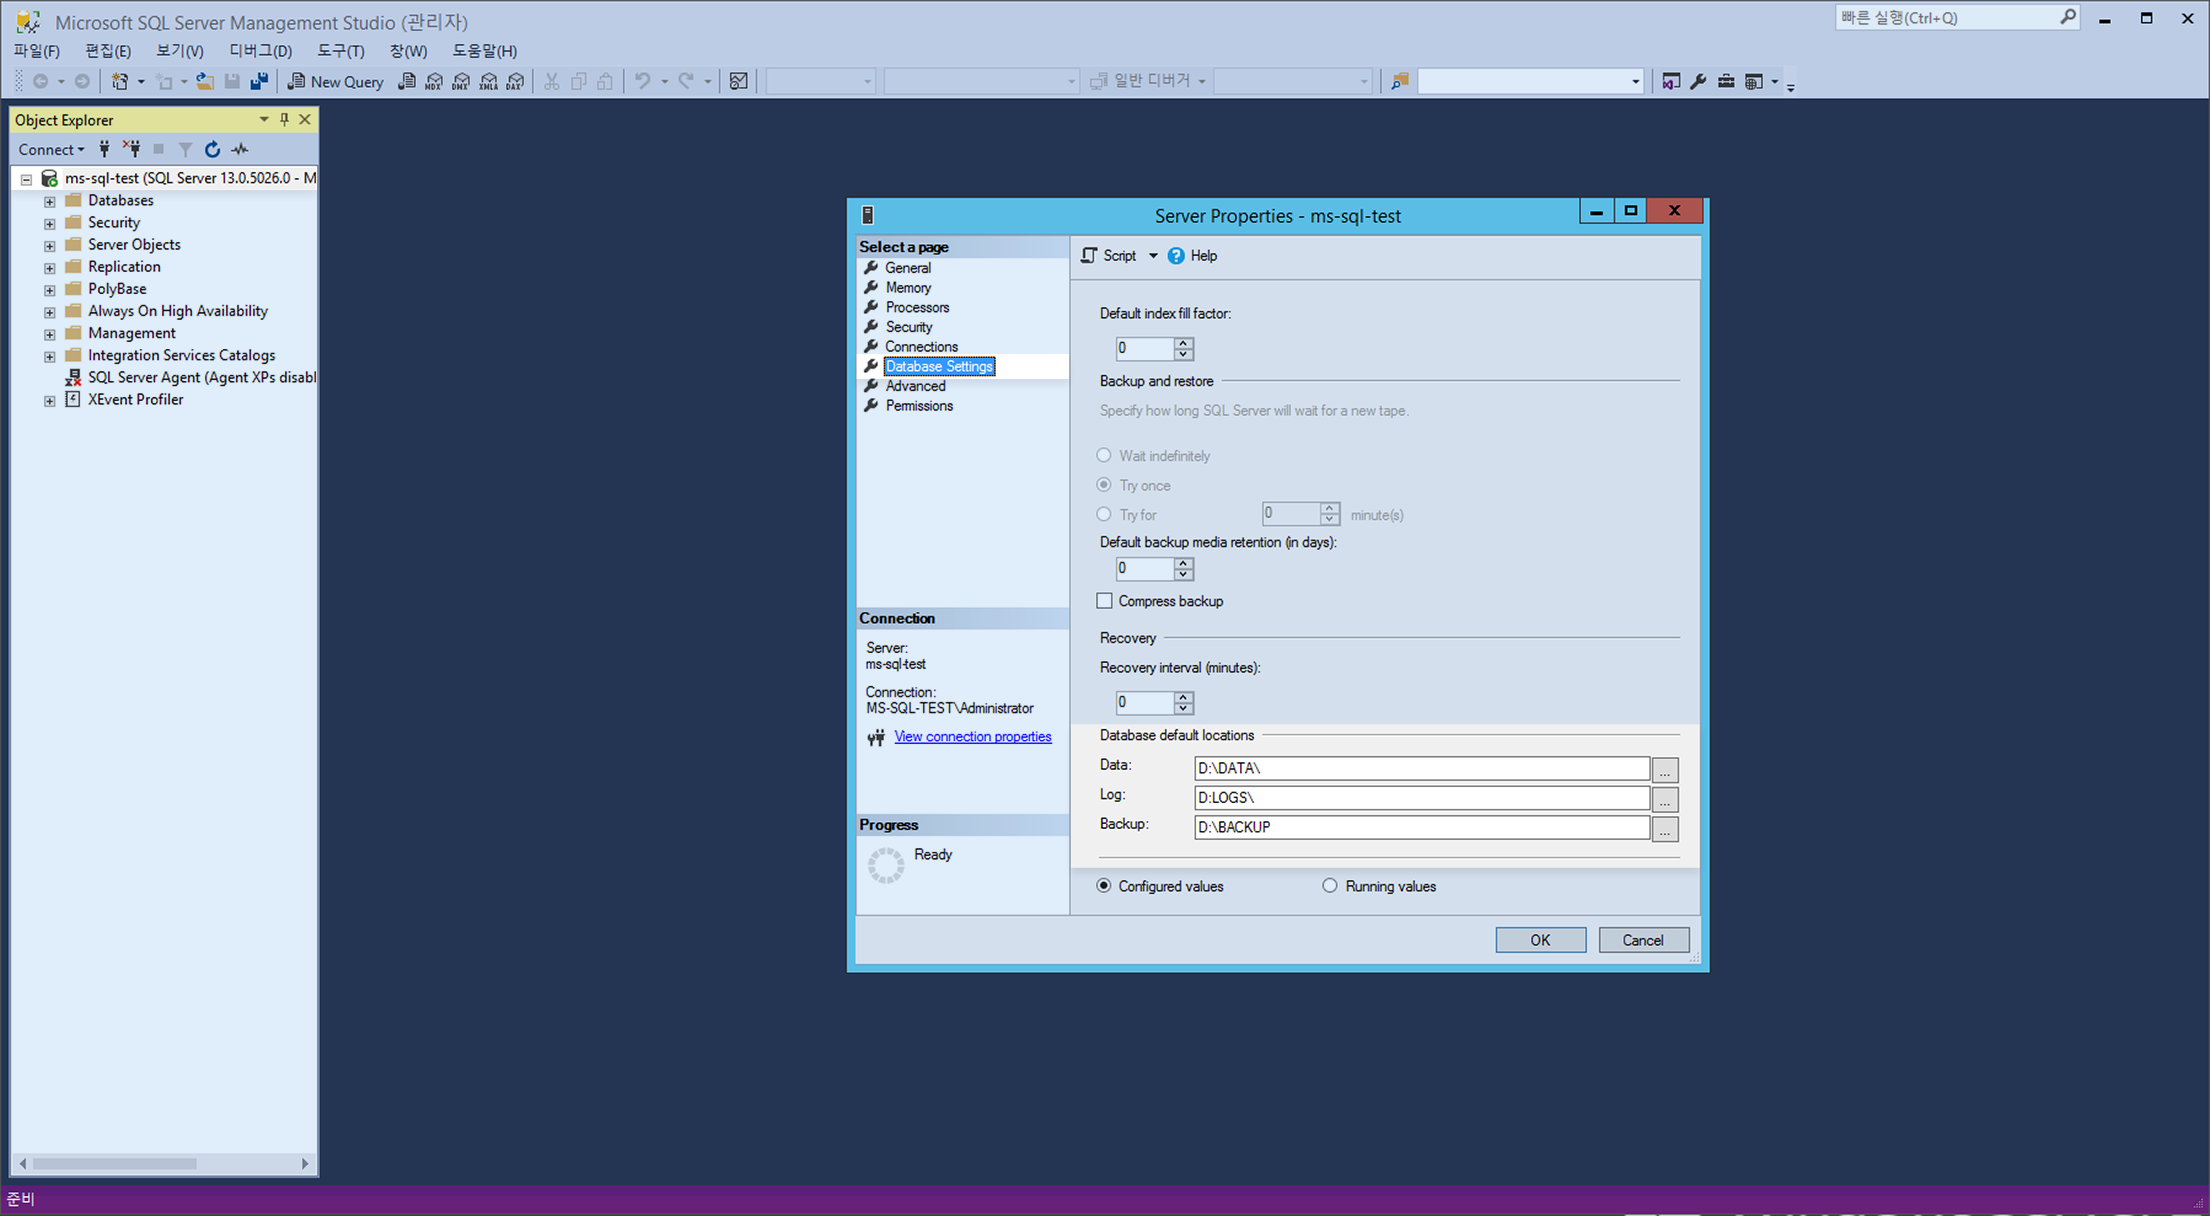
※ To apply the changed default database location, restart Microsoft SQL.
Restart Microsoft SQL
Change of Microsoft SQL settings sometimes requires a restart of the service. To apply changed settings, restart Microsoft SQL.
From SQL Server Configuration Manager, go to SQL Server Configuration Manager (local) > SQL Server Service > SQL Server (MSSQLSERVER) and right click it. When the menu shows up, click Restart to restart the service.

Check/Set Automatic Microsoft SQL Service Execution
Check if Microsoft SQL is set for automatic start with OS running.
Go to SQL Server Configuration Manager (local) > SQL Server in the SQL Server Configuration Manager to find Start Mode.
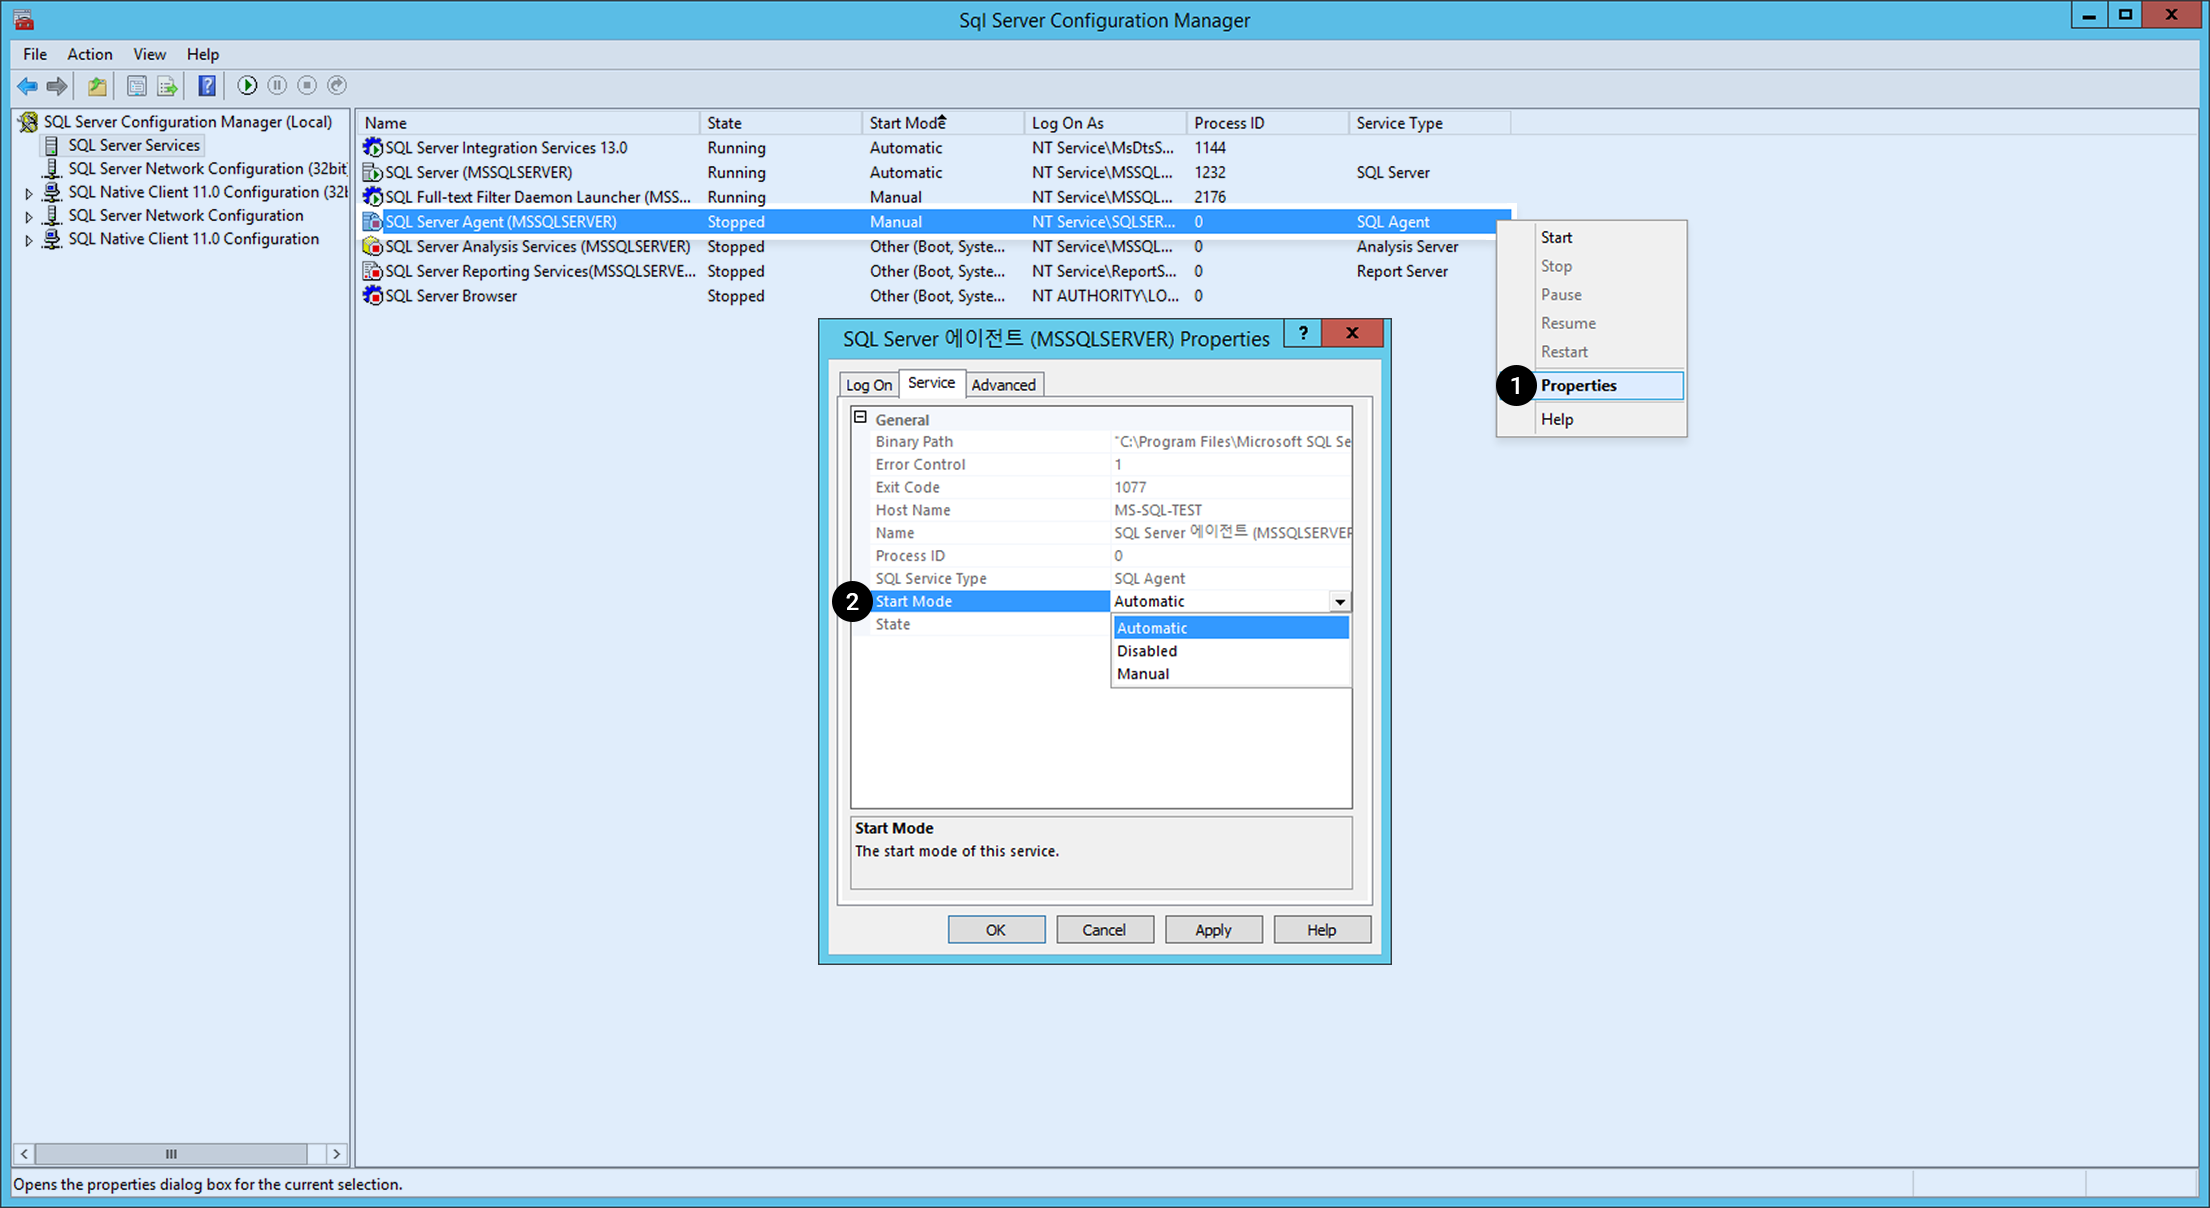
When the service start mode for SQL SERVER (MSSSQLSERVER) and SQL Server Agent (MSSQLSERVER) are not automatic, do the followings: 1. Click the service and right-click it. Select Properties on the menu. 2. Change Service on General > Start Mode to Automatic.
[Note] For the release status of Microsoft SQL Instance, see Instance Release Note.
MySQL Instance
Starting/Stopping MySQL
#Start mysql Service
shell> service mysqld start

#Stop mysql Service
shell> service mysqld stop

#Restart mysql Service
shell> service mysqld restart
Connecting to MySQL
For initial connection, connect to MySQL with default user name.
shell> mysql -uroot
Initial Settings for MySQL Instance
1. Set the Password
There's no password on root user on initial installation. Therefore, it is required to set password as soon as possible. You can change the password as follows.
mysql> ALTER USER USER() IDENTIFIED BY 'NEW PASSWORD';
Default MySQL validate_password_policy is as below:
- validate_password_policy=MEDIUM
- Must be more than 8 characters, and include numbers, lower/upper cases, and special characters.
2. Change the Port
The default MySQL port number is 3306. It is recommended to change the port number for security reasons.
shell> vi /etc/my.cnf


# Specify a port to use in the my.cnf file.

port = Port name to use


# Save vi editor Save editor


# Restart mysql service


shell> service mysqld restart


#Connect with the changed port number


shell> mysql -uroot -P[changed port number]
Description of my.cnf
The default path of my.cnf is /etc/my.cnf, and NHN Cloud recommended variables are set as below:
| Name | Description |
|---|---|
| default_storage_engine | Specify a default storage engine: Default is InnoDB with Online-DDL and transactions available. |
| expire_logs_days | Set log expiration period for logs provided by binlog settings. Default is three days. |
| innodb_log_file_size | Specify the size of log files which save redo logs of transactions. Recommended size is 256MB or higher in actual environment, and it is set as 512MB by default. In order for the changes to take effect, please restart the database. |
| innodb_file_per_table | When a table is deleted or truncated, the table space is immediately returned to the OS. |
| innodb_log_files_in_group | Set the number of innodb_log_file files and use them in circular fashion: requires at least two. |
| log_timestamps | Default log time of MySQL 5.7 is displayed in UTC time format; therefore, change log time to system local time. |
| slow_query_log | Enable the slow_query log option. Queries taking more than 10 seconds in accordance with long_query_time will be logged to the slow_query_log. |
| sysdate-is-now | For sysdate, SQL with sysdate() used for replication results in discrepant time between Master and Slave, so sysdate() and now() functions will behave the same. |
Description of MySQL Directory
Directory and file description of MySQL are as below:
| Name | Description |
|---|---|
| my.cnf | /etc/my.cnf |
| DATADIR | Path for MySQL Data File - /var/lib/mysql/ |
| ERROR_LOG | Path for MySQL error_log File - /var/log/mysqld.log |
| SLOW_LOG | Path for MySQL Slow Query File - /var/lib/mysql/*slow.log |
For detailed release status of MySQL Instance, please refer to Instance Release Notes.
PostgreSQL Instance
How to start/stop PostgreSQL
##CentOS

#Start postgresql service
shell> sudo systemctl start postgresql-${version}

#Stop postgresql service
shell> sudo systemctl stop postgresql-${version}

#Restart postgresql service
shell> sudo systemctl restart postgresql-${version}
##Ubuntu
# Start postgresql service
shell> sudo systemctl start postgresql
# Stop postgresql service
shell> sudo systemctl stop postgresql
# Restart postgresql service
shell> sudo systemctl restart postgresql
Log in to PostgreSQL
For initial connection, connect to MySQL with default user name.
#Switch account to postgres and log in
shell> sudo su - postgres
shell> psql
Create PostgreSQL instance and perform initial setup
1. Change the Port
The image port provided is 5432, the default PostgreSQL port. Port change is recommended for security purposes.
shell> vi postgresql.conf


#Specify the port to be used in the postgresql.conf file.

port =name of the port to use

#Save vi editor

#Restart postgresql service

##CentOS
shell> sudo systemctl restart postgresql-${version}

##Ubuntu
shell> sudo systemctl restart postgresql


#Log in with the changed port as shown below

shell> psql -p[changed port number]
2. Change server log timezone
The default timezone recorded in the server log is set to UTC. It is recommended to change it to match the local time of the SYSTEM.
shell> vi postgresql.conf


#Specify the timezone to be used in the postgresql.conf file.

log_timezone = timezone to use


#Save vi editor


#Restart postgresql service

##CentOS
shell> sudo systemctl restart postgresql-${version}

##Ubuntu
shell> sudo systemctl restart postgresql


#Log in to postgresql

shell> psql


#Check the changed settings

postgres=# SHOW log_timezone;
3. Cancel public schema permission
Since all users are provided with CREATE and USAGE permissions for public schema by default, users who can log in to the DB can create objects in public schema. It is recommended to cancel the permissions so that no users can create objects in public schema.
#Log in to postgresql

shell> psql


#Run permission cancellation command

postgres=# REVOKE CREATE ON SCHEMA public FROM PUBLIC;
4. Allow remote login
To allow logins other than local host, you need to change the listen_addresses variable and client authentication setup file.
shell> vi postgresql.conf

#Specify the address to be used in the postgresql.conf file.
#To allow all IPv4 addresses, 0.0.0.0
#To allow all IPv6 addresses, ::
#To allow all addresses, *

listen_addresses = address to allow


#Save vi editor


shell> vi pg_hba.conf


#Client authentication control per IP address format
#Since old client library is not supported by scram-sha-256, it needs to be changed to md5

# TYPE  DATABASE        USER            ADDRESS                 METHOD
# IPv4 local connections:
host    all             all             127.0.0.1/32            scram-sha-256
host    allowed DB           allowed user          allowed address                   scram-sha-256
# IPv6 local connections:
host    all             all             ::1/128                 scram-sha-256
host    allowed DB           allowed user          allowed address                   scram-sha-256


#Restart postgresql service

##CentOS
shell> pg_ctl reload -D /var/lib/pgsql/${version}/data/

##Ubuntu
shell> pg_ctl reload -D /var/lib/postgresql/${version}/main
PostgreSQL directory description
PostgreSQL directory and file description is as follows:
| Name | Description | CentOS | Ubuntu |
|---|---|---|---|
| postgresql.cnf | config file | /var/lib/pgsql/{version}/data/postgresql.conf | /etc/postgresql/${version}/main/postgresql.conf |
| DATADIR | PostgreSQL data file path | /var/lib/pgsql/{version}/data/ | /var/lib/postgresql/${version}/main |
| LOG | PostgreSQL log file path | /var/lib/pgsql/{version}/data/log/*.log | /var/lib/postgresql/${version}/main/log/*.log |
CUBRID Instance
How to Start/Stop the CUBRID service
You can start or stop the CUBRID service as follows by logging in with the “cubrid” Linux account.
# Start the CUBRID service/server
shell> sudo su - cubrid
shell> cubrid service start
shell> cubrid server start demodb

# Stop the CUBRID service/server
shell> sudo su - cubrid
shell> cubrid server stop demodb
shell> cubrid service stop

# Restart the CUBRID service/server
shell> sudo su - cubrid
shell> cubrid server restart demodb
shell> cubrid service restart

# Start/stop/restart the CUBRID broker
shell> sudo su - cubrid
shell> cubrid broker start
shell> cubrid broker stop
shell> cubrid broker restart
Connect to CUBRID
For initial connection, connect to MySQL with default user name.
shell> sudo su - cubrid
shell> csql -u dba demodb@localhost
Initial Setup After Creating a CUBRID Instance
1. Set the Password
After initial installation, the CUBRID dba account password is not set. Therefore, you must set a password after installation.
shell> csql -u dba -c "ALTER USER dba PASSWORD 'new_password'" demodb@localhost
2. Change the Broker Port
The broker port for query_editor defaults to 30000, and the broker port for broker1 defaults to 33000. For security reasons, it is recommended to change the port.
1) Modify the broker file
Open the following file and enter the port address to change as shown below.
shell> vi /opt/cubrid/conf/cubrid_broker.conf

[%query_editor]
BROKER_PORT             =[port address to change]

[%BROKER1]
BROKER_PORT             =[port address to change]
2) Restart the broker
Restart the broker for the port change to take effect.
shell> cubrid broker restart
3. Change the Manager Server Port
The manager server port defaults to 8001. For security reasons, it is recommended to change the port.
1) Modify the cm.conf file
Open the following file and enter the port address to change as shown below.
shell> vi /opt/cubrid/conf/cm.conf

cm_port =[port address to change]
2) Restart the manager server
Restart the manager for the port change to take effect.
shell> cubrid manager stop
shell> cubrid manager start
CUBRID Directory Description
The CUBRID directory and file descriptions are as follows.
| Name | Description |
|---|---|
| database.txt | CUBRID database location information file path - /opt/cubrid/databases |
| CONF PATH | CUBRID server, broker, manager environment variable file path - /opt/cubrid/conf |
| LOG PATH | CUBRID process log file path - /opt/cubrid/log |
| SQL_LOG | CUBRID SQL Query file path /opt/cubrid/log/broker/sql_log |
| ERROR_LOG | CUBRID ERROR SQL Query file path - /opt/cubrid/log/broker/error_log |
| SLOW_LOG | CUBRID Slow Query file path - /opt/cubrid/log/broker/sql_log |
cubrid.conf Description
A server configuration file that allows you to configure the memory of the database you want to operate, the number of threads according to the number of concurrent users, and the communication port between the broker and the server.
| Name | Description |
|---|---|
| service | A parameter to register processes that start automatically when the CUBRID service starts. By default, server, broker, and manager processes are registered. |
| cubrid_port_id | The port used by the master process. |
| max_clients | The maximum number of concurrently connected clients per database server process. |
| data_buffer_size | A parameter to set the size of the data buffer that the database server caches in memory. It is recommended to set the required memory size to a value within 2/3 of the system memory. |
broker.conf Description
A broker configuration file that allows you to set the port used by the broker you want to operate, the number of application servers (CAS), SQL LOG, etc.
| Name | Description |
|---|---|
| BROKER_PORT | The port used by the broker. The port seen by the actual driver such as JDBC is the port of the broker. |
| MAX_NUM_APPL_SERVER | A parameter to set the maximum number of CASs that can be connected to the broker at the same time. |
| MIN_NUM_APPL_SERVER | A parameter to set the minimum number of CAS processes waiting by default even if there is no connection request to the broker. |
| LOG_DIR | A parameter that specifies the directory where SQL logs are stored. |
| ERROR_LOG_DIR | A parameter that specifies the directory where error logs for the broker are stored. |
cm.conf Description
A CUBRID manager configuration file that allows you to set the port used by the manager server process you want to operate, the monitoring collection cycle, etc.
| Name | Description |
|---|---|
| cm_port | The port used by the manager server process. |
| cm_process_monitor_interval | A cycle for monitoring information collection. |
| support_mon_statistic | A parameter to set whether to use cumulative monitoring. |
| server_long_query_time | A parameter that specifies the threshold (in seconds) for a late query when the slow_query item among the server's diagnostic items is set. |
MariaDB Instance
How to Start/Stop MariaDB
# Start the MariaDB service
shell> sudo systemctl start mariadb.service

# Stop the MariaDB service
shell> sudo systemctl stop mariadb.service

# Restart the MariaDB service
shell> sudo systemctl restart mariadb.service
Connect to MariaDB
For initial connection, connect to MySQL with default user name.
shell> sudo mysql -u root
After changing the password, connect to MySQL as follows.
shell> mysql -u root -p
Enter password:
Initial Setup After Creating a MariaDB Instance
1. Set the Password
After initial installation, the MariaDB root account password is not set. Therefore, you must set a password after installation.
SET PASSWORD [FOR user] = password_option

MariaDB> SET PASSWORD = PASSWORD('password');
2. Change the Port
After initial installation, the port is 3306, which is MariaDB's default port. For security reasons, it is recommended to change the port.
1) Modify the /etc/my.cnf.d/server.cnf file
Open the /etc/my.cnf.d/server.cnf file and enter the port address to change under [mariadb] as follows.
shell> sudo vi /etc/my.cnf.d/server.cnf
[mariadb]
port=[port address to change]
2) Restart the instance
Restart the instance for the port change to take effect.
sudo systemctl restart mariadb.service
Tibero Instance
Create a Tibero Instance
Minimum Recommended Specifications
-
Root block storage
- SSD is recommended for speed, and we recommend setting it to at least 50GBto avoid root disk full.
-
Minimum recommended specifications: 4 vCore/8 GB
- Using less than the recommended specifications might limit the DBMS installation.
Additional Block Storage
- Create additional volumes other than the root volume.
- Tibero Machine Image (TMI) requires 150GB of additional volume, so you must set up at least 150 GB of additional block storage.
Connect to Instance
- After the instance creation is complete, use SSH to access the instance.
- The instance must have a floating IP associated and TCP port 22 (SSH) must be allowed in the security group.
- Connect to the instance using an SSH client and the set key pair.
- For a detailed guide on SSH connection, refer to [SSH Connection Guide](https://docs.toast.com/en/Compute/Instance/en/overview/#linux).
Install TMI
Run the dbca command in the /root path with the root account.
$ ./dbca OS_ACCOUNT DB_NAME DB_CHARACTERSET DB_TYPE DB_PORT
| No | Item | Argument value |
|---|---|---|
| 1 | OS_ACCOUNT | OS account under which Tibero runs |
| 2 | DB_NAME | DB_NAME (= SID) used by Tibero |
| 3 | DB_CHARACTERSET | DB character set used by Tibero |
| 4 | DB_TYPE | Specify Tibero Type (16vCore or less: SE/16vCore or more: CE) |
| 5 | DB_PORT | Service IP port used by Tibero |
Tibero 7 Cloud Standard Edition
[centos@tiberoinstance ~]$ sudo su root
[root@tiberoinstance centos]# cd
[root@tiberoinstance ~]# pwd
/root
[root@tiberoinstance ~]# ./dbca nhncloud tiberotestdb utf8 SE 8639
Tibero 7 Cloud Enterprise Edition
[centos@tiberoinstance ~]$ sudo su root
[root@tiberoinstance centos]# cd
[root@tiberoinstance ~]# pwd
/root
[root@tiberoinstance ~]# ./dbca nhncloud tiberotestdb utf8 CE 8639
Complete Installation
When the dbca command is run, the progress is output and the database is created in the nomount mode. It takes less than 10 minutes. When finished, the output is as below.
SQL>
System altered.

SQL>
System altered.

SQL> Disconnected.
[root@tiberoinstance ~]#
Check the Operation and the Installation Log
Check if Tibero is running.
[root@tiberoinstance ~]# ps -ef |grep tbsvr
nhncloud  9886     1  1 14:14 ?        00:00:00 tbsvr          -t NORMAL -SVR_SID tiberotestdb
nhncloud  9888  9886  0 14:15 ?        00:00:00 tbsvr_MGWP     -t NORMAL -SVR_SID tiberotestdb
nhncloud  9889  9886 36 14:15 ?        00:00:21 tbsvr_FGWP000  -t NORMAL -SVR_SID tiberotestdb
nhncloud  9890  9886  0 14:15 ?        00:00:00 tbsvr_FGWP001  -t NORMAL -SVR_SID tiberotestdb
nhncloud  9891  9886  0 14:15 ?        00:00:00 tbsvr_FGWP002  -t NORMAL -SVR_SID tiberotestdb
nhncloud  9892  9886  0 14:15 ?        00:00:00 tbsvr_FGWP003  -t NORMAL -SVR_SID tiberotestdb
nhncloud  9893  9886  0 14:15 ?        00:00:00 tbsvr_FGWP004  -t NORMAL -SVR_SID tiberotestdb
nhncloud  9894  9886  0 14:15 ?        00:00:00 tbsvr_FGWP005  -t NORMAL -SVR_SID tiberotestdb
nhncloud  9895  9886  0 14:15 ?        00:00:00 tbsvr_FGWP006  -t NORMAL -SVR_SID tiberotestdb
nhncloud  9896  9886  0 14:15 ?        00:00:00 tbsvr_FGWP007  -t NORMAL -SVR_SID tiberotestdb
nhncloud  9897  9886  0 14:15 ?        00:00:00 tbsvr_FGWP008  -t NORMAL -SVR_SID tiberotestdb
nhncloud  9898  9886  0 14:15 ?        00:00:00 tbsvr_FGWP009  -t NORMAL -SVR_SID tiberotestdb
nhncloud  9899  9886  0 14:15 ?        00:00:00 tbsvr_PEWP000  -t NORMAL -SVR_SID tiberotestdb
nhncloud  9900  9886  0 14:15 ?        00:00:00 tbsvr_PEWP001  -t NORMAL -SVR_SID tiberotestdb
nhncloud  9901  9886  0 14:15 ?        00:00:00 tbsvr_PEWP002  -t NORMAL -SVR_SID tiberotestdb
nhncloud  9902  9886  0 14:15 ?        00:00:00 tbsvr_PEWP003  -t NORMAL -SVR_SID tiberotestdb
nhncloud  9903  9886  0 14:15 ?        00:00:00 tbsvr_PEWP004  -t NORMAL -SVR_SID tiberotestdb
nhncloud  9904  9886  0 14:15 ?        00:00:00 tbsvr_PEWP005  -t NORMAL -SVR_SID tiberotestdb
nhncloud  9905  9886  0 14:15 ?        00:00:00 tbsvr_AGNT     -t NORMAL -SVR_SID tiberotestdb
nhncloud  9906  9886  3 14:15 ?        00:00:01 tbsvr_DBWR     -t NORMAL -SVR_SID tiberotestdb
nhncloud  9907  9886  0 14:15 ?        00:00:00 tbsvr_RCWP     -t NORMAL -SVR_SID tiberotestdb
root     13517  8366  0 14:15 pts/0    00:00:00 grep --color=auto tbsvr
[root@tiberoinstance ~]#
The installation log can be found in /root/.dbset.log.
[root@tiberoinstance ~]# ls -alh
Total 20K
dr-xr-x---.  4 root root 104 Oct 17 14:15 .
dr-xr-xr-x. 23 root root 4.0K Oct 17 14:14 .
-rw-r--r--.  1 root root 18 December 29 2013 .bash_logout
-rw-r--r--.  1 root root 176 Dec 29 2013 .bash_profile
-rw-r--r--.  1 root root 176 Dec 29 2013 .bashrc
-rw-r--r-- 1 root root 3.6K Oct 17 14:15 .dbset.log
drwxr----- 3 root root 19 Oct 17 14:13 .pki
drwx------ 2 root root 29 Oct 17 14:04 .ssh
Connect to Tibero
Change the Account
Log in with the OS_ACCOUNT created with the dbca command.
[root@tiberoinstance ~]# su - nhncloud
마지막 로그인: 목  1월 13 11:34:43 KST 2022 일시 pts/0

 #####   ###  ######    ###         #######  ###  ######   #######  ######   #######  #######  #######   #####   #######  ######   ######
#     #   #   #     #   ###            #      #   #     #  #        #     #  #     #     #     #        #     #     #     #     #  #     #
#         #   #     #   ###            #      #   #     #  #        #     #  #     #     #     #        #           #     #     #  #     #
 #####    #   #     #                  #      #   ######   #####    ######   #     #     #     #####     #####      #     #     #  ######
      #   #   #     #   ###            #      #   #     #  #        #   #    #     #     #     #              #     #     #     #  #     #
#     #   #   #     #   ###            #      #   #     #  #        #    #   #     #     #     #        #     #     #     #     #  #     #
 #####   ###  ######    ###            #     ###  ######   #######  #     #  #######     #     #######   #####      #     ######   ######

[nhncloud@tiberoinstance ~]$
Check Connection
[nhncloud@tiberoinstance ~]$ tbsql sys/tibero

tbSQL 7

TmaxTibero Corporation Copyright (c) 2020-. All rights reserved.

Connected to Tibero.

SQL> select * FROM v$instance;

INSTANCE_NUMBER INSTANCE_NAME
--------------- ----------------------------------------
DB_NAME
----------------------------------------
HOST_NAME                                                       PARALLEL
--------------------------------------------------------------- --------
   THREAD# VERSION
---------- --------
STARTUP_TIME
--------------------------------------------------------------------------------
STATUS           SHUTDOWN_PENDING
---------------- ----------------
TIP_FILE
--------------------------------------------------------------------------------
              0 tiberotestdb
tiberotestdb
tiberoinstance.novalocal                                      NO
         0 7
2023/10/17
NORMAL           NO
/db/tibero7/config/tiberotestdb.tip


1 row selected.

SQL>
Tibero Default Accounts
The default accounts provided by Tibero are as follows.
| Schema | Password | Description |
|---|---|---|
| sys | tibero | SYSTEM schema |
| syscat | syscat | SYSTEM schema |
| sysgis | sysgis | SYSTEM schema |
| outln | outln | SYSTEM schema |
| tibero | tmax | SAMPLE schema with the DBA privilege |
| tibero1 | tmax | SAMPLE schema with the DBA privilege |
- SYS: Performs administrator tasks for the database.
- SYSCAT: Creates DATA DICTIONARY & CATALOGVIEW.
- SYSGIS: Creates GIS-related tables and performs GIS-related tasks.
- OUTLN: Performs tasks such as storing related hints so that the same SQL can always be executed with the same plan.
- TIBERO/TIBERO1: An example user with the DBA privilege.
Kafka Instance
[Note] For the instance flavor, please choose c1m2 (CPU 1core, Memory 2GB) or higher specifications.
Start and Stop Zookeeper, Kafka broker
# Start Zookeeper, Kafka broker (Zookeeper first)
shell> sudo systemctl start zookeeper.service
shell> sudo systemctl start kafka.service

# Stop Zookeeper, Kafka broker (Kafka broker first)
shell> sudo systemctl stop kafka.service
shell> sudo systemctl stop zookeeper.service

# Restart Zookeeper, Kafka broker
shell> sudo systemctl restart zookeeper.service
shell> sudo systemctl restart kafka.service
Install Kafka Cluster
- Must install in a new instance.
- An odd number of instances (3 or more) are required, and installation script is executed in an instance.
- An instance consists of of one kafka broker and one zookeeper node.
- The key pair (PEM file) required to connect to another instance must be located at the ~ path of the instance running the installation script. The key pair of cluster instances must be the same.
- Only default port installation is supported. If you need to change the port, change the port by referring to the initial settings guide after completing cluster installation.
- For Kafka-related port communication between instances, set security group as follows.
Set security group
Direction: Inbound
IP protocol: TCP
Port: 22, 9092, 2181, 2888, 3888
How to check Hostname and IP
# Check Hostname
shell> hostname

# Check IP
Console screen
or shell> hostname -i
Example of executing the cluster installation script (enter the hostname and IP checked above)
shell> sh ~/.kafka_make_cluster.sh

Enter Cluster Node Count: 3
### 3 is odd number.
Enter Cluster's IP ( Cluster 1 ) : 10.0.0.1
Enter Cluster's HOST_NAME ( Cluster 1 ) : kafka1.novalocal
Enter Cluster's IP ( Cluster 2 ) : 10.0.0.2
Enter Cluster's HOST_NAME ( Cluster 2 ) : kafka2.novalocal
Enter Cluster's IP ( Cluster 3 ) : 10.0.0.3
Enter Cluster's HOST_NAME ( Cluster 3 ) : kafka3.novalocal
10.0.0.1 kafka1.novalocal
10.0.0.2 kafka2.novalocal
10.0.0.3 kafka3.novalocal
Check Cluster Node Info (y/n) y
Enter Pemkey's name: kafka.pem
ls: cannot access /tmp/kafka-logs: No such file or directory
ls: cannot access /tmp/zookeeper: No such file or directory
### kafka1.novalocal ( 10.0.0.1 ), Check if kafka is being used
### kafka1.novalocal ( 10.0.0.1 ), Store node information in the /etc/hosts directory.
### kafka1.novalocal ( 10.0.0.1 ), Modify zookeeper.properties.
### kafka1.novalocal ( 10.0.0.1 ), Modify server.properties.
ls: cannot access /tmp/kafka-logs: No such file or directory
ls: cannot access /tmp/zookeeper: No such file or directory
### kafka2.novalocal ( 10.0.0.2 ), Check if kafka is being used
### kafka2.novalocal ( 10.0.0.2 ), Store node information in the /etc/hosts directory.
### kafka2.novalocal ( 10.0.0.2 ), Modify zookeeper.properties.
### kafka2.novalocal ( 10.0.0.2 ), Modify server.properties.
ls: cannot access /tmp/kafka-logs: No such file or directory
ls: cannot access /tmp/zookeeper: No such file or directory
### kafka3.novalocal ( 10.0.0.3 ), Check if kafka is being used
### kafka3.novalocal ( 10.0.0.3 ), Store node information in the /etc/hosts directory.
### kafka3.novalocal ( 10.0.0.3 ), Modify zookeeper.properties.
### kafka3.novalocal ( 10.0.0.3 ), Modify server.properties.
### kafka1.novalocal ( 10.0.0.1 ), Start Zookeeper, Kafka.
### Zookeeper, Kafka process is running.
### kafka2.novalocal ( 10.0.0.2 ), Start Zookeeper, Kafka.
### Zookeeper, Kafka process is running.
### kafka3.novalocal ( 10.0.0.3 ), Start Zookeeper, Kafka.
### Zookeeper, Kafka process is running.
##### Cluster Installation Complete #####
Initial Setup After Creating a Kafka Instance
Change the Port
After initial installation, the ports are 9092, which is the Kafka default port, and 2181, which is the Zookeeper default port. It is recommended to change the port for security.
1) Modify the ~/kafka/config/zookeeper.properties file
Open the ~/kafka/config/zookeeper.properties file and enter the Zookeeper port to change in clientPort.
shell> vi ~/kafka/config/zookeeper.properties

clientPort=zookeeper port to change
2) Modify the ~/kafka/config/server.properties file
Open the ~/kafka/config/server.properties file and enter the Kafka port to change in listeners.
How to check Instance IP
Private IP on the console screen
or shell> hostname -i
shell> vi ~/kafka/config/server.properties

# Uncomment
listeners=PLAINTEXT://Instance IP:kafka port to change

# Change Zookeeper port
zookeeper.connect=Instance IP:zookeeper port to change
---> If it is a cluster, change Zookeeper port of each instance IP
3) Restart Zookeeper, Kafka broker
shell> sudo systemctl stop kafka.service
shell> sudo systemctl stop zookeeper.service

shell> sudo systemctl start zookeeper.service
shell> sudo systemctl start kafka.service
4) Check Zookeeper, Kafka Port Change
Check if the changed port is in use.
shell> netstat -ntl | grep [Kafka port]
shell> netstat -ntl | grep [Zookeeper port]
Create and Use Kafka Topic and Data
Create and query a topic
# Instance IP = Private IP / Kafka default port = 9092
# Create a topic
shell> ~/kafka/bin/kafka-topics.sh --create --bootstrap-server [Instance IP]:[Kafka PORT] --topic kafka

# Query a topic list
shell> ~/kafka/bin/kafka-topics.sh --list --bootstrap-server [Instance IP]:[Kafka PORT]

# Check the details of the topic
shell> ~/kafka/bin/kafka-topics.sh --describe --bootstrap-server [Instance IP]:[Kafka PORT] --topic kafka

# Delete a topic
shell> ~/kafka/bin/kafka-topics.sh --delete --bootstrap-server [Instance IP]:[Kafka PORT] --topic kafka
Create and use data
# Start producer
shell> ~/kafka/bin/kafka-console-producer.sh --broker-list  [Instance IP]:[Kafka PORT] --topic kafka

# Start consumer
shell> ~/kafka/bin/kafka-console-consumer.sh --bootstrap-server [Instance IP]:[Kafka PORT] --from-beginning --topic kafka
Redis Instance
Start/Stop Redis
# Start the MySQL service
shell> sudo systemctl start mysqld

# Stop the MySQL service
shell> sudo systemctl stop mysqld

# Restart the MySQL service
shell> sudo systemctl restart mysqld
Connect to Redis
Connect to a Redis instance by using the redis-cli command.
shell> redis-cli
Initial Setup After Creating a Redis Instance
The default configuration file for a Redis instance is the ~/redis/redis.conf file. The description for the parameters to be changed is as follows.
Bind
- Default value:
127.0.0.1 -::1 - Changed value:
<private ip> 127.0.0.1 -::1
Value for an IP used by Redis. To allow access to a Redis instance from outside the server, add a private IP to the parameter. You can check the private IP with the hostname -I command.
Port
- Default value:
6379
Port is 6379, a default value for Redis. It is recommended to change the port for security reasons. After changing the port, you can connect to Redis with the following command.
shell> redis-cli -p <new port>
Requirepass/masterauth
- Default value:
nhncloud
The default password is nhncloud. For security reasons, it is recommended to change the password. If you are using replication connection, you must change the requirepass and masterauth values at the same time.
Automatic HA Configuration Script
A Redis instance of NHN Cloud provides a script that automatically configures an HA environment. You can use the script only for a new instance immediately after installation, and cannot use after changing the set values from redis.conf.
To use the script, the following settings are required.
Copy key pair
The instance running the installation script must have a key pair (PEM file) required to connect to other instances. The key pair can be copied as follows.
- centos
local> scp -i <key pair>.pem <key pair>.pem centos@<floating ip>:/home/centos/
- ubuntu
local> scp -i <key pair>.pem <key pair>.pem ubuntu@<floating ip>:/home/ubuntu/
The key pairs for created instances must be the same.
Set security group
You must set a security group (Network > Security Groups) for communication between Redis instances. Create a security group with the following rules and apply it to a Redis instance.
| Direction | IP protocol | Port range | Ether | Remote |
|---|---|---|---|---|
| Inbound | TCP | 6379 | IPv4 | Instance IP (CIDR) |
| Inbound | TCP | 16379 | IPv4 | Instance IP (CIDR) |
| Inbound | TCP | 26379 | IPv4 | Instance IP (CIDR) |
Sentinel Automatic Configuration
You will need 3 Redis instances to configure Sentinel. After copying the key pair to the instance used as the master, run the script as follows.
shell> sh .redis_make_sentinel.sh
Enter the private IPs of the master and replica in turn. You can check the private IP of each instance with the hostname -I command.
shell> sh .redis_make_sentinel.sh
Enter Master's IP: 192.168.0.33
Enter Replica-1's IP: 192.168.0.27
Enter Replica-2's IP: 192.168.0.97
Enter the file name of the copied key pair.
shell> Enter Pemkey's name: <key pair>.pem
Cluster Automatic Configuration
6 Redis instances are required for Cluster configuration. After copying the key pair to the instance used as the master, run the script as follows.
shell> sh .redis_make_cluster.sh
Enter the private IPs of Redis instances used for a cluster in turn. You can check the private IP of each instance with the hostname -I command.
shell> sh .redis_make_cluster.sh
Enter cluster-1'IP:  192.168.0.79
Enter cluster-2'IP: 192.168.0.10
Enter cluster-3'IP: 192.168.0.33
Enter cluster-4'IP:  192.168.0.116
Enter cluster-5'IP:  192.168.0.91
Enter cluster-6'IP:  192.168.0.32
Enter the file name of the copied key pair.
shell> Enter Pemkey's name: <key pair>.pem
Enter yes to complete cluster configuration.
>>> Performing hash slots allocation on 6 nodes...
Master[0] -> Slots 0 - 5460
Master[1] -> Slots 5461 - 10922
Master[2] -> Slots 10923 - 16383
Adding replica 192.168.0.91:6379 to 192.168.0.79:6379
Adding replica 192.168.0.32:6379 to 192.168.0.10:6379
Adding replica 192.168.0.116:6379 to 192.168.0.33:6379
M: 0a6ee5bf24141f0058c403d8cc42b349cdc09752 192.168.0.79:6379
   slots:[0-5460] (5461 slots) master
M: b5d078bd7b30ddef650d9a7fa9735e7648efc86f 192.168.0.10:6379
   slots:[5461-10922] (5462 slots) master
M: 0da9b78108b6581bdb90002cbdde3506e9173dd8 192.168.0.33:6379
   slots:[10923-16383] (5461 slots) master
S: 078b4ce014a52588e23577b3fc2dabf408723d68 192.168.0.116:6379
   replicates 0da9b78108b6581bdb90002cbdde3506e9173dd8
S: caaae4ebd3584c0481205e472d6bd0f9dc5c574e 192.168.0.91:6379
   replicates 0a6ee5bf24141f0058c403d8cc42b349cdc09752
S: ab2aa9e37cee48ef8e4237fd63e8301d81193818 192.168.0.32:6379
   replicates b5d078bd7b30ddef650d9a7fa9735e7648efc86f
Can I set the above configuration? (type 'yes' to accept):
[OK] All nodes agree about slots configuration.
>>> Check for open slots...
>>> Check slots coverage...
[OK] All 16384 slots covered.
Table of Contents
- Compute > Instance > Installation Component Guide
- NAT Instance
- Key Features
- Source/target check setting
- Routing setting
- Caution on settings
- MS-SQL Instance
- Allow Security Group TCP Port 3389 (RDP)
- Initial Settings after Microsoft SQL Image is Created
- Data Volume Assignment
- Restart Microsoft SQL
- Check/Set Automatic Microsoft SQL Service Execution
- MySQL Instance
- Starting/Stopping MySQL
- Connecting to MySQL
- Initial Settings for MySQL Instance
- Description of my.cnf
- Description of MySQL Directory
- PostgreSQL Instance
- How to start/stop PostgreSQL
- Log in to PostgreSQL
- Create PostgreSQL instance and perform initial setup
- PostgreSQL directory description
- CUBRID Instance
- How to Start/Stop the CUBRID service
- Connect to CUBRID
- Initial Setup After Creating a CUBRID Instance
- CUBRID Directory Description
- MariaDB Instance
- How to Start/Stop MariaDB
- Connect to MariaDB
- Initial Setup After Creating a MariaDB Instance
- Tibero Instance
- Create a Tibero Instance
- Connect to Instance
- Install TMI
- Connect to Tibero
- Tibero Default Accounts
- Kafka Instance
- Start and Stop Zookeeper, Kafka broker
- Install Kafka Cluster
- Initial Setup After Creating a Kafka Instance
- Create and Use Kafka Topic and Data
- Redis Instance
- Start/Stop Redis
- Connect to Redis
- Initial Setup After Creating a Redis Instance
- Automatic HA Configuration Script