Notification > Push > Console Guide
To use the Push service, you need to register third-party push notification service certificates.
Currently, the supported push notification service certificates are as follows: - GCM - Google Cloud Messaging (Firebase Cloud Messaging) - APNS - Apple Push Notification Service - ADM - Amazon Device Messaging
Certificate Management
To manage certificates, go to Notification > Push > Certificates from the menu.
FCM Service Account Credential
To send push notification messages to an Android device, you need Service Account Credential. A Service Account is a special type of account that is typically used for application-to-application (A2A) communication with Google Cloud.
Import the FCM Service Account Credential JSON File
- Sign in to Google Firebase Console.
- Add a project to create a new project.
- Go to the created project.
- Click Gear > Project settings next to Project overview in the top left of the page.
- Select Service Account.
- In the Firbase Admin SDK topic, click Generate new private key to download a new Service Account Credential JSON file.
Register FCM Service Account Credential JSON File
- Go to Notification > Push > Certificate from the console.
- Open and copy the downloaded JSON file.
- Paste the copied content into the FCM Service Account Credential field and click Register.
Get Authentication Information for APNS JWT
To send push notification messages to an iOS device, you need encryption key, Key ID, Team ID (App ID Prefix) and Topic available from the Apple Developer's website.
Getting APNS Encryption Key
- Visit Apple Developer's Console and go to Certificates, IDs & Profiles.
- Select Keys.
- Select Create a key.
- Go to Register a New Key and enter key name, and then go to ENABLE to select Apple Push Notifications service (APNs), and click Continue to proceed.
- Confirm and then select Register.
- Select Download to download encryption key files.
Getting Key ID
- Visit Apple Developer's Console and go to Certificates, IDs & Profiles.
- Select the issued key.
- Confirm it from View Key Details.
Getting Team ID
- Visit Apple Developer's Console and go to Certificates, IDs & Profiles.
- Select Identifiers.
- Confirm it from Edit your App ID Configuration.
Topic
To authentication using JWT, you need a topic which refers to app's bundle ID.
APNS Certificate
To send push notification to iOS devices, you need APNS certificate generated from Apple Developer website.
Create and Import APNS Certificate
- Run Keychain Access app on Mac.
- Choose Access Keychain > Support Certificates > Request a Certificate from Certificate Authority.
- Enter information as required such as Apple Developer’s ID at User's Email Address, choose Disk Saved, and I have saved key pair information, and click Continue.
- Choose the key size and algorithm at Key Pair Information and click Continue. Then, a Certificate Signing Request (CSR) file is created.
- Go to Apple Developer Certificates.
- Click +(Add) at the top right to go to the page issuing Certificates.
- Choose Select Type > Request > Generate tab to upload CSR files made through Keychain and click Generate.
- You can create and download a certificate. If not authorized, you can obtain an authority to download.
- Download the certificate and select it in Keychain > Certificates.
- Right-mouse click on the certificate and choose Send.
- Choose save location and press Save (file format: .p12).
- Enter password to protect exported items, and the certificate is ready.
Register APNS Certificate
- Click Notification > Push > Certificates on Console.
- Click Select File at APNS Certificate > Certificates.
- Enter certificate password at Password .
- Click Register.
Caution for APNS
Differences between APNS (Production) and APNS_SANDBOX (Development)
- Applications built with Production Provisioning Profile must use APNS (Production) while those built with Development Provisioning Profile must use APNS_SANDBOX (Development). Otherwise, push messages may not be properly received.
- In most failure cases of message delivery, the APNS certificate registered at NHN Cloud Push has a different provisioning profile for application buildup. APNS(Production) = Production Provisioning Profile APNS_SANDBOX(Development) = Development Provisioning Profile
- For more details, refer to the following:
APNS Overview
App Distribution Quick Start
Causes of Delivery Failure of APNS Messages
- When a certificate has expired
- When an invalid certificate has been registered
- When a push message has been rejected by the application
- When there’s no Internet access
ADM Credentials
To send push notification to Kindle Fire app, you need its Client ID and Client Secret.
Register ADM Application and Profiles (Acquire Client Id and Client Secret)
- Go to ADM Developer Console.
- Click APP & SERVICES at the top left and choose Add a New App at the bottom.
- When the app is created, click Device Messaging in the middle. Then, click Create a New Security Profile.
- When the profile is created, click Security Profiles in the middle and choose View Security Profile.
- Go to the General tab to check Client ID and Client Secret.
Register Setting Information for ADM Kindle (Acquire API Key)
- Click Security Profiles and then Android/Kindle Setting in the middle.
- Enter information such as App Key Name, Package, MD5 Signature, and SHA256 Signature.
- You can query information of MD5 or SHA256, by using commands like below:
> keytool -list -v -keystore {keystoreFileName}

Enter password for key repository:
Type of key repository: JKS
Key repository provider: SUN

One item is included to a key repository.

Nickname: androiddebugkey
Date of Creation: May 9, 2018
Item Type: PrivateKeyEntry
Chain Length of Certificate: 1
Certificate [1]:
Owner: C=US, O=Android, CN=Android Debug
Issuer: C=US, O=Android, CN=Android Debug
Serial Number: 1
Appropriate Start Date: Wed. May 09 19:59:46 KST 2018 End Date: Fri. May 01 19:59:46 KST 2048
Certificate Fingerprint:
         MD5:  xxxx
         SHA1: xxxx
         SHA256: xxxx
Signature Algorithm Name: SHA1withRSA
Subject Common Key Algorithm: 1024 bits RSA Key
Version: 1
- After registration is completed, click Show and query API key information.
Message Delivery
After certificates and tokens are properly set, go to Console and click Notification > Push > Messages > Add and send immediate push messages.
The following is the format for immediate delivery:
Target
| Name | Description |
|---|---|
| Type | Choose one out of ALL, UID, and TAG. |
| To | You can enter UIDs. Conversion to UID is available by choosing UID in Target > Type: use comma (',') as delimiter to enter many. |
| UIDs | Use comma (',') as delimiter to enter multiple UIDs. |
| Tags | Click Select and choose tags. |
| Selected Tags | Display selected tags: click again to deselect. |
| Countries | Enter country code: use comma (',') as delimiter to enter multiple country codes. |
| Push Types | You can choose multiple types among GCM, APNS, APNS Sandbox, and ADM. |
Option
| Name | Description |
|---|---|
| Time To Live | Refers to effective time for message delivery. If a delivery is delayed during the time set, it is automatically processed as a failure. It is set by minute. Setting it as '0' will not make the delivery to automatically fail. |
Message
| Name | Description |
|---|---|
| Editor Type | Two types: SIMPLE and JSON. In the case of JSON, you can type in your messages. |
| Message Type | Two types: NOTIFICATION and AD. In the case of AD, the messages are delivered only to the users who agreed to receive advertising push messages. |
Rich Message
You can send push notifications with buttons, images, and various other things included. You can also preview how the message would look like in Android and iOS smartphones. You need SDK version 1.7 or above to use this feature.
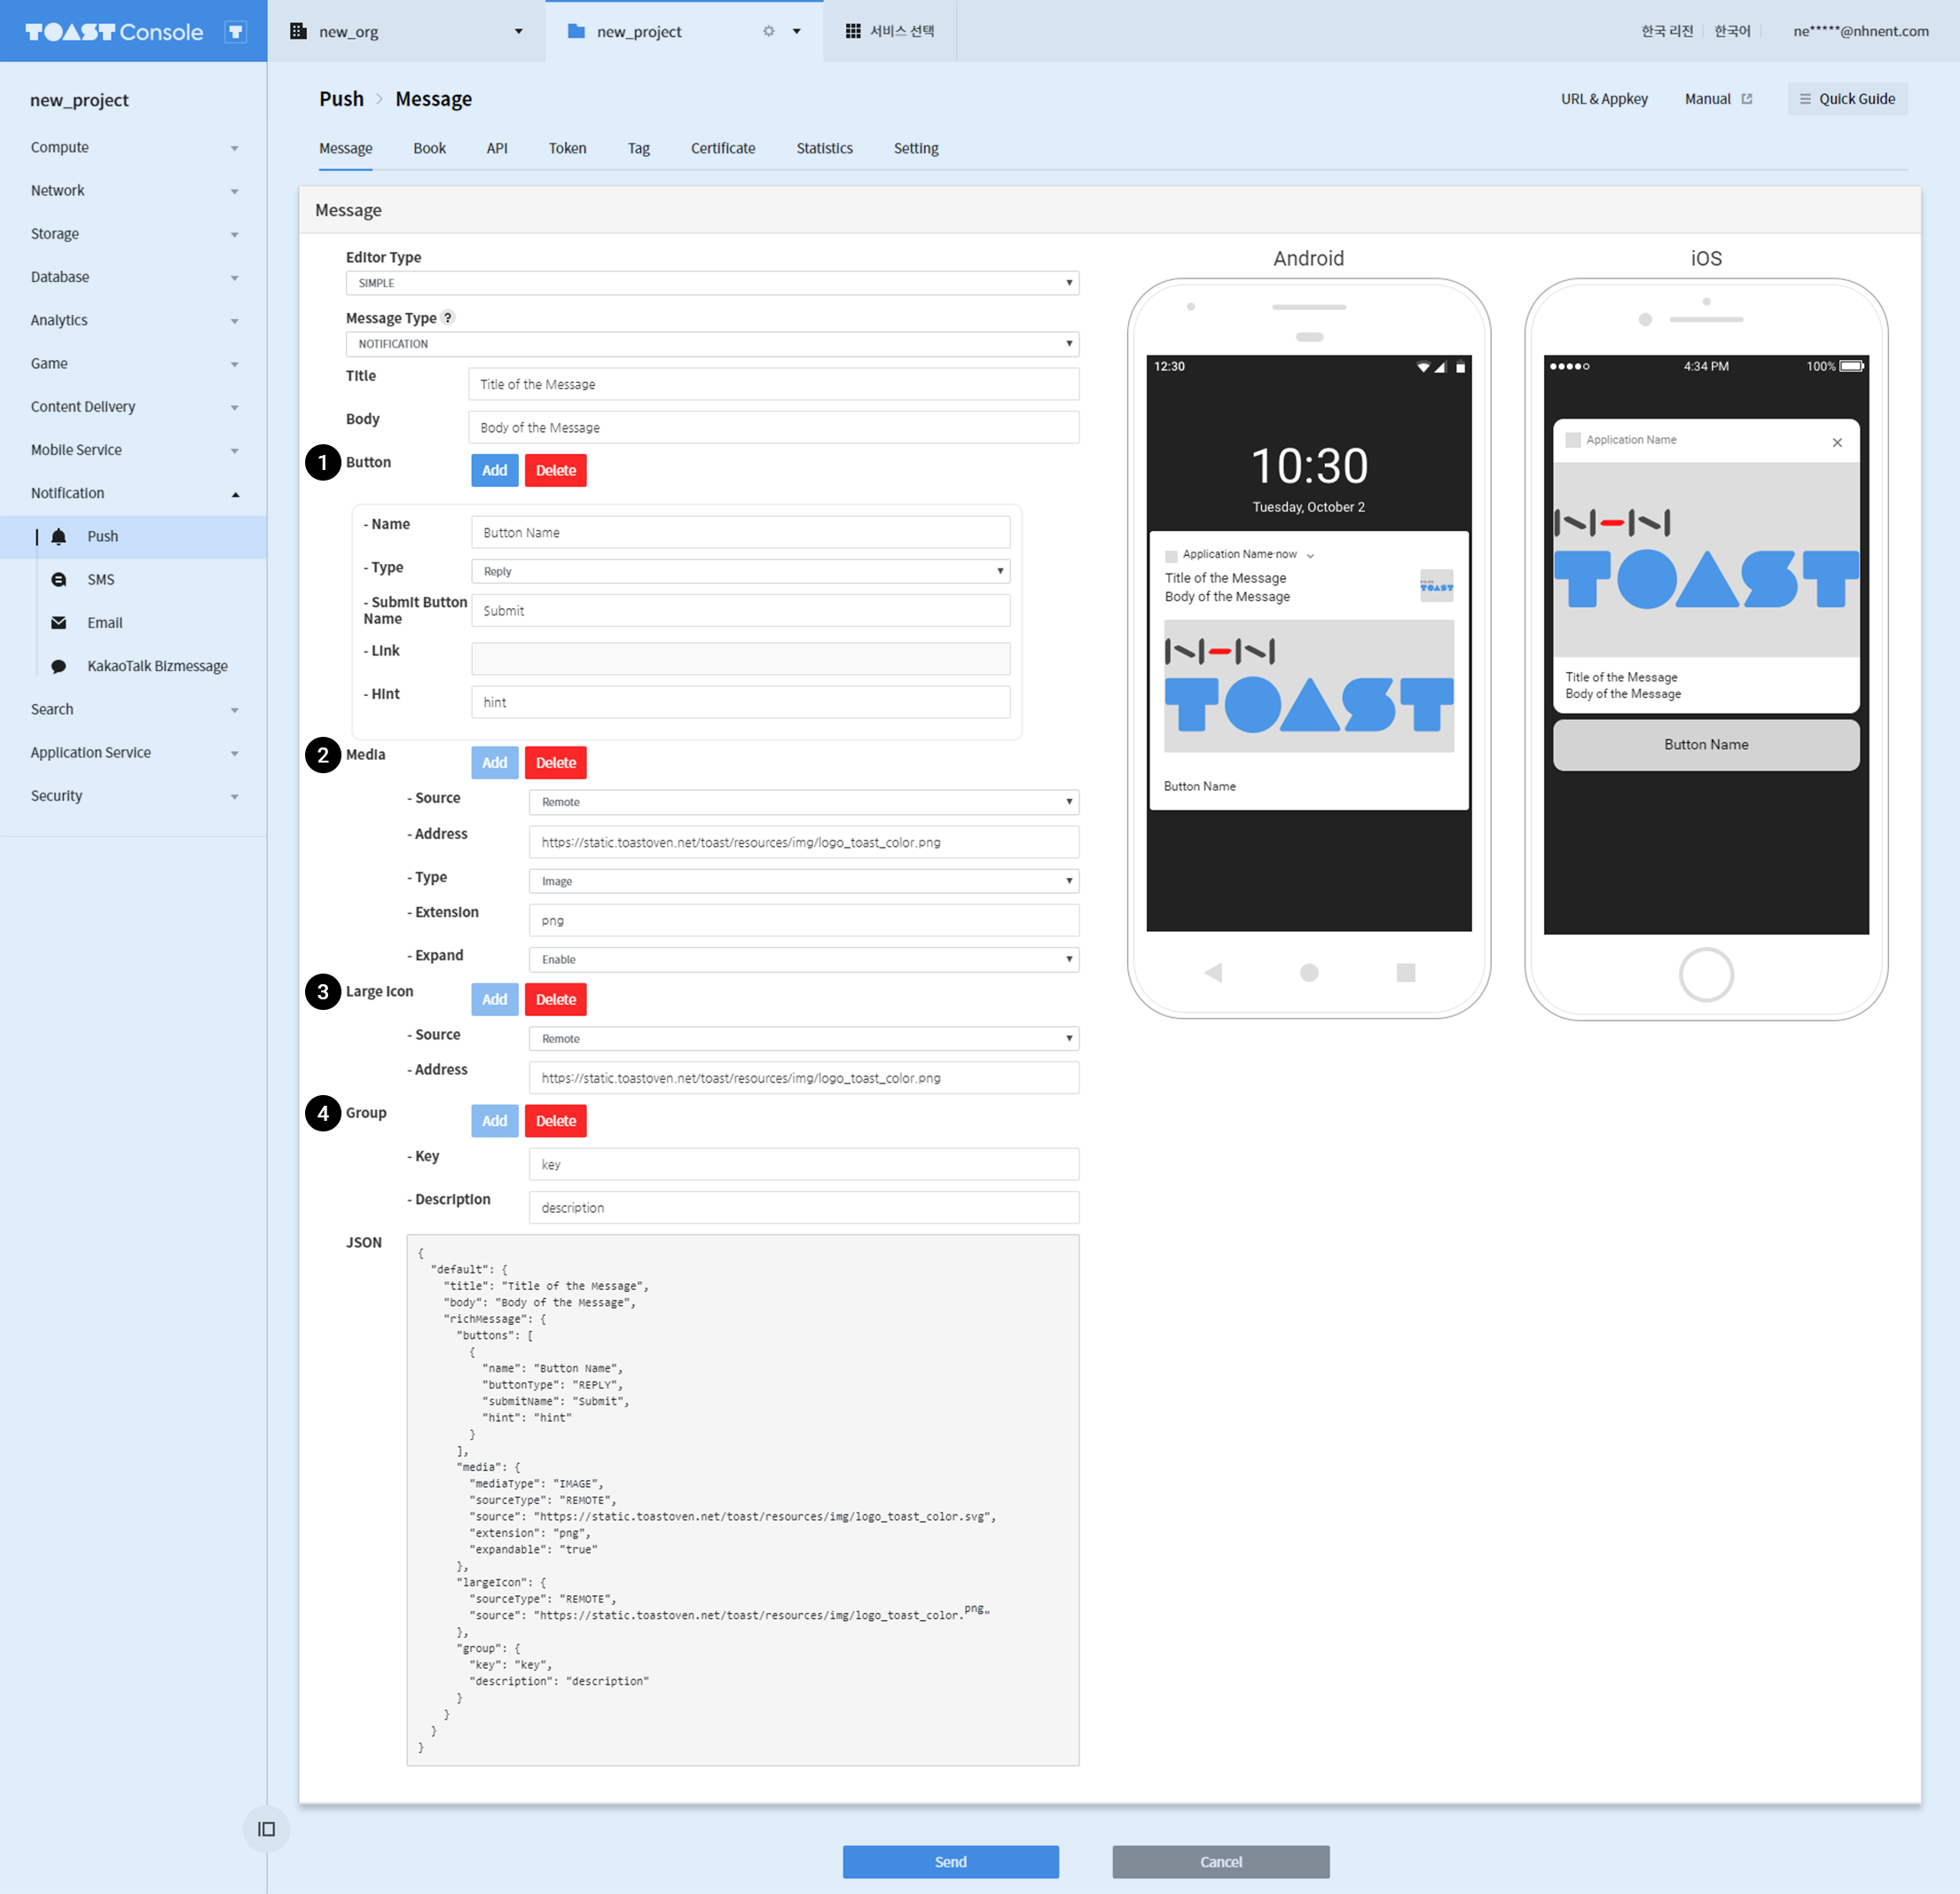
1. Button
| Name | Description |
|---|---|
| Name | Name of the button. |
| Type | Button types are Reply, Open App, Open URL, and Dismiss |
| Submit Button Name | If the button type is "Reply" you can configure the name of the submit button in iOS. |
| Link | URL link to refer to when pressed. Only applies when the type of the button is "Open URL". |
| Hint | Description of the button. |
Button Types
- Reply
- Direct replies are executed.
- When Send is touched by user, user-input text is delivered to action listener.
- Open App
- App is executed.
- Whole message is delivered via action listener. By entering information for a message, movement to a particular page becomes available.
- Open URL
- Execute URL (https://...) or Scheme (Scheme://...) included in the link.
- Enter URL to execute a web browser and the URL is loaded.
- Enter Scheme to execute a scheme which is pre-defined on an app.
- Dismiss
- Notification is dismissed.
2. Media
| Name | Description |
|---|---|
| Source | Source of the media: Remote or Local |
| Address | URL or URI of the media. |
| Type | Three types of media: Image, GIF, Video, and Audio. (Only Image type is available for Android) |
| Extension | File extension of the media file. ex)png, avi, mp4 |
| Expand | Unfolds the image media, Only available on Android. |
Specify Media Files
- External
- Download media files for URL.
- Android
- To apply HTTP at Android Pie or higher version, network-security-config must be set.
- iOS
- To use HTTP for iOS 9 or higher version, ATS (App Transport Security) must be set within Info.plist.
- Fill in Extension with actual extension information of a media file (e.g. jpg, png, mp3, or wav)
- Internal
- Use resources included in an app.
- Android
- Must add files to 'res > drawable' first.
- Since access is made via resource identifier, enter file name to 'richMessage.media.source' for a message, excluding extension.
- File name is used as resource identifier for Android, so same file name is not available even with different extension. Supported image formats are png, jpg, and gif. (Currently, video or audio type media are not supported.)
- iOS
- Must add resources first, to the Notification Service Extension project which creates rich messages.
- Add file or directory from XCode to 'NotificationServiceExtension' project.
- See if files have been well added at 'Build Phases > TARGETS'.
- The entire file name is required including extension, since access is made via bundle resources.
- Enter file name added to 'richMessage.media.source' for a message.
Media Types
- Image
| Android | iOS | |
|---|---|---|
| Supported Format | JPEG, PNG, GIF | JPEG, PNG, GIF |
| GIF Animation | Not supported | Supported |
| File Size | No limits | 10MB |
| Recommendations | 2:1 horizontal image is recommended Small: 512x256 Medium: 1024x512 Large: 2048x1024 |
Horizontal image is recommended Max size: 1038x1038 |
- Video
| Android | iOS | |
|---|---|---|
| Supported Format | Not supported | MPEG, MPEG3Video, MPEG4, AVIMovie |
| File Size | Not supported | 50MB |
- Voice
| Android | iOS | |
|---|---|---|
| Supported Format | Not supported | WaveAudio, MP3, MPEG4Audio |
| File Size | Not supported | 5MB |
3. Large Icon
This feature is only available on Android. A large icon is set for the notification. The file setting method is the same as the media file setting method.
| Name | Description |
|---|---|
| Source | Source of the icon image: Remote or Local |
| Address | URL or URI of the icon image. |
4. Group
This feature is only available on Android. Groups are set for notifications, and notifications with the same group key are represented in group.
| Name | Description |
|---|---|
| Key | Group key |
| Description | Group Description |
5. Alert Sounds
| Android | iOS | |
|---|---|---|
| Supported Format | MP3, PCM/WAVE, Vorbis | Linear PCM, MP4(IMA/ADPCM), μ-law, aLaw |
| Extension | .mp3, .wav, .ogg | .aiff, .wav, .caf |
| Play Time | No limits | 30 seconds |
- Only the resources that are included in an app can be specified. (no external URL is allowed)
- Android
- Must add resources first to the 'res > raw' folder.
- File extension is ignored, since access is made via resource identifier.
- Operates only on Android Oreo or lower versions.
- iOS
- Must add resources first, as bundle resources of an app project.
- The entire file name is required, including extension, since access is made via bundle resources.
Scheduled Delivery
You can send push notification at the scheduled time. Go Console and click Notification > Push > Reservation to do so.
The following is the format for scheduled delivery:
| Name | Description |
|---|---|
| Schedule Type | EVERY_DAY: Send messages at a specific time, on a daily basis between StartDate and EndDate. EVERY_WEEK: Send messages on a specific day as set in the Reservation Condition, on a weekly basis. EVERY_MONTH: Send messages on a specific date as set in the Reservation Condition, on a monthly basis. |
| Day of Week | You may choose a day of the week. |
| Day of Month | You can enter date (month), using comma (',') as delimiter. |
| Delivery Time | You can enter the time for messages to be delivered in format of 'HH:mm'. |
| Start Date | You can enter a date to start delivering messages in format of 'YYYY-MM-DD'. You can enter the date with calendar. |
| End Date | You can enter the last date to deliver messages in format of 'YYYY-MM-DD'. You can enter the date with calendar. |
| Local Time | When it is set 'true', the messages are delivered based on the local time. |
Check Token
Choose push types and you can look up or delete a token. Deleting a token is not supported in Public API for now, and is only available in API and Token tabs.
Public APIs
These are API calls provided in public API. You can add tokens, send messages, and get feedbacks through API calls. You can choose which API version to use. For further detail, please refer to API Guide.
Tokens
You can map the tokens on specific UIDs. You can search by UIDs or tokens.
Go to Console > Notification > Push > and click Token tab.
Add Token
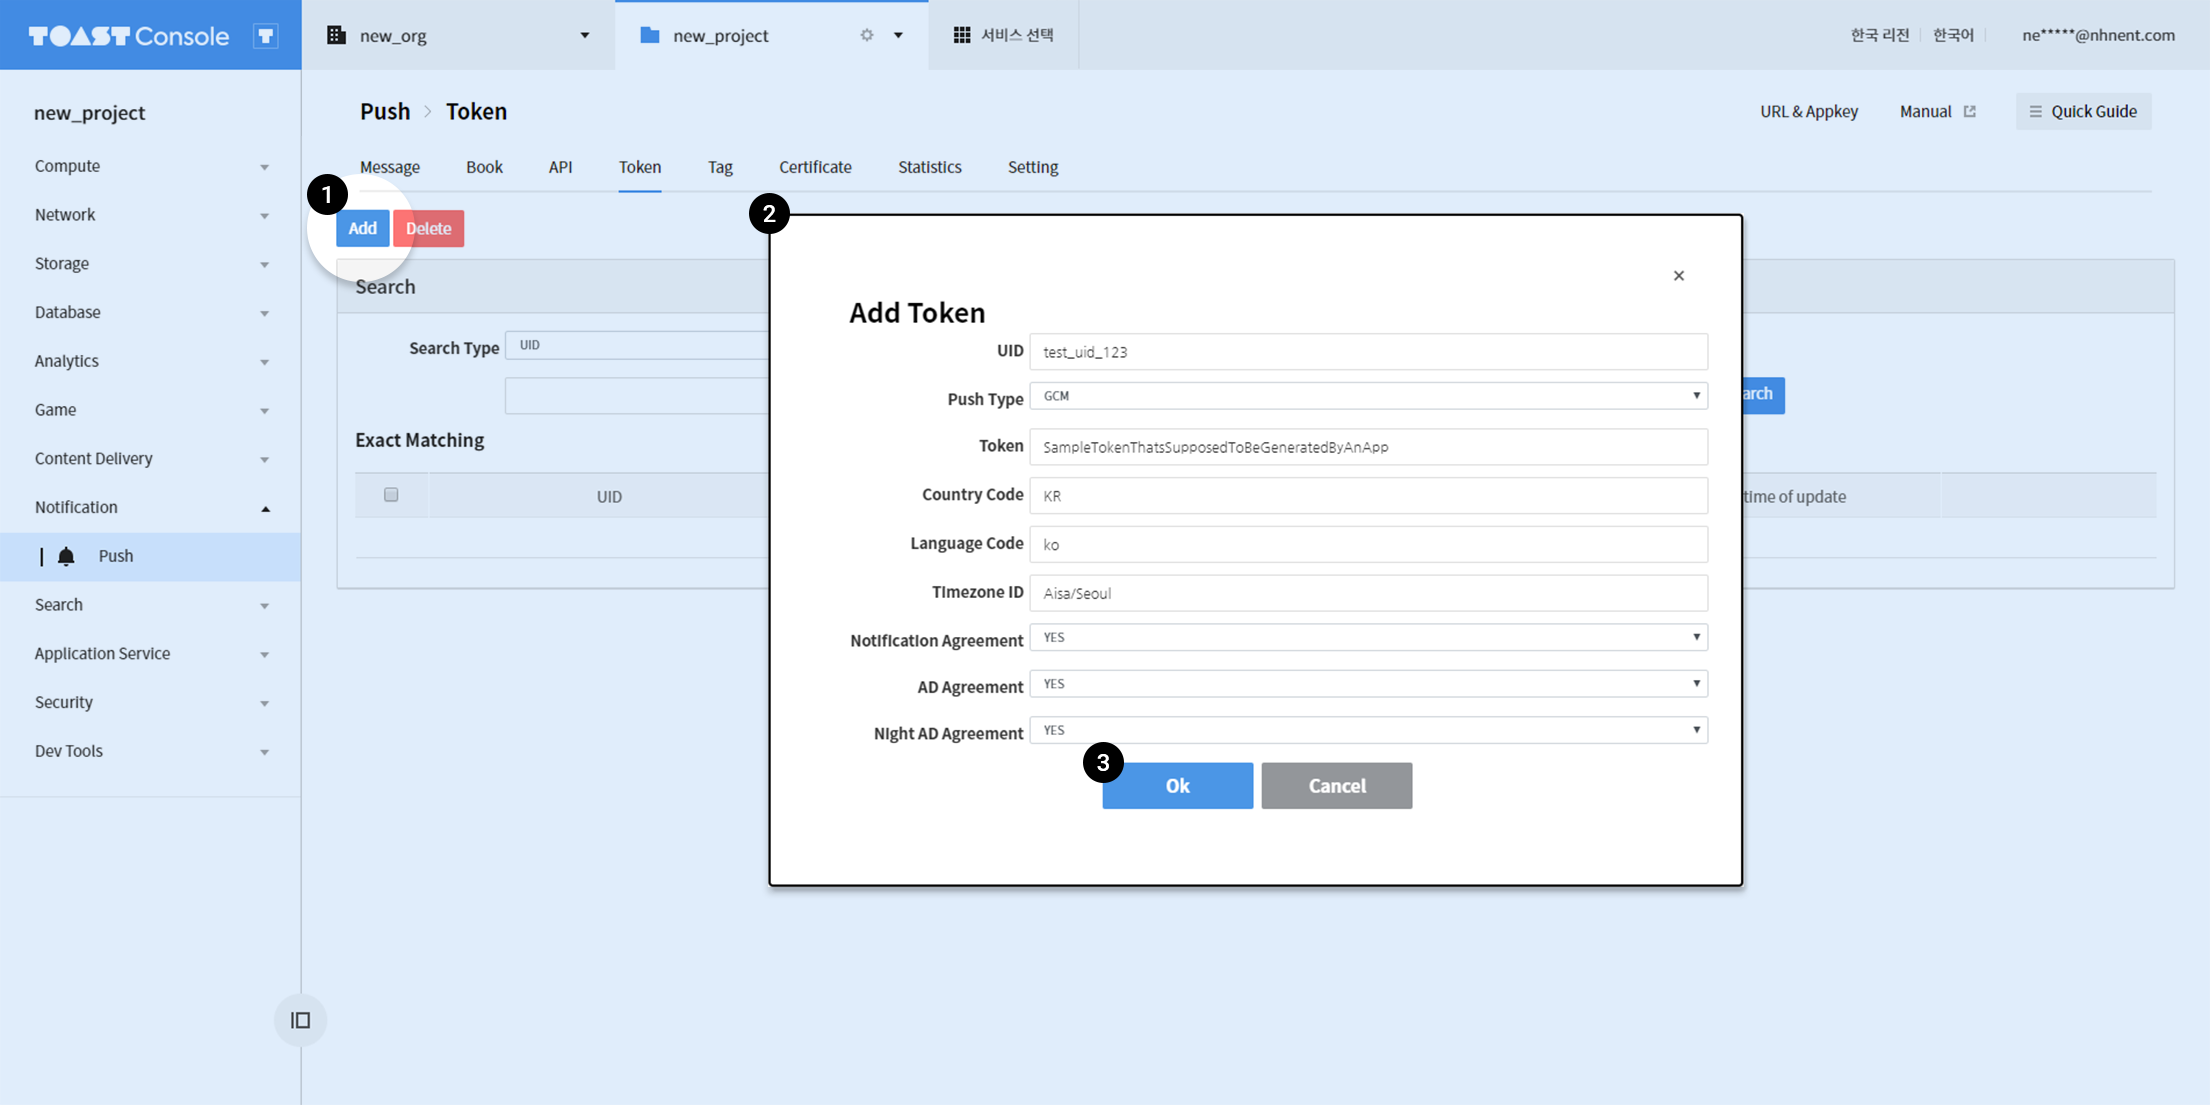
- Click Add.
- Enter 'UID' and 'Token' on the Add Token modal.
- Complete the rest of the form and click Ok.
Search Tokens
Select TOKEN for Search Type and choose an appropriate push type to search tokens.

- Click on Details button to see detailed information of the token.
Search UIDs
Select UID for Search Type to search UIDs.
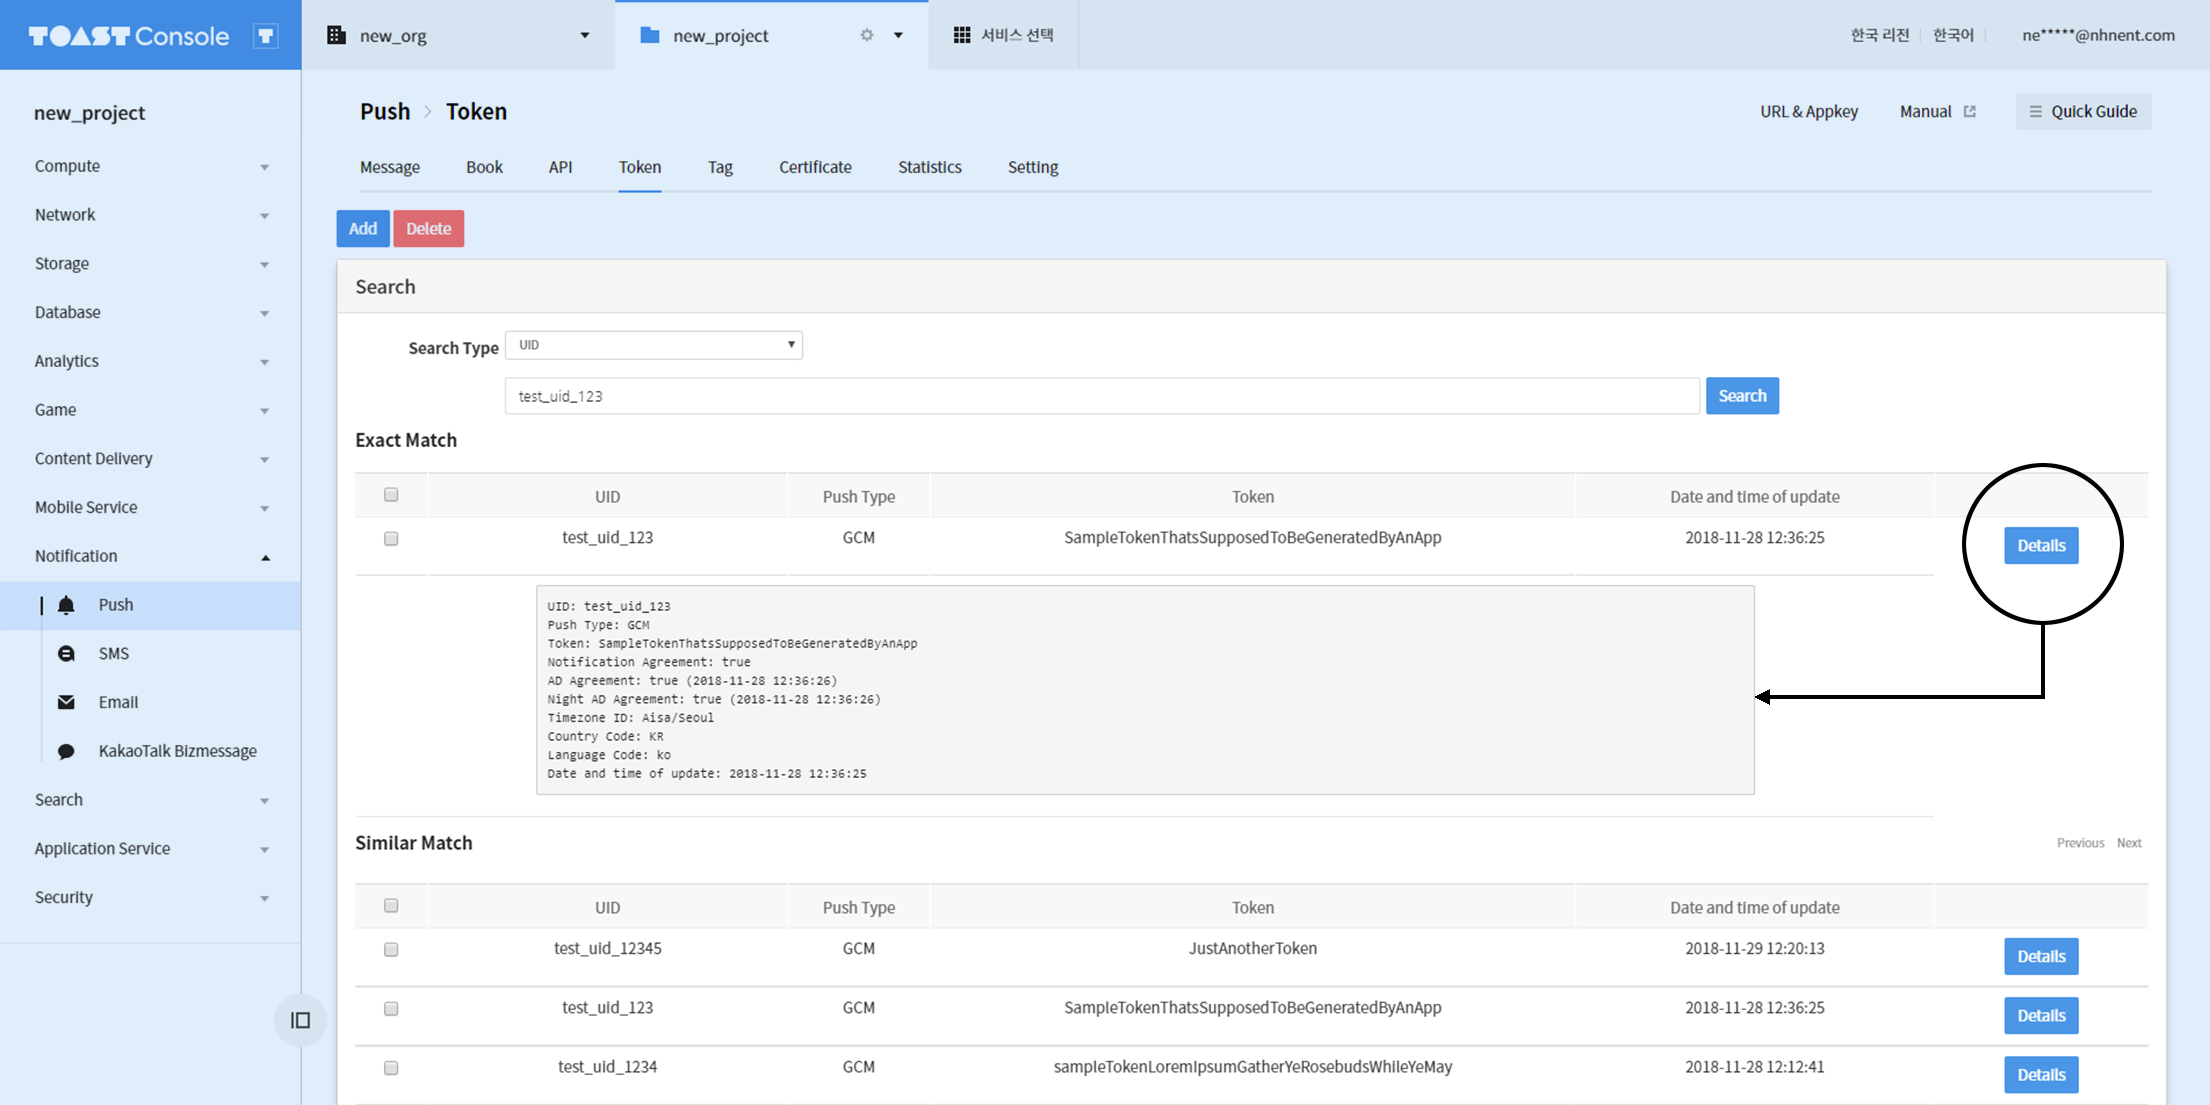
- Partial match will show up on the search result too.
- Click on Details button to see detailed information of the token.
Tags
You can map multiple UIDs to tags. Tags are used globally in Notification service.
Go to Console > Notification > Push > and click Tag tab.
Add Tag
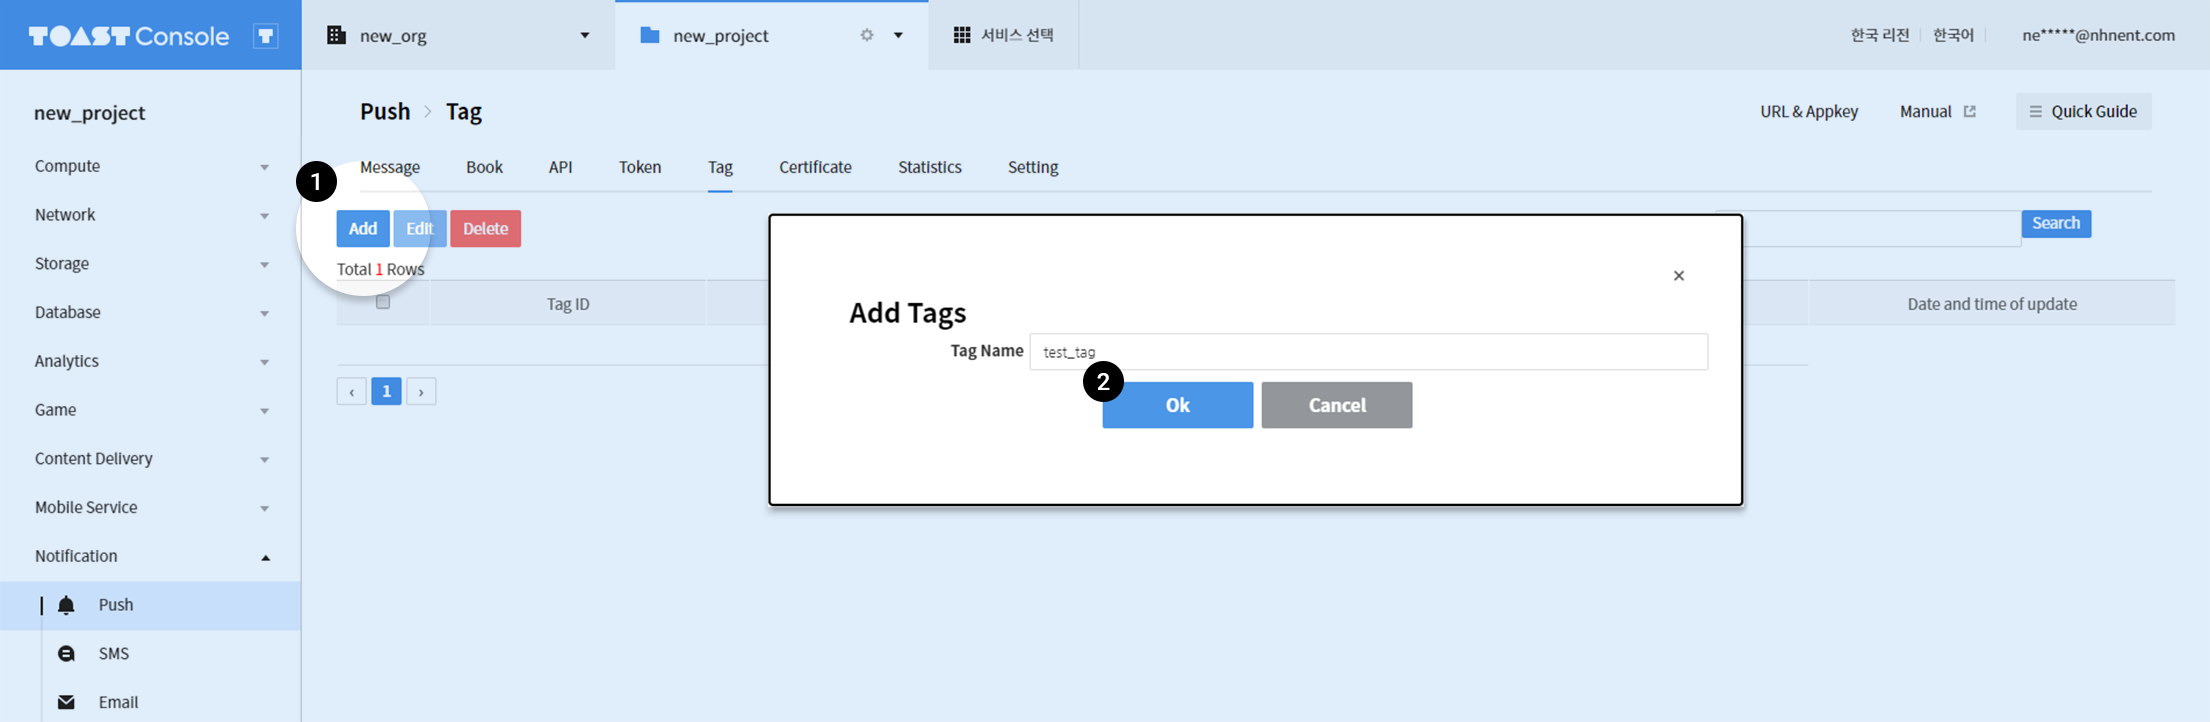
- Click Add and enter the name of the tag on Add Tags modal.
- Click Ok to add the token.
Manage UIDs attached on Tags
Click on the tag to check the list of UIDs attached to it.
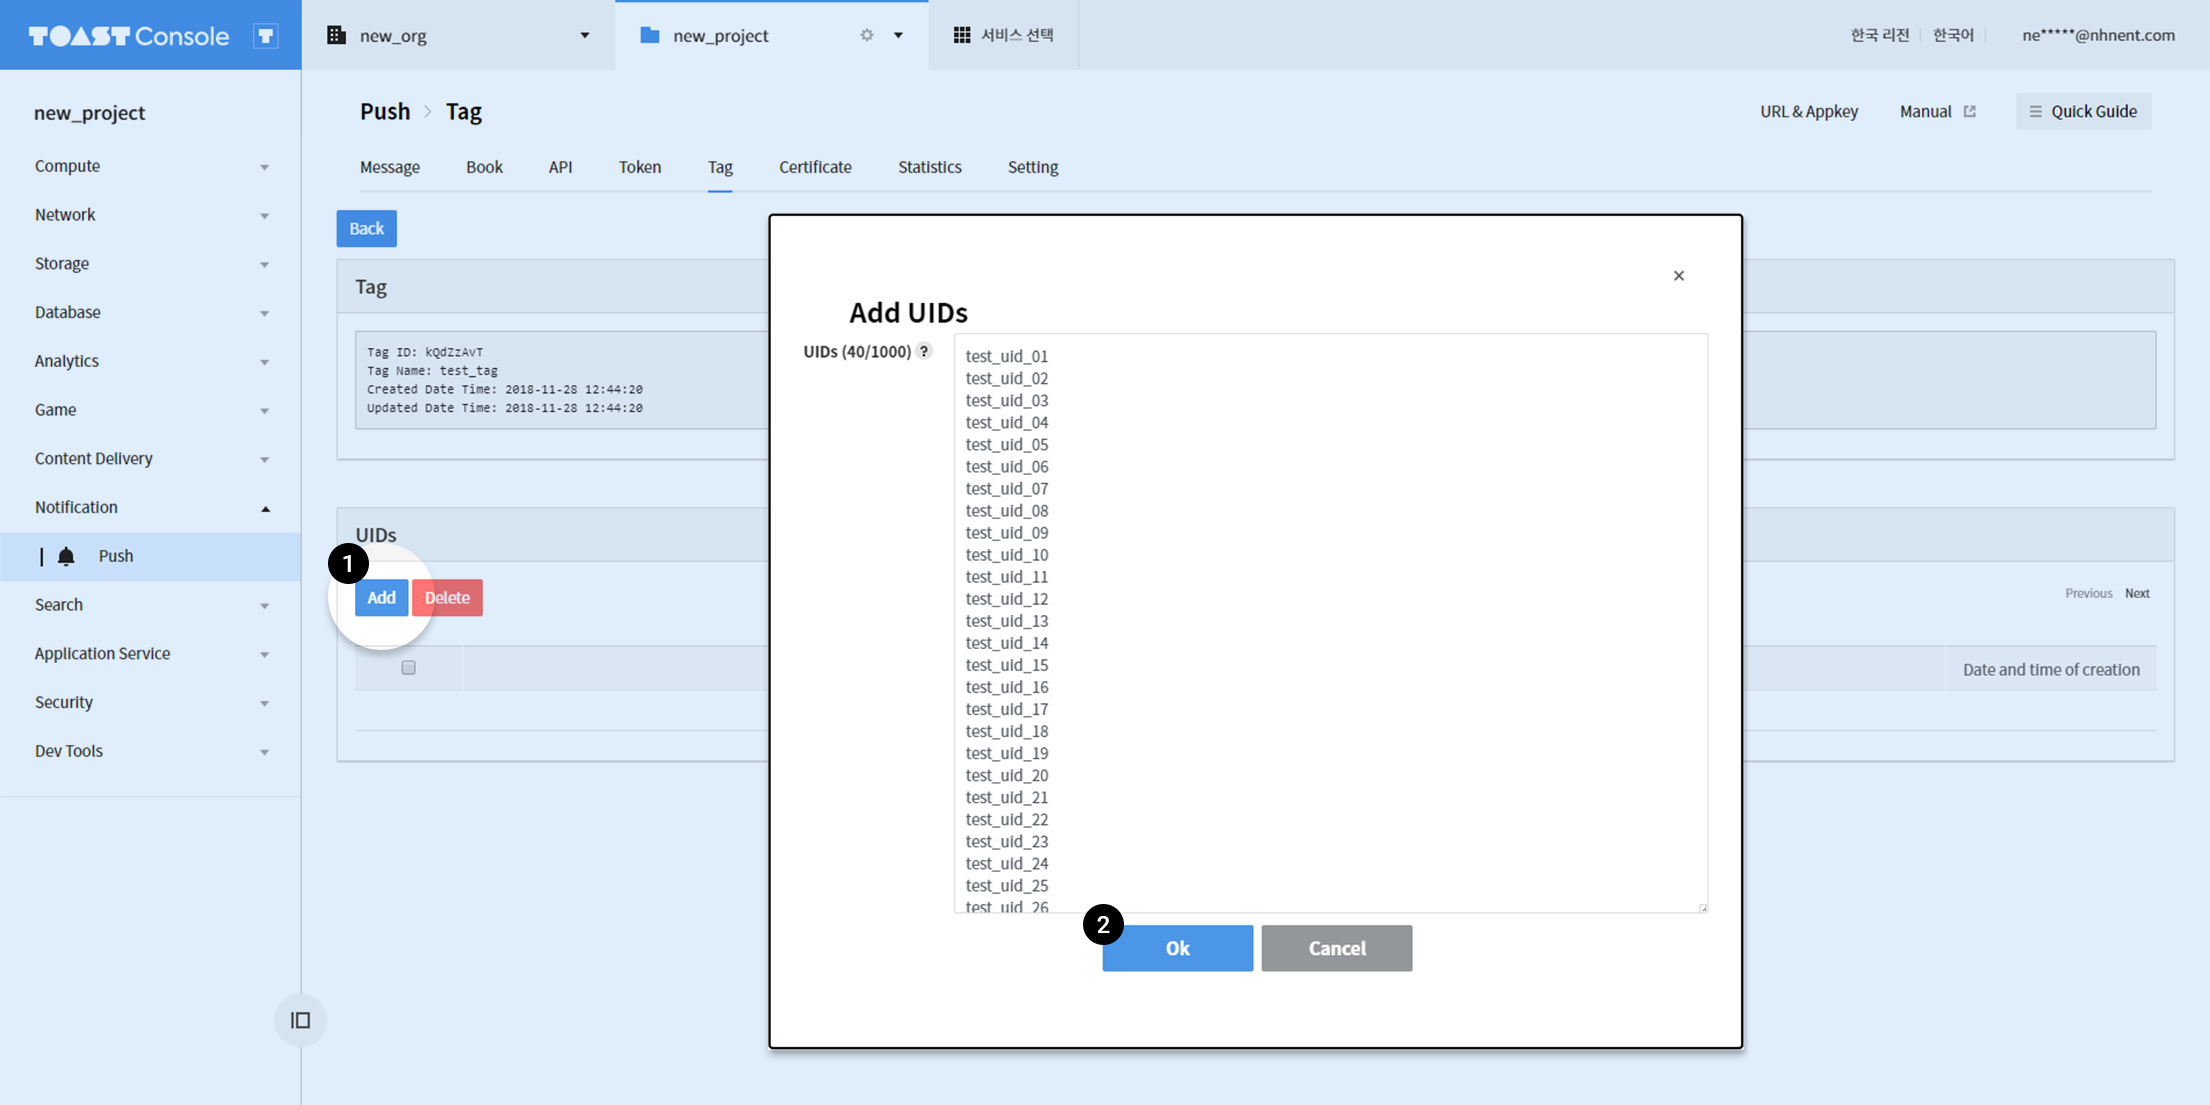
- Click Add.
- After entering the UID, click the OK button.
- Up to 1,000 UIDs can be added at a time.
Statistics Event Key Management
Statistics event keys can be managed from the Statistics Event Key Management tab. You may set the name, description, and event collection period. Without configuring event collection period, the collection period is set as indefinite. Once created, a statistics event key can be setup for message delivery. Delivery results of messages to which a statistics event key is configured can be searched with the statistics event key from the Statistics tab.
Statistics
You may search data on received/checked messages that are collected for the last 30 days. Select Statistics from the console, and you can search statistics on registration or deletion of a message or a token.
- Set period as part of a search condition.
- Manual setting is available other than simple period setting, between 1 minute and 30 days.
- Set a display method of graphs in each type.
- By default, graph is displayed in automatically optimized type for each period setting.
- From message statistics, you can search by statistics event key or push type.
Token Setting
You can configure Push service.
Go to Console > Notification > Push > and click Setting to set Token Expiration Period and App Type.
Position Setting of Ad Phrase
- You can configure the position of the Ad phrase displayed on the advertisement push notification.
- Title
- Default
- '(Ad)' will be prepended in the title along with contact information.
- Body
- '(Ad)' phrase, contact information, and unsubscription method will be displayed in the body.
- After the feature is set, it may take several minutes until a feature is actually applied.
Token Setting
-
Token Expiration Period
- Exclude tokens that did not request registration during set period from the list of message delivery.
- Default is 12 months.
- Tokens of the users who do not use the app during the period are automatically excluded from the message delivery list, thus saving costs.
-
App Type
- Manage tokens by the type of the app.
- Multiple Tokens
- Default
- User can use the app installed on many devices all at once, and a user can have multiple tokens.
- For instance, if a user has a mobile phone and a tablet PC, he can have two tokens, and push messages are delivered to both of the devices.
- Single Token
- User can use app on one device only and a user can have only one token.
- For instance, if a user has a mobile phone and a tablet PC, he can have only one token, and push messages are delivered to one of the two.
-
After the feature is set, it may take several minutes until a feature is actually applied.
Collect Message Receipt/Check Data
- The Message Delivery Receipt feature can be enabled.
- SDK v1.4 or higher versions must be applied for the activated features to work. For Android, the feature works only by applying the SDK. For iOS, additional processing is required.
- Collected data are available on the Statistics tab.
- Data collection time is based on the device time.
- After the feature is set, it may take several minutes until a feature is actually applied.
Causes for Low Indicators of Message Receiving Data
- When message notification is not enabled on the app Unless the user enables message notifications with OS (iOS or Android) level setup on initial app execution, message receiving events cannot be collected. (The average rate of notification enabled, as of 2018, is 43.9% for iOS and 91.1% for Android. source accengage)
- When token expiration of a deleted app is delayed Some apps are deleted but not directly lead into token expiration. If token is delayed for expiration, messages may be delivered but receiving events cannot be collected, since app has been deleted.
- When it is disconnected to the internet for a long time If it is not connected to the internet, due to various reasons, including phone being turned off, in the energy-saving mode, or in network grey area, both message receiving and event collecting are unavailable.
- When it fails to collect receiving events Even if a message has been received, it may not be properly collected depending on the OS or network environment when the receiving event is sent to server.
Log Message Delivery History
- Send message delivery history to Log & Crash Search as specified.
- Appkey: Enter Appkey from Log & Crash Search service.
- Secretkey: Enter SecretKey from Log & Crash Search service.
- Log Source: Enter a value to log along with history logging, as a separator from other logs.
- Log Level: Record specific parts only from the delivery history:
- ALL: Log all history, including success/failure of delivery.
- INFO: Log delivery, and failed delivery of expired tokens only: do not log successful deliveries.
- ERROR: Log history of failed deliveries only.
- You can view the logs in Analytics > Log & Crash Search > Log Search.
- Delivered message will follow the pricing from Log & Crash Search
Log Type for Delivery History
Body
{
    "tokens" : [{
            "UID" : "User Id",
            "token" : "Device Token",
            "newToken": "New Device Token",
            "message": "Result Message"
        }
    ],
    "payload" : {
        "priority" : "high",
        "data" : {
            "messageDeliveryReceipt" : true,
            "title" : "Title",
            "body" : "Body",
            "messageDeliveryReceiptData" : {
                "messageId" : 963854842757578,
                "sentDateTime" : "2017-11-06T10:41:55.619+09:00"
            }
        },
        "registration_ids" : ["Token"]
    }
}
- tokens: Delivered token information
- UID: User ID
- token: Token
- newToken: Newly-issued token (shows only when a new token exists)
- message: Result message (shows only for abnormal responses)
- payload: Messages actually delivered to FCM, APNS or ADM (with different content for each push type)
Fields
- Appkey: Push Appkey delivering messages
- messageId: Message ID
- pushType: Push types (FCM, APNS, APNS_SANDBOX, or ADM)
- sentResult: Result of delivery (SENT, INVALID_TOKEN, or ERROR)
- messageErrorType: Type of delivery failure
- CLIENT_ERROR: Delivery failed due to invalid delivery request by client error
- EXTERNAL_ERROR: Delivery failed out of external error, due to abnormal responses from Google, Apple, or Amazon server
- INTERNAL_ERROR: Delivery failed out of internal error
- messageErrorCause: Cause of failed delivery
- SKIP: Invalid token or certificate
- NO_TOKEN: No target of delivery
- INVALID_TOKEN: Delivery request with invalid token
- INVALID_MESSAGE: Delivery request with invalid message
- INVALID_CERTIFICATE: Certificate expired
- UNAUTHORIZED: Certificate expired
- EXPIRED_TIME_OUT: Message requested for delivery expired
- APNS_ERROR: Abnormal response from APNS
- GCM_ERROR:Abnormal response from FCM
- AGENT_ERROR: Abnormal communication with Google, Apple, or Amazon server
- UNKNOWN: Unknown internal error
Settings for preventing duplicate messages
- This is a feature that restricts sending the same message to the same user multiple times.
- The decision of whether a message is duplicate or not is based on the message type, text (content), sender information, opt-in setup guide, ad display text location, and token. If all values against these criteria are the same, it is determined as a duplicate message and thus not sent.
- Any messages not sent will be processed as failure. The cause of its failure is logged as 'DUPLICATED_MESSAGE_TOKEN'.
- It can be set in "Settings for preventing duplicate messages" under the Settings tab.
- It could take several minutes for the settings to be completely applied.
Reserve Message for Acceptance of Ad Opt-in
- Added a feature of sending a guide message to tokens that have reached two years since their last acceptance of ad opt-in.
- Every month at a specific time set by the user, a guide message will be sent to the target tokens.
- The guide message must contain the information about the user's opt-in acceptance and the time of opt-in and how to set ad opt-in.
- If you place the temporary replacer for opting in to receive advertisement messages (###AD_AGREEMENT_DATE_TIME###) in the body, when sending a message, its time will be replaced with the opt-in acceptance time of the token.
Guide for Notice of Personal Information Assignor
When the Customer uses NHN Cloud Push Service, assignment of personal information between the Customer and the Company arises, and the assignee, the Customer, is obliged to disclose the status (assignor and content of business) of his assignment of personal information to the Company, through the personal information handling policy, in accordance with Act on Promotion of Information and Communications Network Utilization and Information Protection. Accordingly, the Company may provide guidelines as below for the Customer, to abide by relevant regulations in the use of NHN Cloud Push Service and not to be adversely affected for not disclosing his assignment status:
Notice of Personal Information Assignor To use Push Service, make sure the following is displayed for 'Personal Information Handling Policy' > Assignment Status of the Customer.
Assignor: NHN Cloud
Content of Business:Deliver Push Messages in lieu of Customers
- Document Updates
- (Jan. 21, 2020) Added reason for low message reception data metric
- (September 19, 2018) Add description of advertisement display text
- (July 24, 2018) Added description of APNS Certificate
- (June 15, 2018) Added description of relocating GCM to Firebase
- (Nov. 23, 2017) Added saving history of message delivery
- (Sept. 21, 2017) Modified description of immediate delivery
- (July 20, 2017) Added Guide for Notice of Personal Information Assignor
Table of Contents
- Notification > Push > Console Guide
- Certificate Management
- FCM Service Account Credential
- Get Authentication Information for APNS JWT
- APNS Certificate
- ADM Credentials
- Message Delivery
- Target
- Option
- Message
- Rich Message
- Scheduled Delivery
- Check Token
- Public APIs
- Tokens
- Add Token
- Search Tokens
- Search UIDs
- Tags
- Add Tag
- Manage UIDs attached on Tags
- Statistics Event Key Management
- Statistics
- Token Setting
- Position Setting of Ad Phrase
- Token Setting
- Collect Message Receipt/Check Data
- Log Message Delivery History
- Settings for preventing duplicate messages
- Reserve Message for Acceptance of Ad Opt-in
- Guide for Notice of Personal Information Assignor