Database > EasyCache > Console User Guide
Getting Started
To use EasyCache, you must create a replication group first.
Replication Group
Create a Replication Group
-
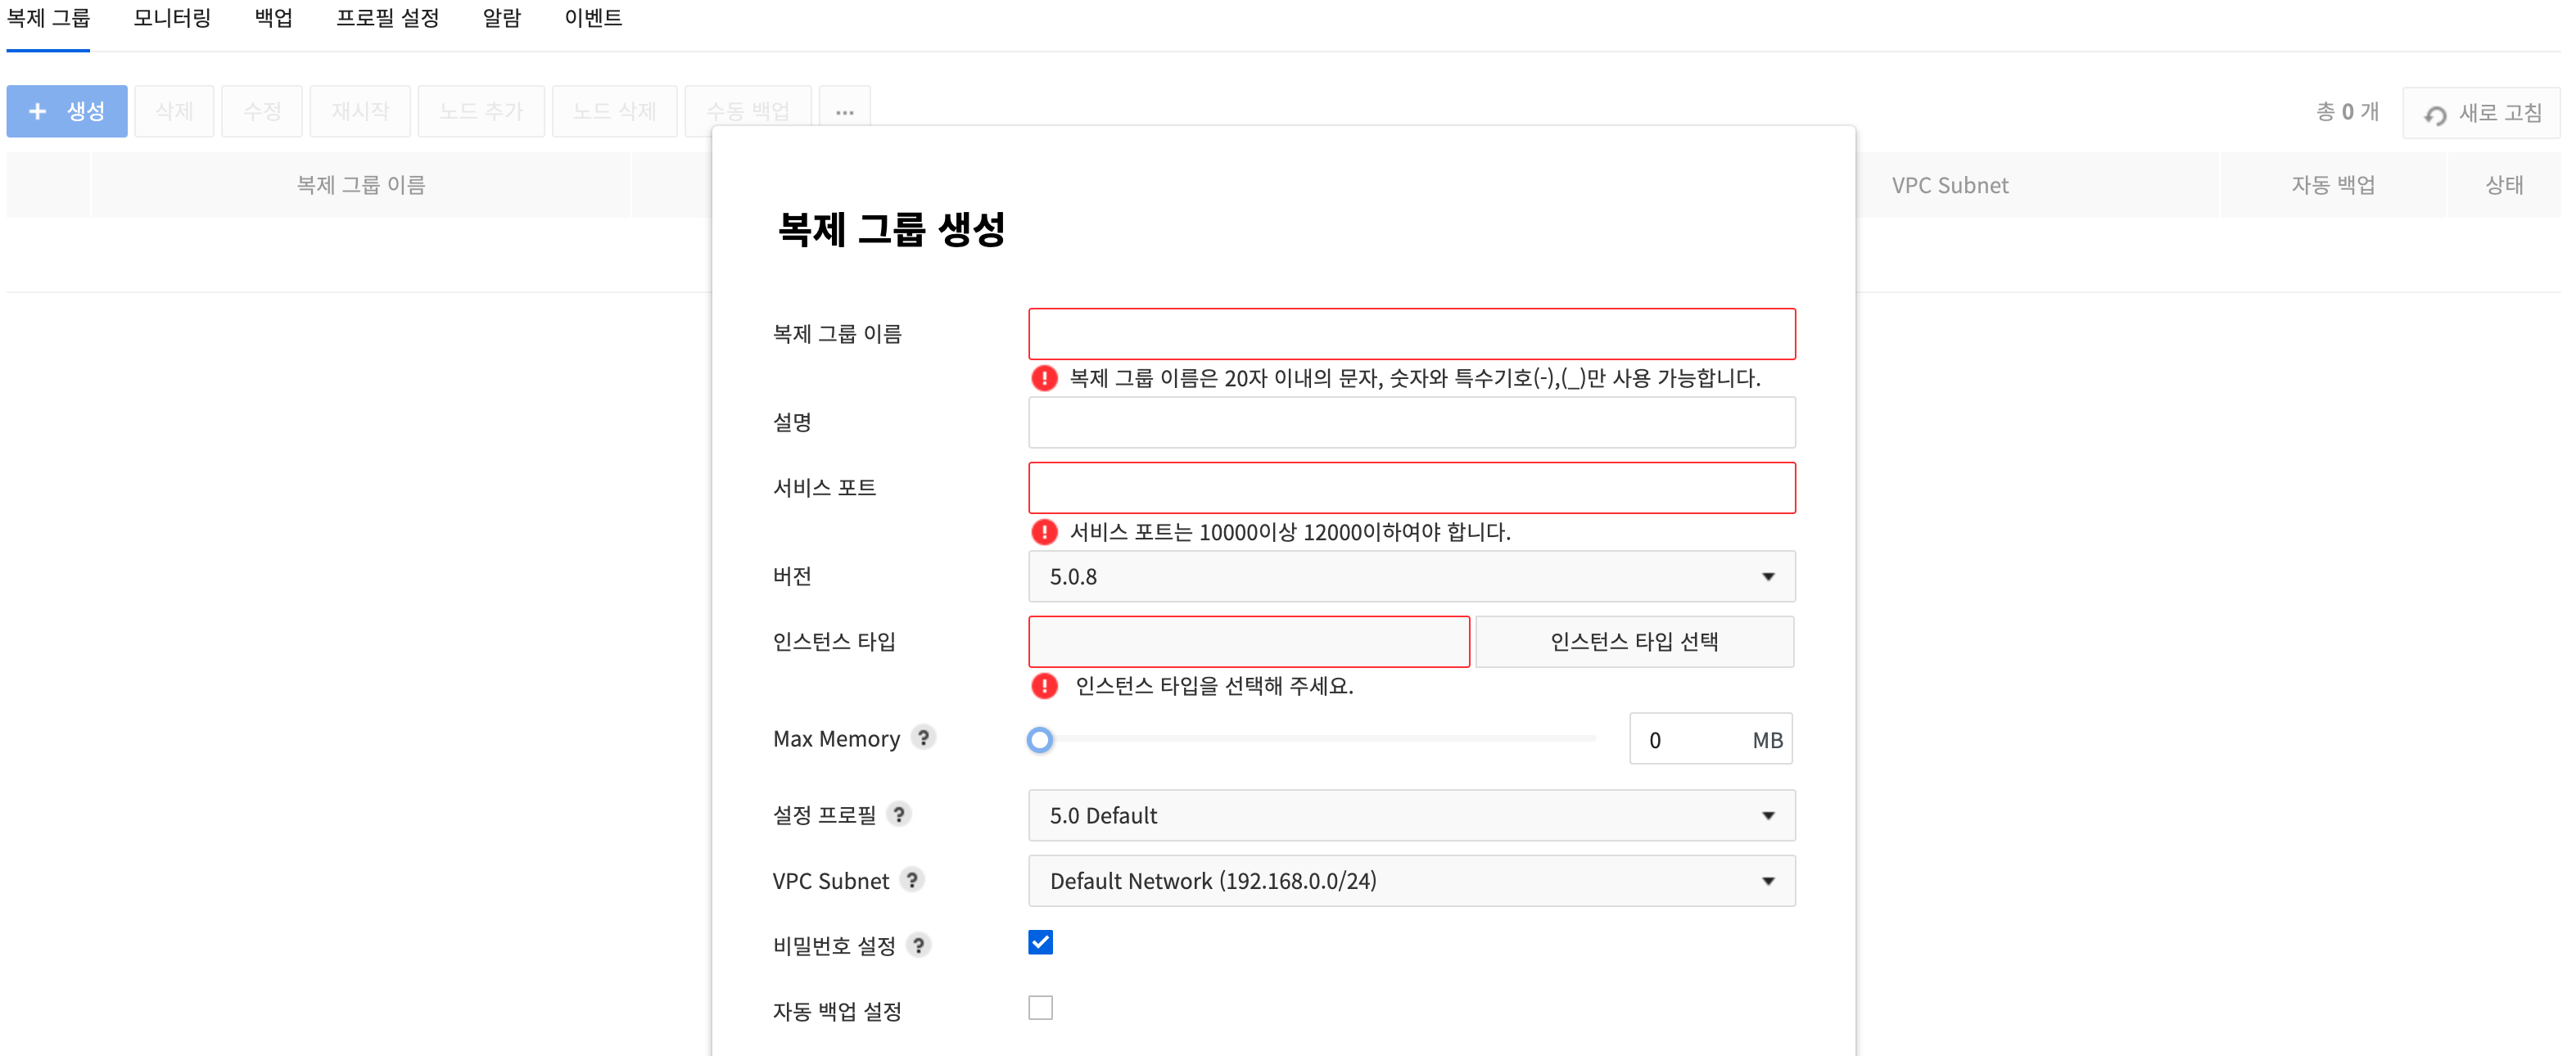
In the Replication Group tab on Console > Database > EasyCache, click Create and a Create Replication Group pop-up will show up.
-
Enter all required fields on the setting window and click Create at the bottom.
- Replication Group Name: Enter name of a replication group.
- Description: Enter description of the group.
- Service Port: Enter the port number of Redis.
- Available between 10000 and 12000.
- Version: Select the version of Redis to create.
- Instance Type: Select specifications for the replication group.
- Max Memory: Adjust the max memory to prevent out-of-memory issues when running synchronization or backup.
- You can change the size of max memory for a Redis server.
- The size of memory for management can be also secured flexibly when needed.
- Configuration Profile: Select a configuration file for Redis.
- The default profile is provided.
- More configuration profiles can be added for selection.
- VPC Subnet: Select a subnet for Compute & Network to allow private network communication. Otherwise, it is set to the default network.
- Set Password: Select whether to set a password. The default value is 'Set Password' (selected).
- Auto Backup Setting: Select whether to use auto backup.
- Backup Retention Period: Available from 1 day up to 30 days
- Backup Start Time: Specify start time of backup, by 30-minute interval.
- Backup Window: Backup starts randomly between start time and backup window. Available from 1 hour up to 3 hours.
- TLS Certificate Setting: Select one of the certificates stored in Certificate Manager to communicate with TLS certificate. If you decide to use a TLS certificate at the time of replication group creation, you can't change it later.
- TLS Service Port: Port for connections using a TLS certificate. The port must be set between 10000 and 12000, differently with the service port.
- Use TLS Service Port Only: You can enable connections using only the TLS service port. If you enable this feature, you won't be able to connect using regular service ports.
- Select Certificate: Select one of the TLS certificates stored in Certificate Manager. You must enter the Appkey of Certificate Manager product.
- redis requires a public key, a secret key, and a CA public key. Therefore, for the certificate to use, relevant keys must be included. For how to create a key, see Certificate Manager > Trouble Shooting Guide.
-
Click Create.
-
After confirming what is entered in the screen, click Create. Along with a replication group, a master node is created. It takes a few minutes to create.
Constraints
- Service is restricted for such commands that may severely impact service.
- See developer's guide to find out the commands.
Replicate (Add Nodes)
By creating a replica node supported by Redis, availability can be raised.
-
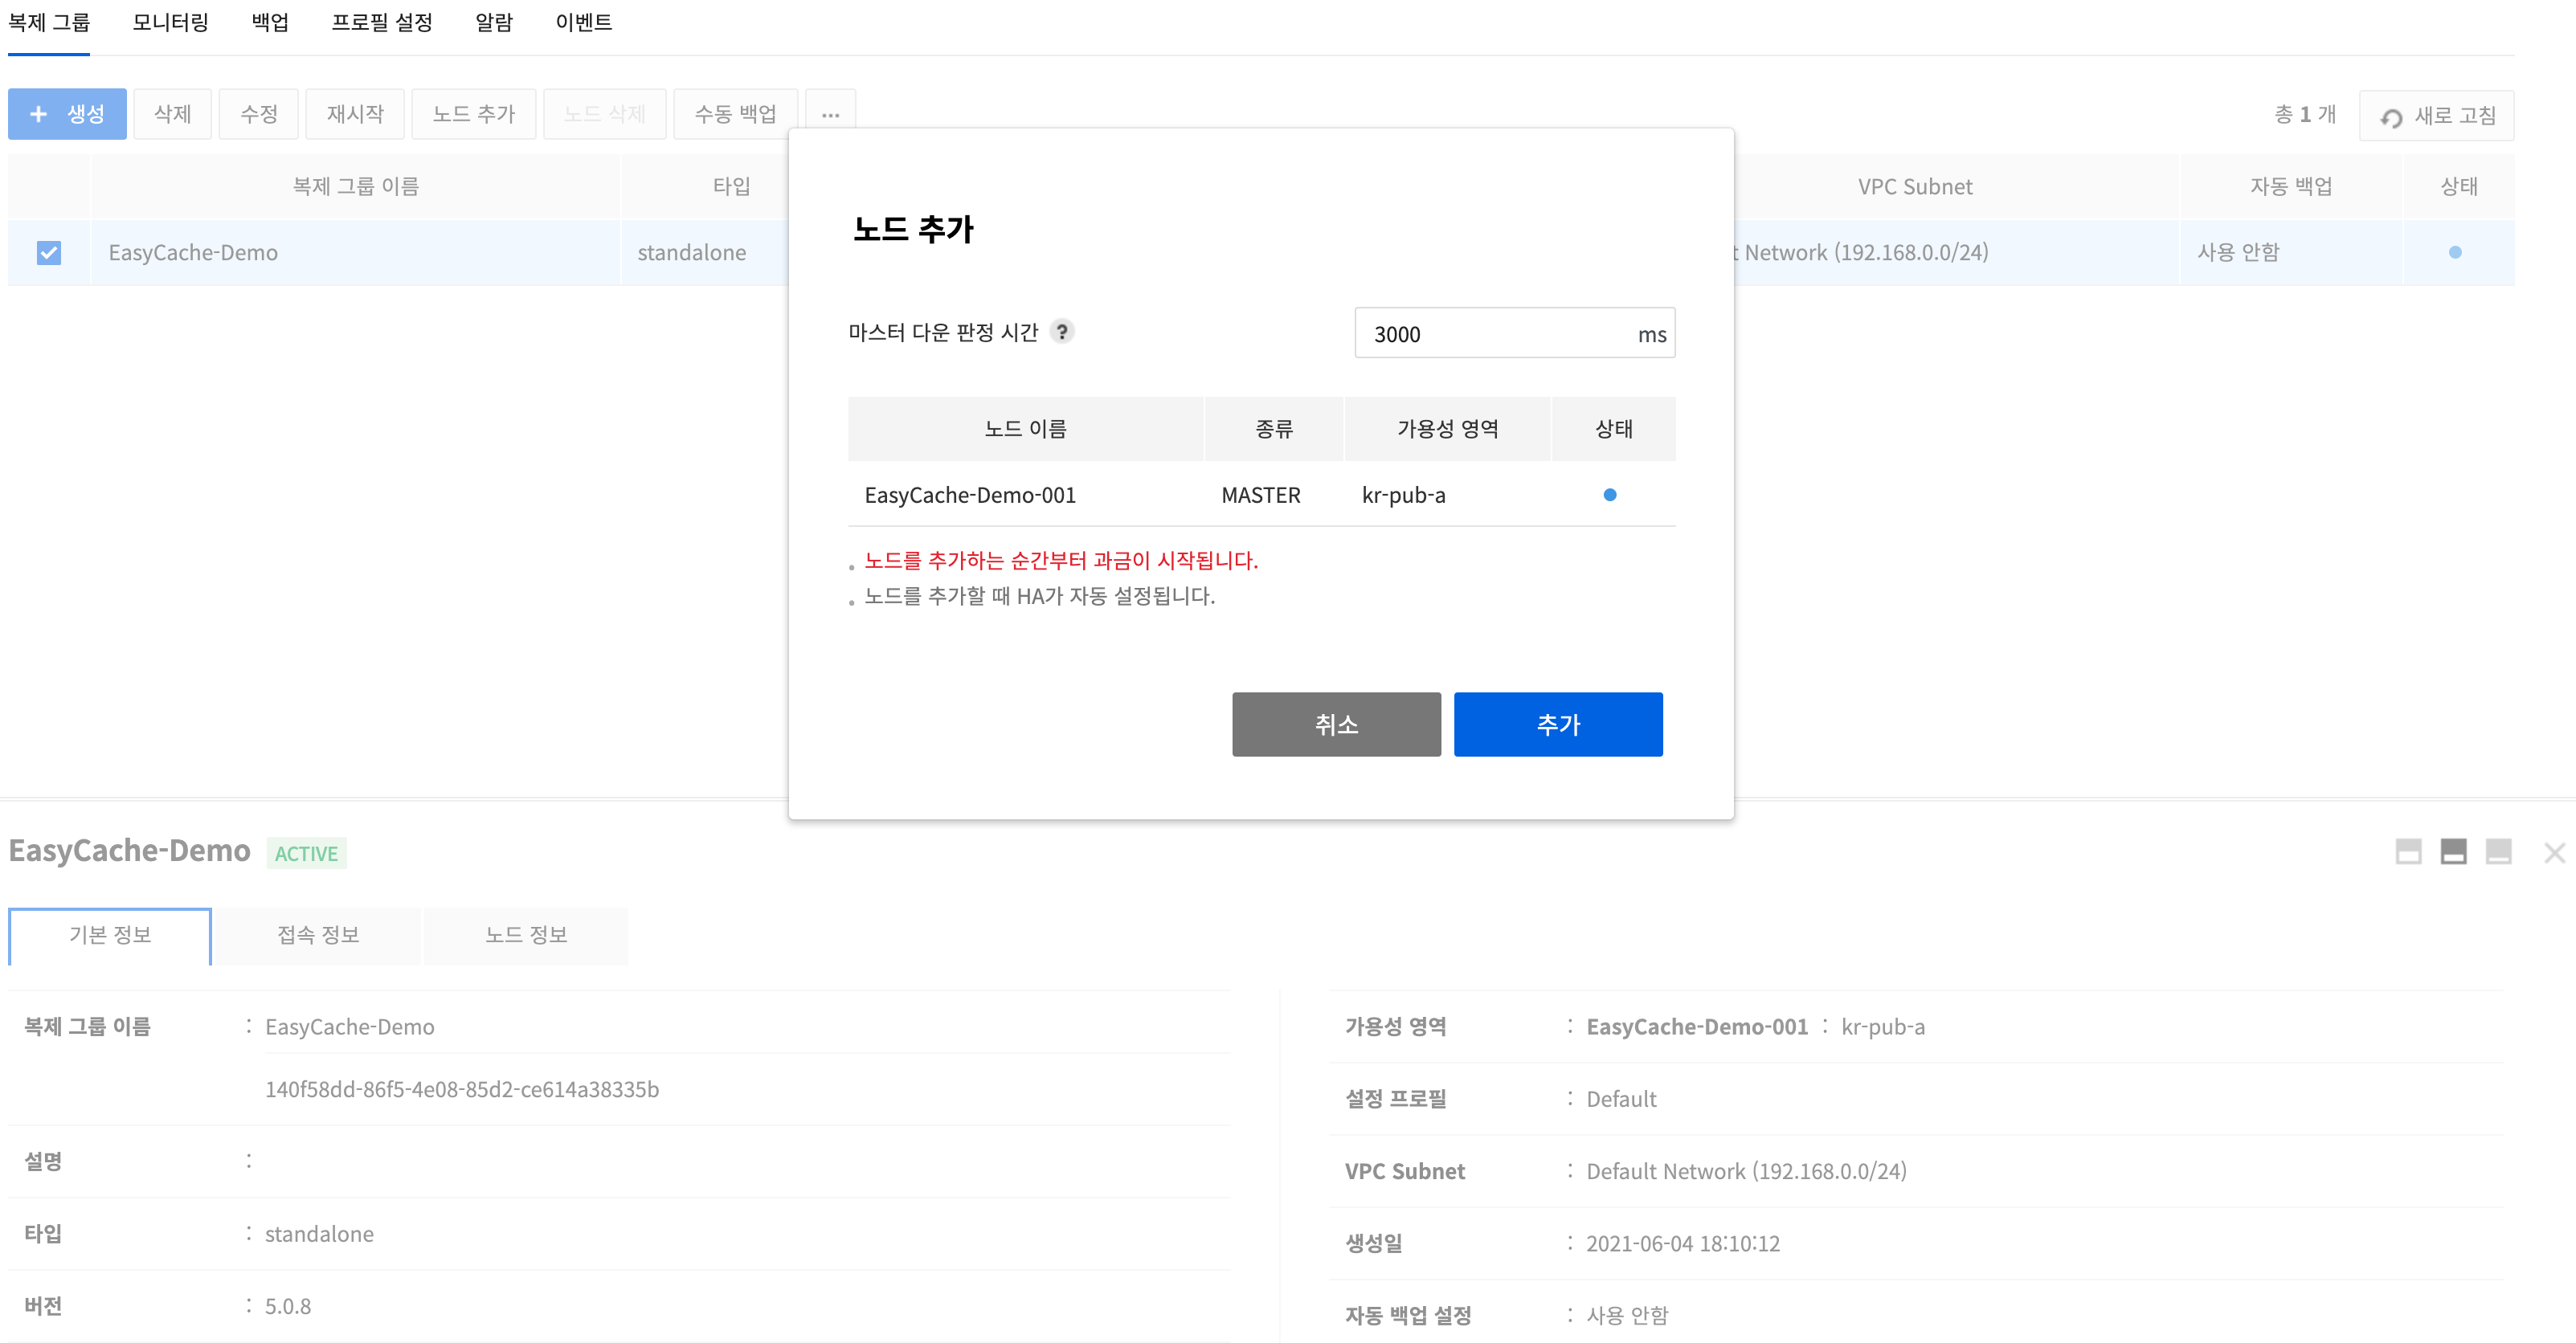
To create a replica node, select an original replication group and click Add Nodes.
-
To see if the master node has gone down, set wait time for health check response. Default is 3000ms.
-
Master node information can be checked.
-
Click Add, and a replica node is created.
- To check information of the node, go to Replication Groups > Node Information. Replication relation is automatically set while it is created.
The replica node has the same server specifications as the original master node. It may take more time to create a replica node, in proportion to the size of the original master node.
Constraints
- On the original master node, a maximum of 2 replica nodes can be created.
- If an abnormal Replica node is present, delete it first before adding a new Replica node.
- A replica node cannot create its own replica nodes under it.
High Availability (HA)
By adding a replica node to the standalone master node, high availability is automatically configured.
- By setting an auto failover, downtime can be reduced to the minimum when an error occurs on the master node.
- Failover refers to detecting a master node in which error has occurred and thereby automatically promoting a replica node to the master.
- You may find events on failure and status of the master or replica node.
Constraints
- If HA setting fails when adding 1 replica node, click the Update HA button in Replication Group > Basic Information to update the HA settings.
-
If HA settings fails to update when adding 2 replica node, click the Update HA button in Replication Group > Basic Information to update the HA settings again.
-
With a failover, the existing master node in which error occurred is suspended. When the failed node is deleted, it is changed into a general standalone master node in which high availability is not enabled.
- By adding a replica node to the standalone master node, high availability can be newly specified.
- The newly changed master node inherits the domain applied to access the existing master node.
- The existing node with failover becomes 'Disabled', under which, high availability is not enabled only with the new master node.
Modify a Replication Group
- Select an original replication group, and click Modify.
- On the pop-up of Modify Replication Group, set name, backup period, and others.
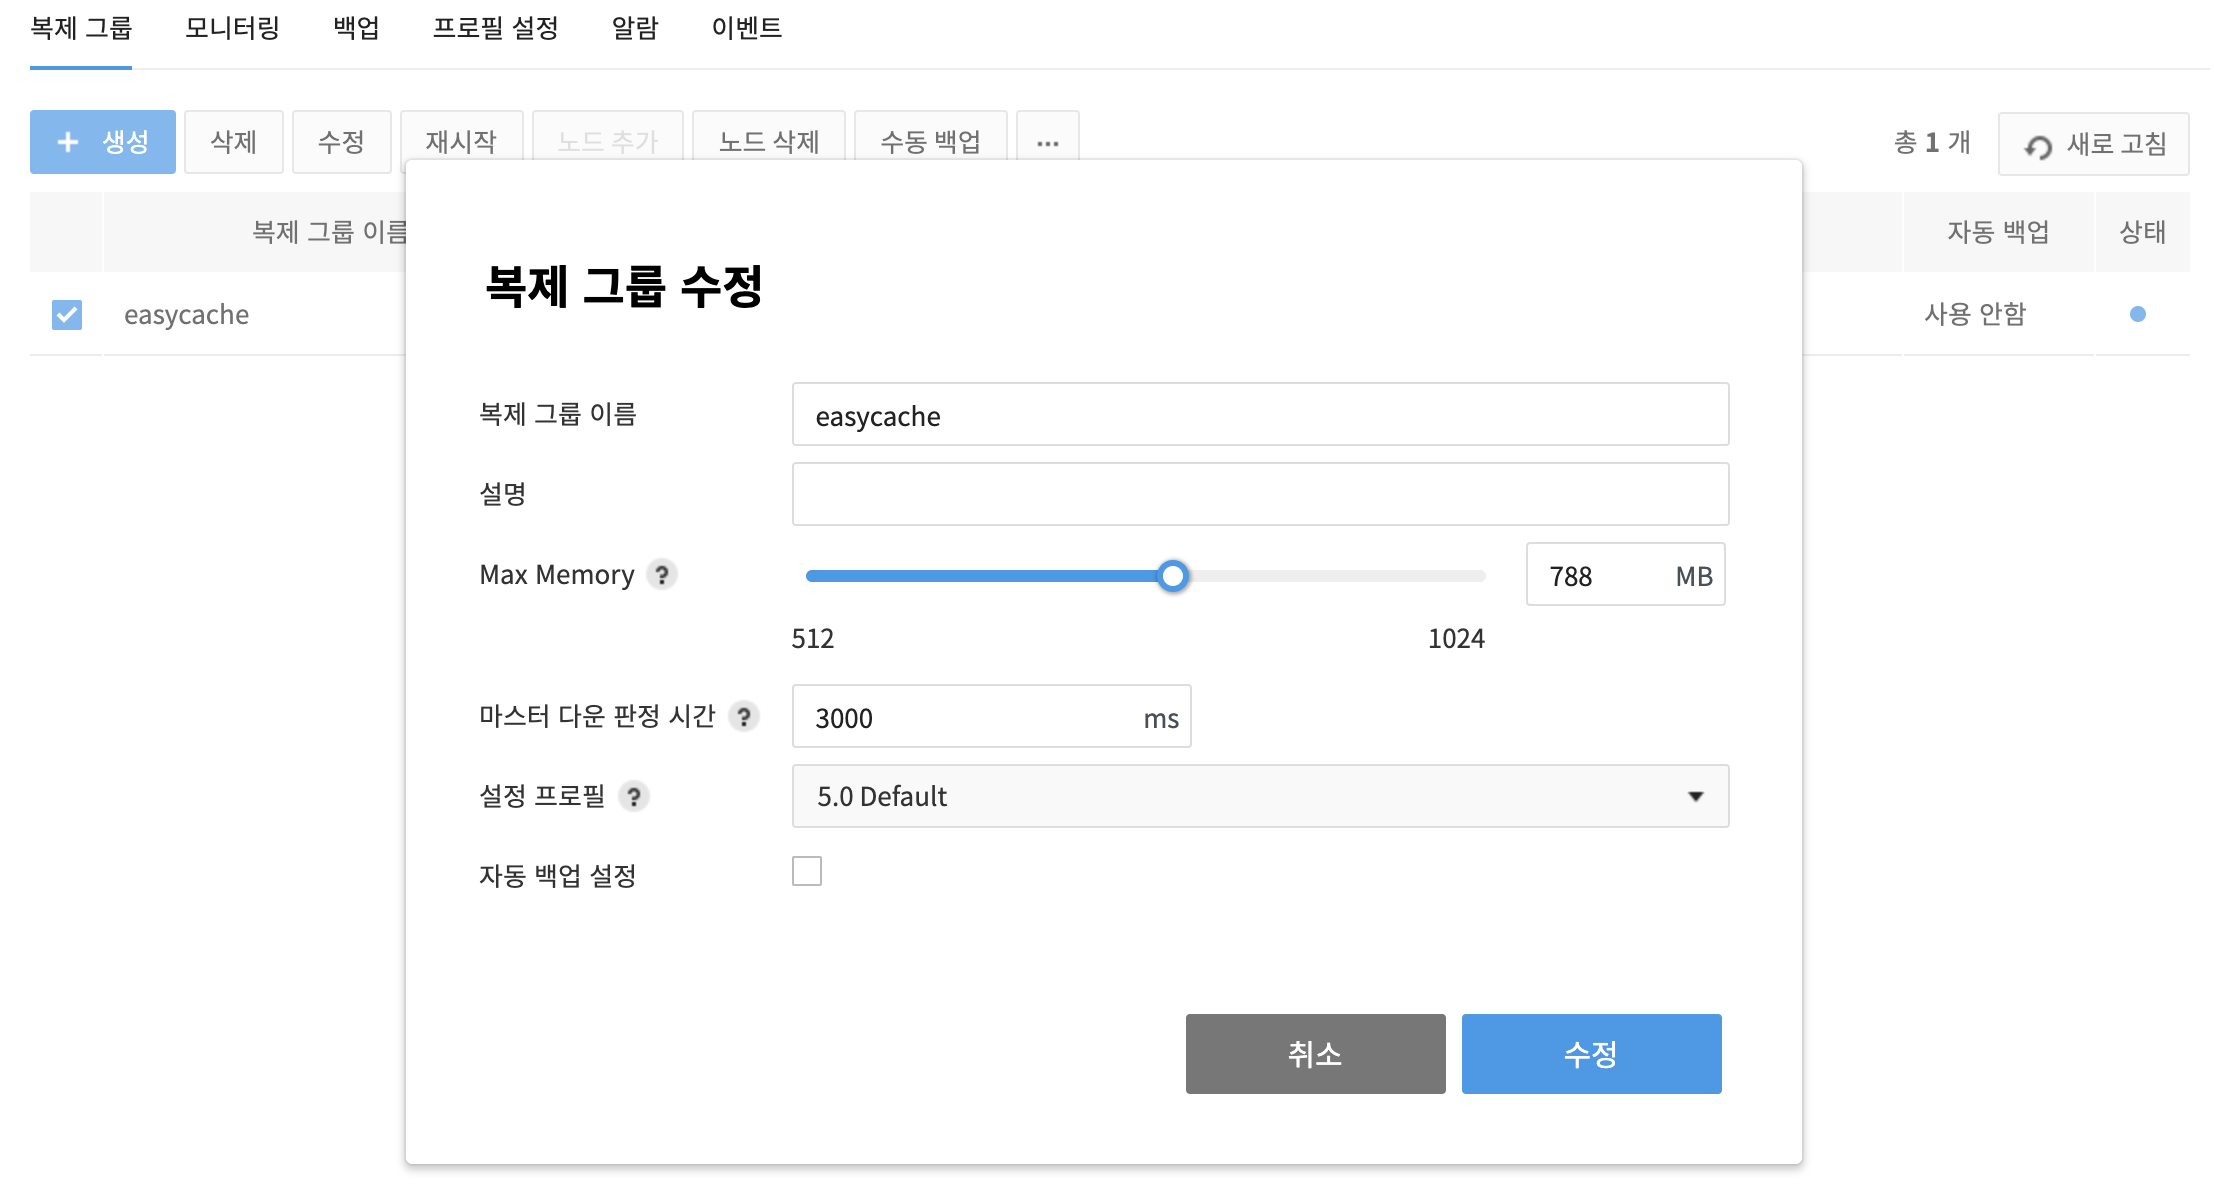
- Name of Replication Group: Name of a replication group can be changed.
- Description: Description of a replication group can be changed.
- Configuration Profile: Redis setting can be changed.
-
Max Memory: Volume of the maximum memory for usage can be changed.
-
Auto Backup Setting: Select whether to use auto backup.
- Retention Period: Available from 1 day up to 30 days.
- Backup Start Time: Specify start time of a backup, by 30-minute interval.
- Backup window: Backup to start randomly between start time and backup window, from 1 hour up to 3 hours.
-
The following is an item that can be found when a replica node is available.
- Master Down Time: Wait time can be configured for a health check response to see if the master node is down; default is 3000ms.
-
Check changes and click Change. Service port, Redis Version, Instance Type, and Availability Area cannot be changed, once they're configured.
Auto Backup
- Memory data (RDB file) is automatically backed up at a specific time once every day.
- To manage auto backups that are created, go to Backup.
- When a replication group bound for backup is deleted, backup files are deleted altogether.
- After a backup retention period, backup files will be automatically deleted.
- Backup starts randomly between start time and backup window.
Create Manual Backups
You may create a backup for replication group at a time of choice. Even if a replication group bound for backup is deleted, manual backup files cannot be deleted.
- Manage created manual backups from the Backup tab.
- Performance may be degraded while backup is executed.
- After a backup retention period, backup files will be automatically deleted.
-
If a replication group bound for backup is deleted, details of the group are not displayed for basic information.
-
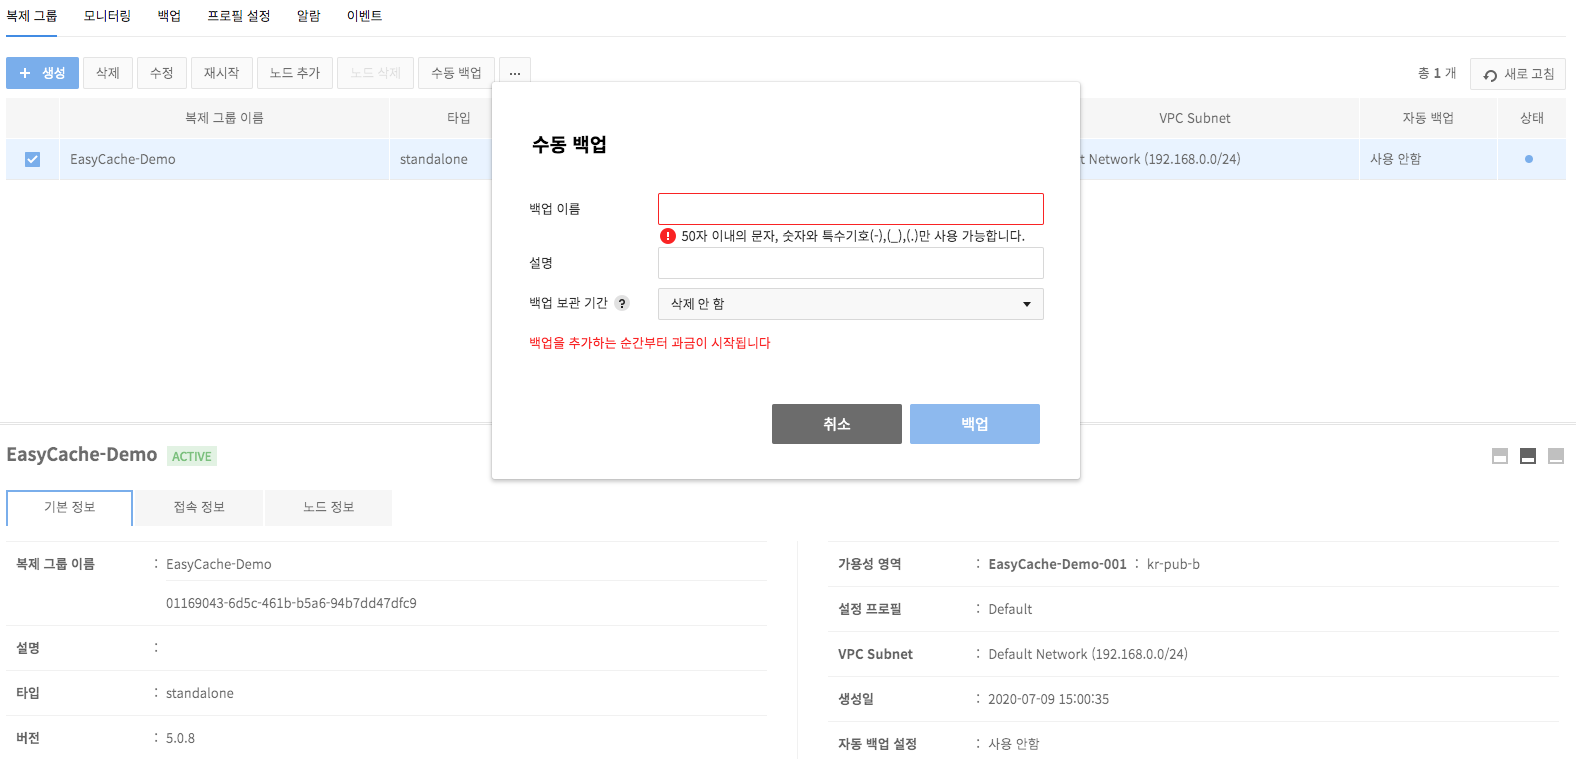
To create manual backup files, select a replication group and click Manual Backup.
-
Enter information for Manual Backup and click Backup. It may take more time to create a backup in proportion to the size of data.
-
Backup Name: Enter name of a backup.
- Description: Enter description of a backup.
- Backup Retention Period: You may not delete, or retain backup from 1 day, up to 30 days.
[Caution] EasyCache, as a Redis-based cache service, does not provide any features for data persistence other than the automatic and manual backup provided by the web console page. Therefore, in case of data loss due to restart or unexpected failure, the data cannot be recovered if there is no backup data created by automatic and manual backup.
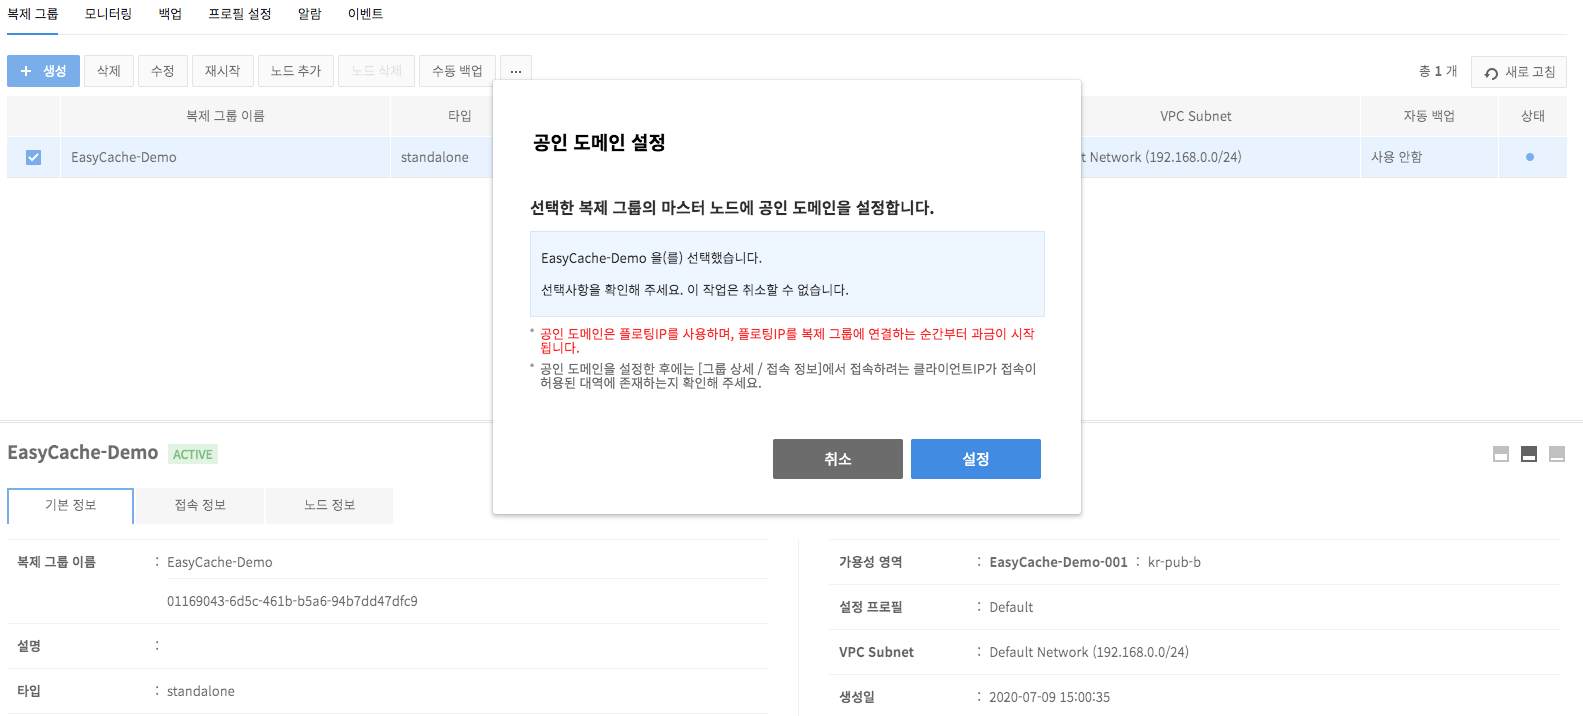
Configure Public Domains
- Access to a replication group is available only on instances sharing the same subnet; but to enable external access, configure public domain setting from domain management.
Read-only domain setup
- To set up a read-only domain, after selecting target replication group where a Replica node is added, click other action button (⋯) and click Read-only Domain Setup.
- The read-only domain you set is a private domain that can be logged in from the VPC subnet you selected when creating a replication group, and this is where the IP of the Replica node is bound to.
- Go to Replication group > Login Information if you want to check the read-only domain you set.
-
If failover occurs due to the fault of the Master node
- When there is 1 replica node
- Until the old master node is recovered with the replica node or a new replica node is added after deleting the old one, the read-only domain retains the IP of the old replica node that has been promoted to the master node due to the failover.
- If the old master node is recovered with the replica node or a new replica node is added after deleting the old one, the binding of the read-only domain changes to the IP of the new replica node.
- If binding fails, manually try again in Replication Group > Access Information.
- When there are 2 replica nodes
- The IP of the old replica node promoted to new master node is excluded from binding
- When recovering an old master node that has been changed to a replica node or adding a new replica node after manually deleting it, the IP of the new replica node is added to the read-only domain.
- When there is 1 replica node
-
If Replica node fails or is deleted
- When there is 1 replica node
- The binding of the read-only domain changes to the IP of the master node.
- When recovering a replica node or adding a new replica node after manually deleting it, the read-only domain binding changes to the IP of the new replica node.
- If binding fails, manually try again in Replication Group > Access Information.
- When there are 2 replica nodes
- The IP of the replica node is excluded from the read-only domain.
- When recovering a replica node or adding a new replica node after manually deleting it, the IP of the new replica node is added to the read-only domain binding.
- When there is 1 replica node
-
When deleting the replication group or disabling the service while set to read-only domain, the read-only domain is disabled.
Constraints
- When the binding of the read-only domain is changed
- When binding is changed without login interruption (for instance, when new Replica node is added after failover of the Master node)
- If the client logged in as a read-only domain supports the detection of binding change in domains or such logic is implemented, user will be logged in again using the changed binding IP. Otherwise, the user has to terminate the current login and log in again.
- When binding change results in disconnection (e.g. when Replica node fails or is deleted)
- If the client supports automatic relogin or such logic is implemented, user will be logged in with the changed binding IP. Otherwise, the user has to log in again.
- When binding is changed without login interruption (for instance, when new Replica node is added after failover of the Master node)
Import Data
- After selecting the replication group, click the other actions button(⋯), then the Import Data to import the data.
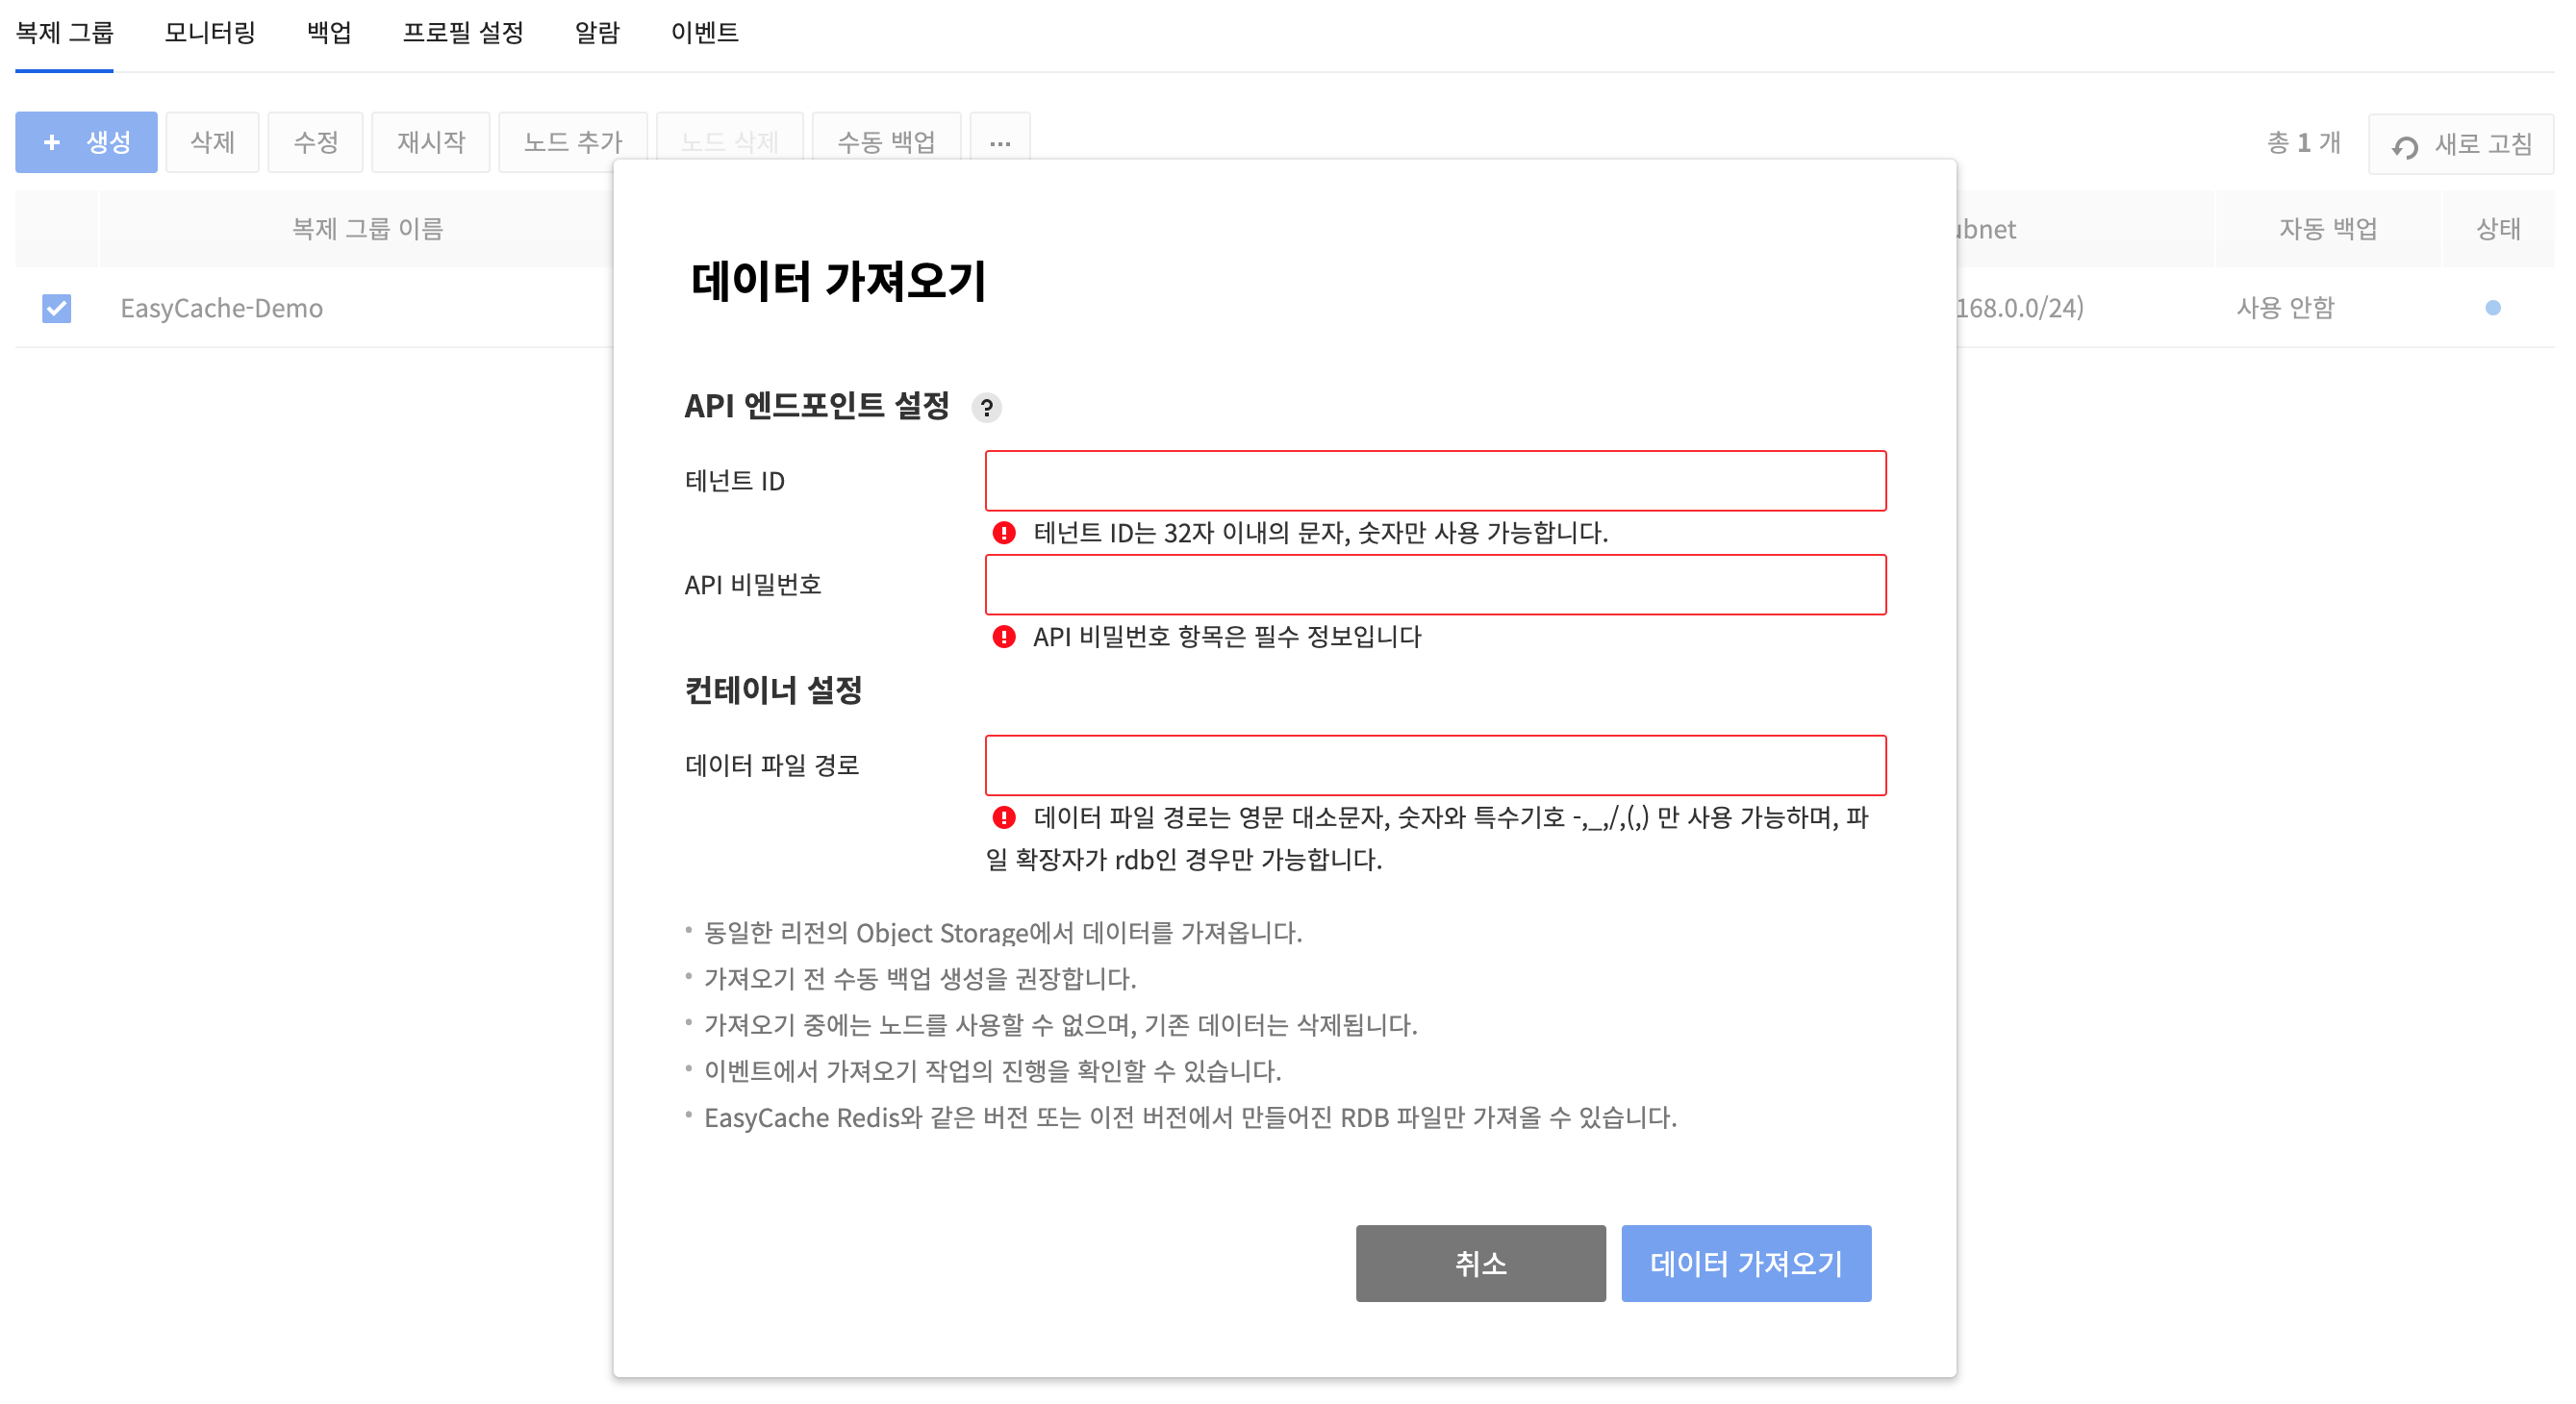
- The RDB file in the user’s object storage can be imported to the node in use. The region of the object storage and EasyCache must be the same.
- When importing the data, the API endpoint settings of object storage, container, and the path to the RDB file is needed.
- For container and RDB file paths, only uppercase and lowercase letters, numbers, and special symbols -,_,/,. can be entered.
- After Import Data, back up is recommended before the previous data of the node gets deleted.
- Node cannot be used while executing Import Data. The execution status can be checked in events.
- Only the RDB files created in the same or previous version of EasyCache Redis can be imported. RDB file created in a newer version than the EasyCache Redis cannot be imported.
Export Data
- After selecting the replication group, click Other Actions button(⋯), then the Export Data to export the data.
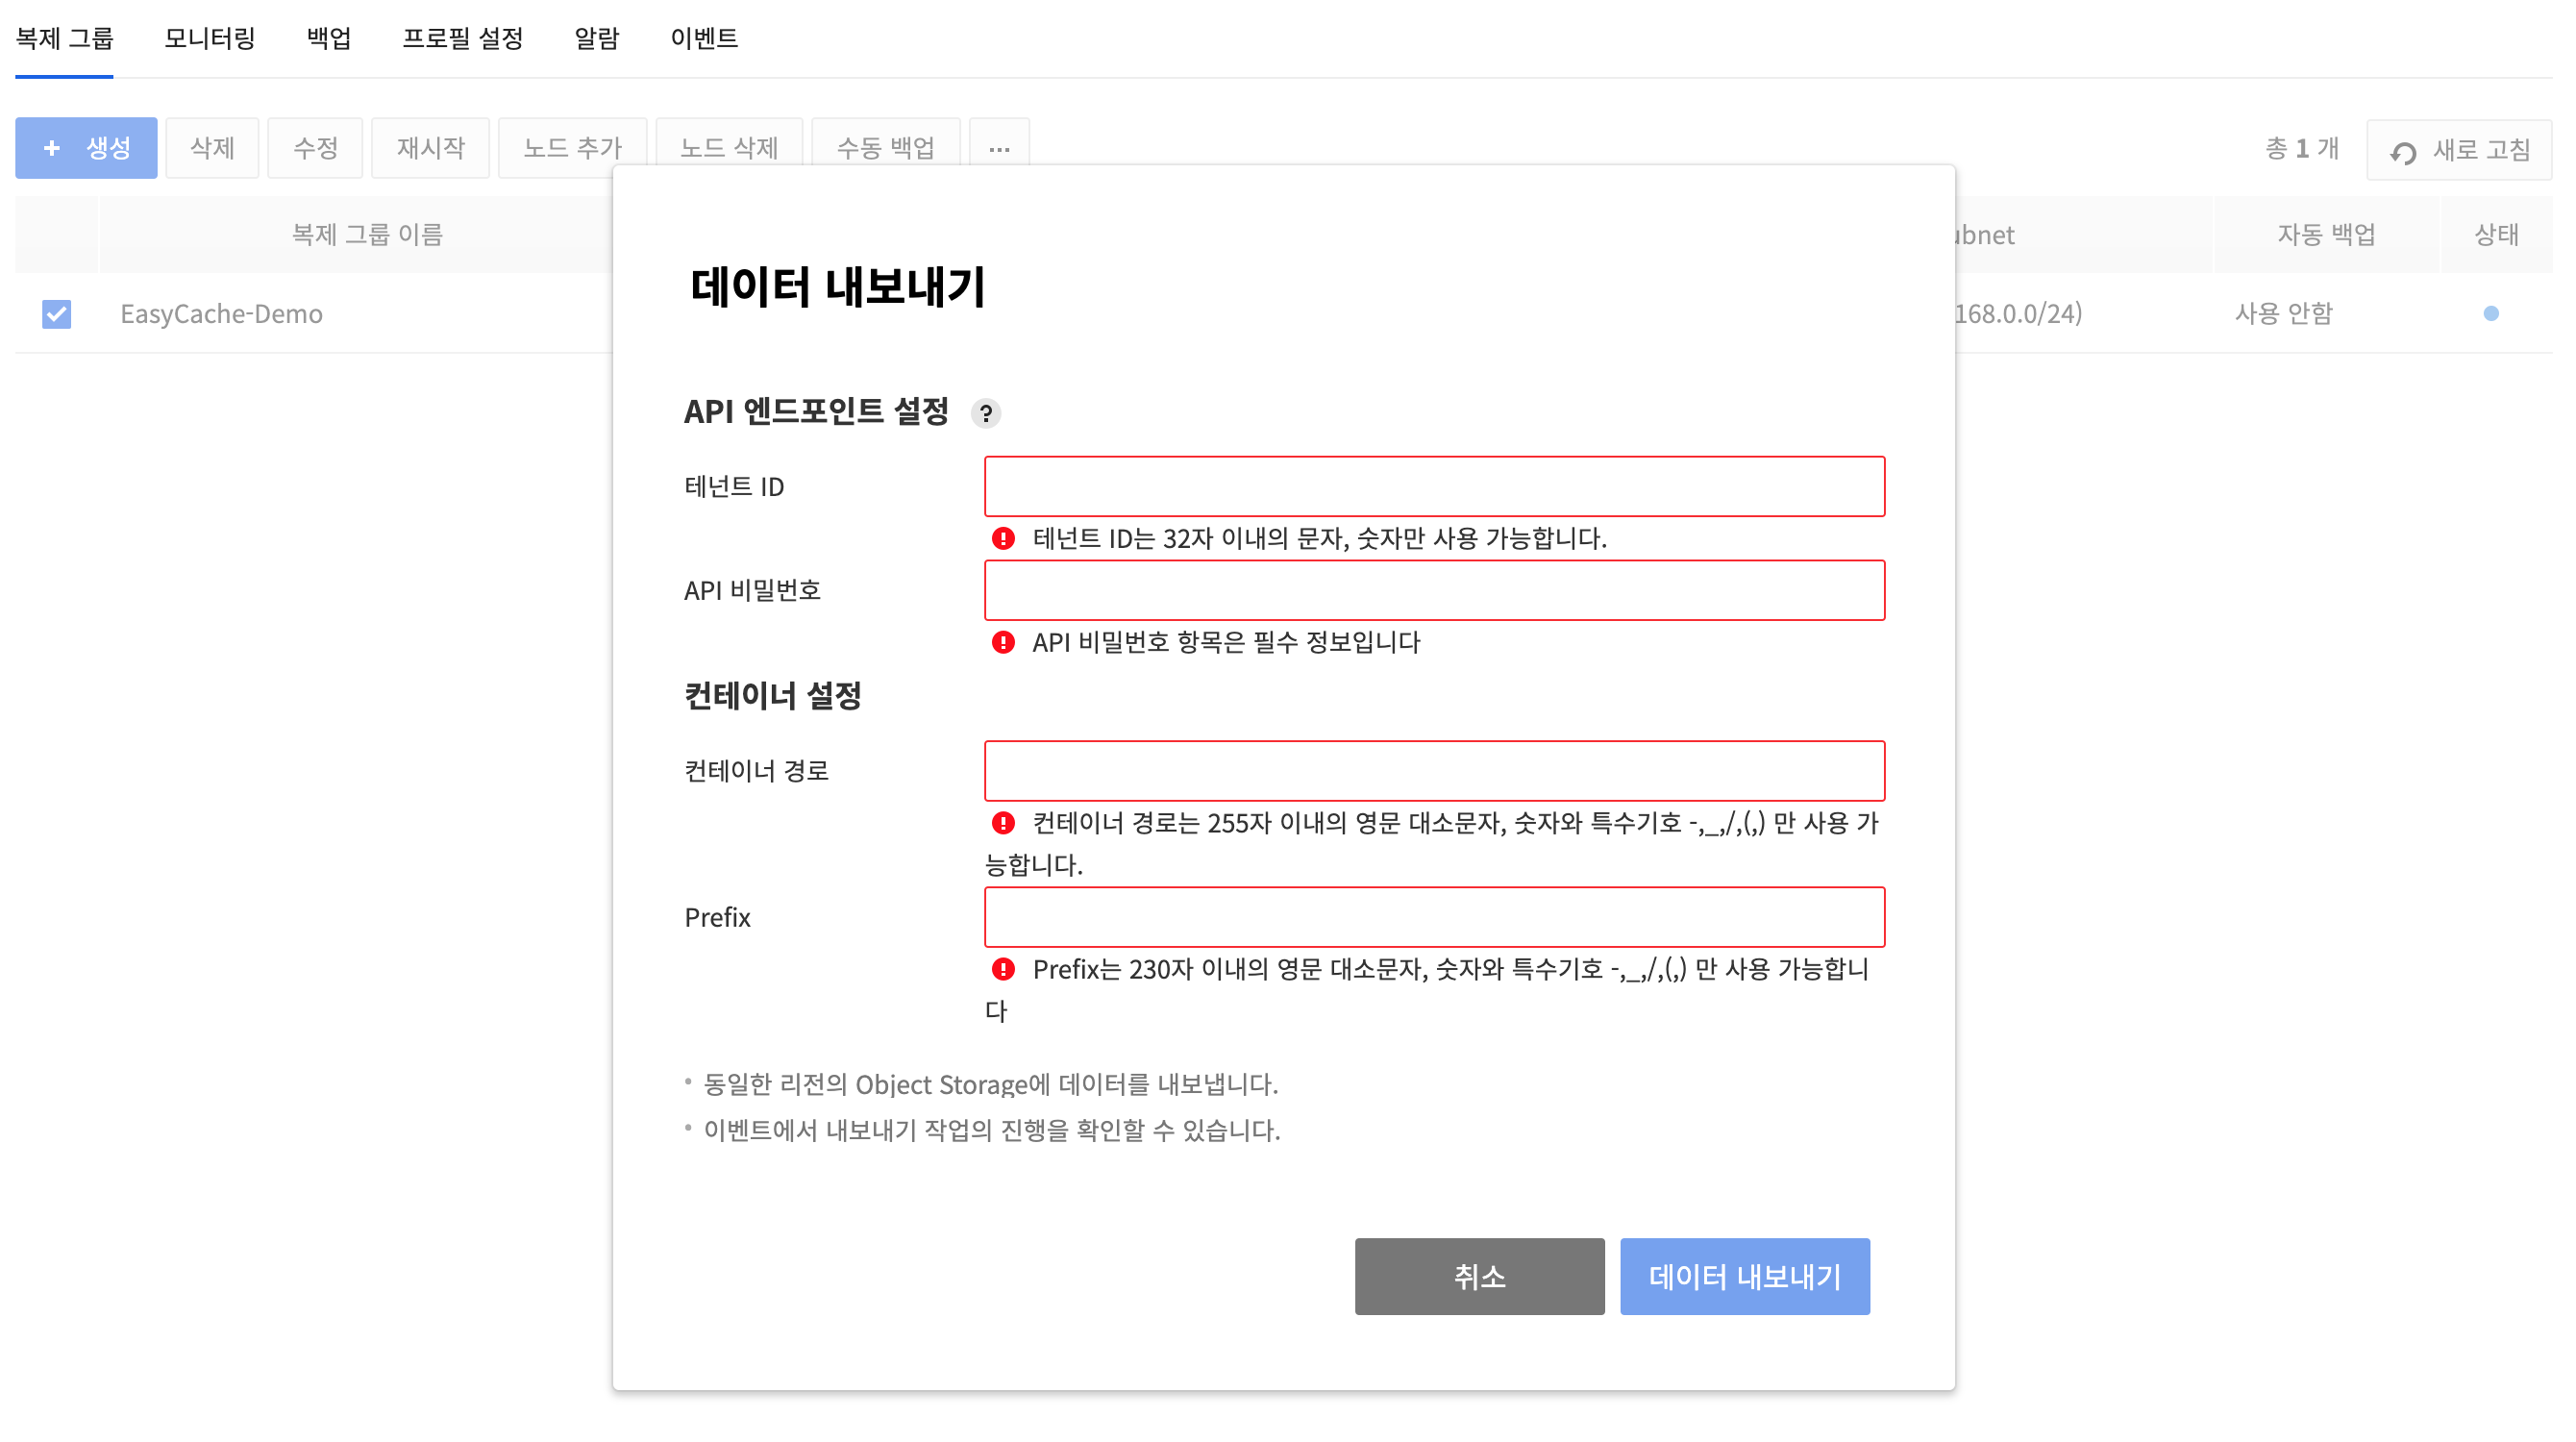
- You can export the data of the EasyCache replication groups to the user’s object storage. In this case, the object storage and EasyCache must be in the same region.
- When exporting data, set the API endpoint for object storage and enter the path to the container to which the data will be exported and the prefix required to create a file name.
- For container paths and prefix, only uppercase and lowercase letters, numbers, and special symbols -,_,/,. can be entered.
- If the data in the EasyCache replication group is larger than 1 gigabyte, a segment object is automatically created when exporting to object storage.
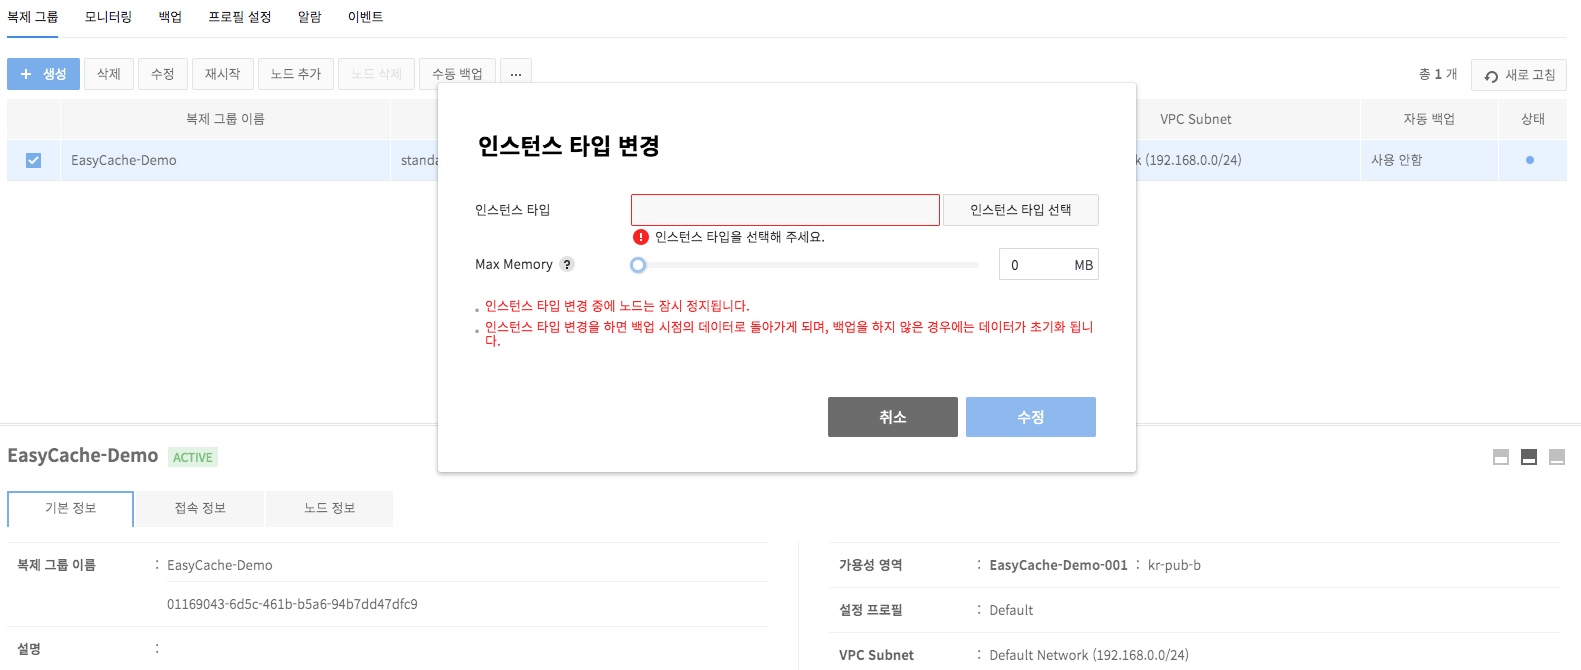
Change Instance Types
- It is available to change the instance type of a node in service.
- Change of an instance type means upgrading to higher specifications only.
- While a type change is underway, node is suspended from service.
- With the change of instance type, data is reverted to a time of backup, and if backup was not available, data goes back to default.
- When there's a replica node, failover occurs to change instance type of the master node.
Constraints
- Redundant manual backup is unavailable. Try again after current manual backup is done.
- Executing a manual backup during auto backup time may cause delays in the backup.
Upgrade a Version
- You can upgrade an existing replication group that is Redis version 5 to Redis version 6.
- To run a version upgrade, select a target replication group that is Redis version 5, click the more actions button (⋯) and click Upgrade Version.
- In the Upgrade Version dialog, you can select the configuration profile that will be applied when upgrading the version.
- Performing data backup before running a version upgrade lets you protect against data loss and other contingencies.
- Running a version upgrade when the replication group's network traffic is low can increase the speed and reliability of the upgrade.

Constraints
- Redis versions below 7.0.7 can be upgraded to the next version after a one-time upgrade to 7.0.7.
- If the existing replication group to upgrade the Redis version has a custom configuration profile other than the default configuration profile applied, and you want to apply the same configuration profile when upgrading, create a custom configuration profile with Redis version 6 in Profile Settings in advance and select the corresponding configuration profile when upgrading the version.
- If a read-only domain is set, you can upgrade the version after clearing the read-only domain setting.
- For standalone type replication groups
- Write operations to the replication group that occur during a version upgrade are excluded from data restoration target after upgrade.
- If the Redis server is restarted during a version upgrade, read and write operations to the replication group become temporarily unavailable.
- For replication type replication groups
- The master node is changed after a version upgrade.
- During a version upgrade, read and write operations to the replication group are temporarily unavailable while the master change required for the upgrade is performed, and a failover event may occur.
- Failover is not guaranteed while an HA node is being upgraded during a version upgrade.
- If the version upgrade fails, you can run the version upgrade again by clicking Replication Group > ⋯ > Upgrade Version.
Change Master
- After selecting the target replication group where a Replica node is added, click Other Action button(⋯) and click Change Master to change the master node of the replication group.
- The Replica node is changed to Master node, and the existing Master node is changed to Replica node.
- When there are 2 Replica nodes, change the Replica node appropriate for the system to Master node.
Replace Certificate
- To replace the certificate for a replication group that uses a TLS certificate, select the replication group that currently uses the TLS certificate, and then click the Options button (⋯) > Replace Certificate.
- Enter the appkey for your Certificate Manager product to get TLS certificates.
- Select a TLS certificate you want and proceed to change the certificate.
[Caution] When you replace the certificate, the replication group is restarted to return to the data at the time of the backup, or if no backup was performed, the data is initialized.
Replication Group Details
Details of a replication group, such as basic, access, node, and monitoring, can be found.
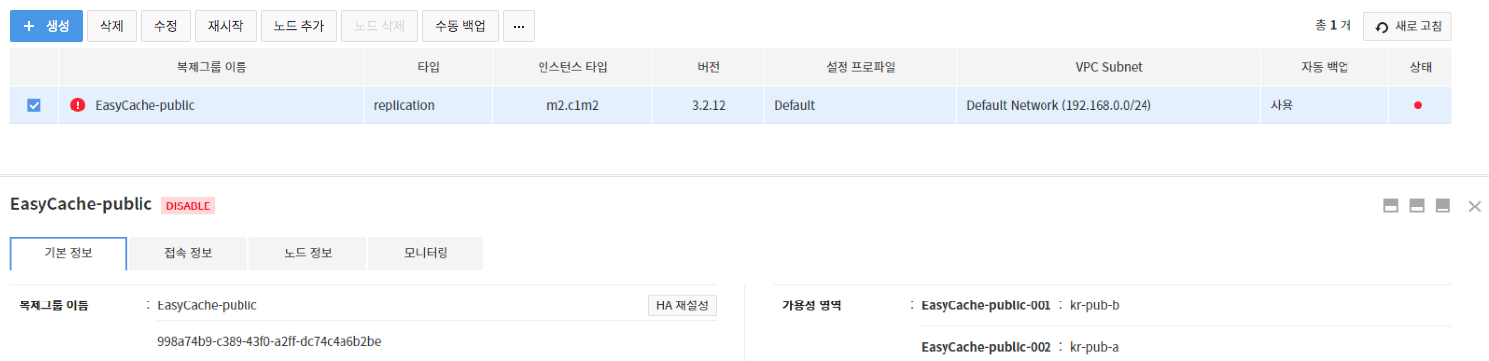
Basic Information
Select a created replication group, press Basic Information and check details of the replication group.
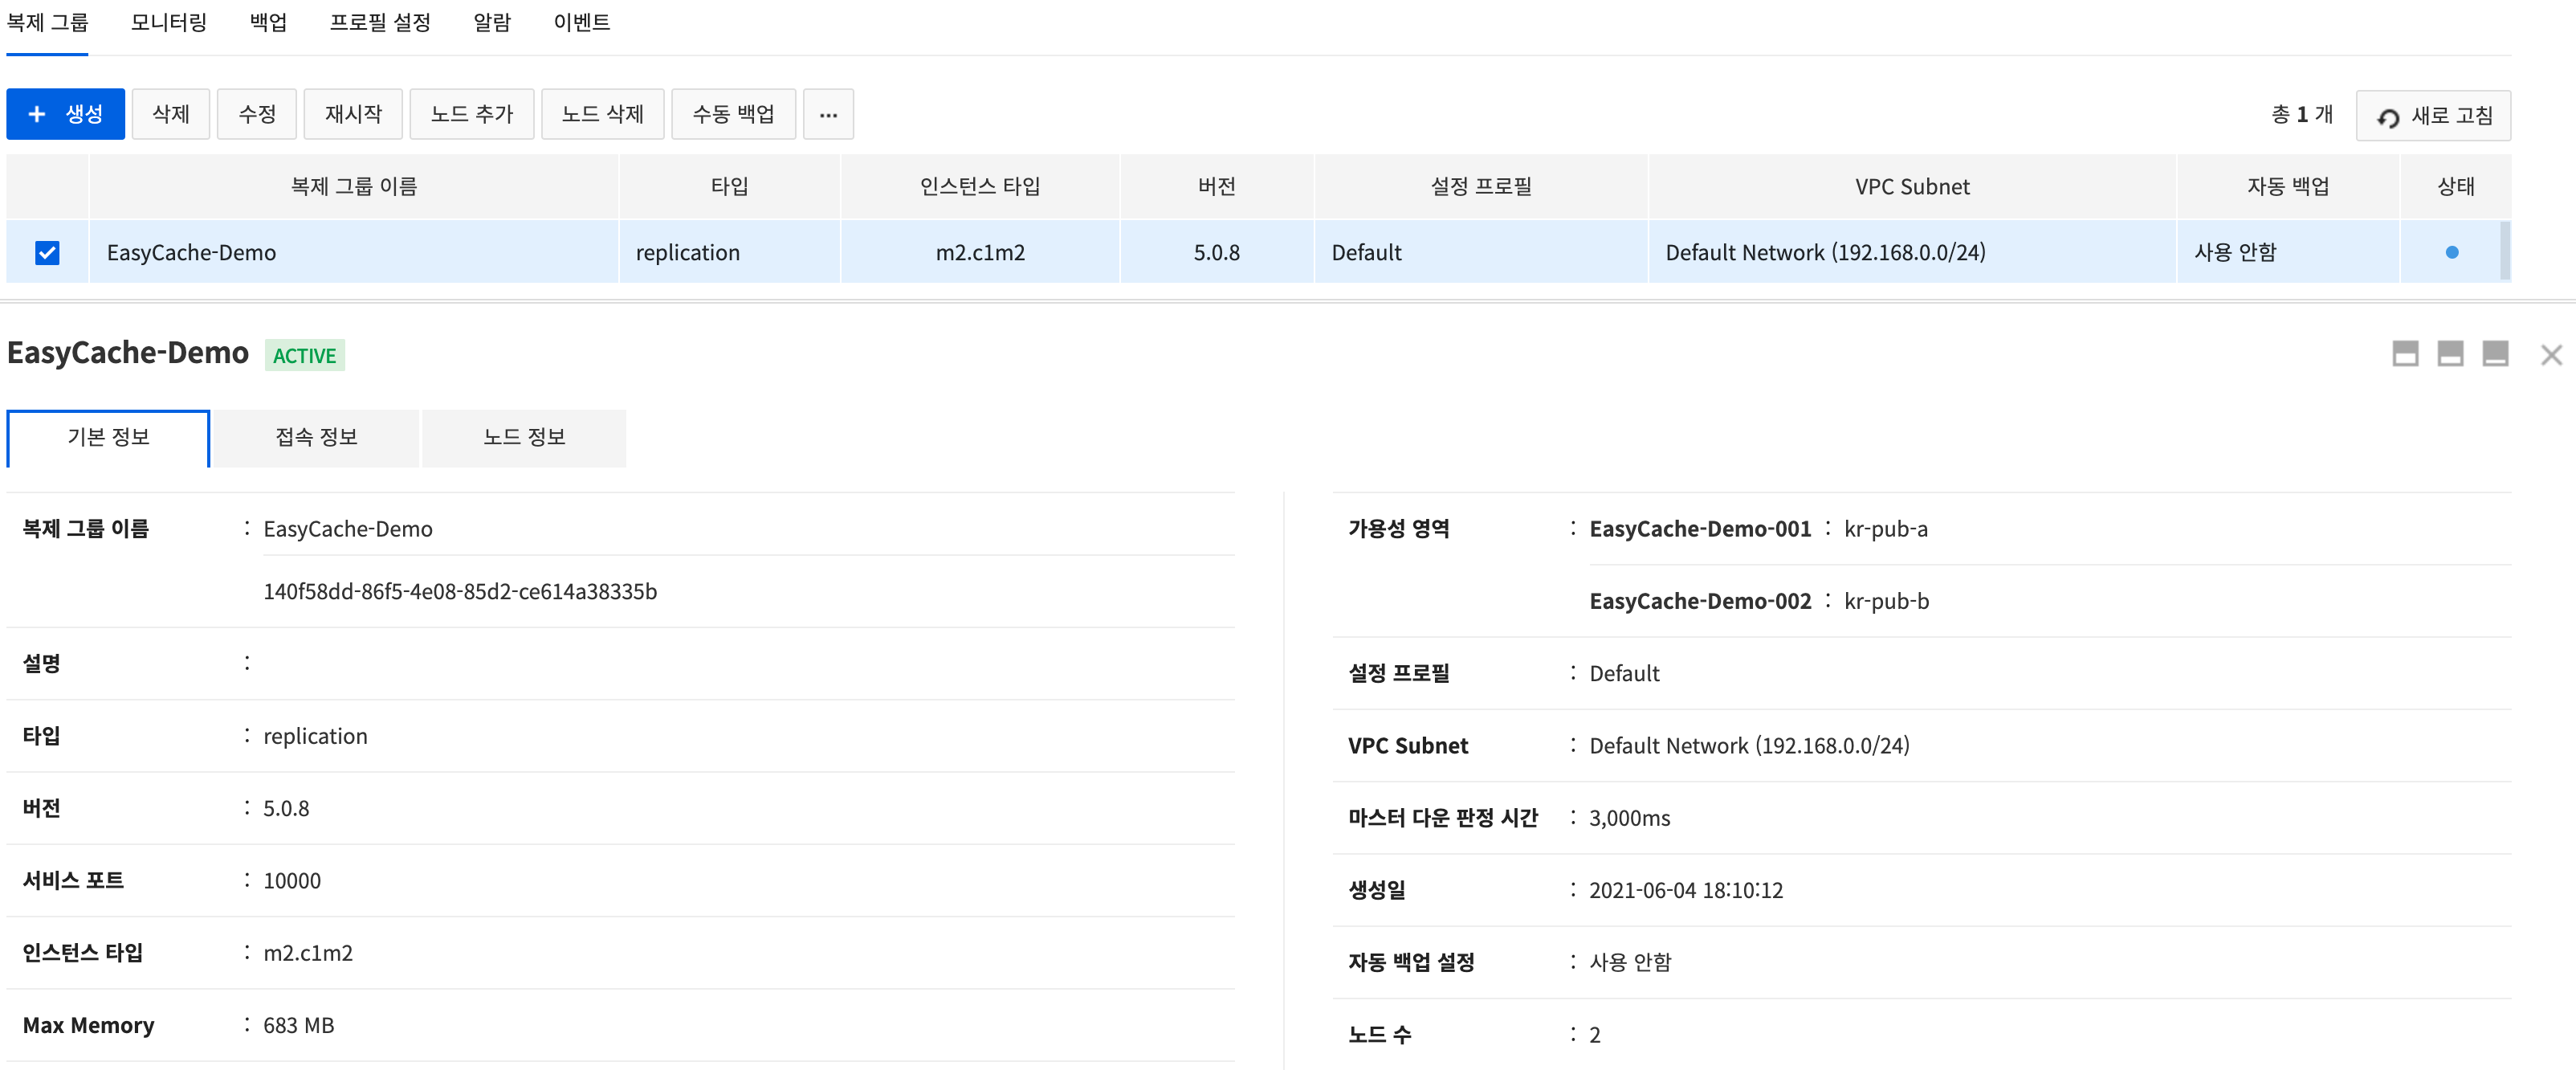
The following items can be found:
- Name, description, type, version, service port, and instance type of replication group
- Max memory, availability area, and configuration profile
- VPC Subnet(subnetwork), creation date, automatic backup settings, number of nodes
- Whether TLS certificate enabled, TLS service port, TLS certificate name
The following items can be found when there's a replica node:
- Master down timer
Access to Replication Groups
Select a created replication group and click Access Information.
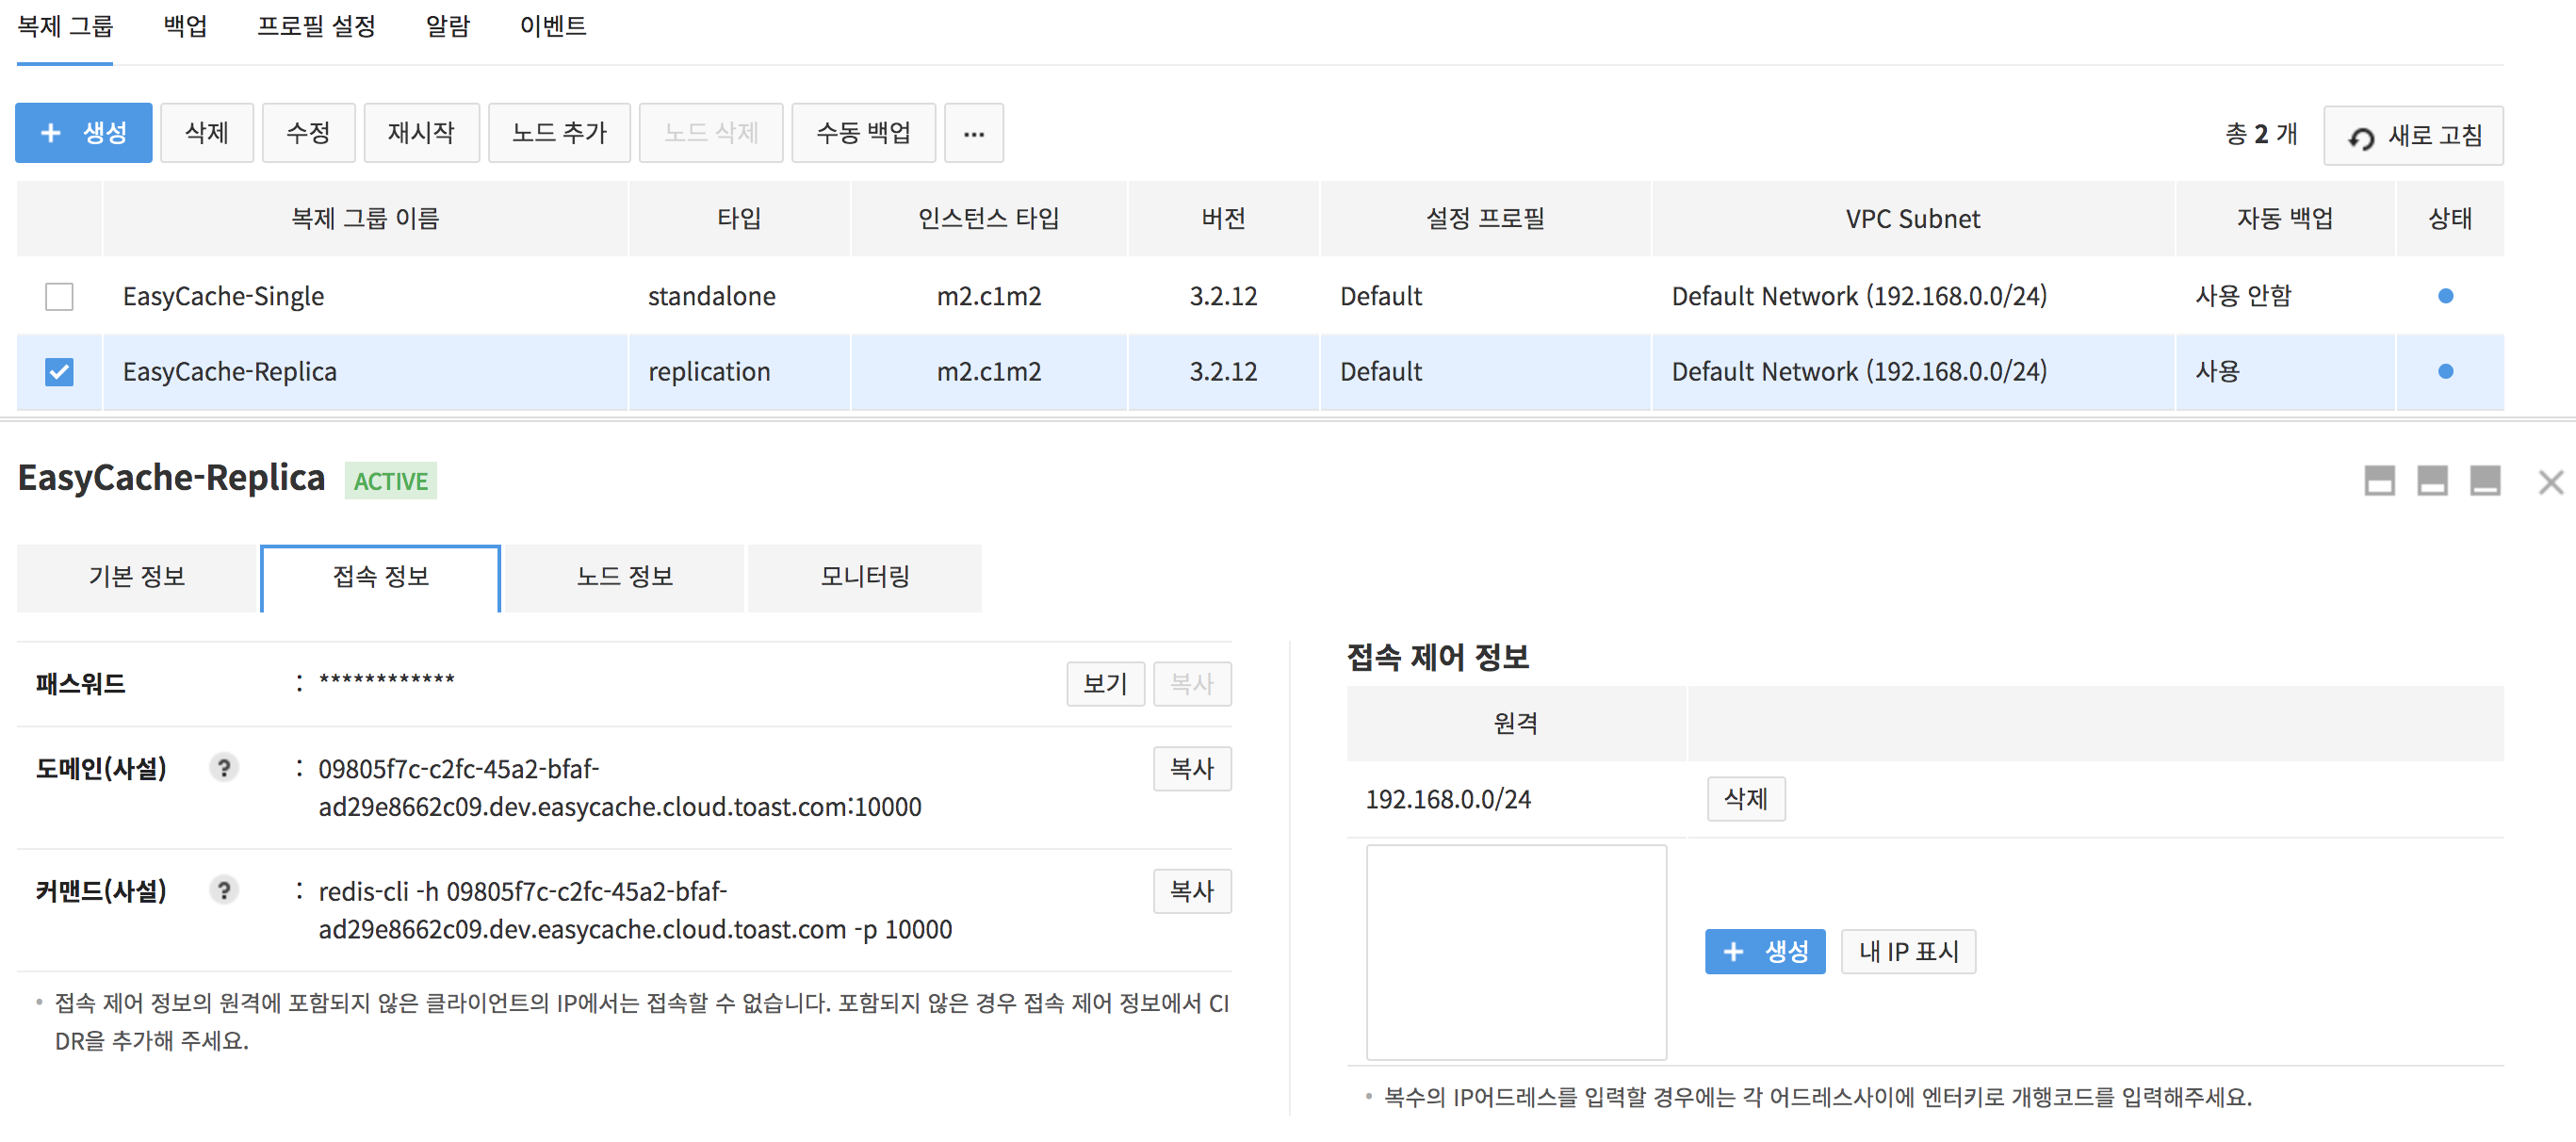
- To see encrypted password, click View.
- Press Copy to copy password.
- Check available domain information.
- A Redis node without public domain setting does not allow external access.
- Click Copy to copy domain.
- For replication groups with TLS certificate, must add the following options.
- --tls: Select whether to use TLS.
- --cert {Path for public key}: Enter the public key extracted from a certificate used for connection.
- --key {Path for secret key}: Enter the secret key extracted from a certificate used for connection.
- --cacert {Path for CA key}: Enter the CA key extracted from a certificate used for connection.
- redis requires a public key, a secret key, and a CA public key. Therefore, for the certificate to use, relevant keys must be included. For how to create a key, see Certificate Manager > Trouble Shooting Guide.
ex) redis-cli -h {IP or domain} -p {TLS service port} --tls --cert {Path for public key} --key {Path for secret key} --cacert {Path for CA key}
- Access information is available on an application of node connected with same VPC subnet.
- Commands are executable on nodes connected with same VPC subnet.
- Access Control Information: Enter accessible users to a replication group in the CIDR format.
- Show My IP: Displays local IPs in the CIDR format.
- Press Create to register.
- Cannot access with IPs that are not registered for access control information.
Node Information
Select the replication group created and click the *Node Information* tab to check the details and logs of the replication group node.
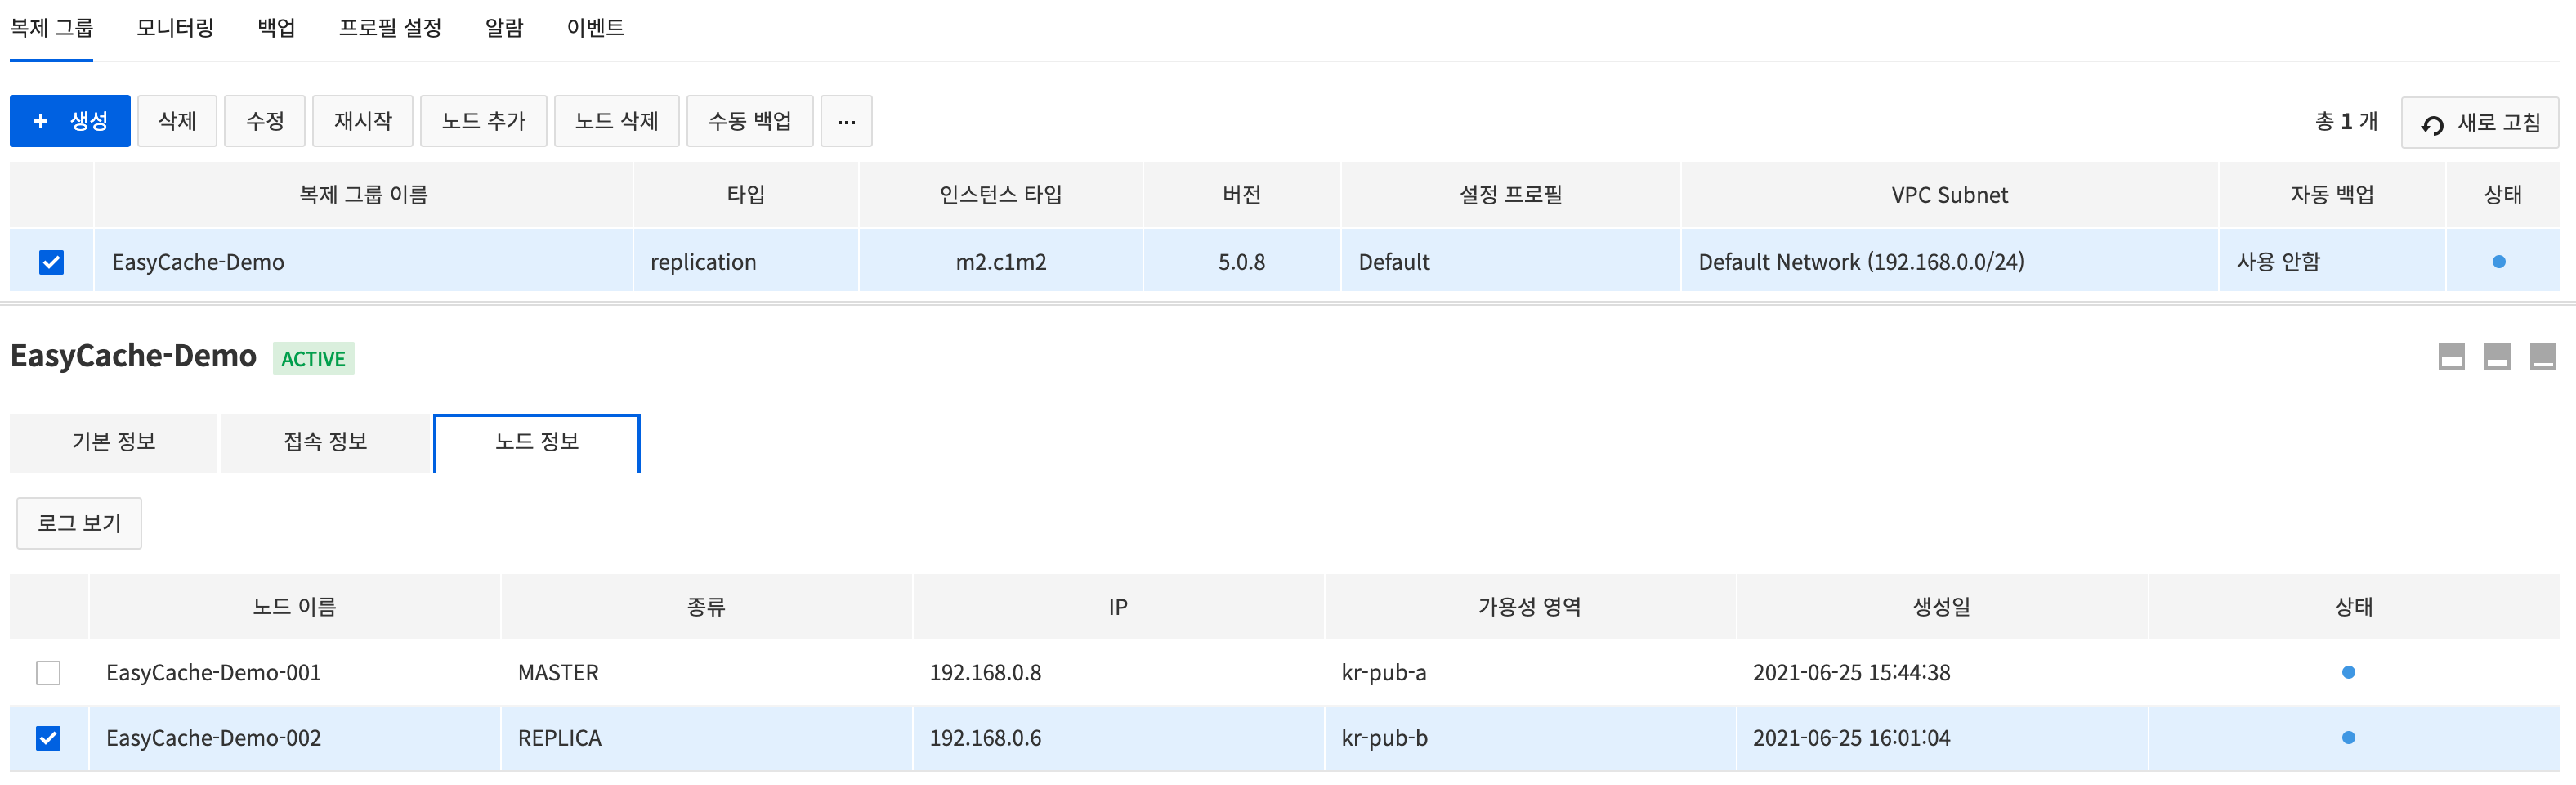
- The following items can be found:
- Name, type, IP, availability area, date of creation, and status of node
- To view logs of the node, click the View Log button.
View Log
For each node, you can search for logs up to 1 month.
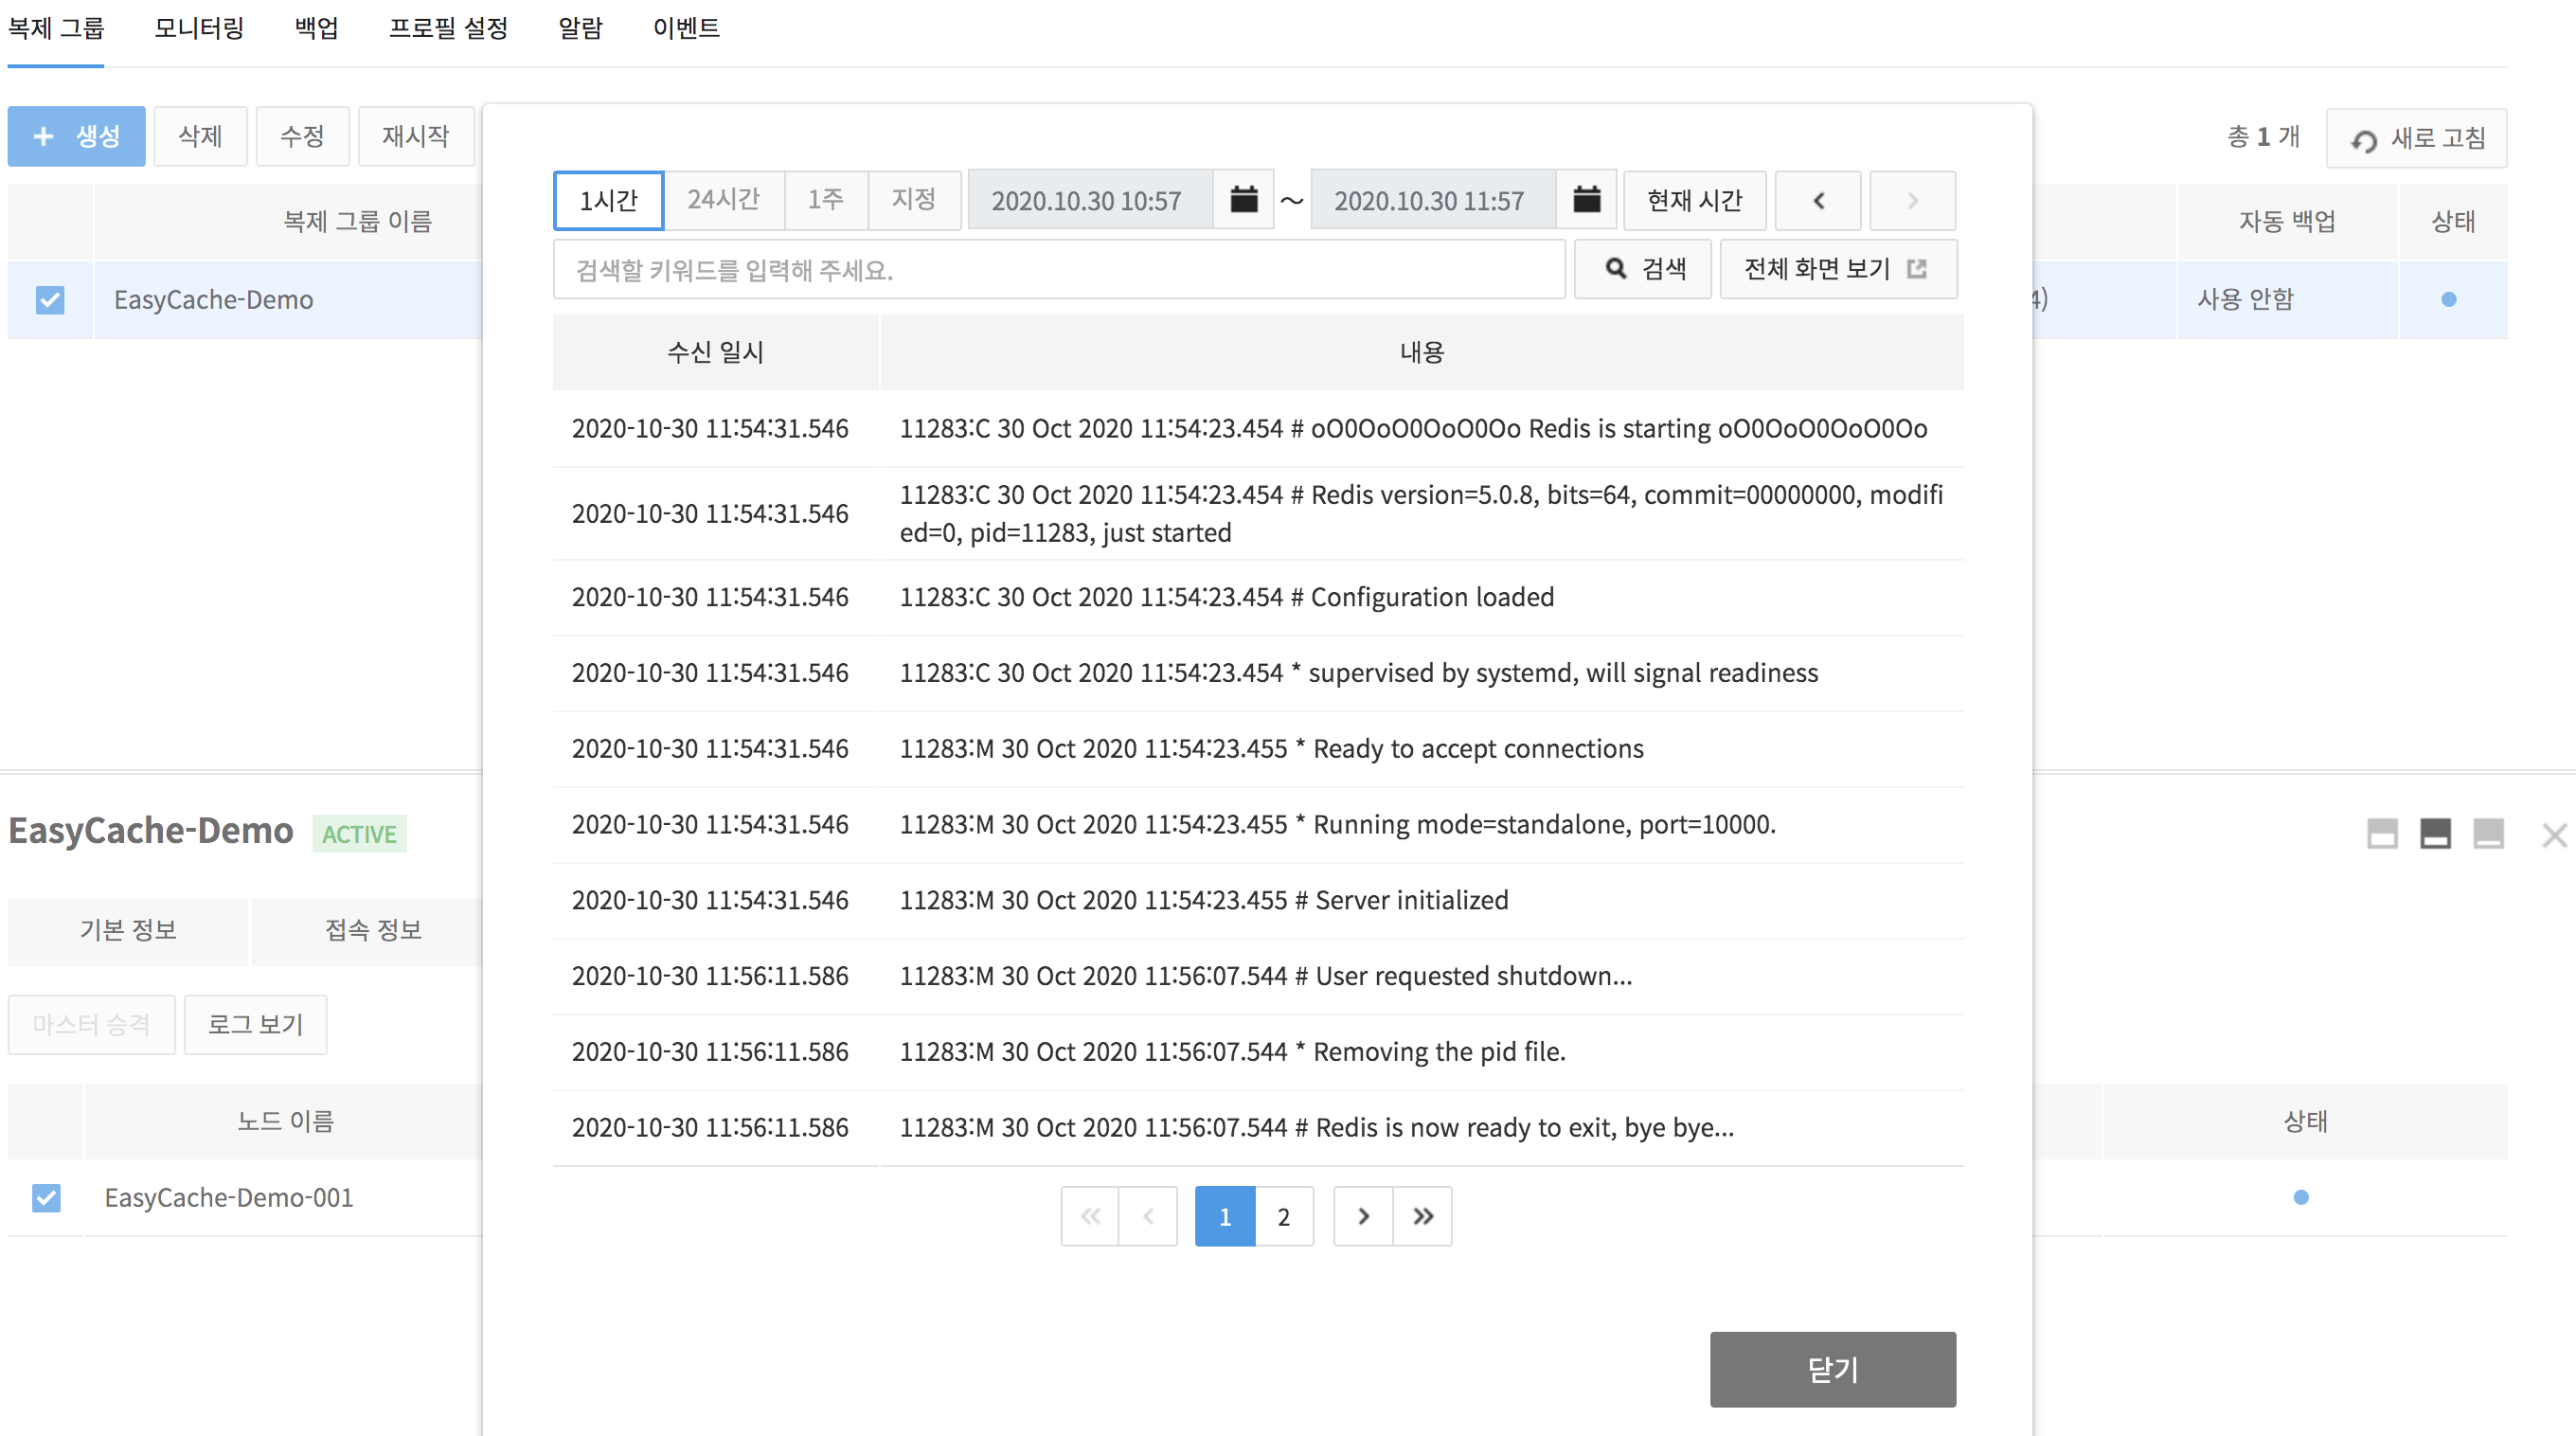
- You can change a search period by clicking the 1 Hour, 24 Hours, 1 Week, or Custom buttons.
- Click the Custom button to set the search period that you want in the displayed calendar.
- Click the Current Time button to search again from the selected search period based on the current time.
- Click the arrows on the right side of Current Time to search further backward or forward in the same amount of selected search period.
- Click the View Full Screen button to view all logs for 1 month on a new window.
Monitoring
EasyCache collects monitoring items that are required to run and use Redis at every minute and shows collected data on charts.
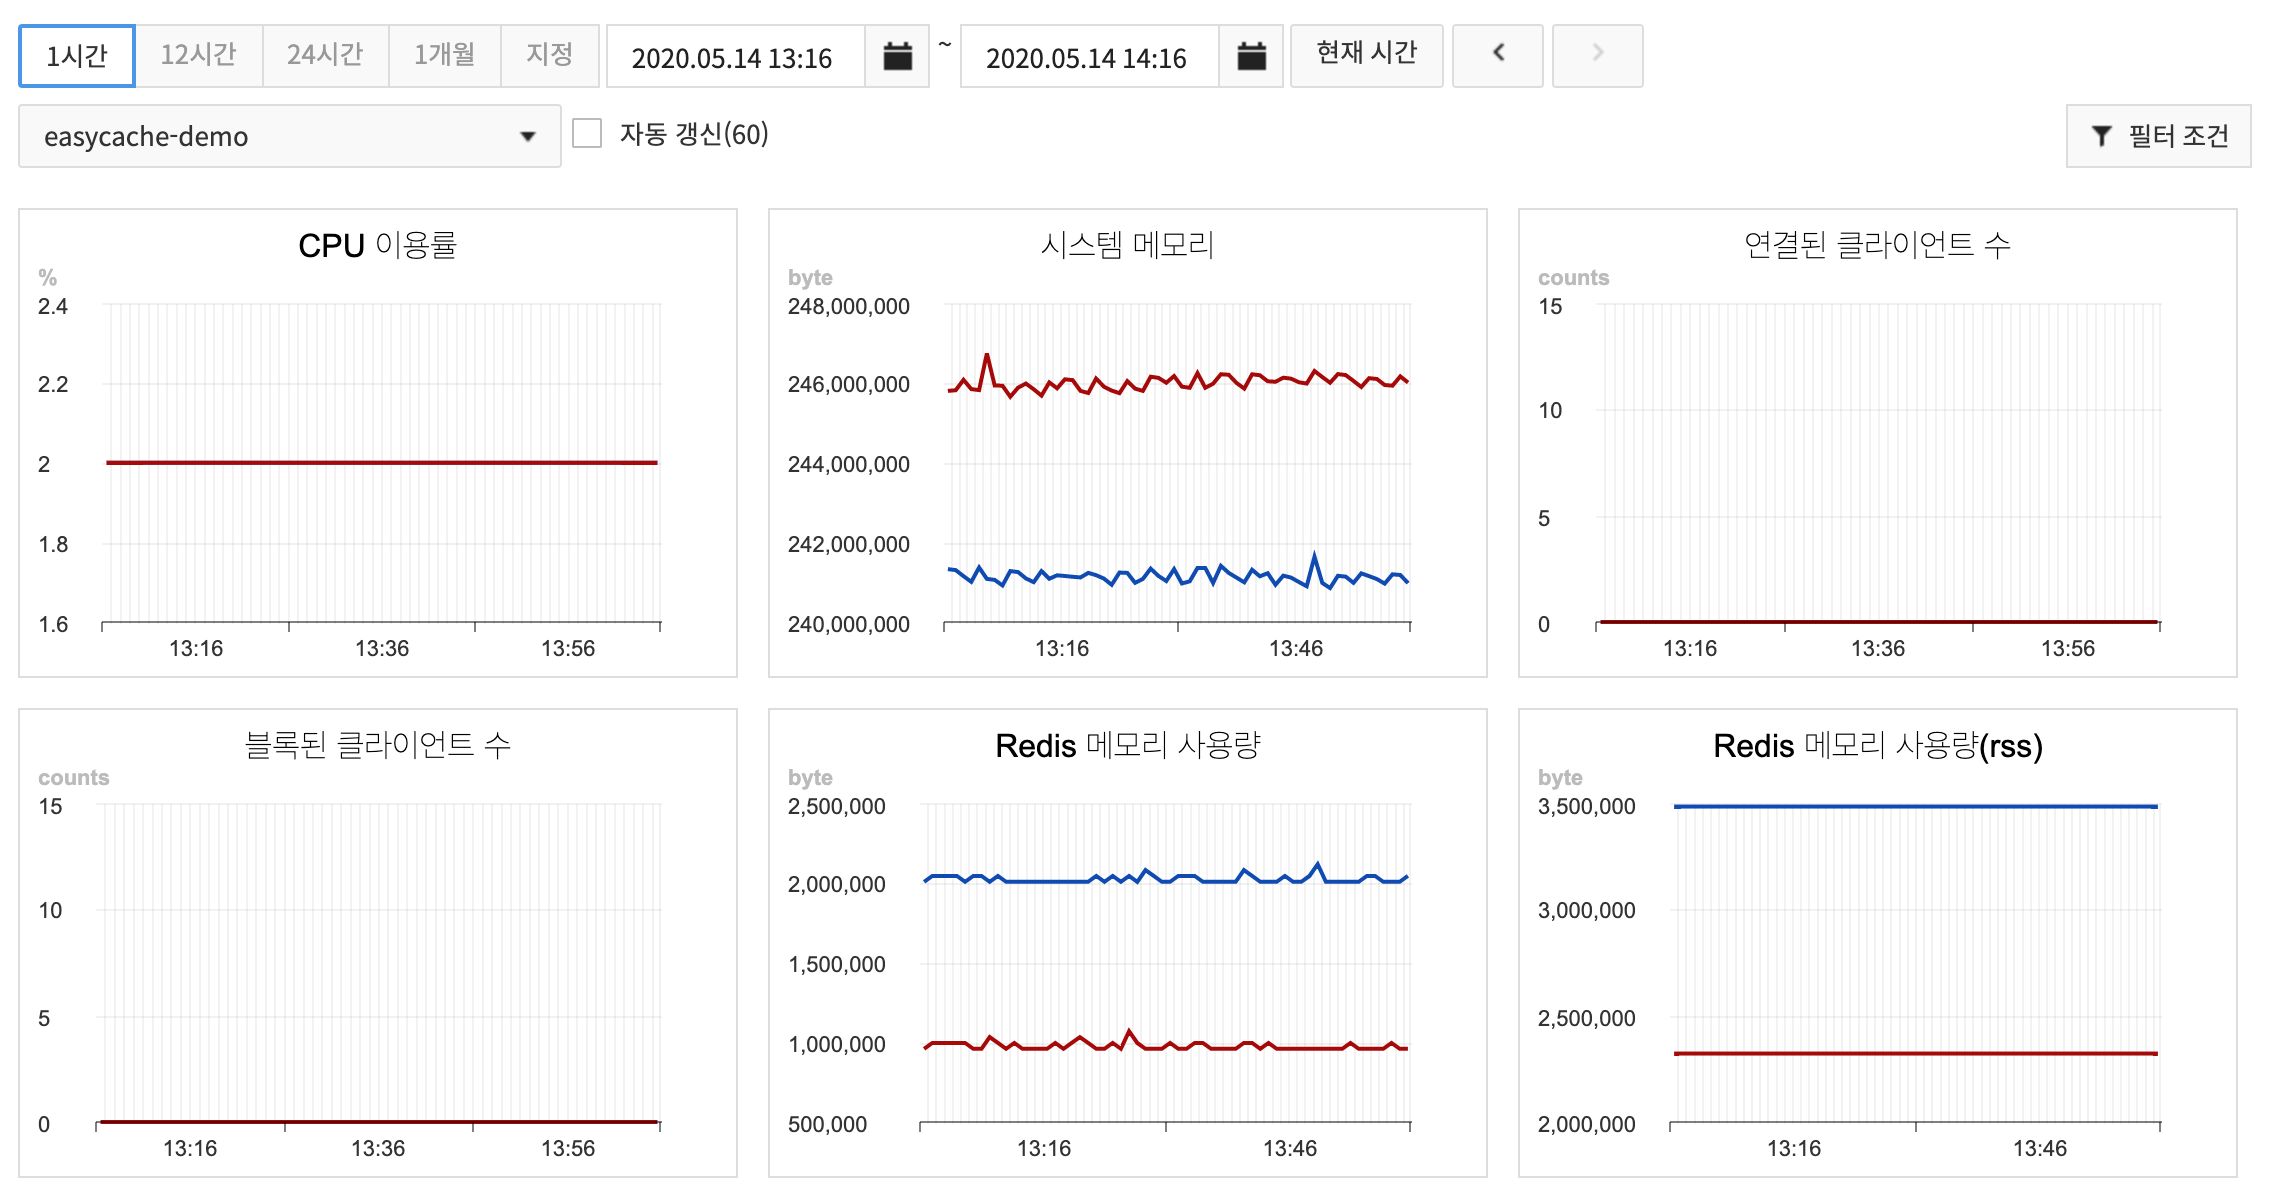
- Whenever you click the buttons such as 1 Hour, 24 Hours, and so on, the display is updated as of the current time.
- 1 Hour shows data collected at every minute on a chart.
- 12 Hours shows 10-minute average of collected data on a chart.
- 24 Hours shows 10-minute average of collected data on a chart.
- 1 Month shows 6-hour average of collected data on a chart.
- Click the Custom button to set your own search period.
- A search period can be set by clicking on the calendar.
- Although a day or time is selected on the calendar, selected search period is maintained.
- Click the Current Time button to search again from the selected search period based on the current time.
- Click the arrows on the right side of Current Time to search further backward or forward in the same amount of selected search period.
- A replication group can be selected to show charts from the replication group dropdown.
- With Auto Update enabled, chart data can be updated at every 60 seconds.
- By clicking on the chart, it is expanded for display.
- On an expanded chart, statistics and collection period may be changed for display.
- Statistical method is applied to show accumulated data, and if the collection time is 1 minute, same value will be displayed even with changed statistics, since low data is applied.
- The data storage period for monitoring is 40 days.
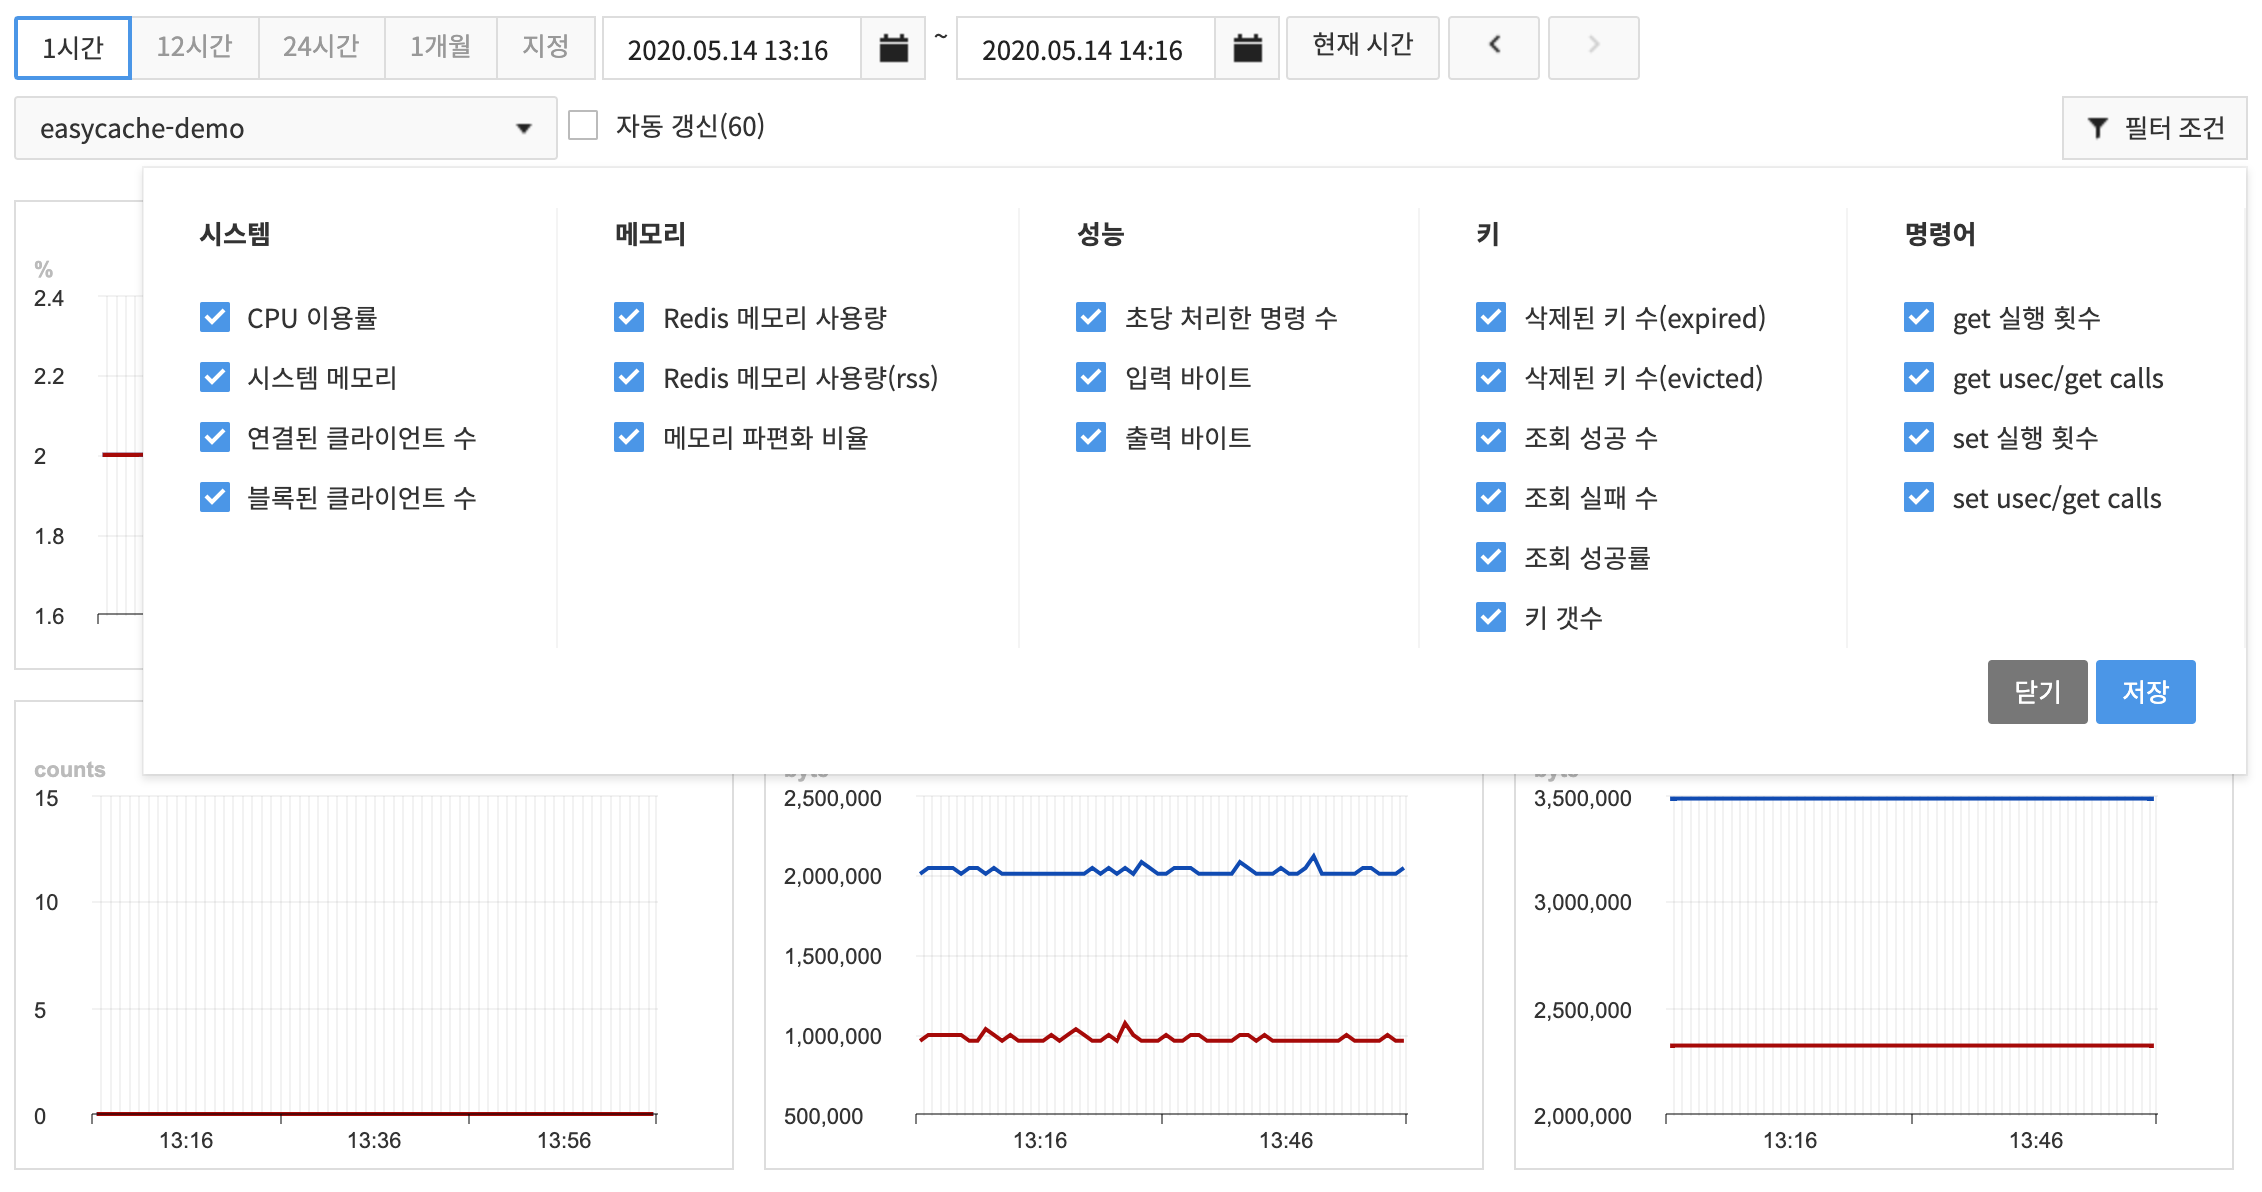 * In monitoring, you may opt to show selected items only from Filter Conditions.
* Find out the monitoring items as follows:
* CPU Usage Ratio
* System Memory
* Connected Client
* Blocked Client
* Redis Memory Usage Volume
* Redis Resident Set Size (rss)
* Memory Fragmentation Ratio
* Command Count per Second
* Input Byte
* Output Byte
* Expired Key Count
* Evicted Key Count
* Successful Query Count
* Failed Query Count
* Successful Query Rate
* Key Count
* get Execution Count
* get usec/get calls
* set Execution Count
* set usec/get calls
* In monitoring, you may opt to show selected items only from Filter Conditions.
* Find out the monitoring items as follows:
* CPU Usage Ratio
* System Memory
* Connected Client
* Blocked Client
* Redis Memory Usage Volume
* Redis Resident Set Size (rss)
* Memory Fragmentation Ratio
* Command Count per Second
* Input Byte
* Output Byte
* Expired Key Count
* Evicted Key Count
* Successful Query Count
* Failed Query Count
* Successful Query Rate
* Key Count
* get Execution Count
* get usec/get calls
* set Execution Count
* set usec/get calls
Backup
On the Backup tab, you may back up or delete backups. Since performance may be degraded during a backup, it is recommended to execute backup while service load is low.
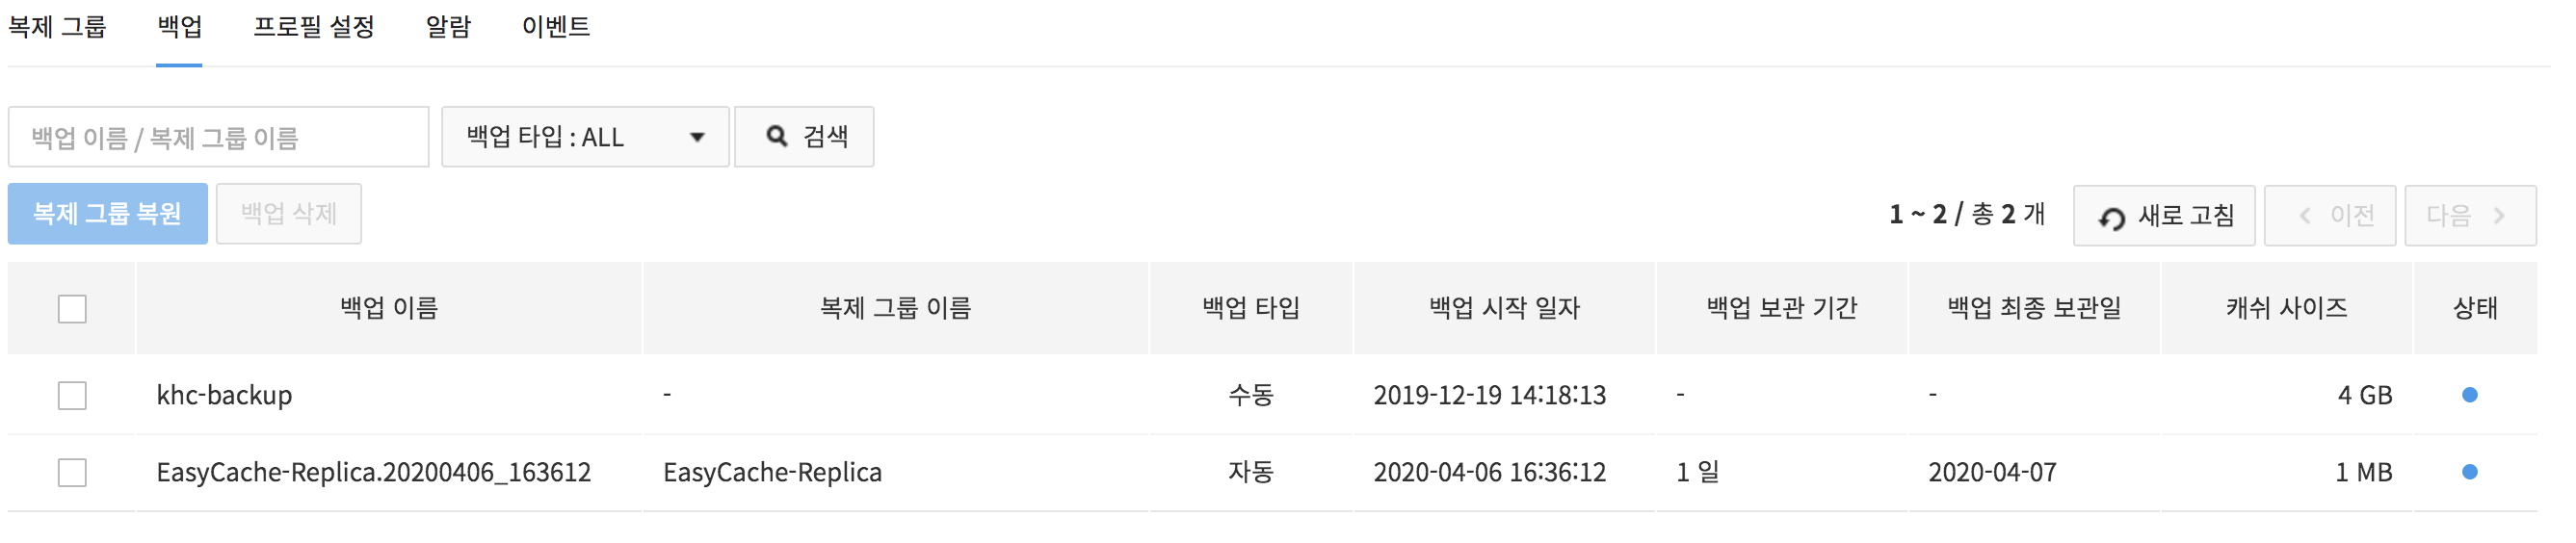
- You may select one or many backup files to delete.
- Enter name of a backup or a replication group on the search window, and press Search to find the result.
-
With Refresh, update the list of backup files and find information.
-
Basic Information has details of a backup file or a replication group.
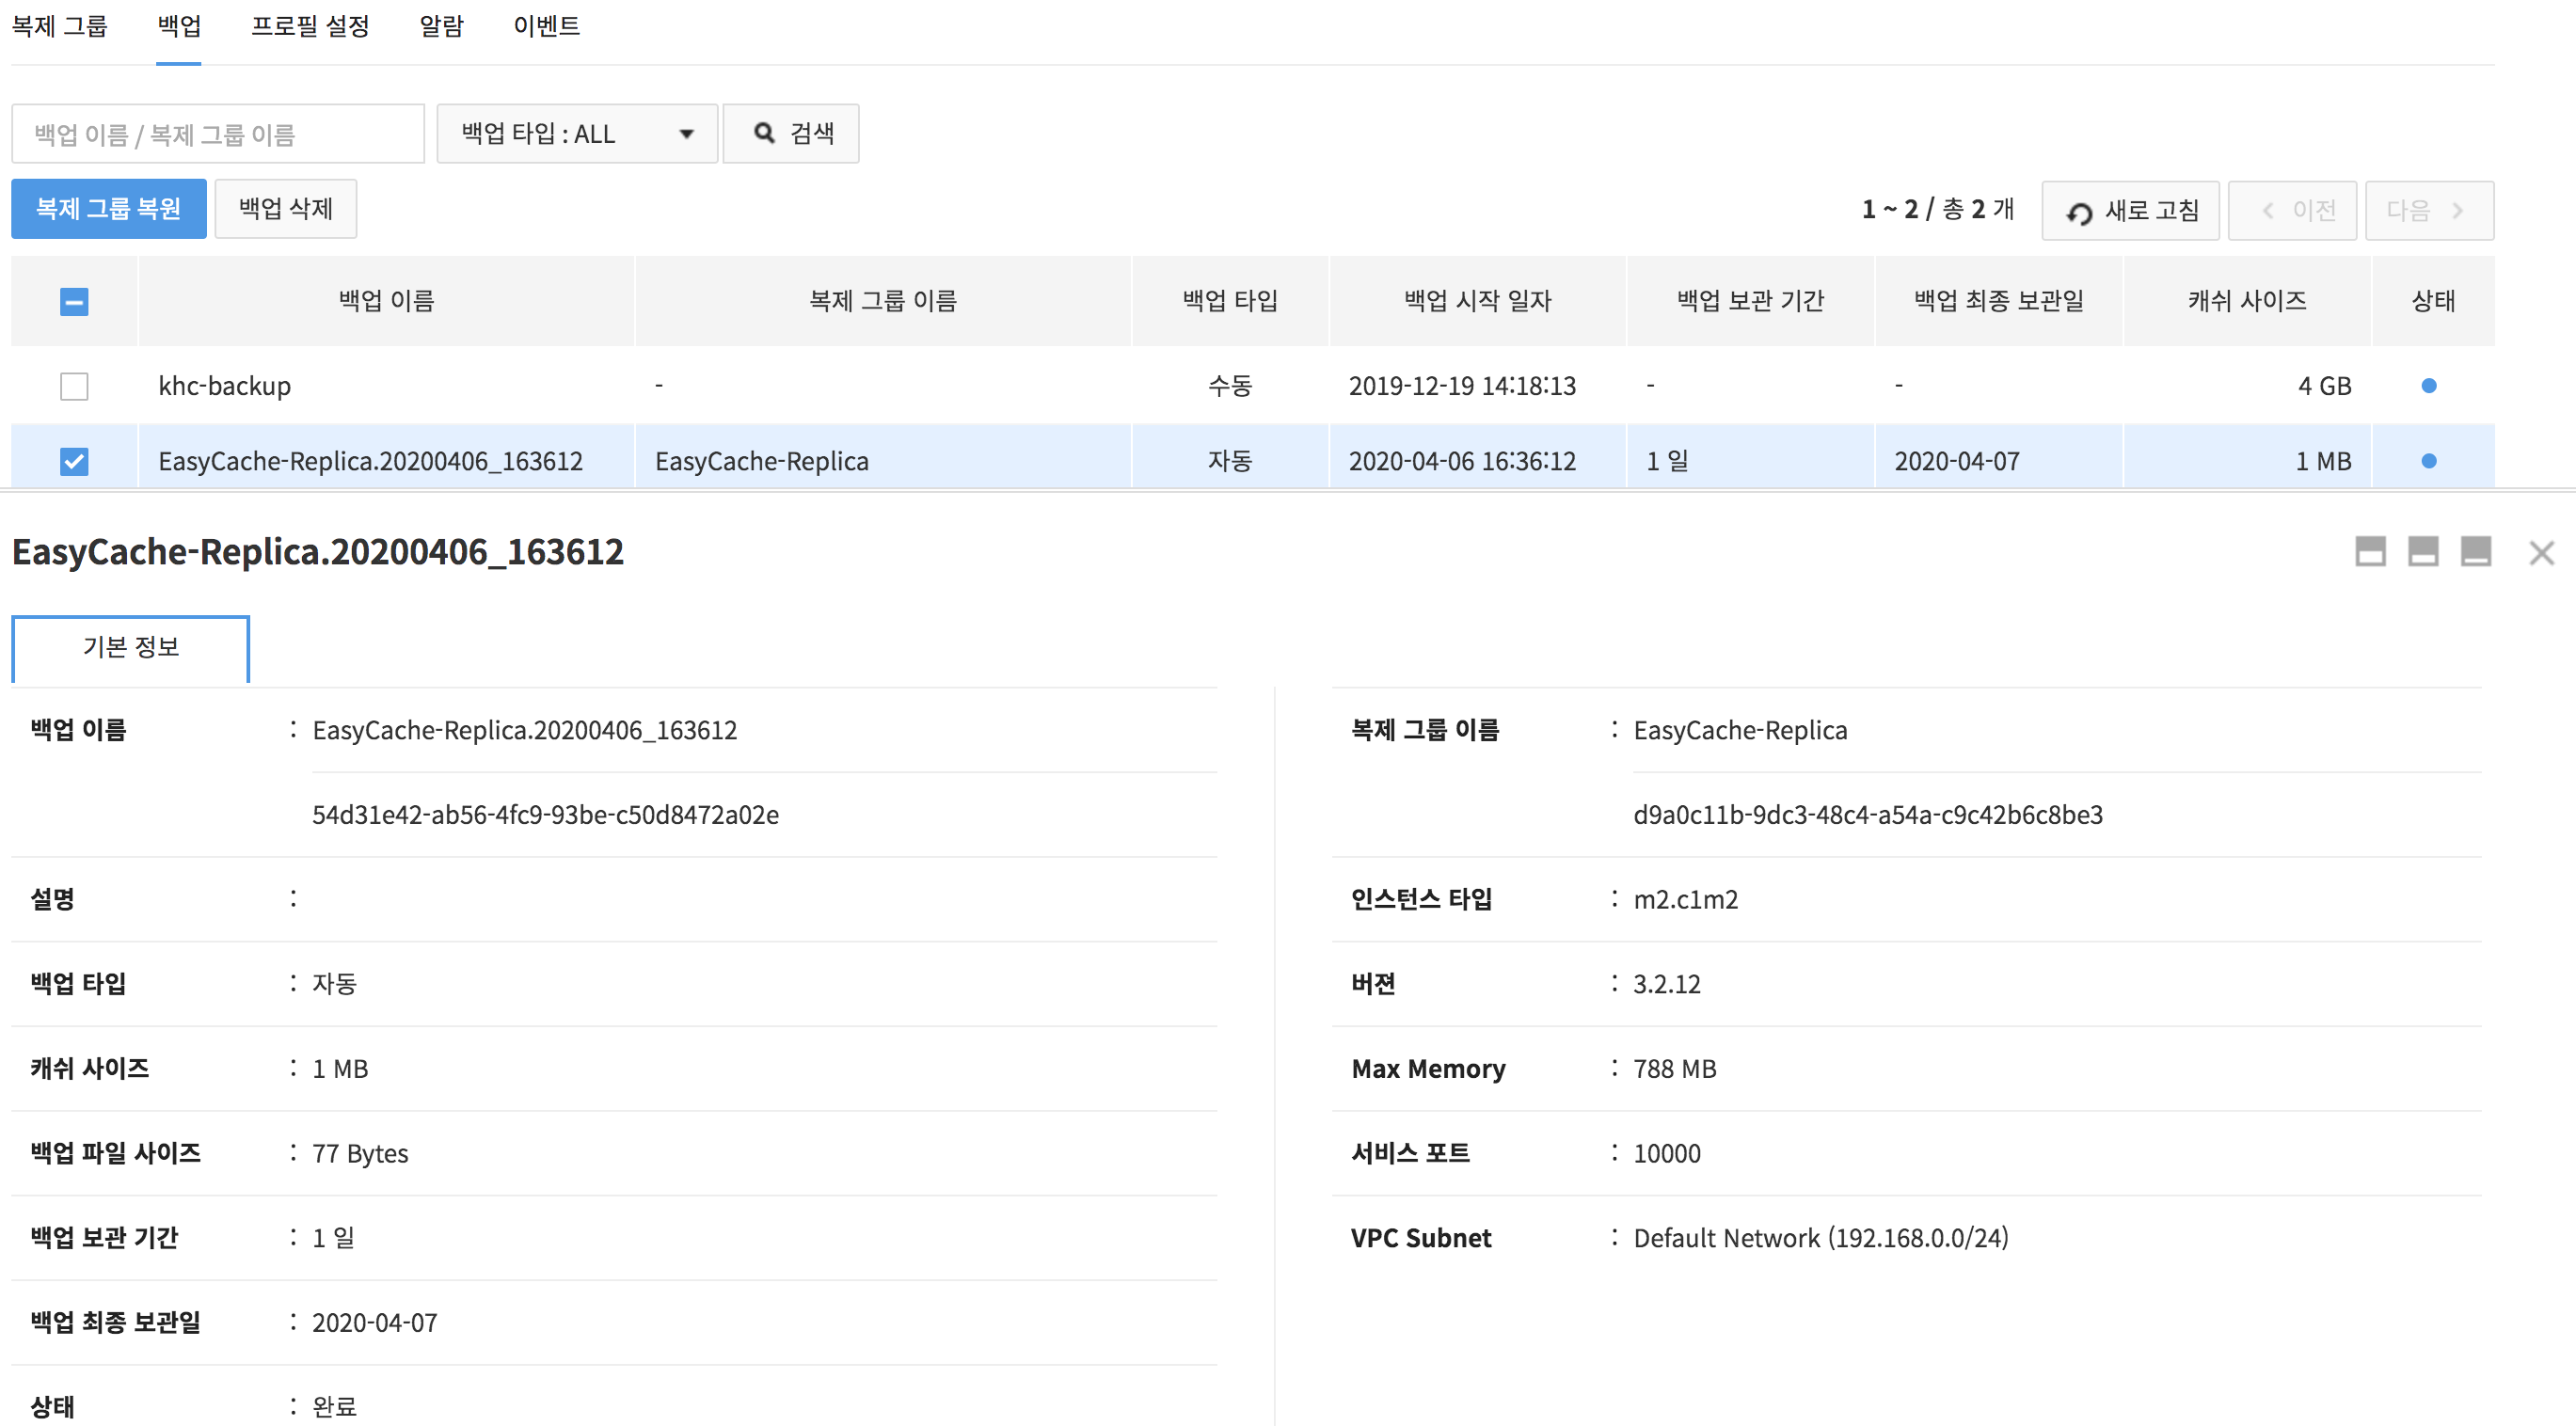
- Backup File Details
- Name, description, or type of backup; size of cache or backup file, backup retention period, last retention date, status, and backup start date
- Replication Group Details
- Name of replication group, type or version of instance, max memory, service port, and VPC subnet
- Backup File Details
Restore
Memory data can be restored by using retained backup files.
Restore a new replication group
-
Select a backup file and click Restore new replication group. While restoring, it is possible to create a new node with the same or different specification without changing the original node.
-
Enter the following item in the Restore new replication group dialog box and click the Create button. You can check the created replication group in the Replication group tab.
- Name of Backup: Backup file name to restore
- Replication Group Name: Enter name of a replication group.
- Description: Enter description of the group.
- Service Port: Shows the port of a replication group bound for backup.
- Port number of Redis can be changed.
- Available between 10000 and 12000.
- Version: Shows the version of Redis of a replication group for backup.
- Instance Type: Shows the specification of a replication group bound for backup.
- Shows instance types that are larger than cache of a backup only.
- Instance type can be changed.
- Max Memory: Adjust the max memory to prevent out-of-memory issues when running synchronization or backup.
- You can change the size of max memory for a Redis server.
- Since max memory volume is changeable, management memory can be flexibly secured.
- Configuration Profile: Shows Redis configuration file of a replication group bound for backup.
- Configuration can be changed by adding more profiles.
- VPC Subnet: Shows VPC subnet of a replication group for backup.
- Select a subnet for Compute & Network to allow private network communication.
- Auto Backup Setting: Select whether to use auto backup.
- Backup Retention Period: Available from 1 day up to 30 days
- Backup Start Time: Specify start time of a backup, by 30-minute interval.
- Backup Delay Time: To start randomly between backup start time and specified time. Available up to 3 hours.
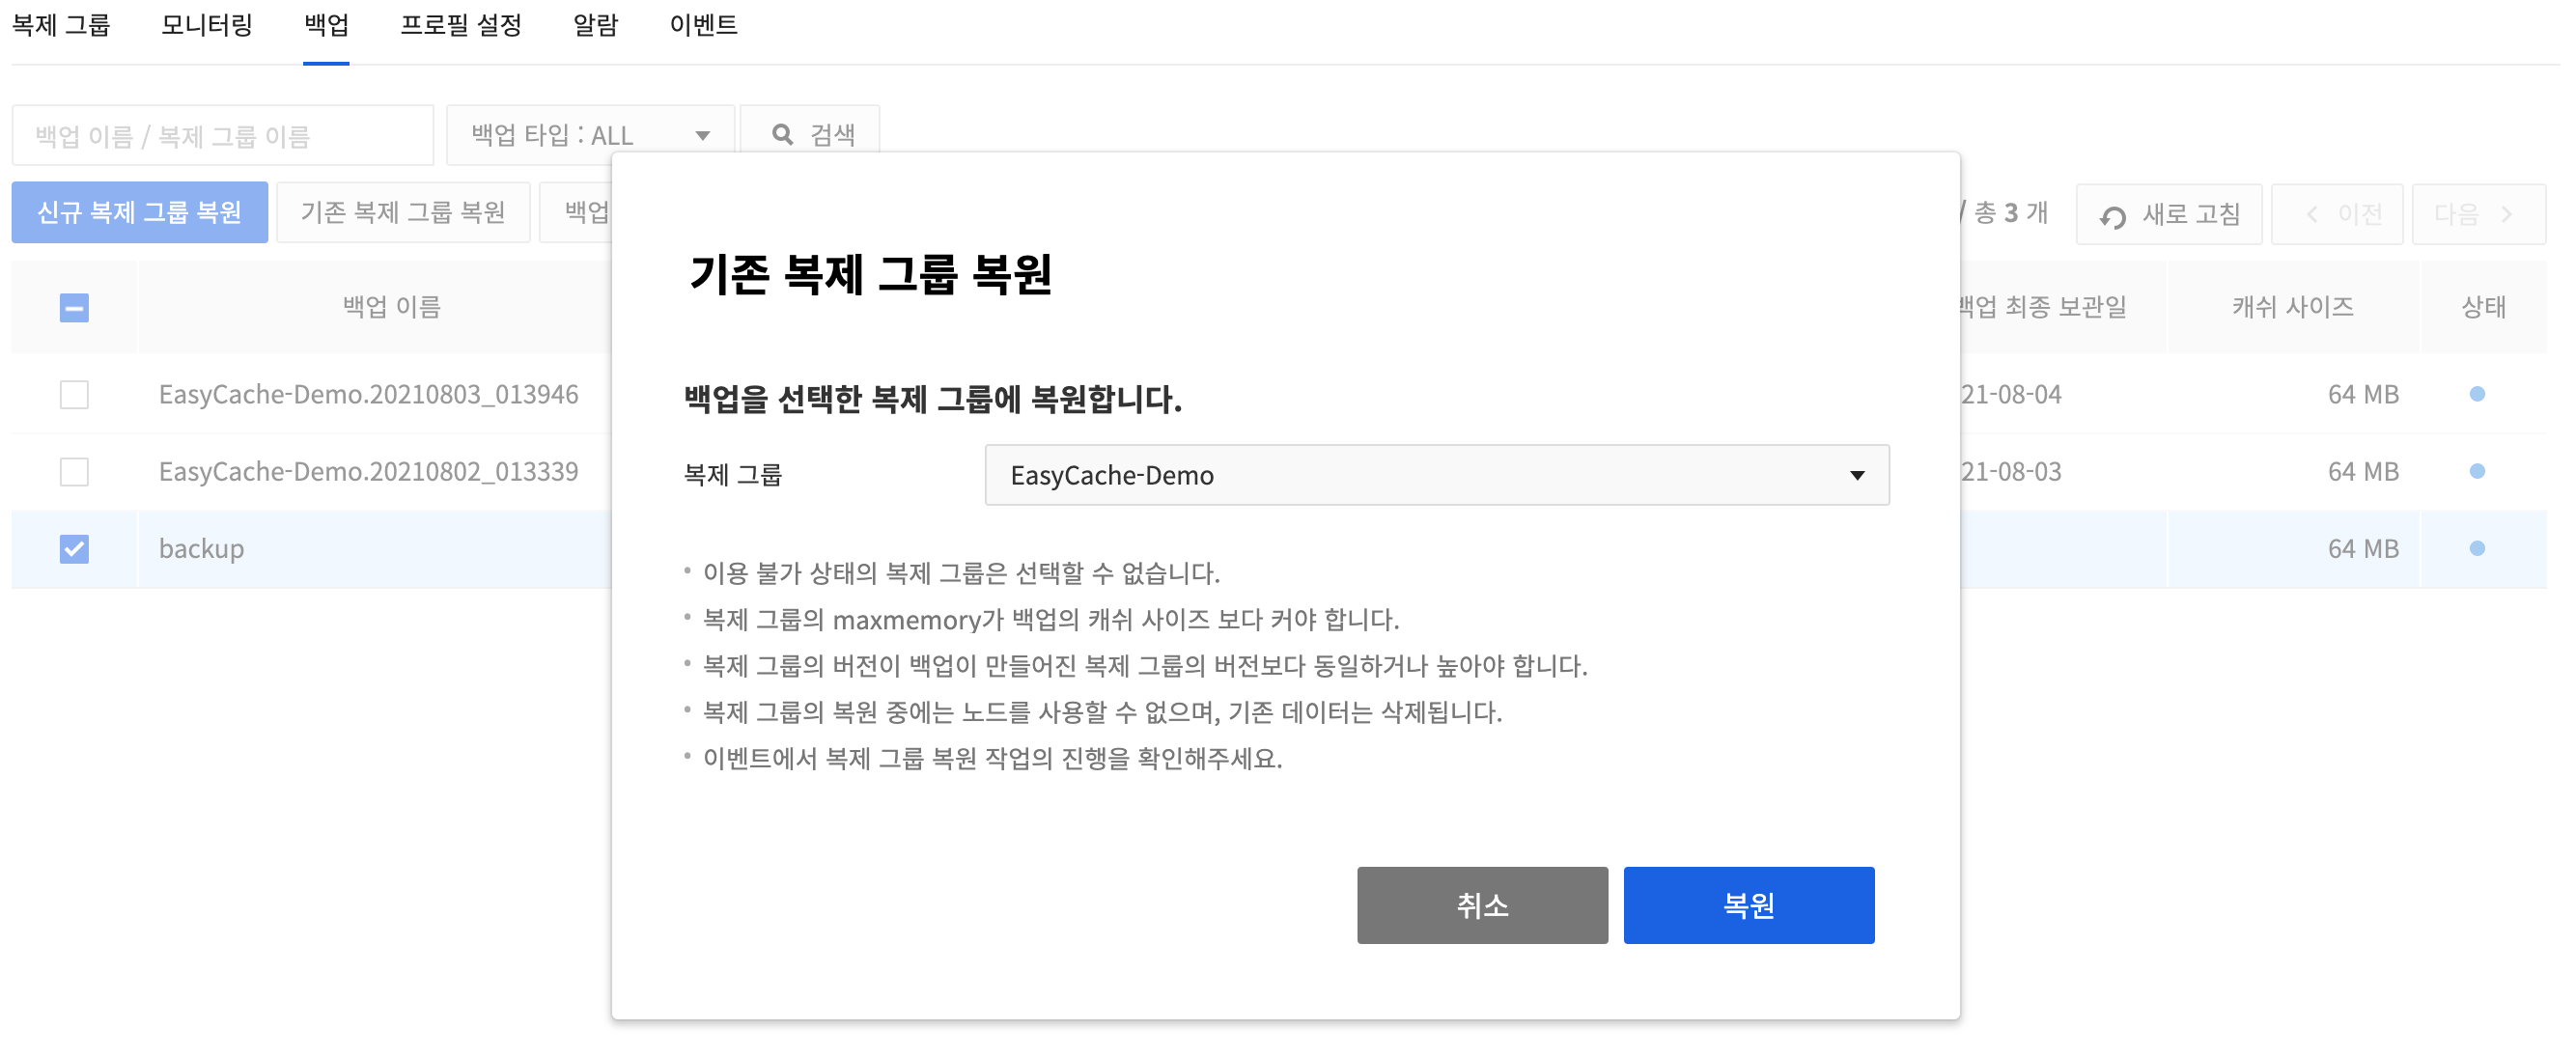
Restore an existing replication group
-
Select a backup file and click Restore existing replication group. Change the data of selected replication group to the backup data.
-
You cannot use nodes while restoring a replication group, and the existing data is deleted. You can check the progress from the event.
- You cannot select the replication group in unavailable status, and the maxmemory of the replication group must be larger than the cache size of the backup.
- You can only restore to a replication group whose version is the same or higher than the version of the replication group from which the backup was made.
Configuration Profiles
Create a Configuration Profile
Redis configuration which is available for change can be registered as profile for management.
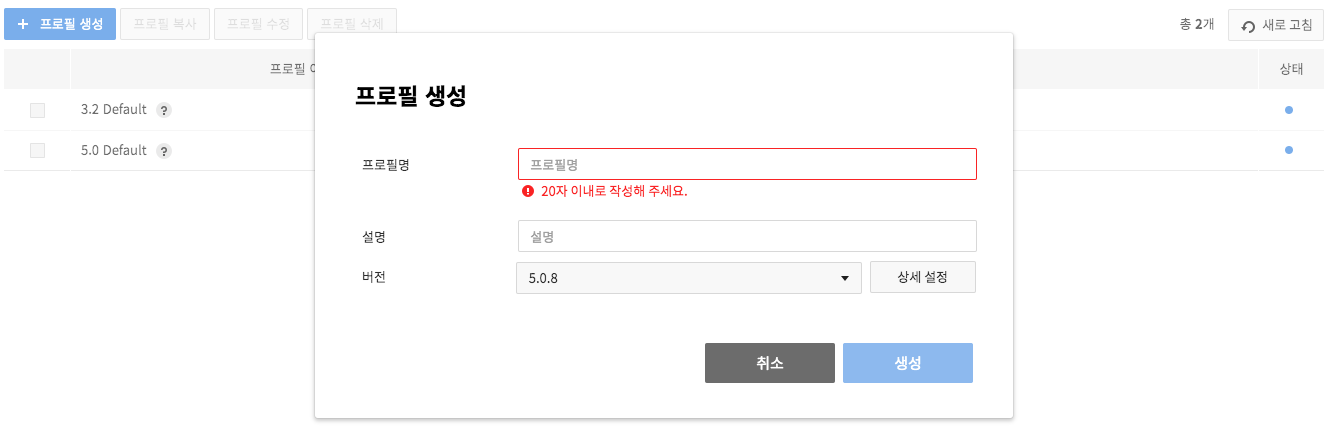
- To register as profile, go to Profile Configuration and click Create Profiles.
-
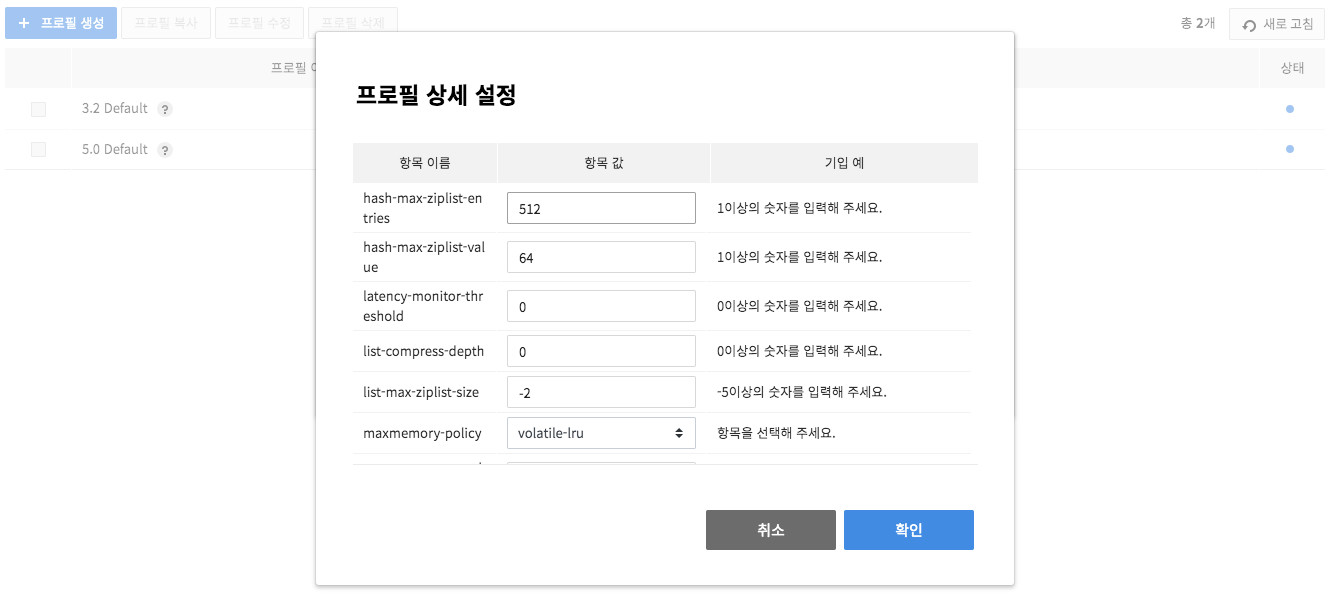
On the pop-up for Create Profiles, select name, description, and version of a profile.
-
On Detail Setting, you many change each profile item. When a profile is registered without changes, default setting is applied.
-
Click Create and register profile.
-
Modify registered profile and it is also applied to nodes in service.
-
You may delete a registered profile, unless it has a node in service.
-
You may copy a registered profile for use. Item values may be changed when copied.
-
Basic profile with default setting information is provided.
-
Default profile cannot be modified or deleted.
-
You can check profile status.
-
| Status | Description |
|---|---|
| Normal | Profile can be modified or deleted. |
| Applying Changes | Changed profile and transmitting changes to each node. Once changes are transmitted, the status is changed to normal. While change is underway, you cannot create, modify, or delete a replication group. |
| In Service | Replication group is being created or changed with a profile. After a replication group is created and completed, the status will be changed to normal. Profile cannot be created or modified while in service. |
Constraints
- Settings information can be changed while modifying or copying a profile or by clicking the Detailed Settings button when creating a profile.
- If you enter a value that is out of range or invalid, fault might occur.
- For the valid value or range, see Redis document.
Profile Details
Check profile details like below.
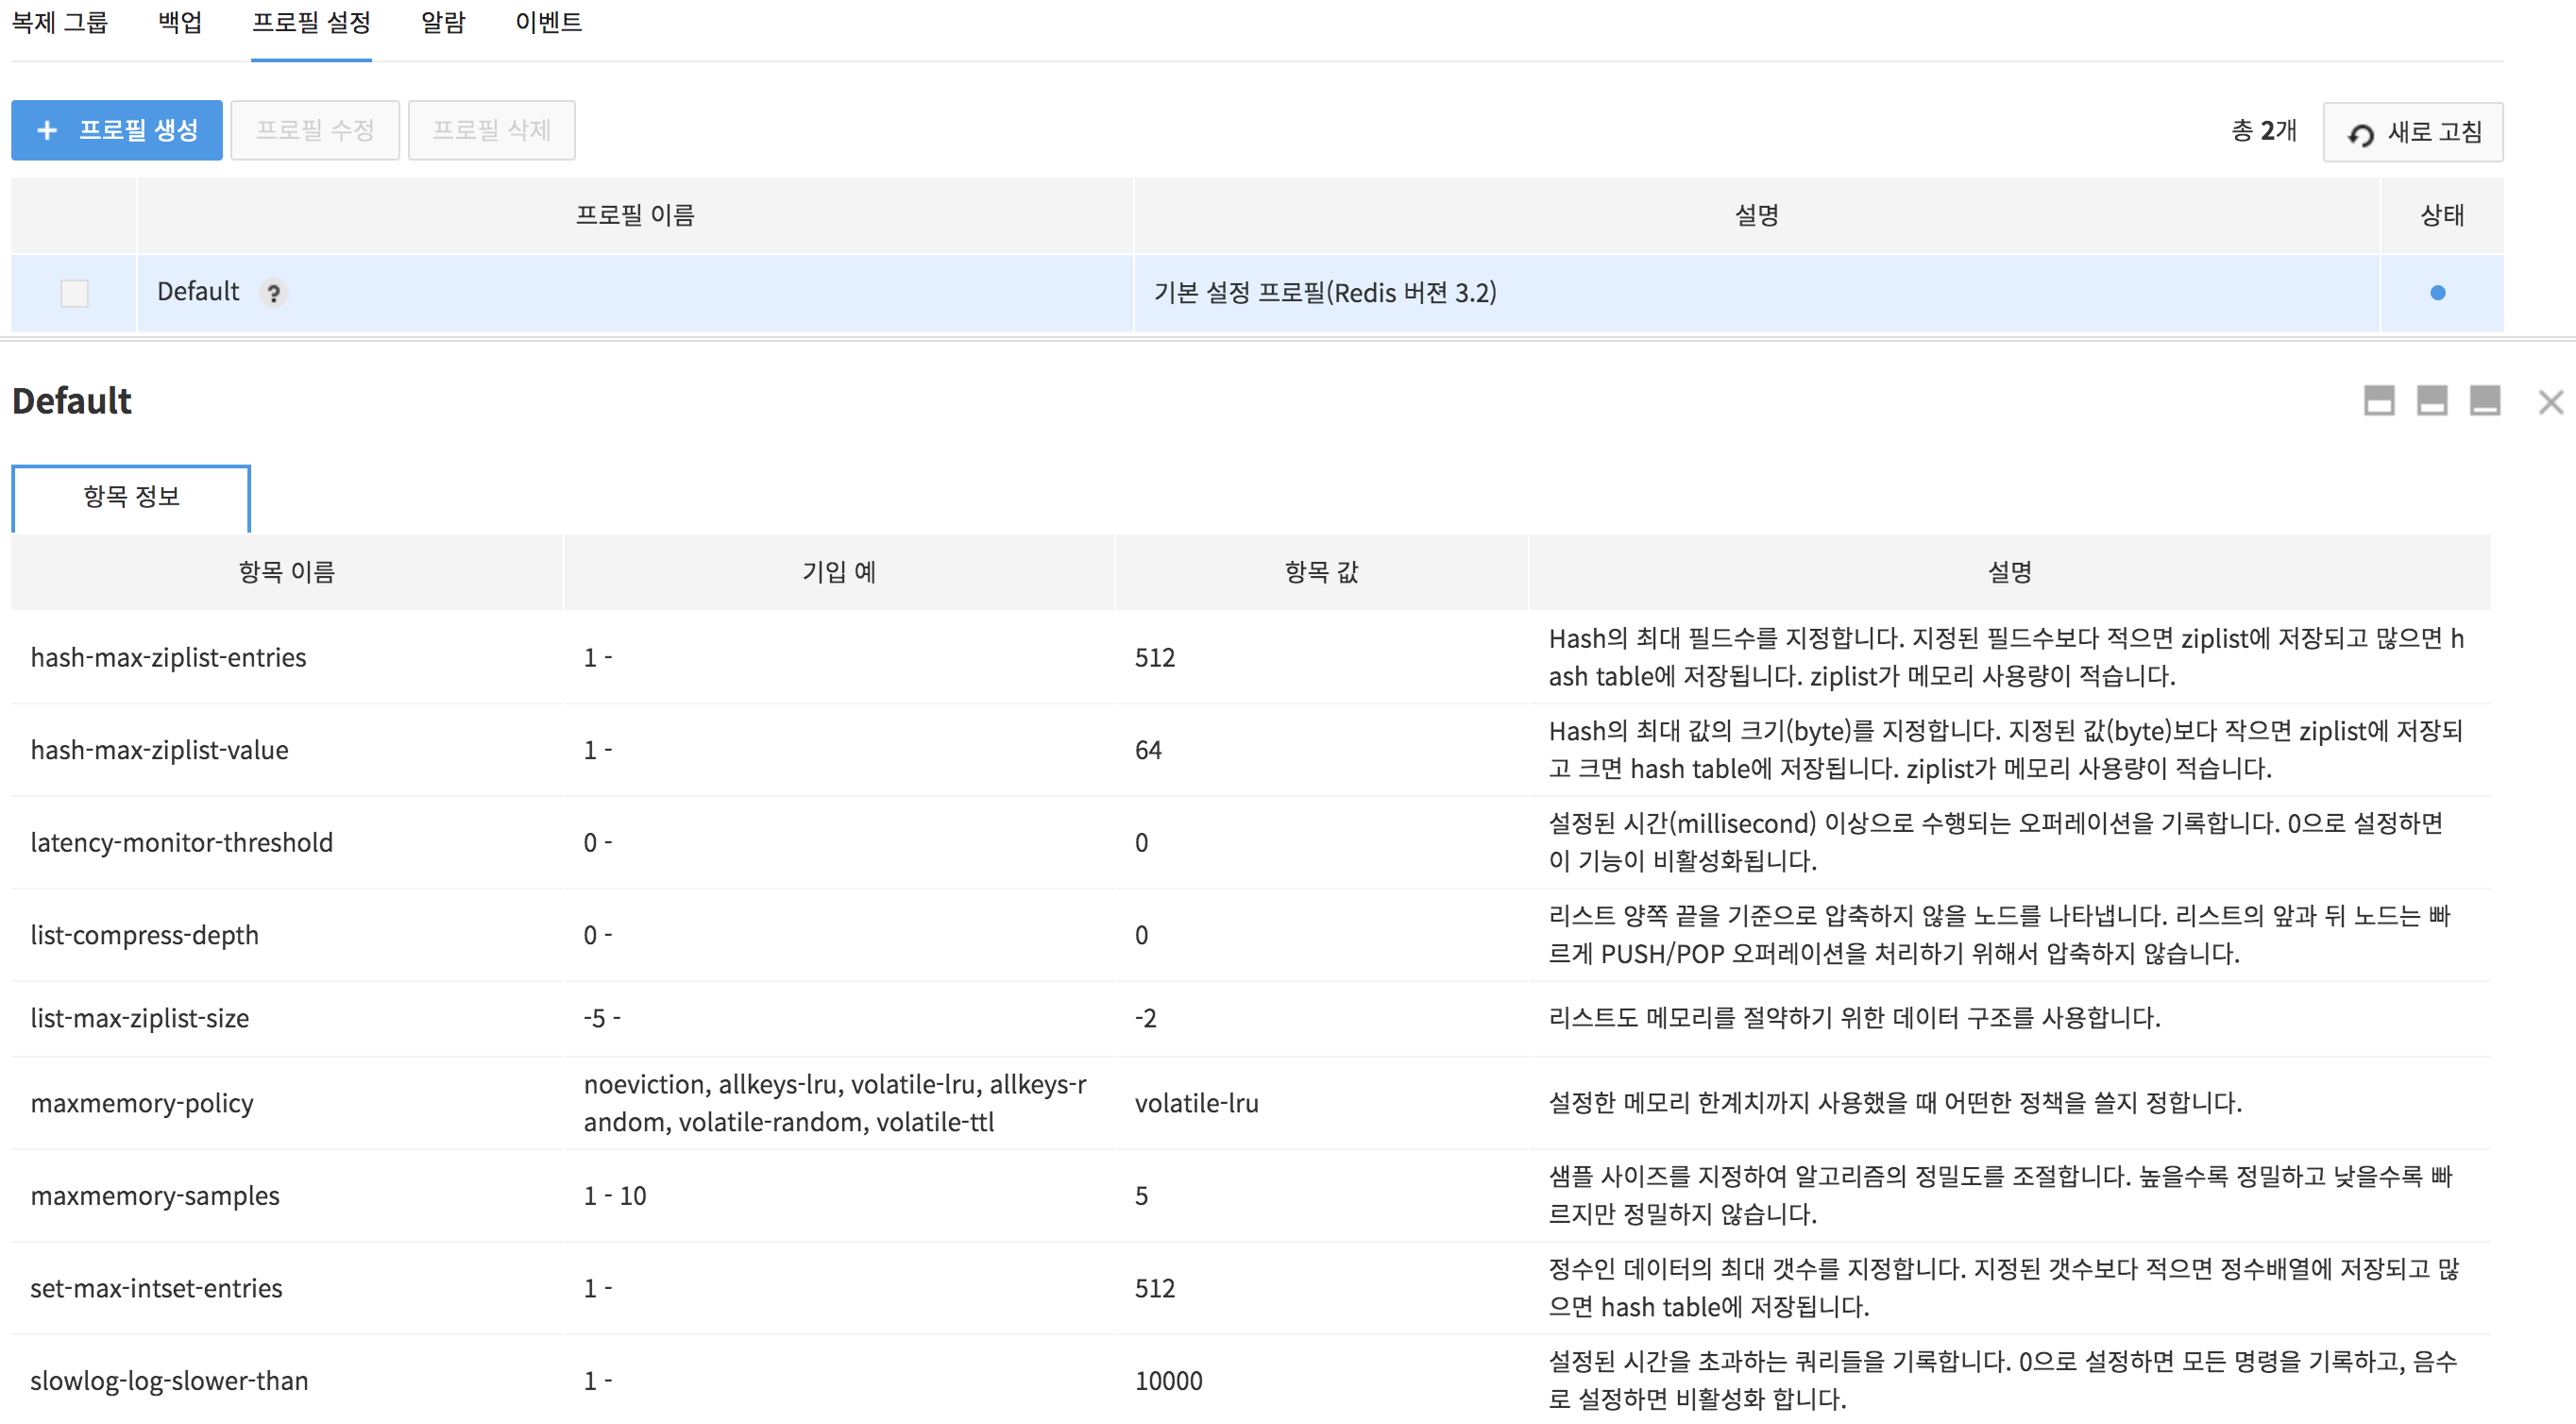
- Profile Details
- Item name
- Example of Input: Example of item input
- Item: Actual set value
- Description: Description on items
- Profile Items
- hash-max-ziplist-entries
- hash-max-ziplist-value
- latency-monitor-threshold
- list-compress-depth
- list-max-ziplist-size
- maxmemory-policy
- maxmemory-samples
- set-max-intset-entries
- slowlog-log-slower-than
- slowlog-max-len
- tcp-keepalive
- timeout
- zset-max-ziplist-entries
- zset-max-ziplist-value
- replica-ignore-maxmemory (added in Redis 5.0)
- lazyfree-lazy-eviction (added in Redis 5.0)
- lazyfree-lazy-expire (added in Redis 5.0)
- lazyfree-lazy-server-del (added in Redis 5.0)
- repl-backlog-size (added in Redis 5.0)
- stream-node-max-bytes (added in Redis 5.0)
- stream-node-max-entries (added in Redis 5.0)
- client-query-buffer-limit (added in Redis 5.0)
- proto-max-bulk-len (added in Redis 5.0)
- activedefrag (added in Redis 5.0)
- active-defrag-ignore-bytes (added in Redis 5.0)
- active-defrag-threshold-lower (added in Redis 5.0)
- active-defrag-threshold-upper (added in Redis 5.0)
- active-defrag-cycle-min (added in Redis 5.0)
- active-defrag-cycle-max (added in Redis 5.0)
- active-defrag-max-scan-fields (added in Redis 5.0)
- active-expire-effort (added in Redis 6.0)
- lazyfree-lazy-user-del (added in Redis 6.0)
Alarms
EasyCache sends alarms on a particular event occurred from a resource of choice to a recipient group.

Alarm Rules
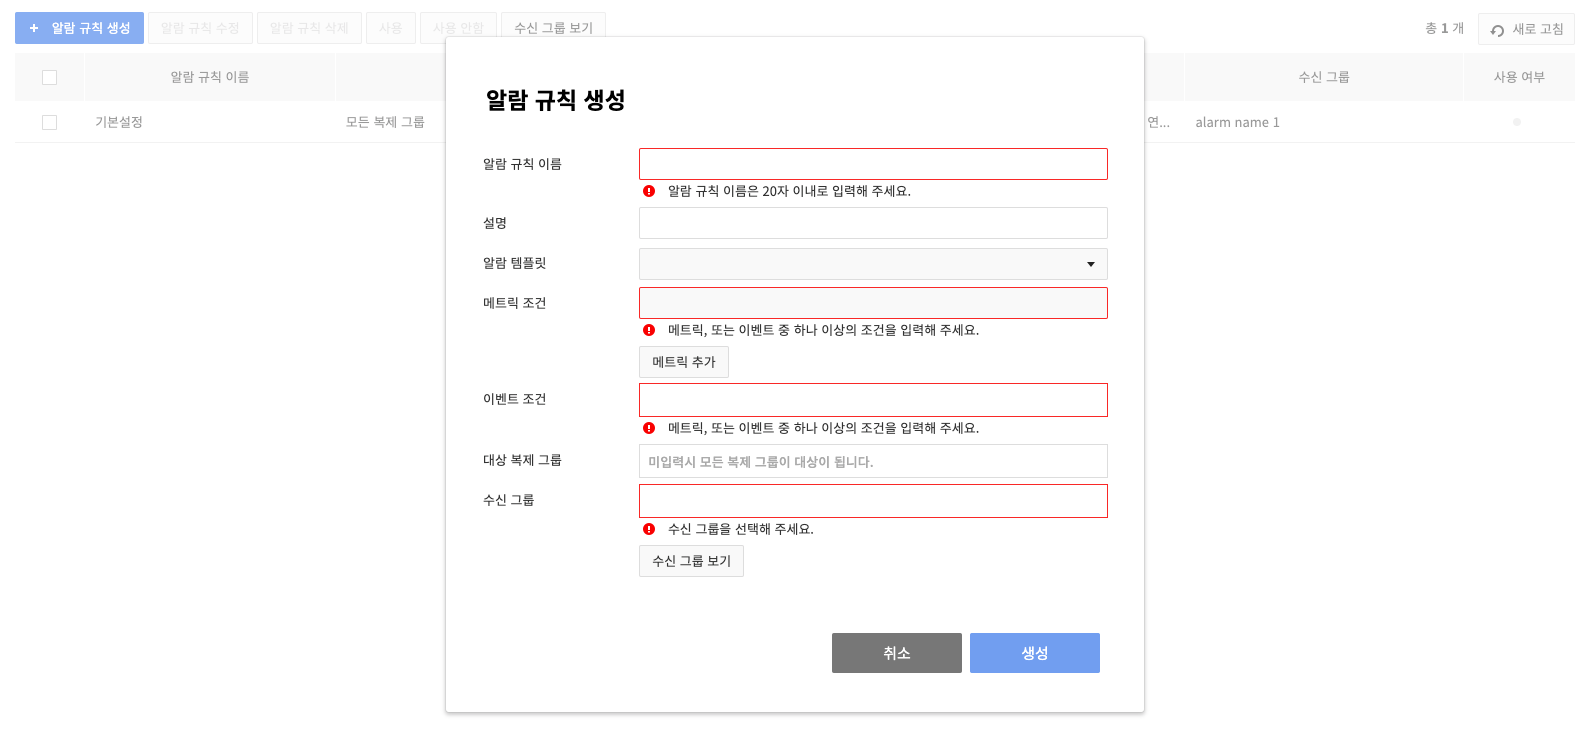
Specify the condition, target, and recipient group for an alarm. 1. To set alarms you need, go to Notification and click Create Alarm Rules.
-
On the pop-up for Create Alarm Rules, specify the condition of sending an alarm and recipient groups.
-
There are two alarm conditions: Metric Condition and Event Condition.
- Metric Condition: You can specify alarm conditions using various performance indicators (see Monitoring) collected from the cache instance, and the following conditions can be specified.
- Metric name, operator, type of collection, frequency of evaluation, threshold value
- Event Condition: You can specify the event you want to be notified of among all events that occur within the service (see Event Items).
- Metric Condition: You can specify alarm conditions using various performance indicators (see Monitoring) collected from the cache instance, and the following conditions can be specified.
-
If it is difficult to determine the settings required for the Metric Condition and Event Condition, consider using the default template provided in Alarm Template.
- Default-Standalone: Recommended alarm trigger conditions for replication groups operated as standalone
- Default- HA: Recommended alarm trigger conditions for replication groups operated as replication
-
Click View Recipient Groups to check recipient groups or add more.
-
Alarm rules are basically applied to all replication groups. To create an alarm rule only for a specific replication group, specify the replication group for Target Replication Groups.
-
After setting is done, click Create.
The created alarm rules can be temporarily disabled by setting the alarm to 'Disabled.' The alarm rules are applied to all regions.
Recipient Groups
Alarm recipients can be managed under each group.
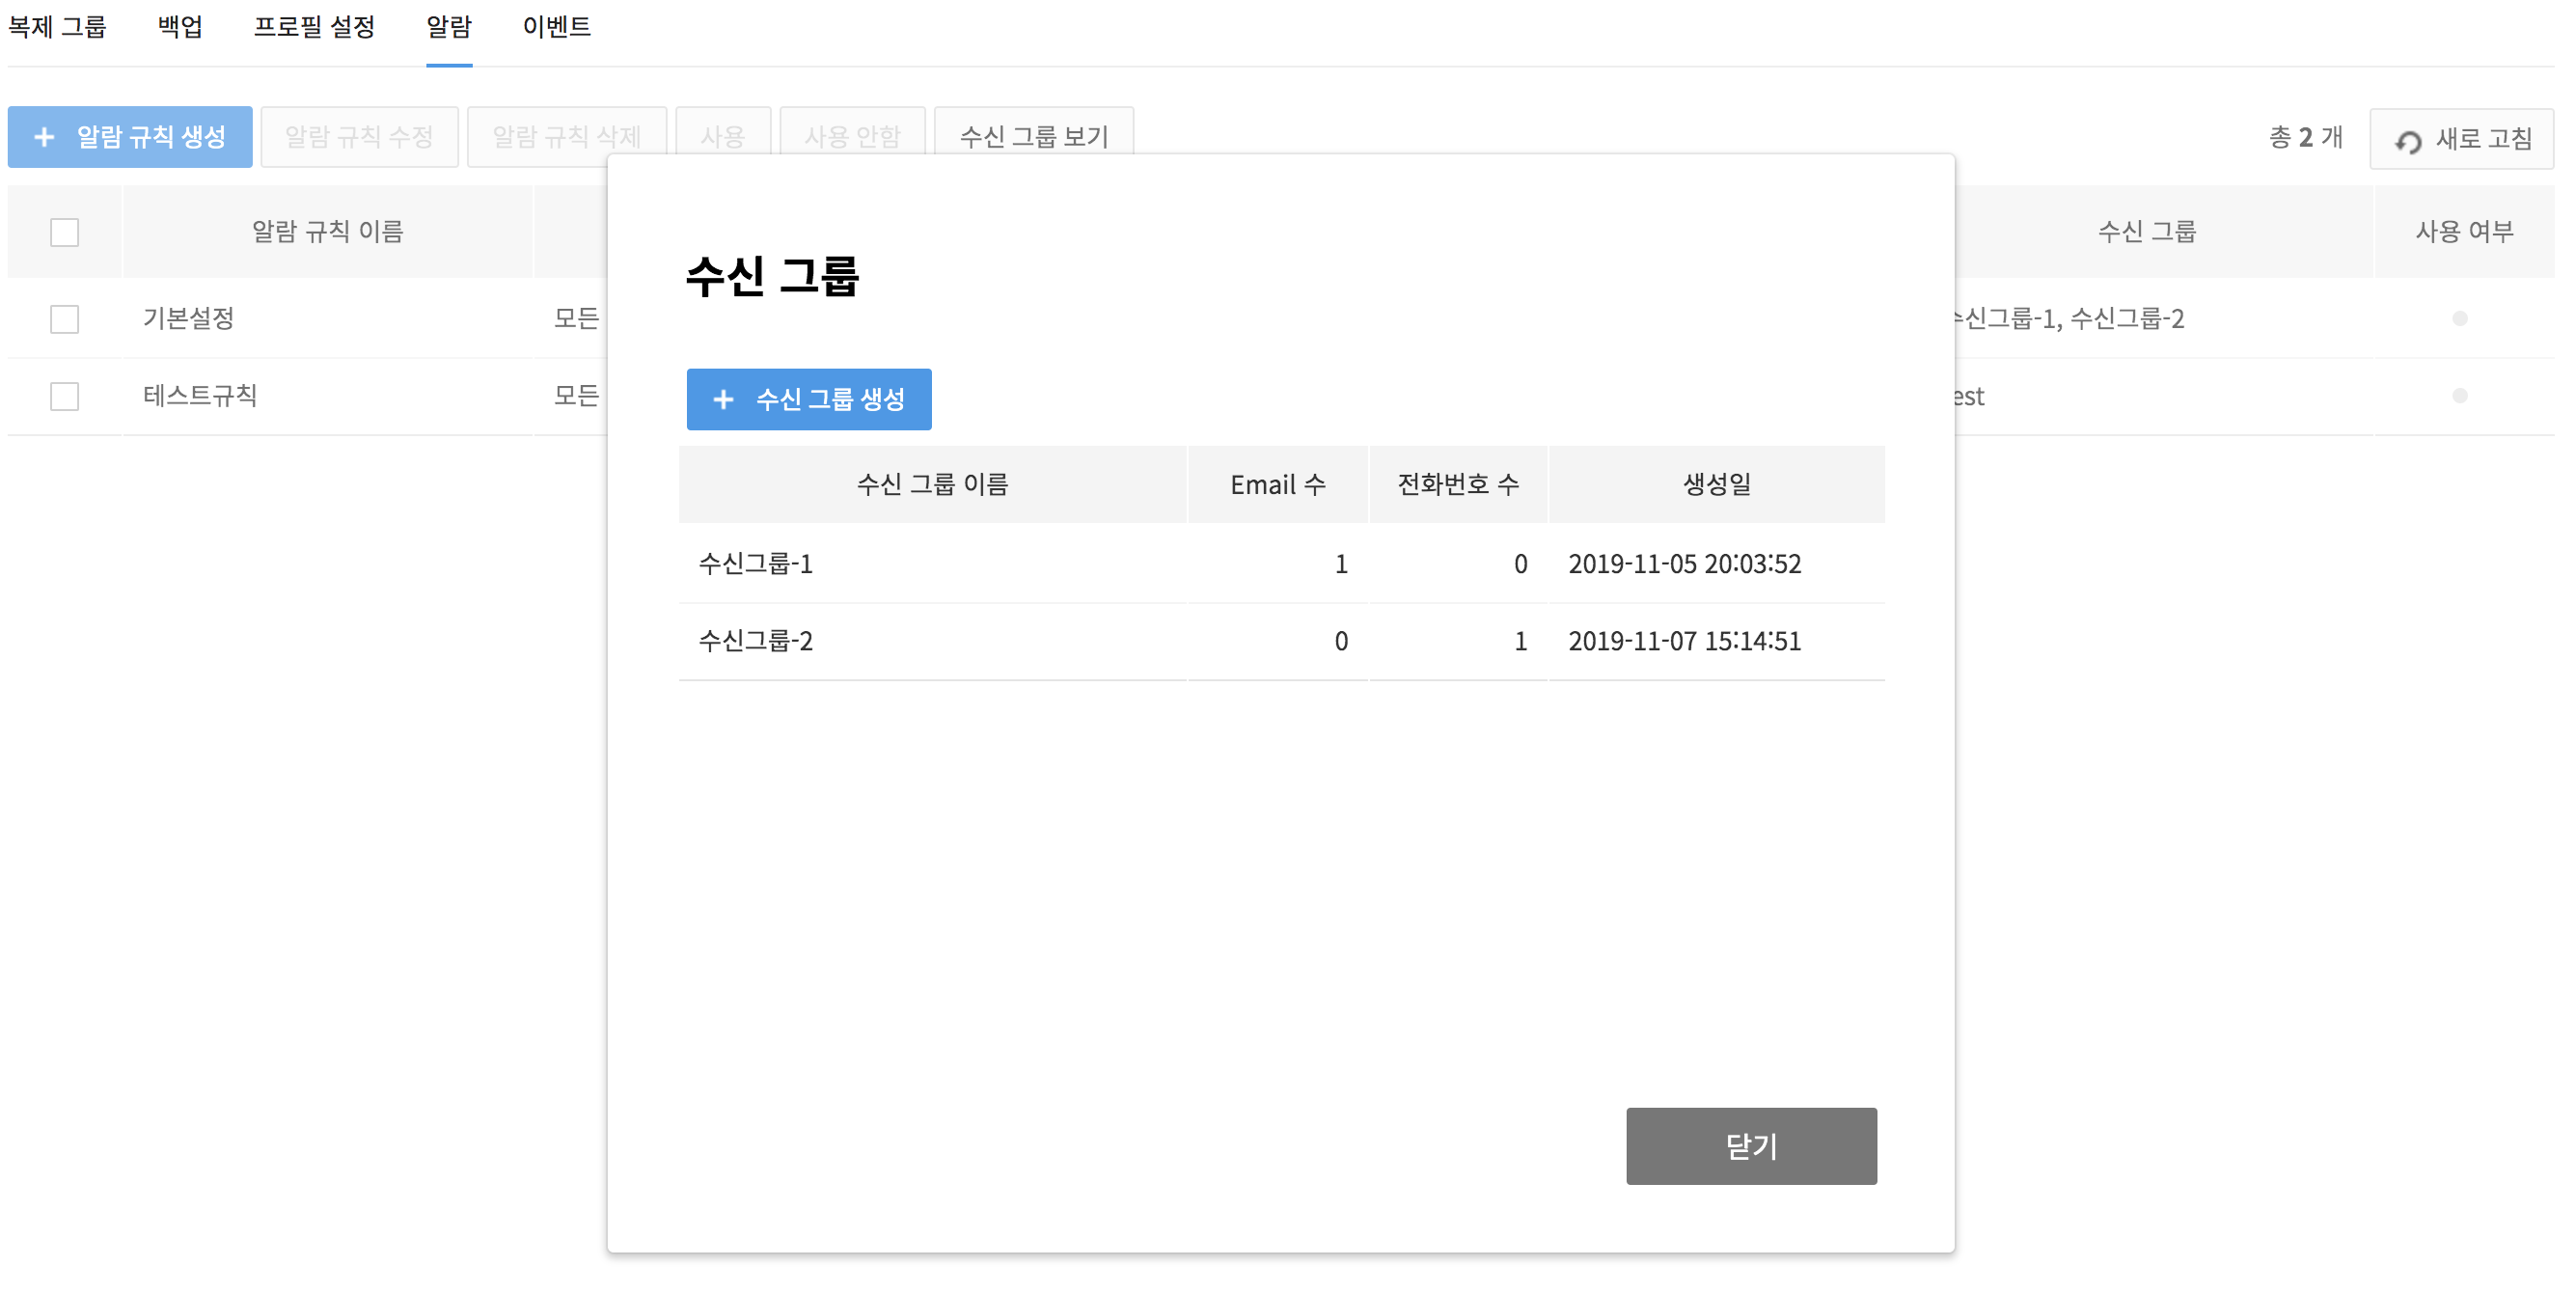
- To check recipient groups, click View Recipient Groups.
- If you don't have a group in need, click Create Recipient Groups to create a new group.
- Available recipients to be specified by each group are confined to project members only.
- Messages can be mailed or texted to the email address or phone number registered for NHN Cloud membership.
- Note that, by deleting a current recipient group for alarm rules, no more alarms are to be sent, if there's no other recipient group.
The created receiver group can be used across all regions.
Constraints
- If there's only one replication group as the target of alarm rules, and if the group has been deleted from the replication group page, further alarms are to be sent to all replication groups because its only replication group is gone.
- If there's only one recipient group for alarm rules, and if the group has been deleted from the detail recipient group page, no further alarms can be sent because its only recipient group is gone.
- Alarms for the creation of a replication group are sent for all replication groups, even if there's a target replication group.
- If a new user is added to a project, about an hour of wait time may be incurred until the user is synchronized to the list of project users of a recipient group.
- Even when an alarm rule specifies a specific replication group in the target replication group, alarm rules without specified replication group will be synchronized in other regions and they will be applied to all regions.
Events
-
Select Event.
-
EasyCache automatically retains significant events occurred at a replication group.
-
Enter a word to search on the search window and click Search, and search results shows on the resource name and description of an event.
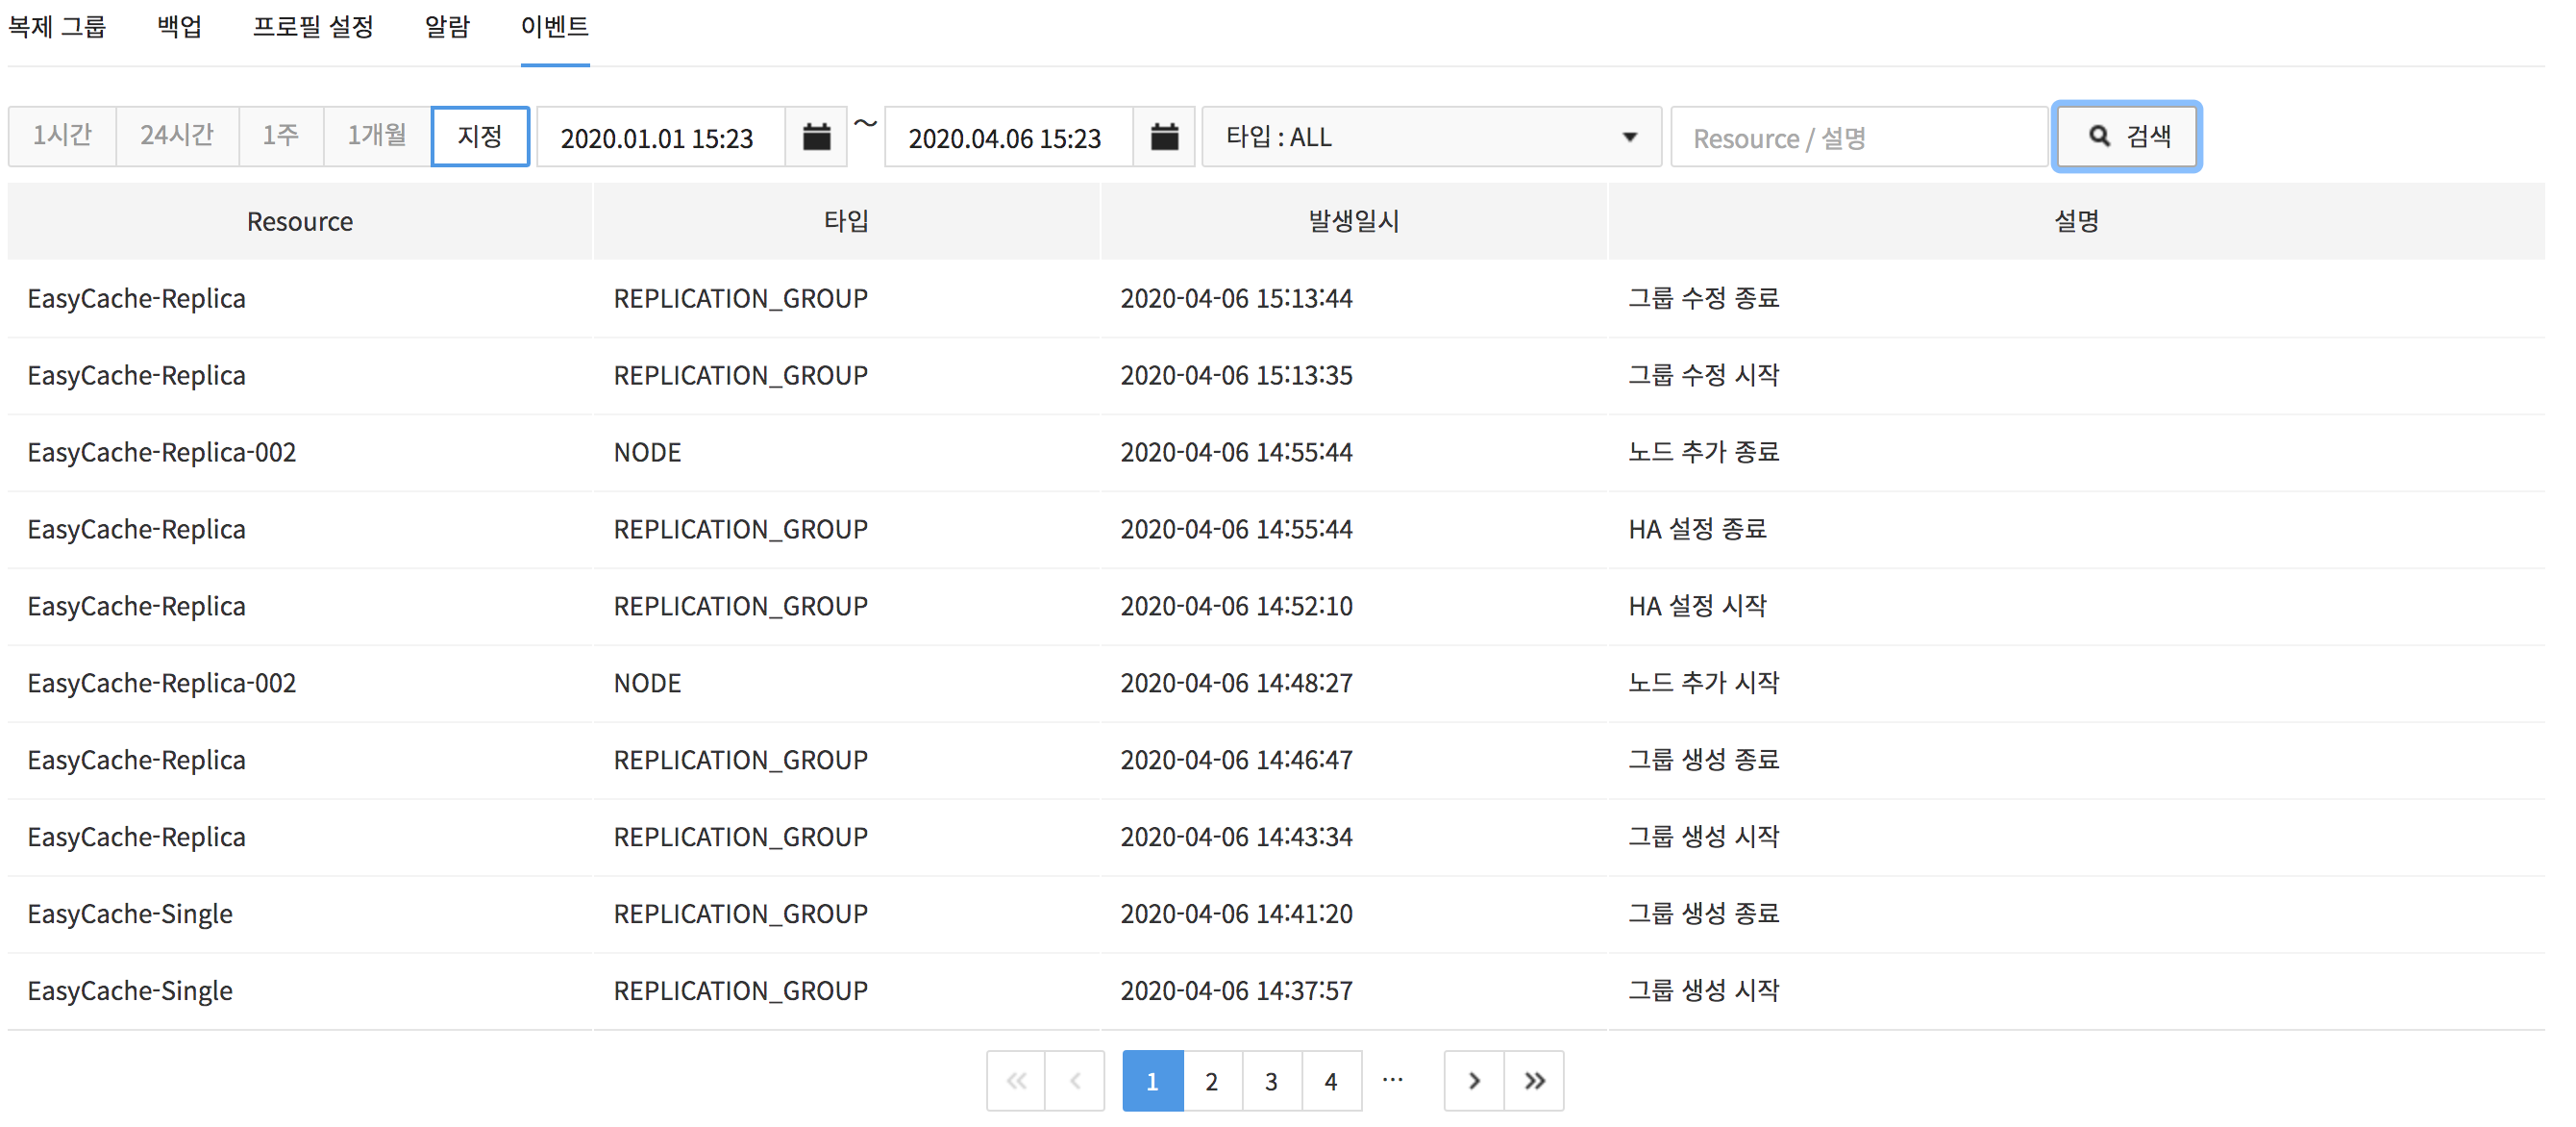
- Search by time or date is available.
- Event data can be retained for a month.
- Event type refers to a resource type from which an event has occurred.
- ALL: Events related to NODE and REPLICATION_GROUP.
- NODE: Events related to NODE.
- REPLICATION_GROUP: Events related to REPLICATION_GROUP.
- PROFILE: Events related to PROFILE.
Event Items
| Type | Event | Event Details |
|---|---|---|
| Replication Group | Delete | Started, Failed, Closed |
| Create | Started, Failed, Closed | |
| Modify | Started, Failed, Closed | |
| Restart | Started, Failed, Closed | |
| Change Group Instance | Started, Failed, Closed | |
| Import Data | Start, Failed to set up user OBS, Failed to download data file, Damaged files or unsupported file format, Failed to restart node, Failed to synchronize replica, Terminate | |
| Export Data | Start, failed to set user Object Storage Service, failed to create data file, failed to upload data file, end | |
| Restore Existing Replication Group | Start, Failed to download data file, Damaged files or unsupported file format, Failed to restart node, Failed to synchronize replica, Terminate | |
| Update HA Settings | Started, Failed, Closed | |
| Upgrade Version | Started, Failed, Closed | |
| Change Master | Started, Failed, Closed | |
| Publicly Credited Domain | Set | Started, Failed, Closed |
| Cancel | Started, Failed, Closed | |
| Read-Only Domain | Set | Started, Failed, Closed |
| Cancel | Started, Failed, Closed | |
| Cache Instance | Connect | Successful, Failed |
| Node | Delete | Started, Failed, Closed |
| Add | Started, Failed, Closed | |
| Status | Disabled, Enabled | |
| Change Node Instance | Started, Failed, Closed | |
| Profile | Modify | Started, Failed, Closed |
| Auto HA | Delete | Started, Closed |
| Set | Started, Failed, Closed | |
| Failover | Successful | |
| Backup | Manual Backup | Started, Failed, Closed |
| Auto Backup | Started, Failed, Closed |
Appendix 1. Guide for EasyCache Restart for Hypervisor Maintenance
- To restart a EasyCache node, use the Restart feature in the console.
- With the restart feature of a replication group, the node is not moved to a different hypervisor. Use the restart feature in the console according to the following guideline.
1. Go to a project where the node specified as a maintenance target is included.
2. Check the maintenance target replication group.
- The replication group with !Restart icon on the side is the replication group including the maintenance target node.

- By hovering the mouse cursor on the !Restart icon, you can see the detailed maintenance schedule.
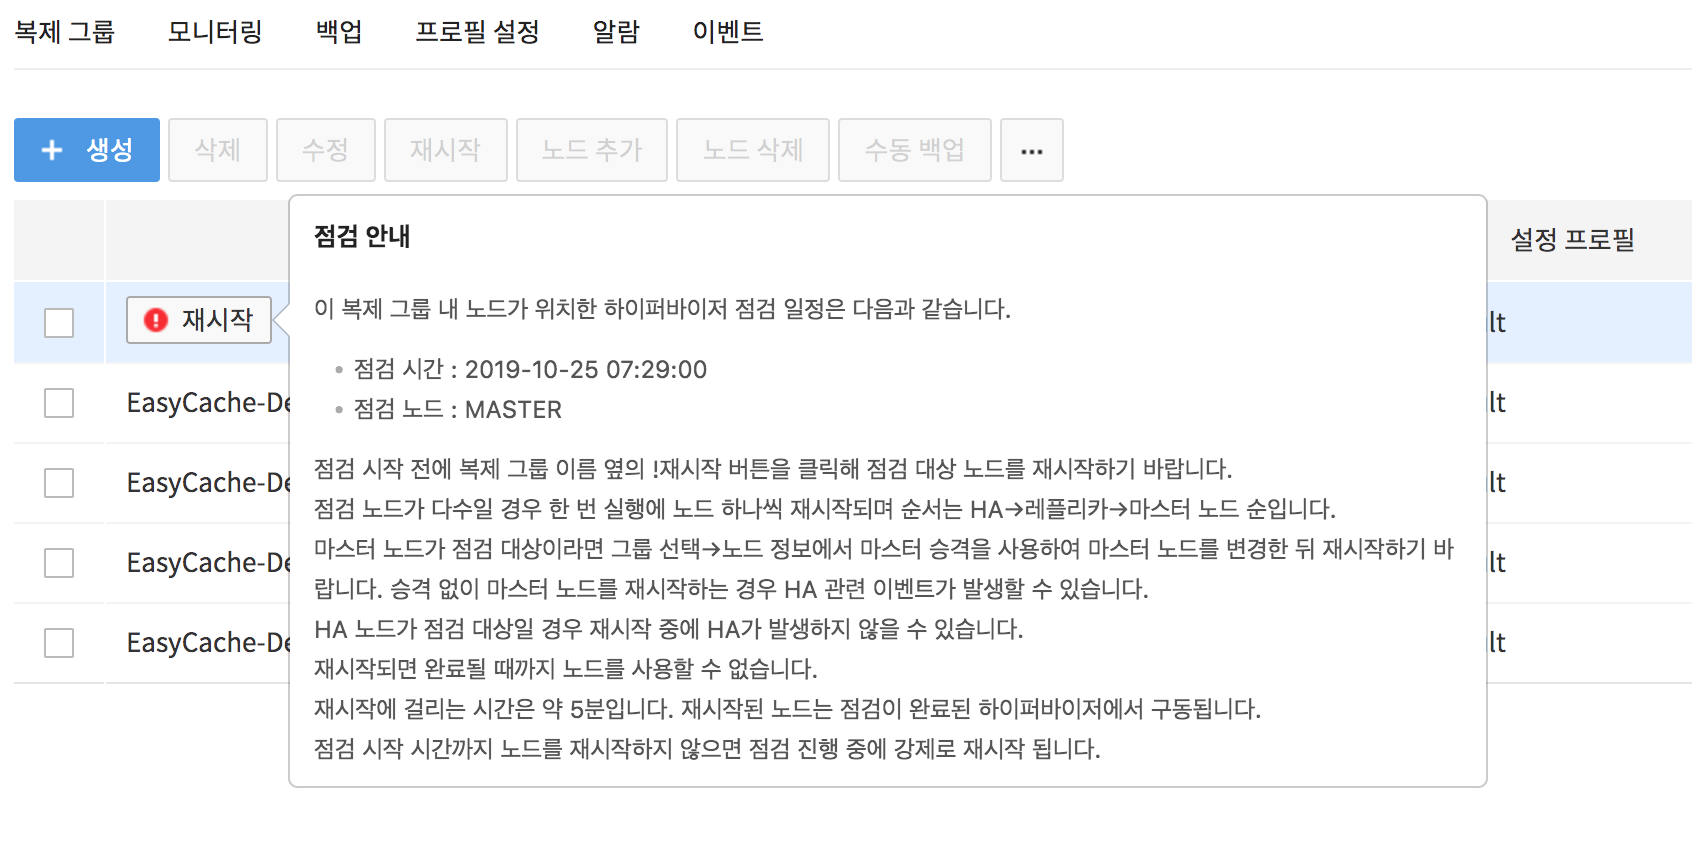
3. Check the type of the maintenance target node.
-
Depending on the node type, the impact of restart on service is as follows:
- MASTER: The restart feature can be used after changing the master node to replica node by selecting Replication Group > Change Master. Standalone type can be used without change.
- REPLICA : No impact on service.
- HA: During restart, failover is not guaranteed and a failover event may occur.
-
If it is determined that the service is affected by the node move, please contact the NHN Cloud customer center and we will guide you through the appropriate action.
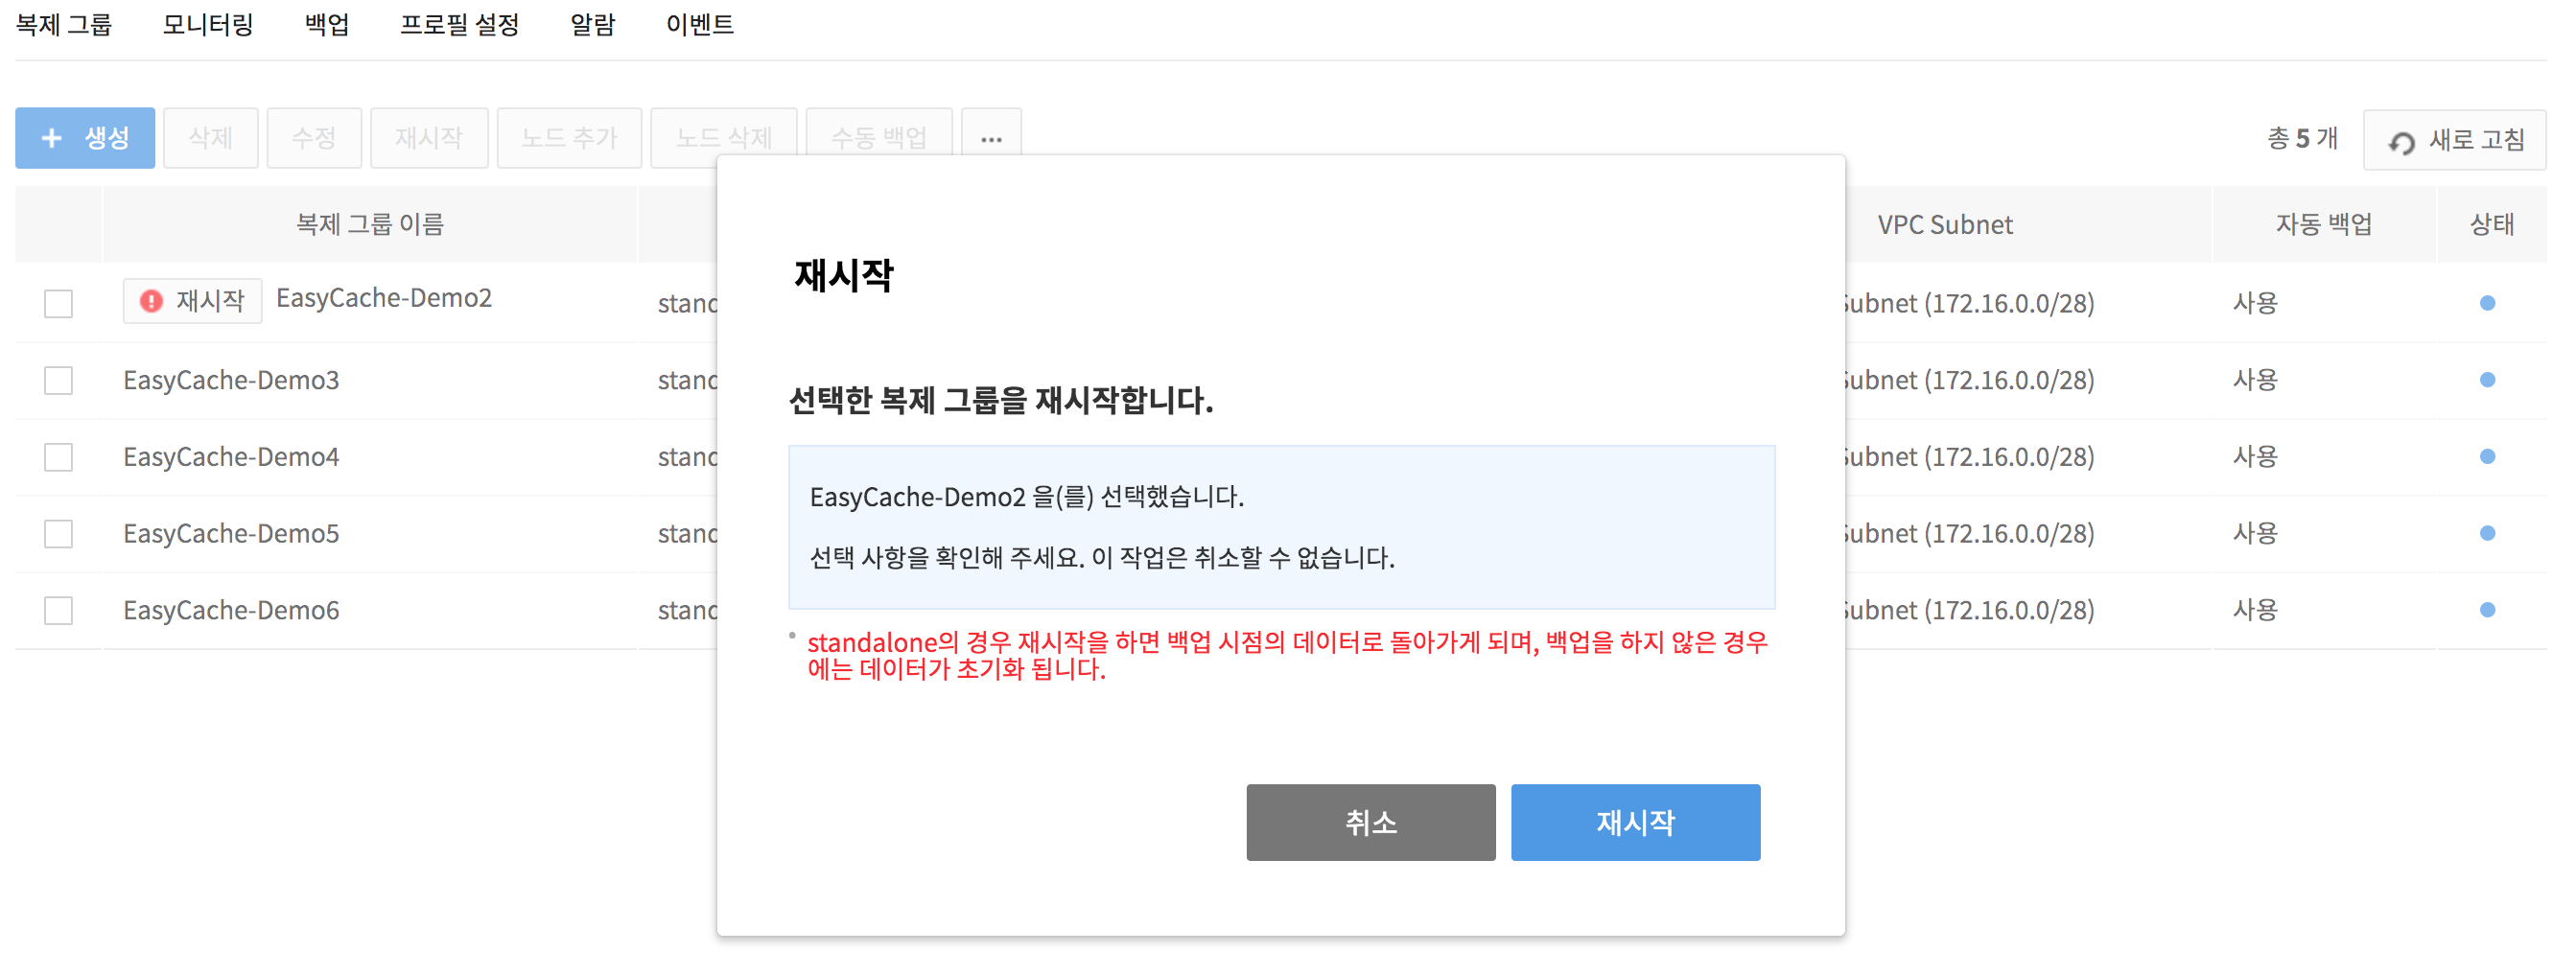
4. Select the maintenance target replication group, and click the !Restart icon on the right side to restart the maintenance node.
-
When there are multiple maintenance nodes, only one node is restarted at a time. The HA node is restarted first and then the Replica node is restarted.
-
In case of a standalone type, when restart occurs, it returns to the data at the time of backup. If backup was not performed, data is reset.
-
If the replication's master node is the maintenance target, it cannot be used immediately. Change the master node to a replica node and restart it.
5. Wait until the status indicator of the replication group changes to blue color and !Restart icon disappears.
- While a replication group is being restarted, the replication group cannot be operated.
Appendix 2. Guide for Internet Gateway Restart for Server Maintenance
- To restart a internet gateway, use the Restart Internet Gateway feature in the console.
- Use the restart feature in the console according to the following guideline.
1. Go to a project where the internet gateway specified as a maintenance target is included.

2. Check the maintenance target replication group tab.
- Check the !Restart Internet Gateway icon on the far right of the Replication Groups tab.
- By hovering the mouse cursor on the !Restart Internet Gateway icon, you can see the detailed maintenance schedule.

3. Click the !Restart Internet Gateway icon displayed on the right side of the maintenance target replication group to restart the maintenance node.

4. Wait until the !Restart Internet Gateway icon disappears.
- After restart, nodes using public domain cannot access external networks. Nodes that are not using public domain are not affected.
- The time required for restart is approximately 1 minute. The restarted internet gateway runs on a device where maintenance has been completed.
Table of Contents
- Database > EasyCache > Console User Guide
- Getting Started
- Replication Group
- Create a Replication Group
- Replicate (Add Nodes)
- Modify a Replication Group
- Auto Backup
- Create Manual Backups
- Configure Public Domains
- Read-only domain setup
- Import Data
- Export Data
- Change Instance Types
- Upgrade a Version
- Change Master
- Replace Certificate
- Replication Group Details
- Monitoring
- Backup
- Restore
- Configuration Profiles
- Create a Configuration Profile
- Profile Details
- Alarms
- Alarm Rules
- Recipient Groups
- Events
- Event Items
- Appendix 1. Guide for EasyCache Restart for Hypervisor Maintenance
- 1. Go to a project where the node specified as a maintenance target is included.
- 2. Check the maintenance target replication group.
- 3. Check the type of the maintenance target node.
- 4. Select the maintenance target replication group, and click the !Restart icon on the right side to restart the maintenance node.
- 5. Wait until the status indicator of the replication group changes to blue color and !Restart icon disappears.
- Appendix 2. Guide for Internet Gateway Restart for Server Maintenance
- 1. Go to a project where the internet gateway specified as a maintenance target is included.
- 2. Check the maintenance target replication group tab.
- 3. Click the !Restart Internet Gateway icon displayed on the right side of the maintenance target replication group to restart the maintenance node.
- 4. Wait until the !Restart Internet Gateway icon disappears.