Notification > Email > Console Guide
Deliver Mails
General Mail Delivery
You can send an email by entering the recipient, title, content, attachment, and so on. For general mail delivery, you must enter the receiver directly.
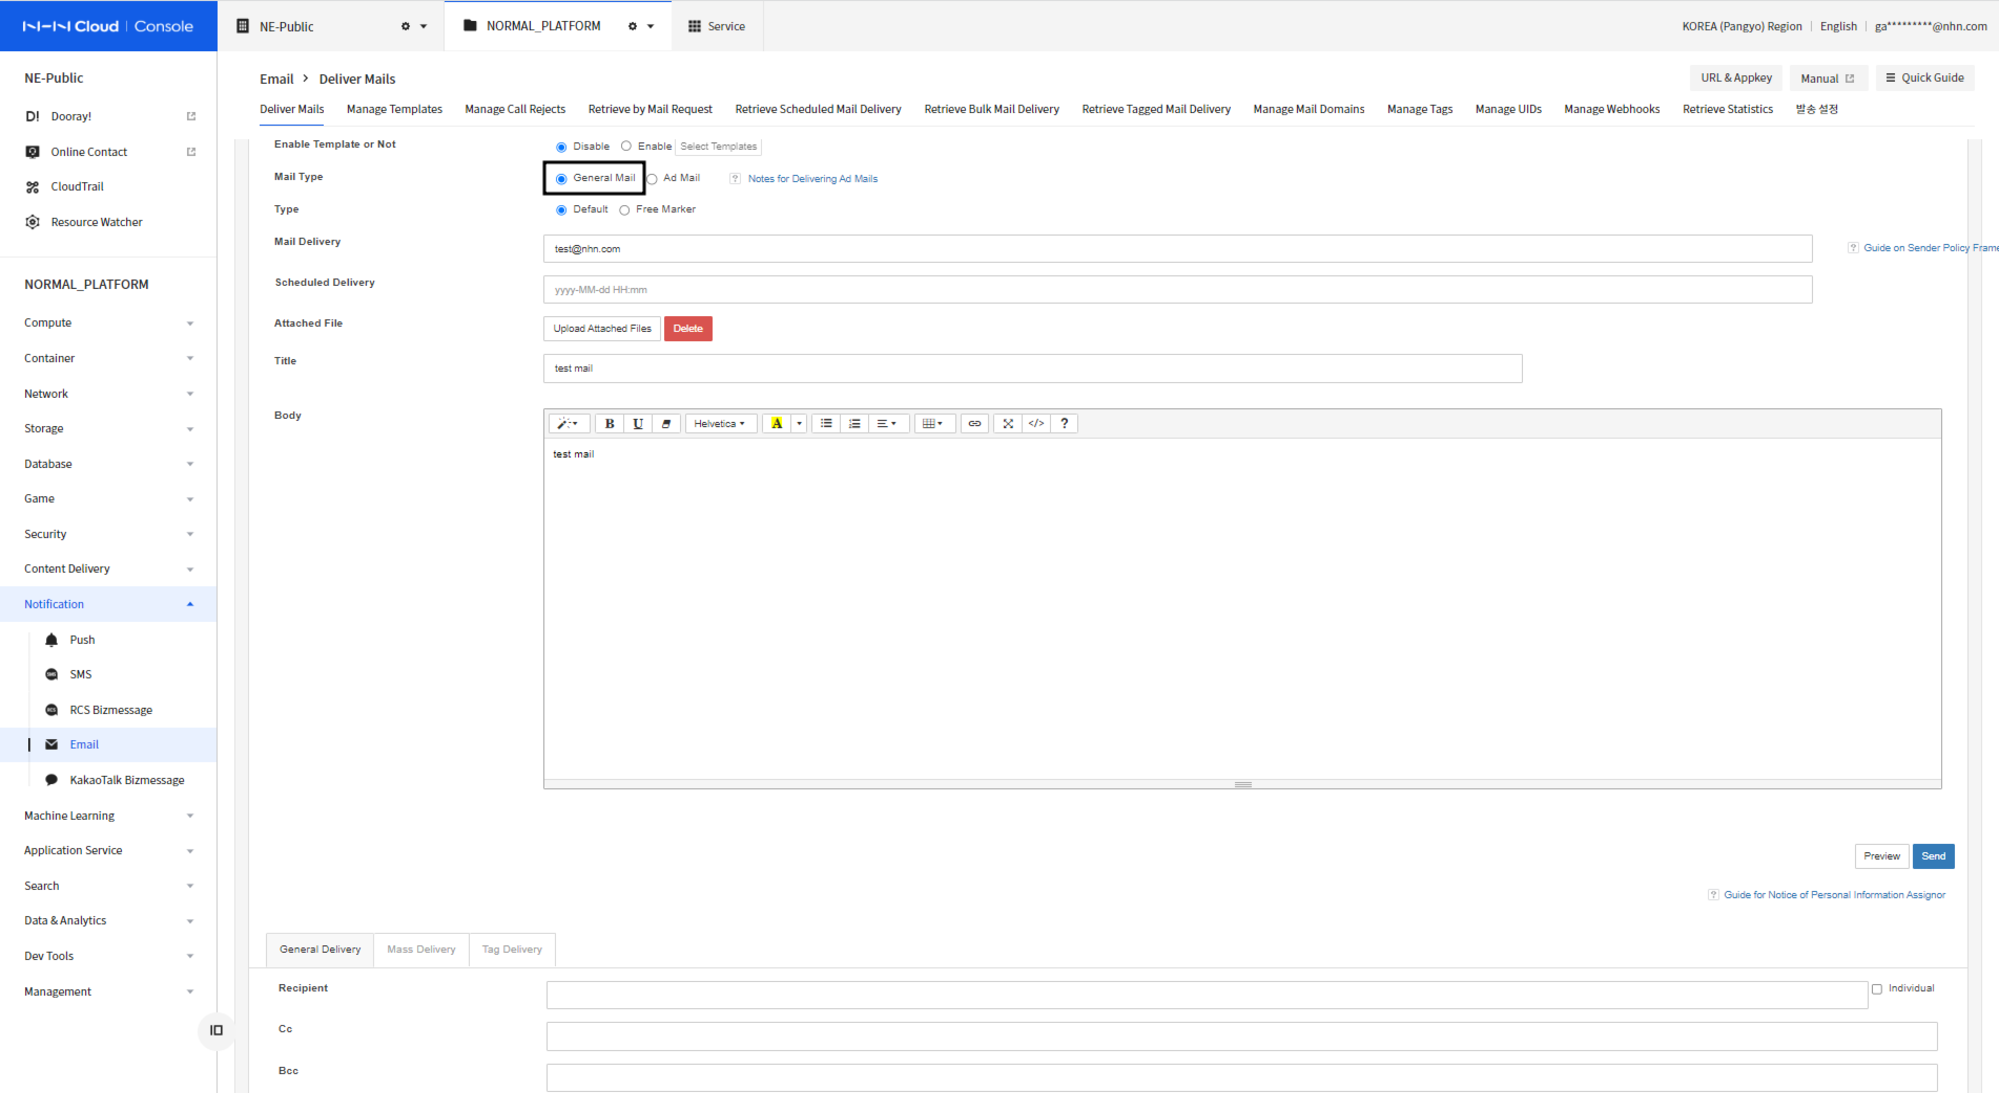
- On Deliver Mails tab, select Disable under Enable Template or Not.
- On Deliver Type tab, select General Mails.
- Enter Deliver Mails address. You can enter the sender's name and mail address by creating it in the name format.
- When you send it in the form of "Sender Name
, it will appear to recipient in the form of sender name and email address.
- When you send it in the form of "Sender Name
- To choose time of delivery, specify it Scheduled Delivery.
- Click Attached File and upload attached files.
- Enter the title and message content.
-
In Recipient and CC, enter the email address that you want to send to.
-
Up to 10 attachments can be uploaded, and only 30MB or less files can be uploaded.
- Total size of attachments cannot exceed 30MB.
- You can attach up to 30MB, but it is recommended to attach it within 10MB because it may be rejected due to
exceeding the limitor may result in a higher spam rating depending on the attachment restriction policy of incoming email system (gmail.com, naver.com, etc.).
Advertising Mail Deliver
You can deliver advertising mails.
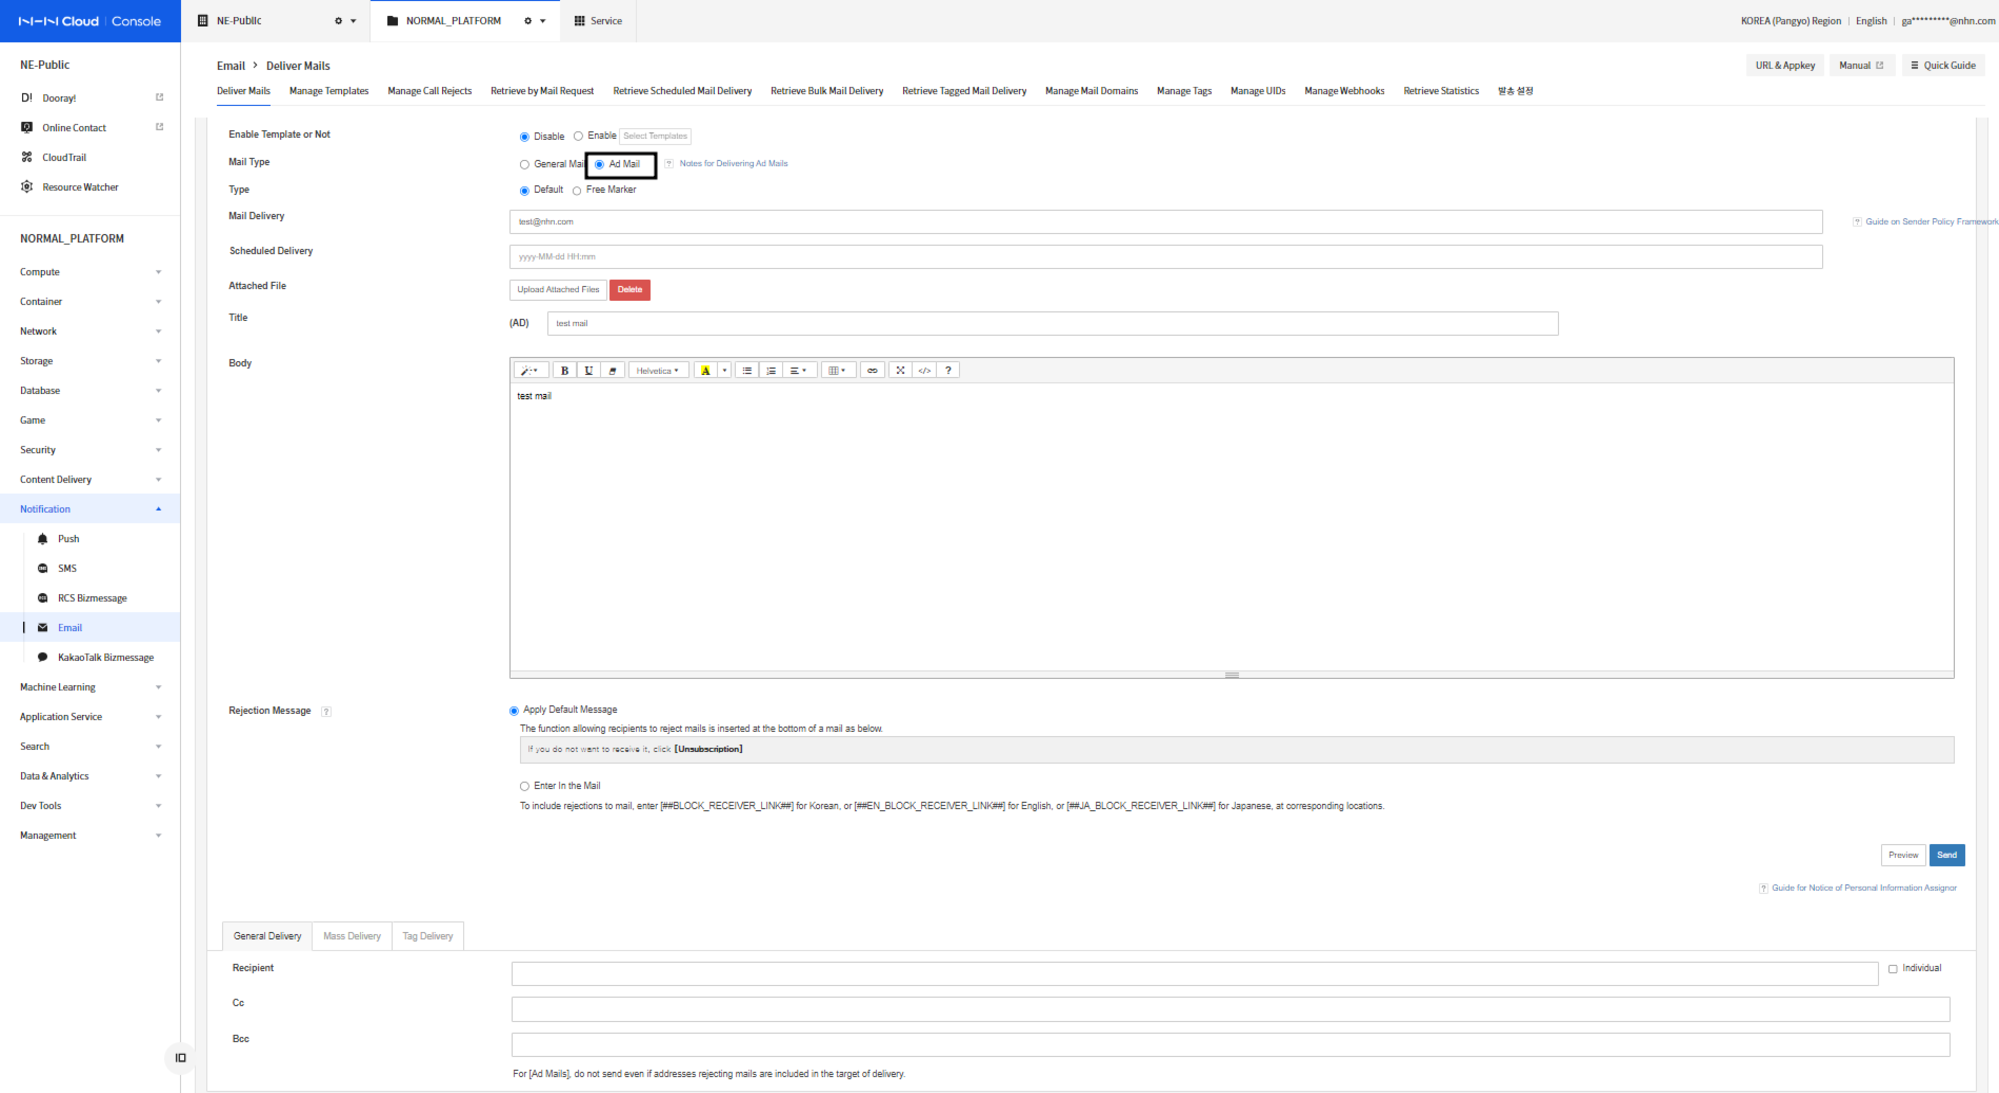
- On the Mail type select Advertising Mail.
- Enter Deliver Mails address. You can enter the sender's name and mail address by creating it in the name format.
- When you send it in the form of "Sender Name
, it will appear to recipient in the form of sender name and email address.
- When you send it in the form of "Sender Name
- To choose time of delivery, specify it Scheduled Delivery.
- Click Attached File and upload attached files.
- Enter the title and message content.
-
In Recipient and CC, enter the email address that you want to send to.
-
"(Advertising)" phrase must be included at the beginning of title.
- You must display sender's name, email address, phone number, and address in the body.
- Unsubscription link must be entered in Korean/English form and technical measures must be taken to decline receipt.
- When sending advertising email, it will not send to users who are registered as Unsubscribed.
Precautions When Sending Advertising Emails
When sending commercial advertising email or business promotion email under the Information and Communication Network Act, the following must be
complied. (Check the contents of the Korea Internet Promotion Agency)
- Advertising emails should only be sent to receivers who have explicitly agreed to receive it. In the event of a dispute due to a violation of this provision, the responsibility lies with the advertising mail sender.
- "(Advertising)" phrase must be included at the beginning of title.
- Mail body must display sender information, including sender's name, email address, phone number and address.
- Mail body should specify a notice that receivers can easily unsubscribe or withdraw their consent to receive.
- Technical measures should be taken to make it easier for the receivers to choose whether to unsubscribe or withdraw their consent by pressing [Unsubscription] within the body and in this case, the notice and technical measures should be specified in Korean and English.
If you do not want to receive it, please click on [Unsubscription]
If you do not want to receive it, please click a [Unsubscription]
NHN Cloud provides the following technical measures for 'advertising mail' to comply with the Information and Communication Network Act.
- Insert phrase (advertising) into the title.
- It provides unsubscribe function in Korean and English so that the receiver can choose to decline to receive.
- Advertising email will not send to users who are registered as Unsubscribe.
Key Providing as Unsubscription Link
| Key | Phrase | Usage example |
|---|---|---|
| BLOCK_RECEIVER_LINK | Unsubscription | If you don’t want to receive the mail, click on ##BLOCK_RECEIVER_LINK##. |
| EN_BLOCK_RECEIVER_LINK | Unsubscription | |
| JA_BLOCK_RECEIVER_LINK | 受信拒否 | メールの受信を希望しない場合、##JA_BLOCK_RECEIVER_LINK##をクリックしてください。 |
| BLOCK_RECEIVER_LINK_URL | - | If you no longer wish to receive these emails, please <a href='##BLOCK_RECEIVER_LINK_URL##' target='_blank'>click here</a>. |
Template Mail Delivery
You can use mail templates that was created in advance.
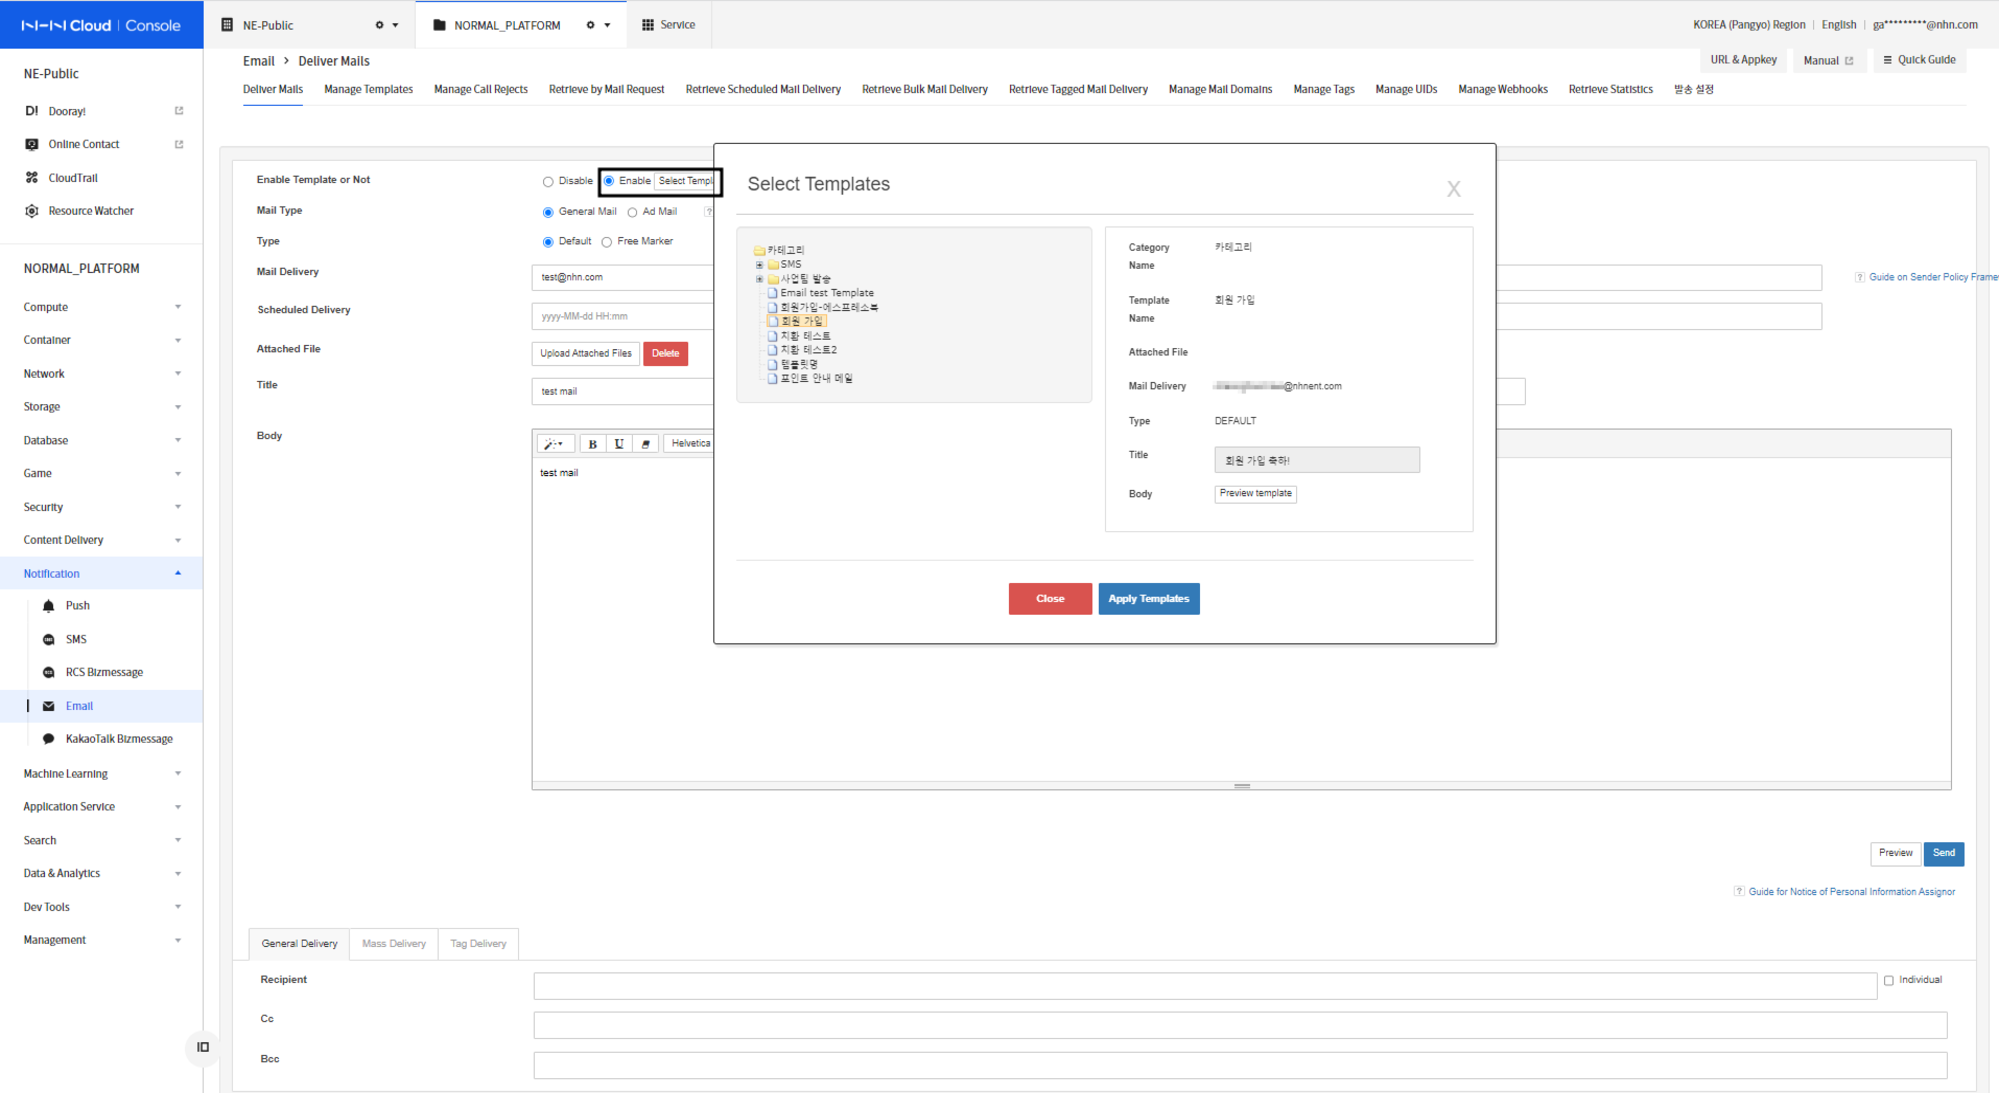
- Enable Use Templates and select a template from Select Templates.
- For more information on how to create templates, refer to the section Manage Category and Template below.
- To choose time of delivery, specify it Scheduled Delivery.
- Click Attached File and upload attached files.
- In Recipient and CC, enter the email address that you want to send to.
Mass Delivery
You can send Mass Delivery mail through template file in Excel/CSV format. On the bottom tab, select Mass Delivery .
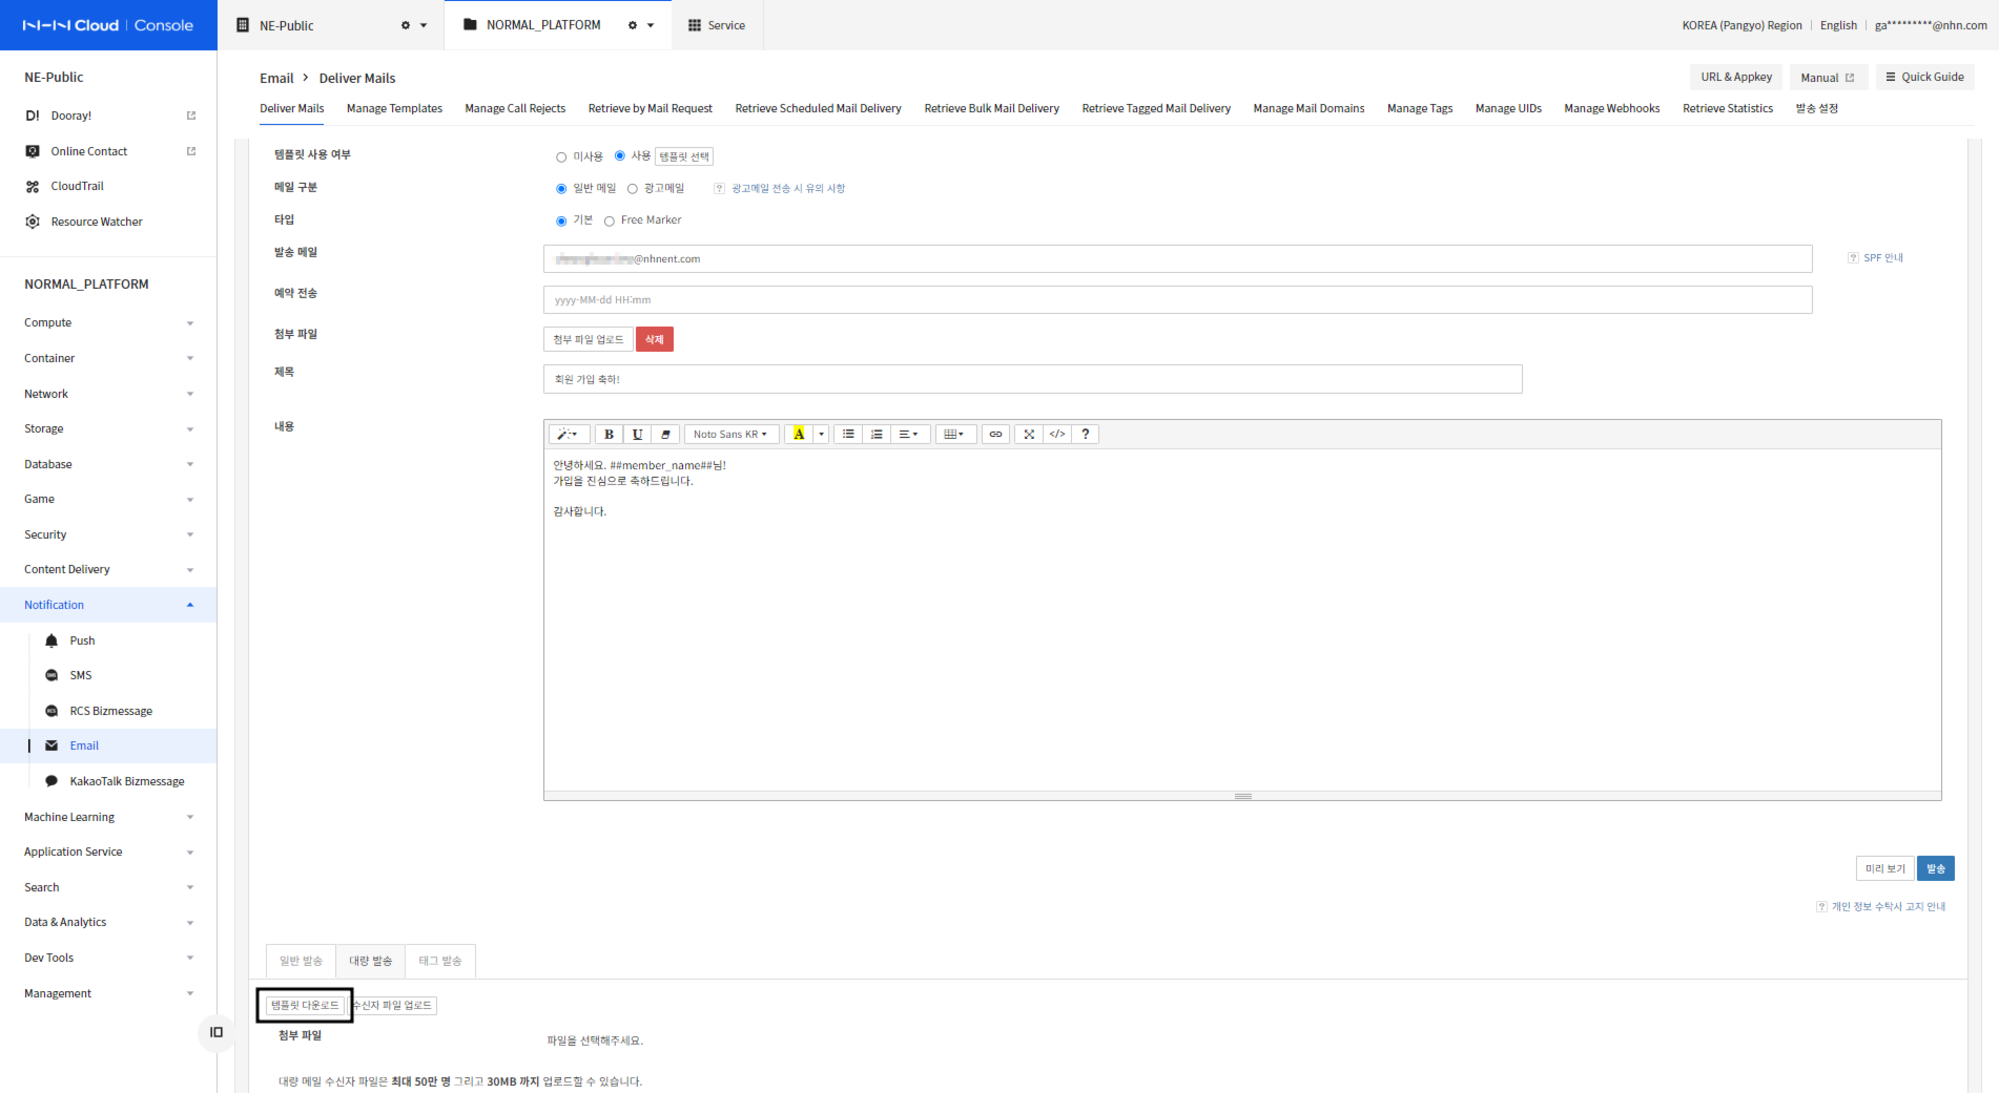

If you type ##replacement key## format in the mail title and content, you can replace the mail content with data you specify and send it. If you are using Free Marker type, please enter it in the form of ${replacement key}.
- On Mass Delivery tab at the bottom of screen, click on Download Template.
- After selecting Enable from the Enable Template or Not, and clicking the Download Template, then you can download CSV and XLSX and XLS template files that contain template replacements.
- In template file, enter replacement data to specify in replacement key, including receiver mail address and name.
- Upload Recipient File to upload the created file.
- Files containing template data can be uploaded by up to 30MB.
- If there is an error in template data, error information appears. Check and correct any errors.
- Errors display the total number of errors and their contents (up to 10).
- Type of Errors
- When receive_mail_address column does not exist: the receive_mail_address column must be entered as a column for entering the receiver mail address.
- If no data is entered
- When receiver mail address or replacement data is not entered.
- Type of Errors
- To choose time of delivery, specify it Scheduled Delivery.
- Click Attached File and upload attached files.
- Enter the title and message content.
- If you click on Send button, you can select 2 options check and proceed and send immediately
- check and proceed: Check Mass delivery tab to confirm mail receivers within 7 days before sending mail. (Not supported for scheduled sending.)
- Send Immediately: Mail is sent immediately without confirming the mail receiver. On Mass Delivery tab, you can check delivery status.
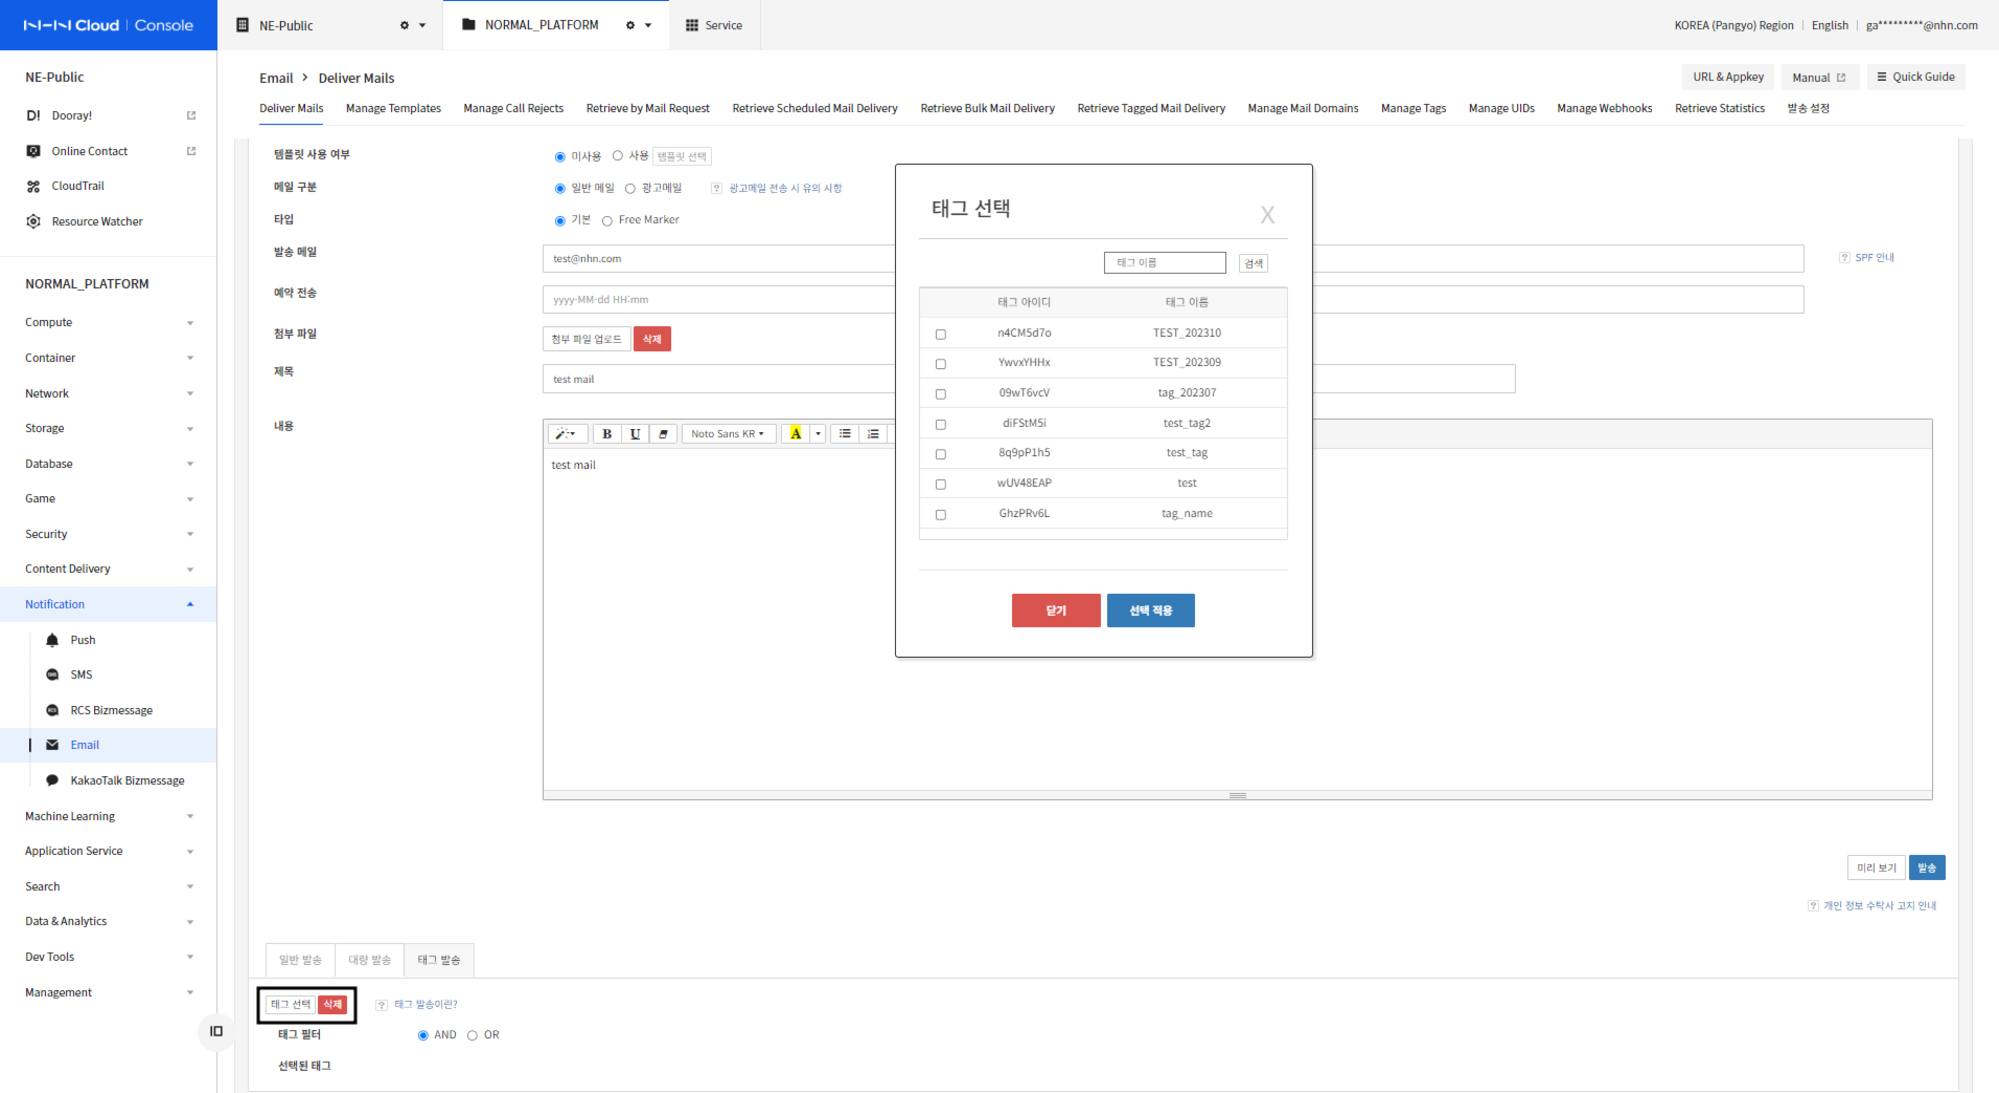
Tagged Mail Delivery
You can send it as UID that meets tagged conditions. Select Tagged delivery on bottom tab. For more information about tags, refer to Note.
- On Deliver Mails tab, select Disable under Enable Template or Not.
- Select Tagged delivery tab at the bottom of screen and click on Select Tag button.
- Tags can be registered on Tag Management, while UID and phone numbers can be saved on the UID Management tab.
- Select the tag that you want to send On Select Tag window.
- You can select up to four tags.
- You can apply AND, OR conditions to the multiple selected tags.
- AND: Targets are only receivers who belong to multiple tags.
- OR: Targets are receivers who belong to more than one tag.
- You can apply AND, OR conditions to the multiple selected tags.
- To choose time of delivery, specify it Scheduled Delivery.
- Click Attached File and upload attached files.
- Enter the title and message content.
- If you click on Send button, you can select 2 options check and proceed and send immediately
- check and proceed: Go to the View Tagged Mail Delivery tab to confirm mail receivers within 7 days before sending mail. (Not supported for scheduled sending.)
- Send Immediately: Email is sent immediately without confirming the mail receiver. Delivery status can be checked on the View Tagged Mail Delivery tab.
Template Management
After creating categories, you can classify and manage templates that you use to send mail.
Add/Modify Category
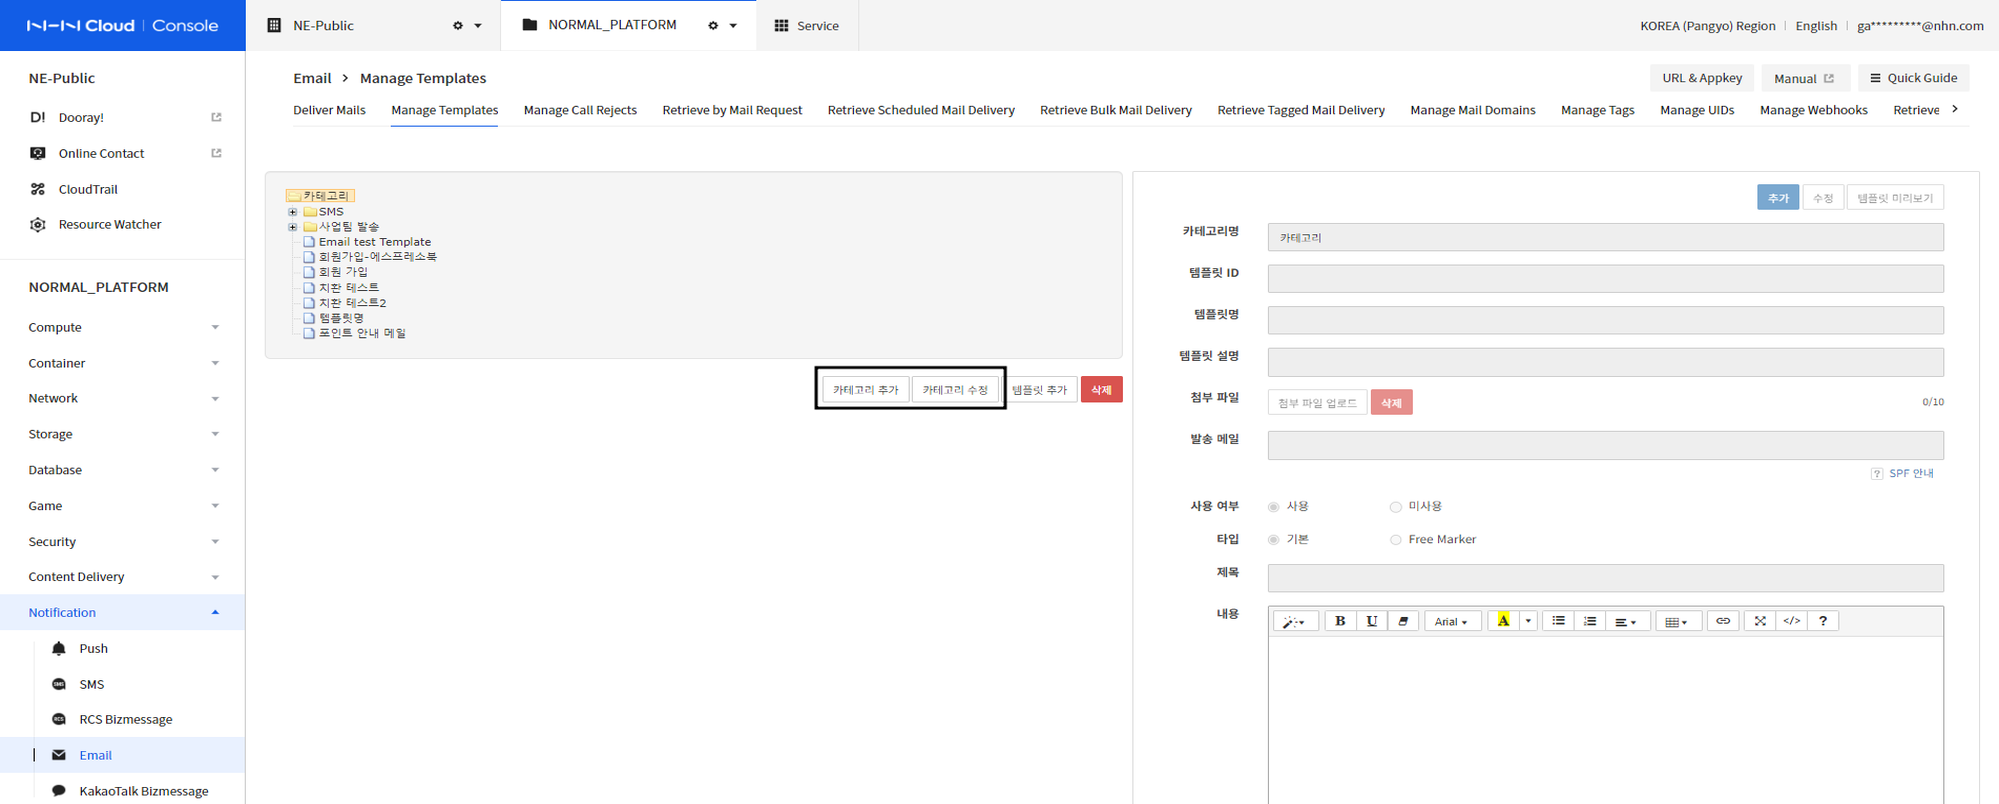
- Click on Add/Modify Category button and you can add/modify category.
- Make sure to click Modify Category while a category is selected.
Add/Modify Template
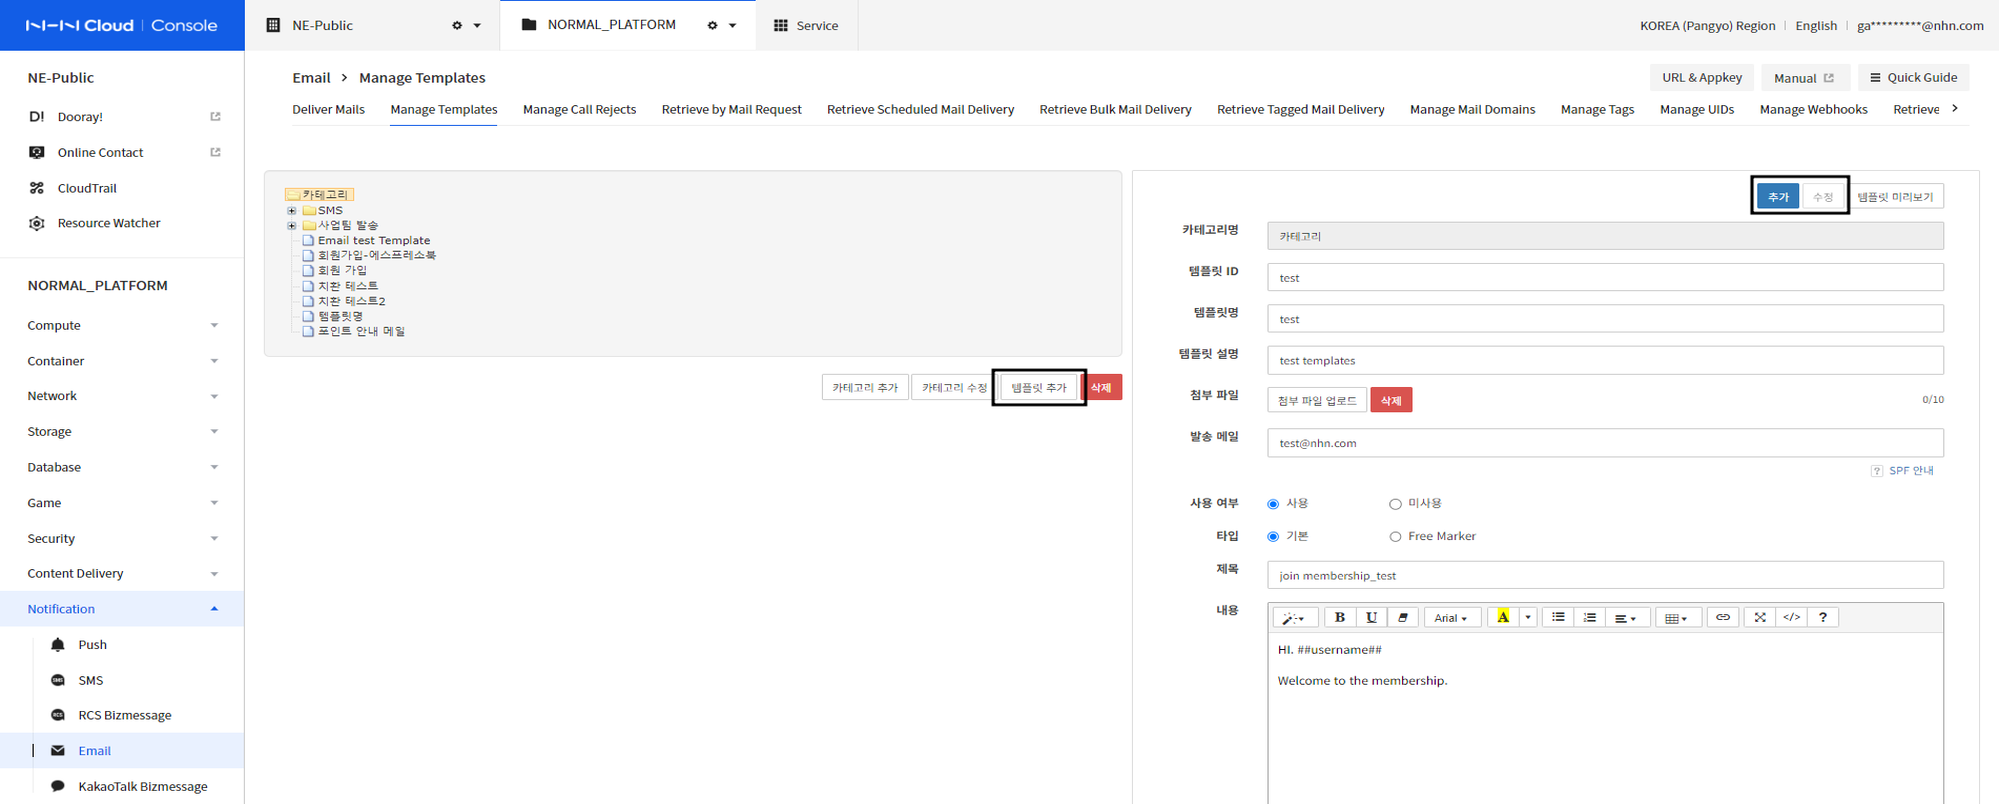
- To add/modify template, you can click on Add/ modify template button
- Make sure to click Add Templates while a category is selected.
- If want to enter to replace authentication number, order number, coupon code, points, etc., enter by tying replacement key to ### in the title or contents .
Unsubscription Management
You can manage targets of Unsubscription On Unsubscription management tab.
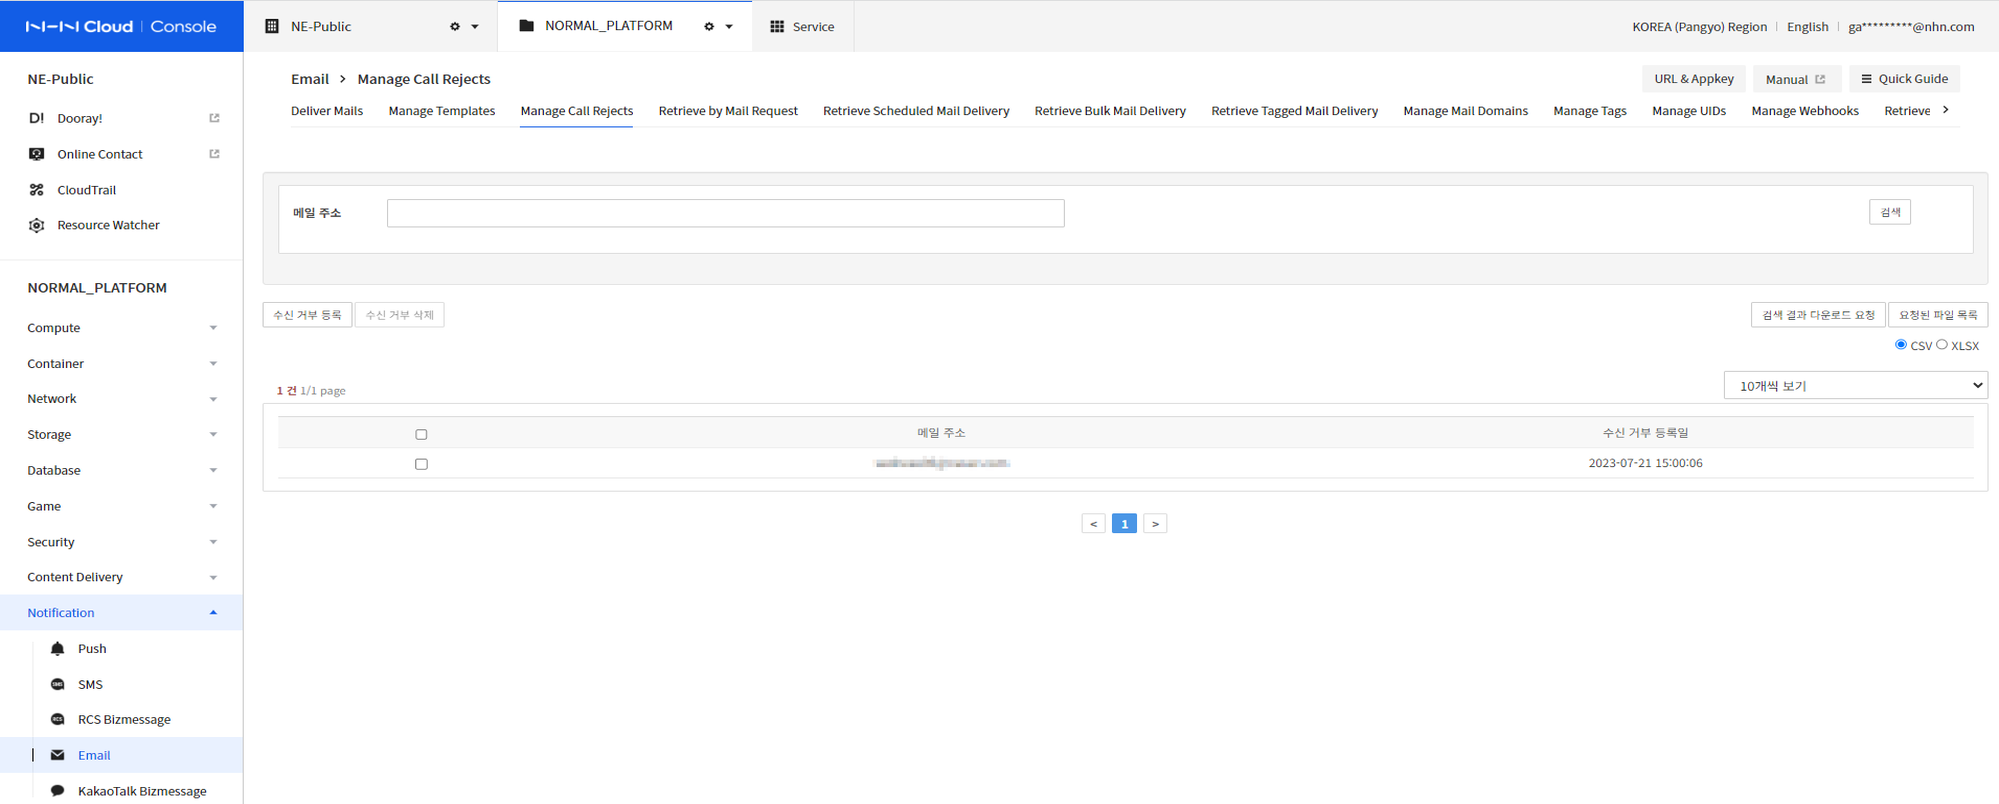
You can View users who have declined to receive so far, and you can register or delete the Unsubscription by directly inputting or uploading file.
Register Directly as Unsubscription
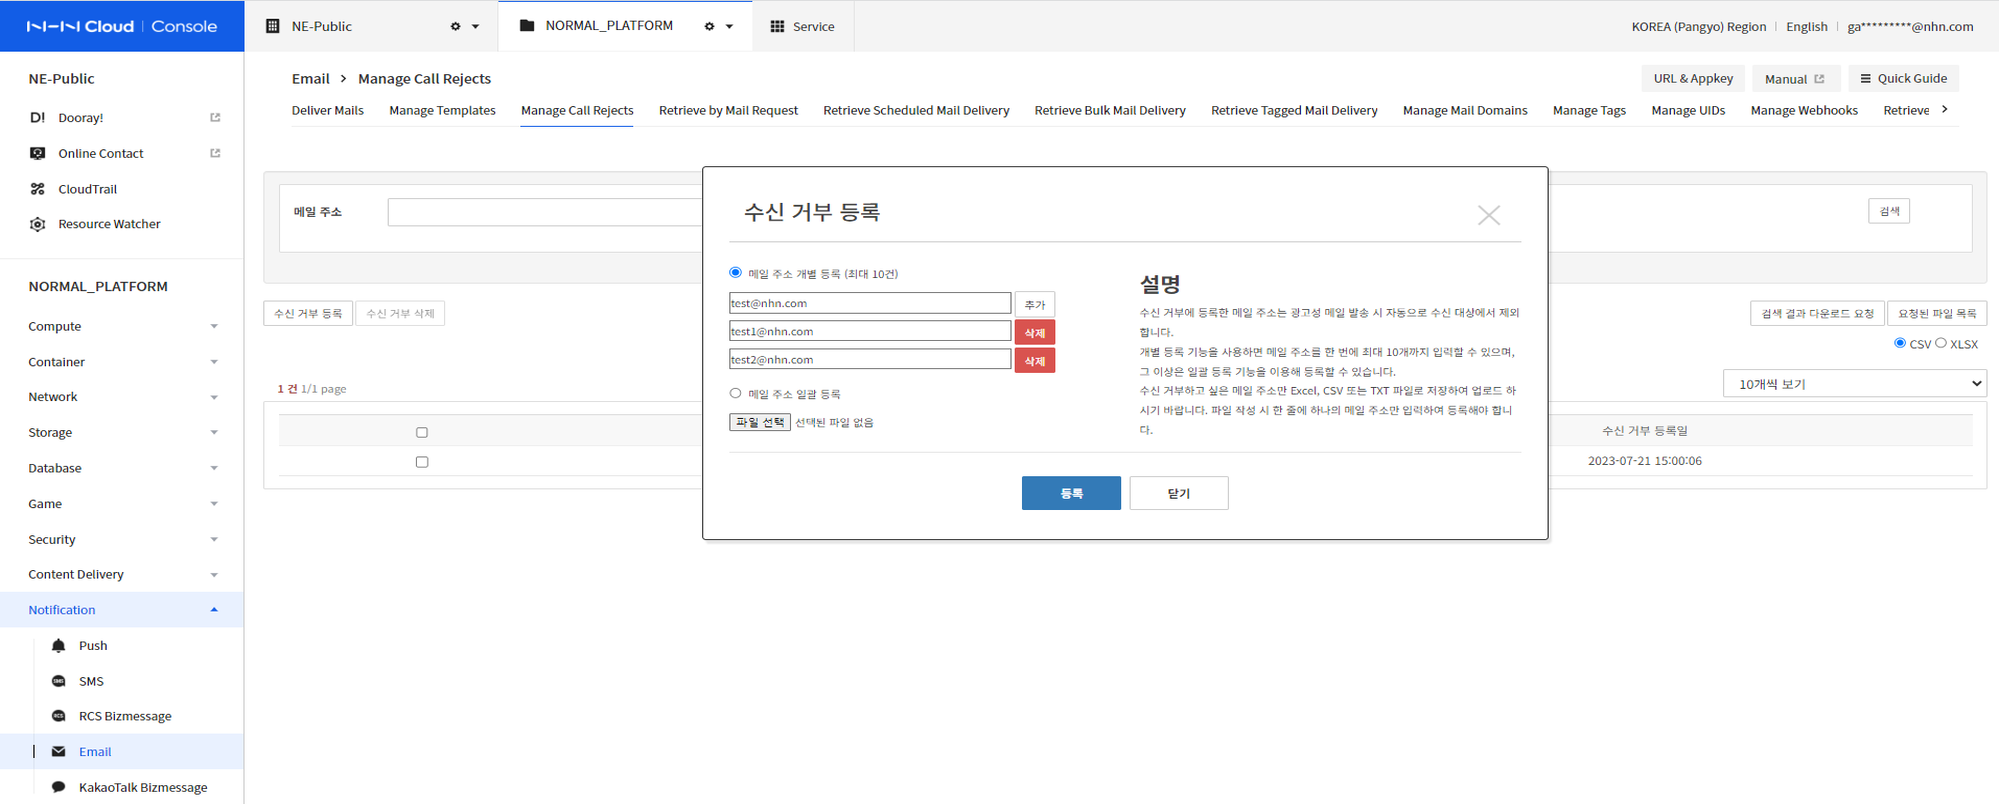
- On Reregister Unsubscription window, enter Email address of Unsubscription.
- You can register up to 10 people by clicking on Add button.
Register by Uploading as Unsubscription File
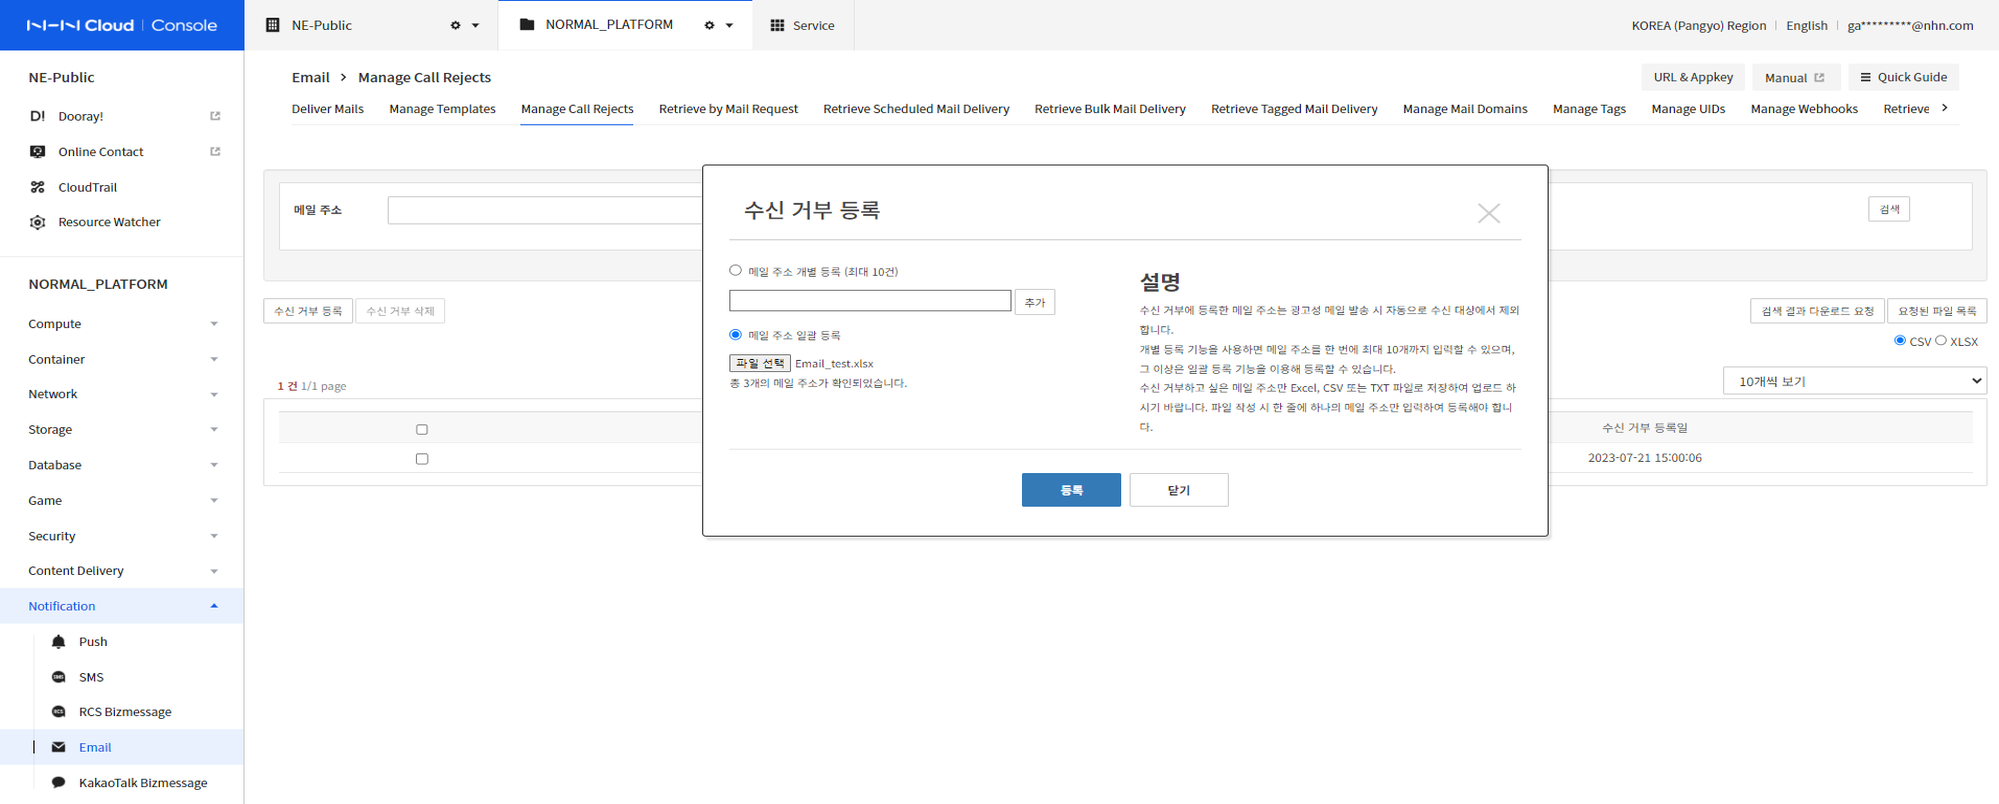
- You can upload Unsubscription file in the format of CSV, text (.txt), Excel (.xlsx) file.
- Click Register mail address batch to upload the file.
- When successfully uploaded a total of n mail addresses has been verified. phrase displays.
Delete Unsubscription
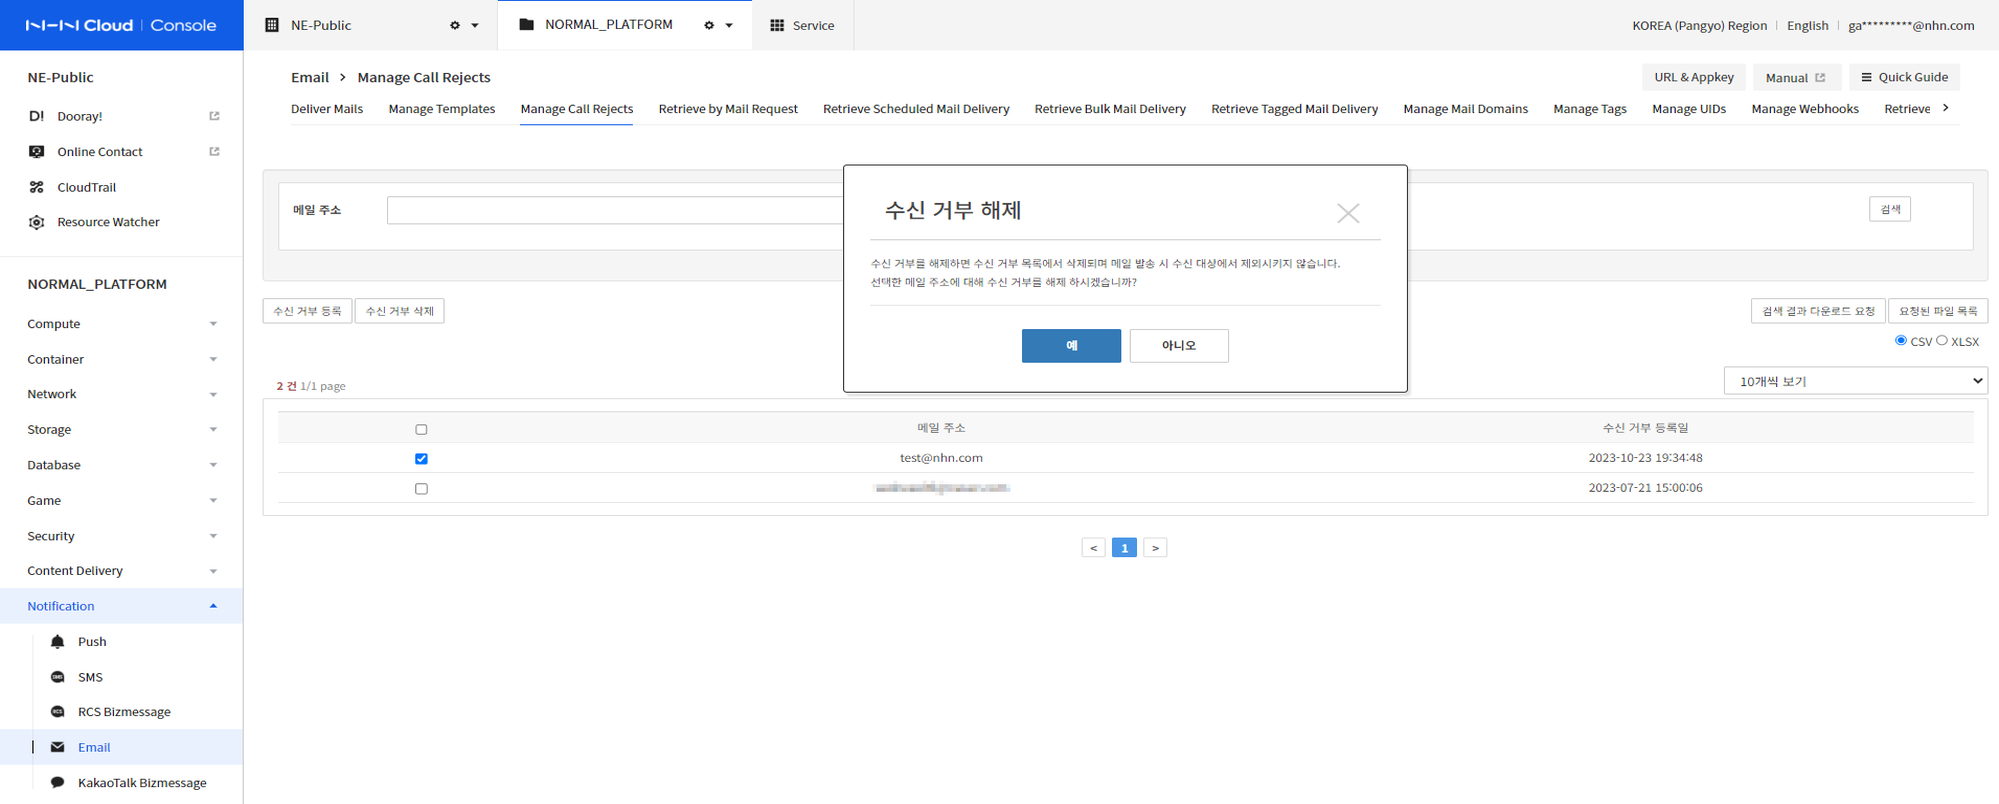
- Select Unsubscription email address you want to delete and click Delete Unsubscription button.
- Once deletion is complete, it can be seen on the Unsubscription Management tab.
Retrieve Delivery
Retrieve by Mail Request
On the Retrieve by mail request tab, you can view emails sent using conditions such as the date and time of delivery, date and time of receipt, template, status of delivery, etc.
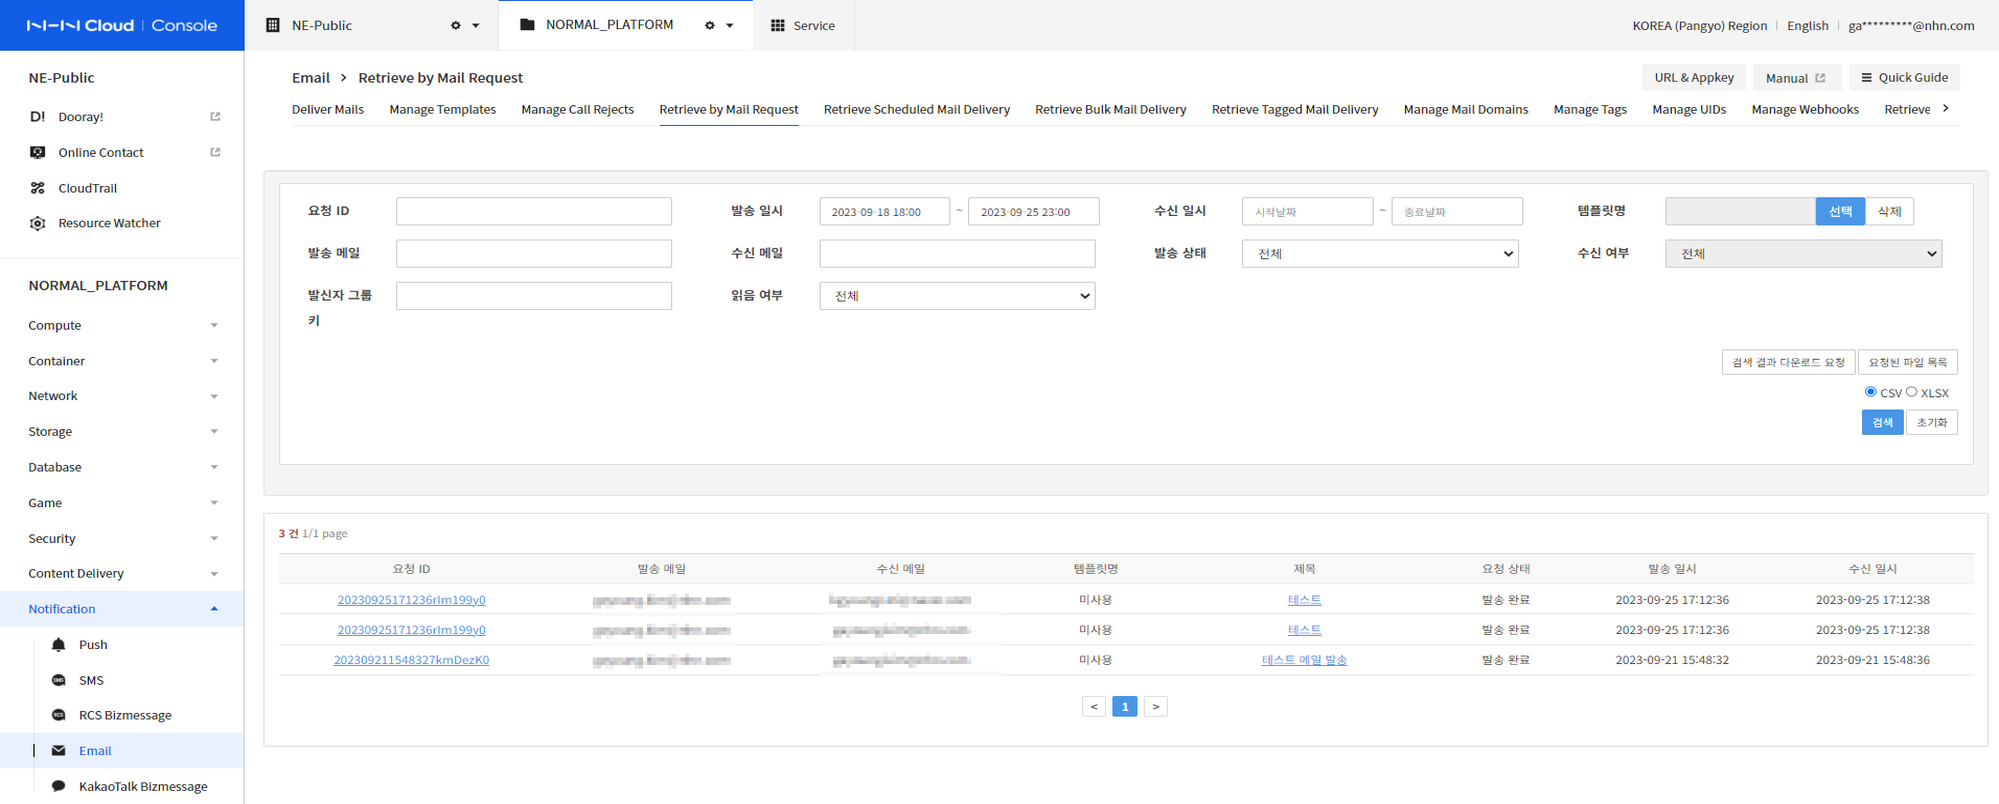
- Request ID or date and time of delivery is a required value.
- Delivery date and time search can be done within maximum 7 days.
- Receipt date and time search can be done within maximum 1 month.
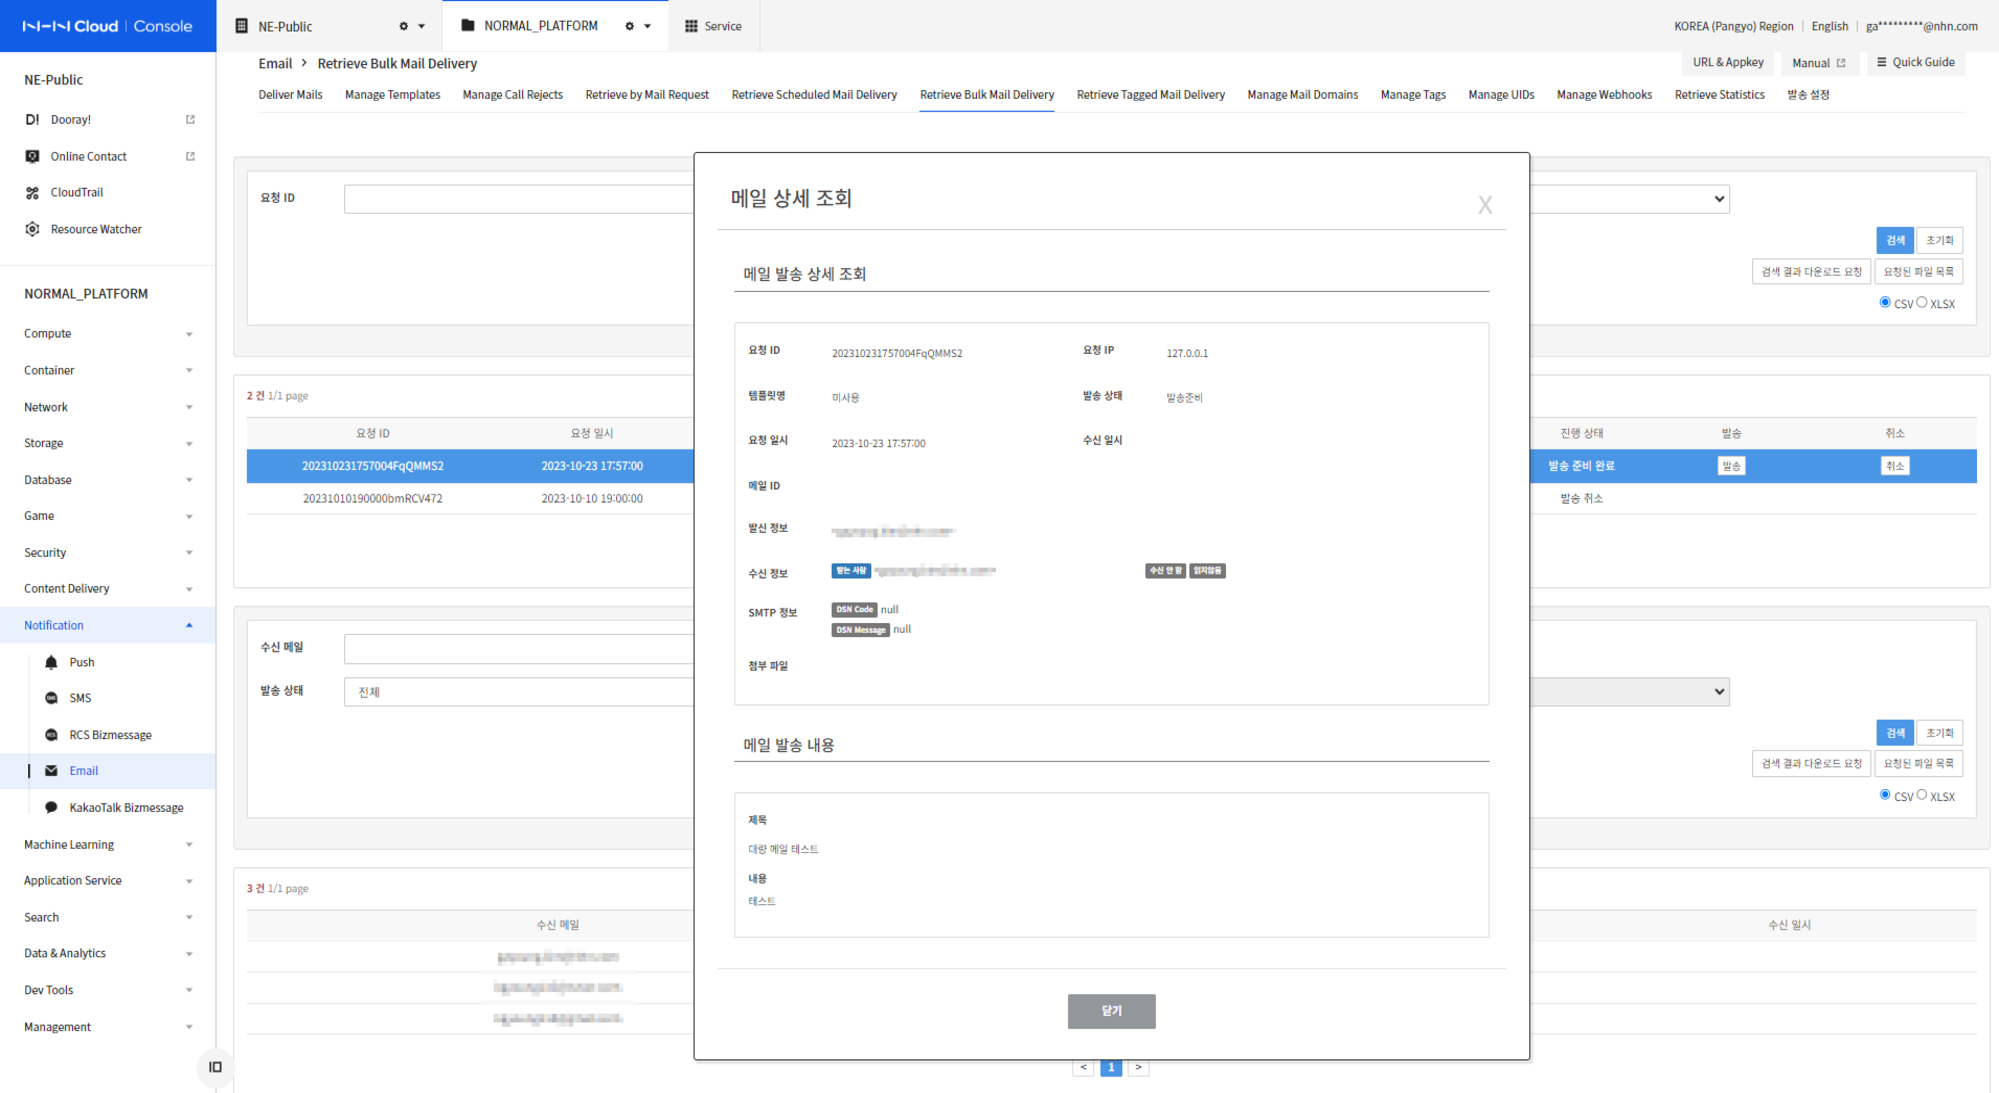
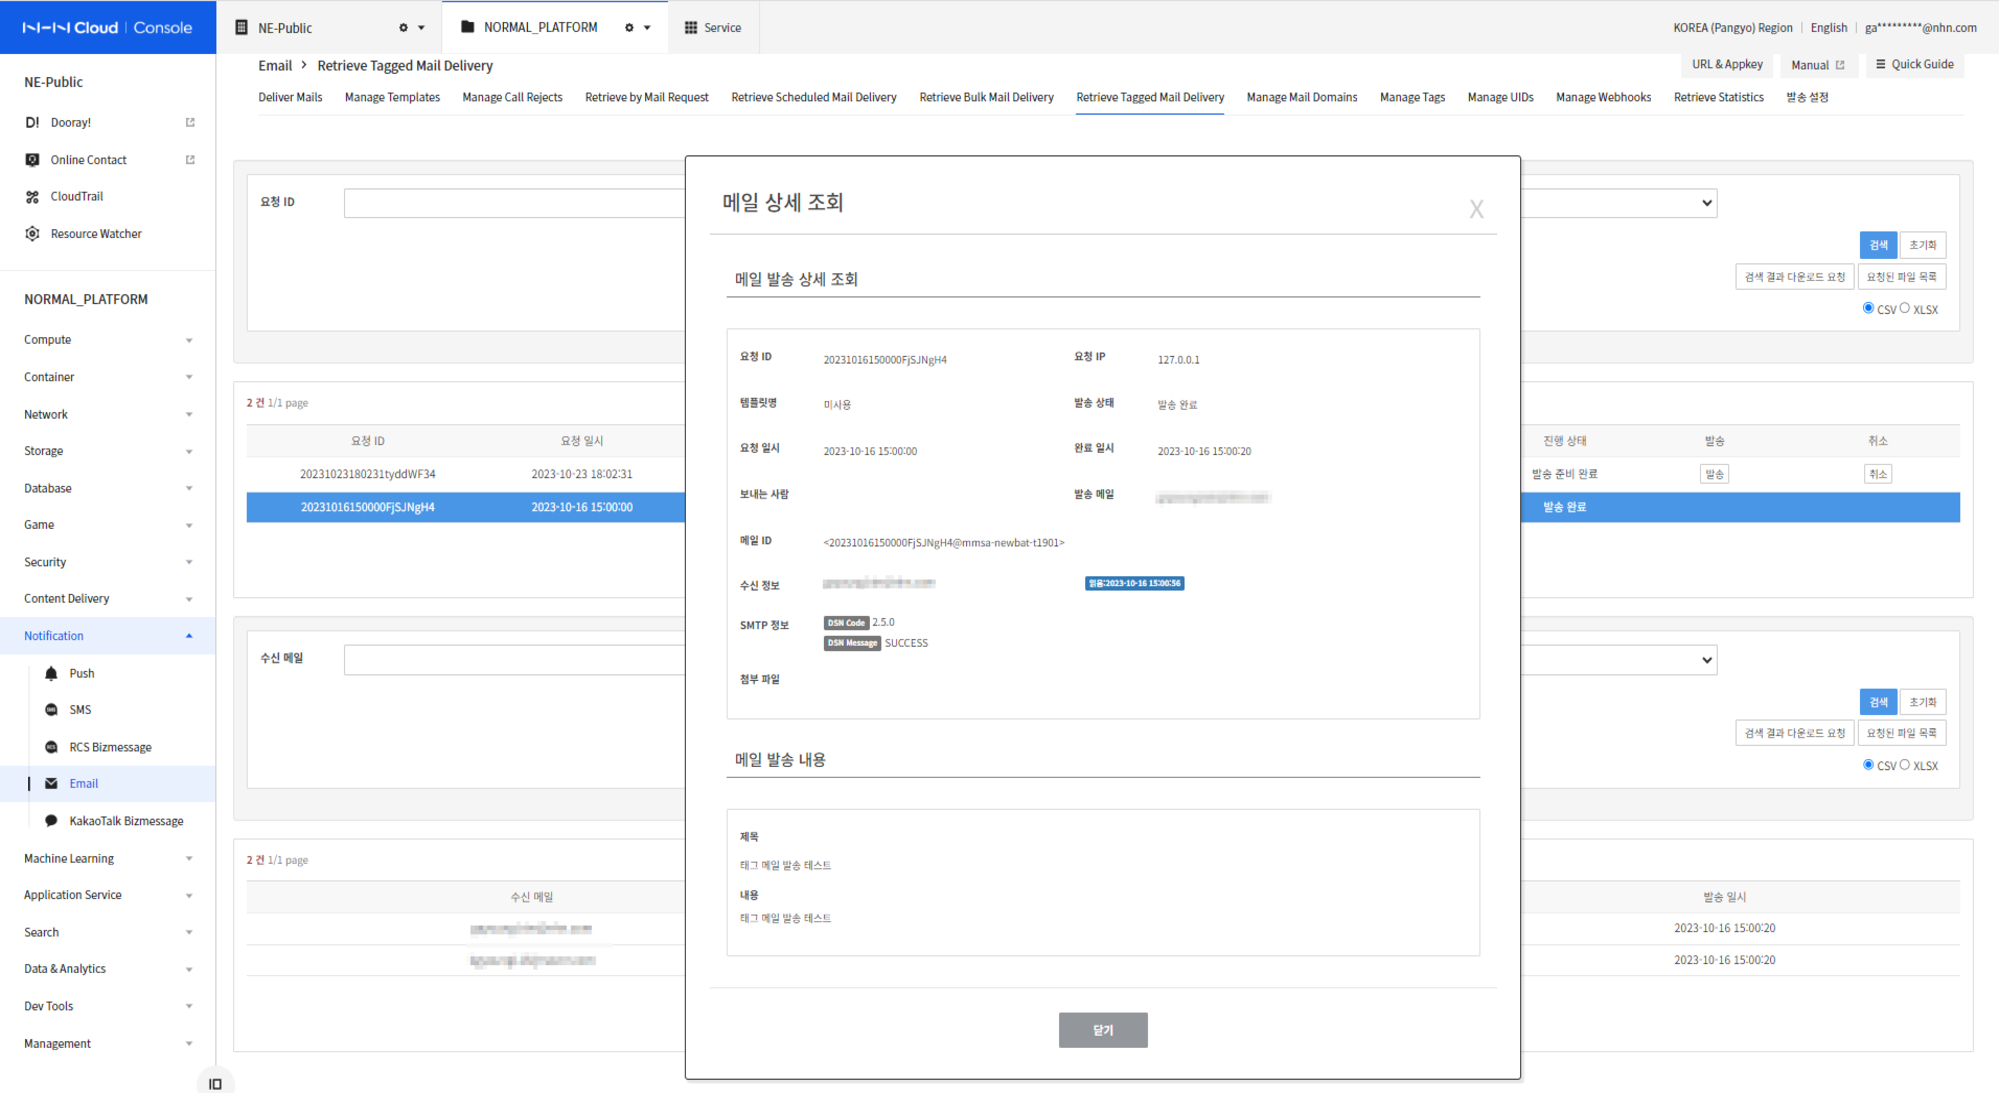
- To find out more, click on request ID or title to display pop-up View Details.
- Data shown on full screen can be downloaded to Excel.
- You can check the status of your send request through the request status.
View Scheduled Delivery
You can view mails that has been delivered on schedule under View Scheduled Delivery tab.
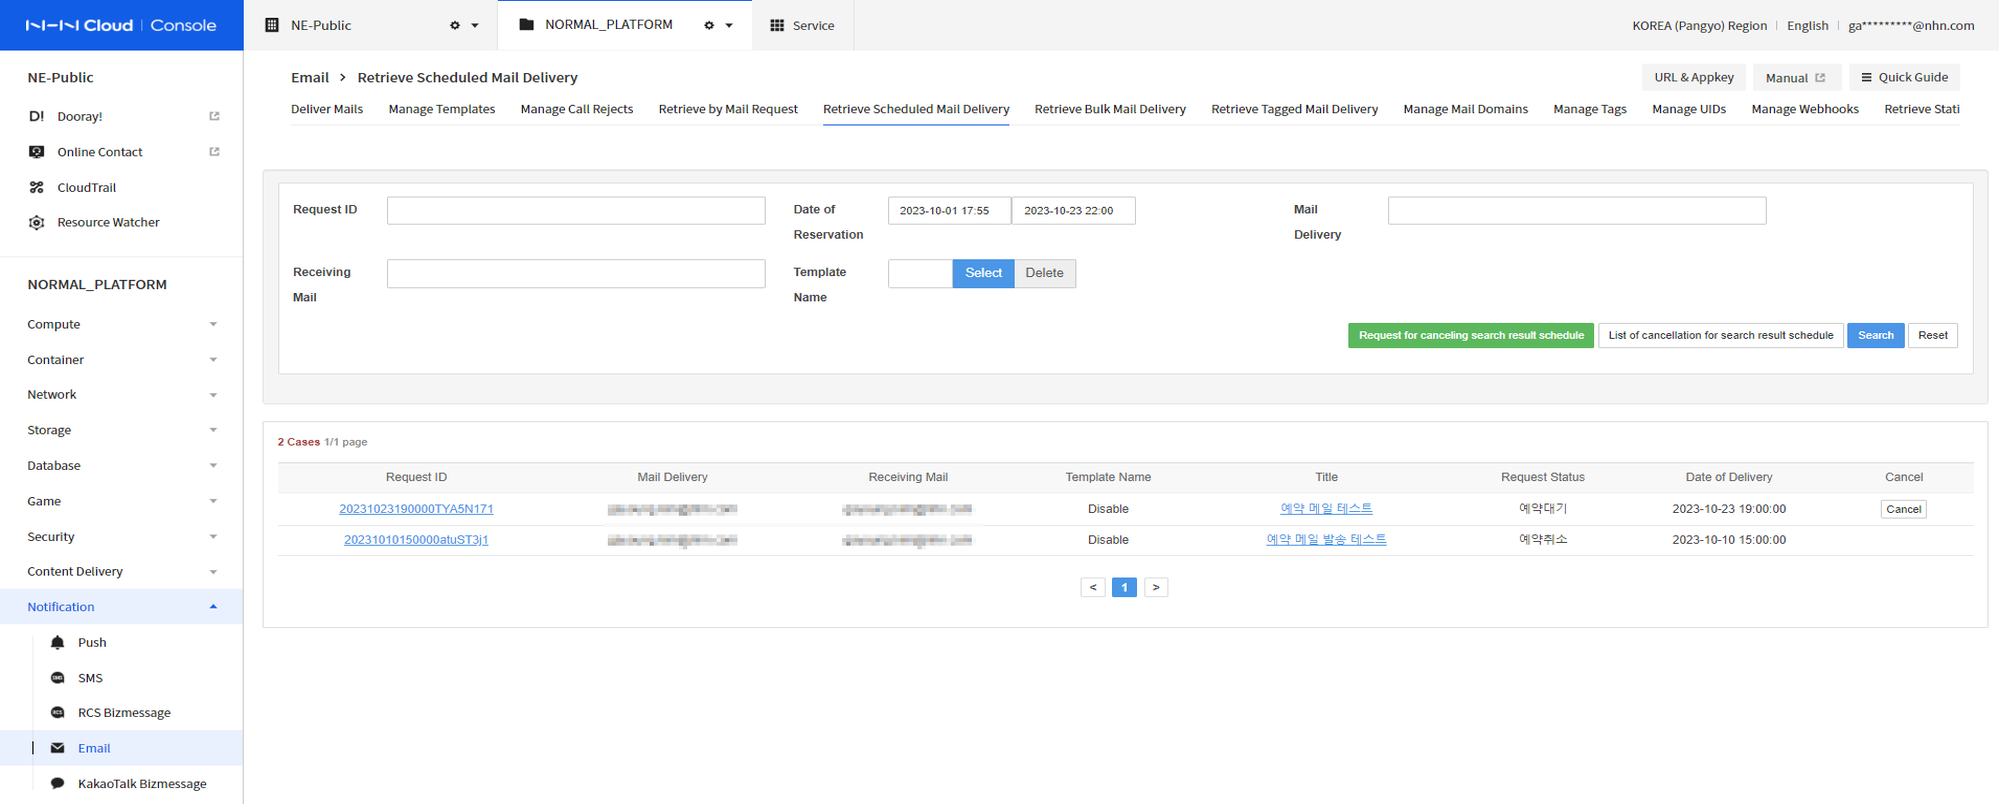
- Request ID or date and time on schedule is a required value.
- Scheduled date and time search can be done within a maximum of 1 month.
- To find out more, click on request ID or title to display pop-up View Details.
- You can check the status of your send request through the request status. Successfully scheduled delivery can be found on View by mail request tab.
- If your scheduled sending is waiting, you can cancel scheduled delivery by clicking on [Cancel] button or by clicking on [Request to Cancel Search Results]
button based on search conditions.
- If you are 10 minutes before the scheduled delivery time, the corresponding delivery history will be moved to View by mail request tab..
- Once moved to View by mail request tab, you cannot cancel the delivery.
View Mass Delivery
On View Mass Delivery tab, you can view or deliver or cancel to deliver mass delivery.
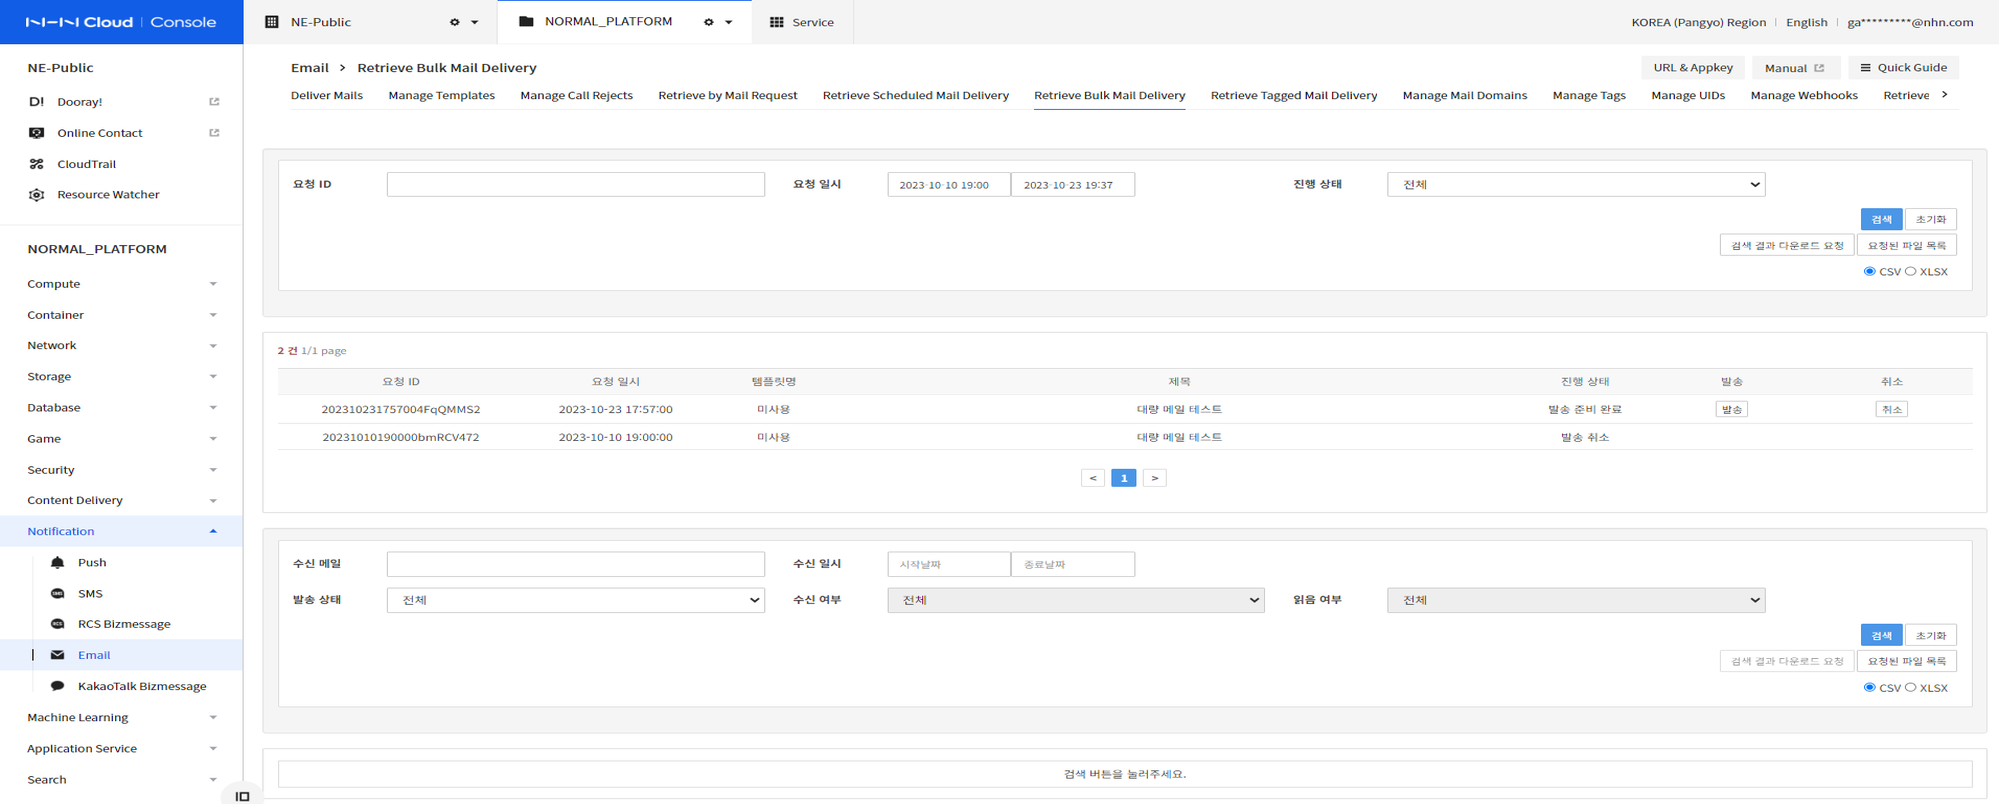
- Request ID or date and time of request is a required value.
- Request date and time search can be done within a maximum of 1 month.
- Cancel Sending: When sending mass delivery, select Check and proceed and select the 'Complete Ready to Send' status item and then click on Cancel sending button to send or cancel.
- View: You can view mass delivery items in View form at the top. By selecting column list of View item, you can check incoming mail and delivery information ( delivery content, delivery result) in View form at the bottom.
- If your scheduled sending is waiting, you can cancel it by selecting it from the list.
- At progress status, you can check the status of your delivery request.
- Data shown on full screen can be downloaded to Excel.
Progress Status of Mass Delivery
- Waiting: It is a status before reading recipient file data.
- Ready to send: It is a status while loading recipient file data information.
- Complete ready to send: It is a status that is completed ready to send. If selected scheduled items (column on the list), you can see mails sent by the receiver in the list below.
- Waiting to send It is a status waiting to send mails.
- Sending: It is a status that is in the middle of mail sending. If selected scheduled items (column on the list), you can see progress rate of sending status.
- Complete delivery: It is a status that delivery is normally completed.
- Delivery failed It is a status that the error happened during delivery. You can check delivery status by mail in view mail delivery status list.
- Delivery cancels: It is a status that the user cancelled the delivery.
Mail Delivery Status by Recipient
Select mass delivery (column on the list) to check delivery information of each received mail and the result.
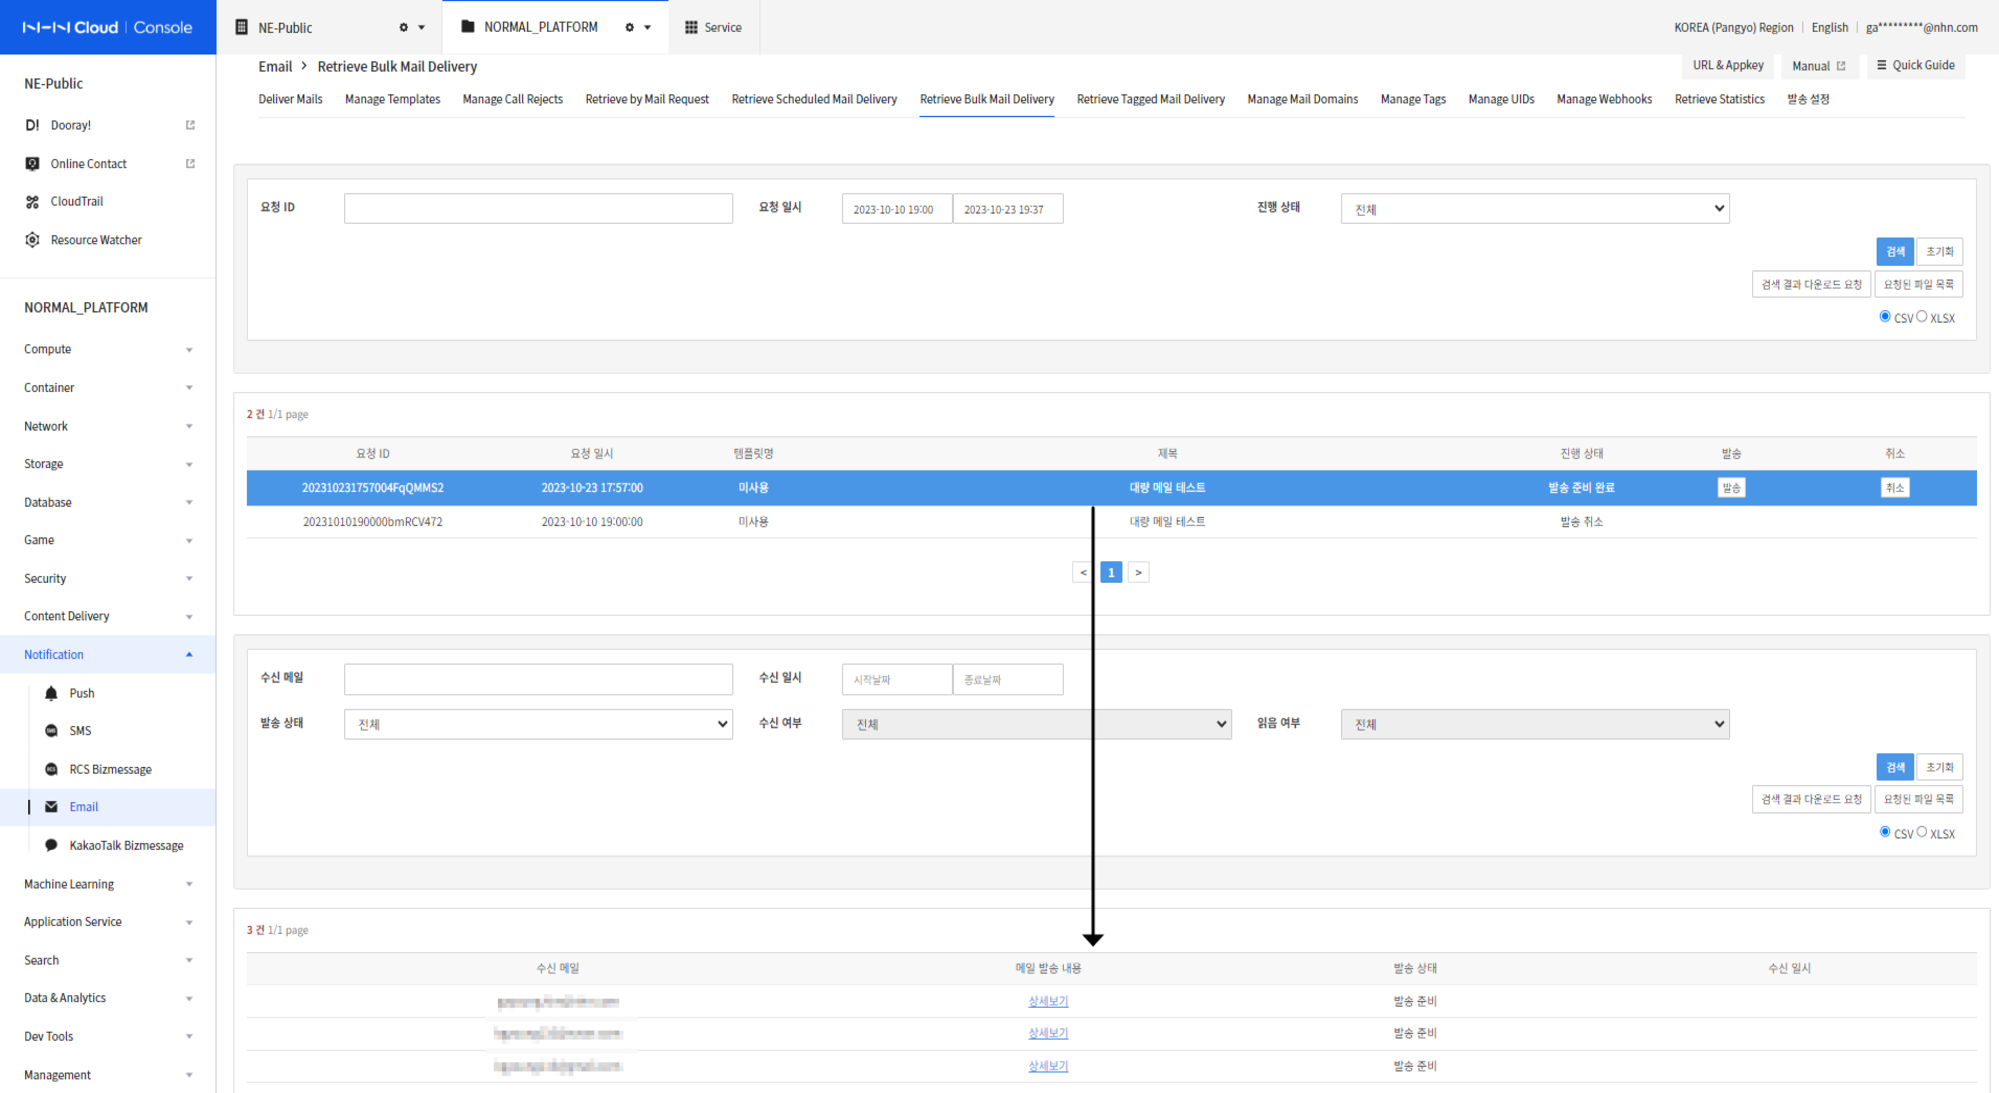
On View by recipient, you can select the corresponding recipient to see if the delivery content has been successfully replaced.
View Tagged Mail Delivery
On the View Tagged Mail Delivery tab, you can view, or deliver or cancel scheduled tagged mail delivery.
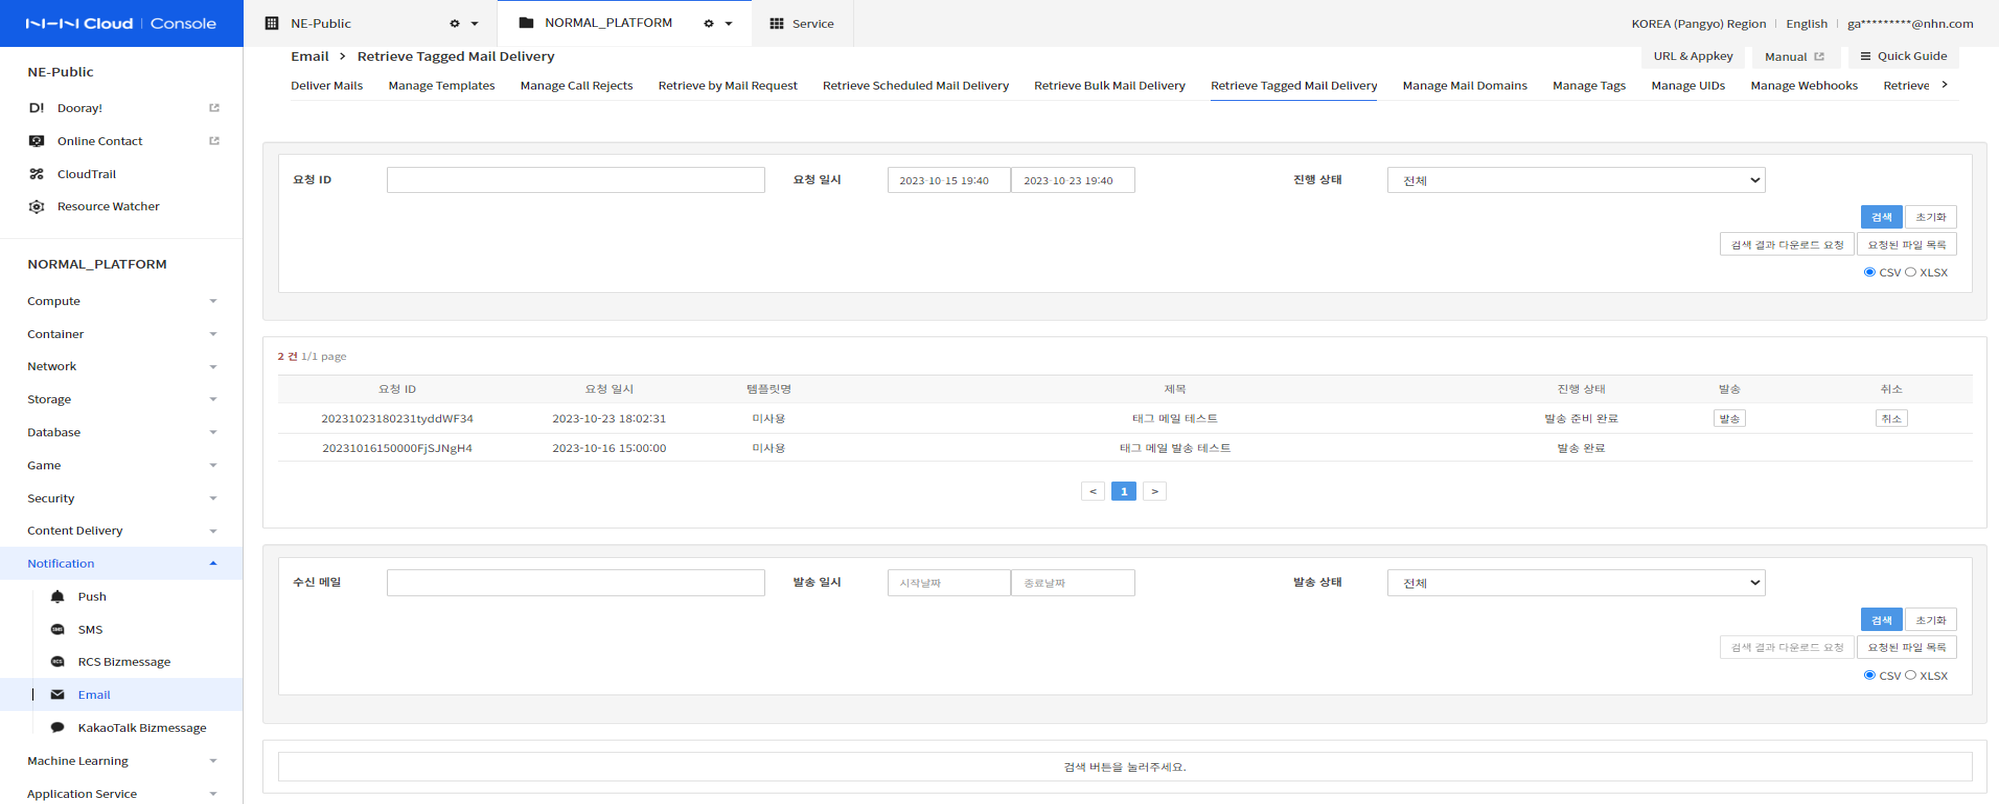
- Request ID or date and time of request is a required value.
- Request date and time search can be done within a maximum of 1 month.
- Cancel Sending: When sending tagged mail delivery, select Review and proceed and select 'Complete Ready to Send ' status item and then click on Cancel sending button to send or cancel.
- View: You can view tagged mail mass delivery items in View form at the top. By selecting column list of View item, you can check incoming mail and delivery information (delivery content, delivery result) in View form at the bottom.
- For scheduled sending, delivery cannot be canceled separately.
- At progress status, you can check the status of your delivery request.
- Data shown on full screen can be downloaded to Excel.
Progress Status of Tagged Mail Delivery
- Waiting: It is a status before reading recipient file data.
- Ready to send: It is a status while loading recipient file data information.
- Complete ready to send: It is a status that mail was complete ready to send. If selected scheduled items (column on the list), you can see mails sent by the receiver in the list below.
- Waiting to send It is a status waiting to send mails.
- Sending: It is a status that is in the middle of mail sending. If selected scheduled items (column on the list), you can see progress rate of sending status.
- Complete delivery: It is a status that delivery is normally completed.
- Delivery failed It is a status that the error happened during delivery. You can check delivery status by mail in view mail delivery status list.
- Delivery cancels: It is a status that the user cancelled the delivery.
Mail Delivery Status by Recipient
Select tagged mail delivery (column on the list) to check delivery information of each received mail and the results from the list at the bottom.
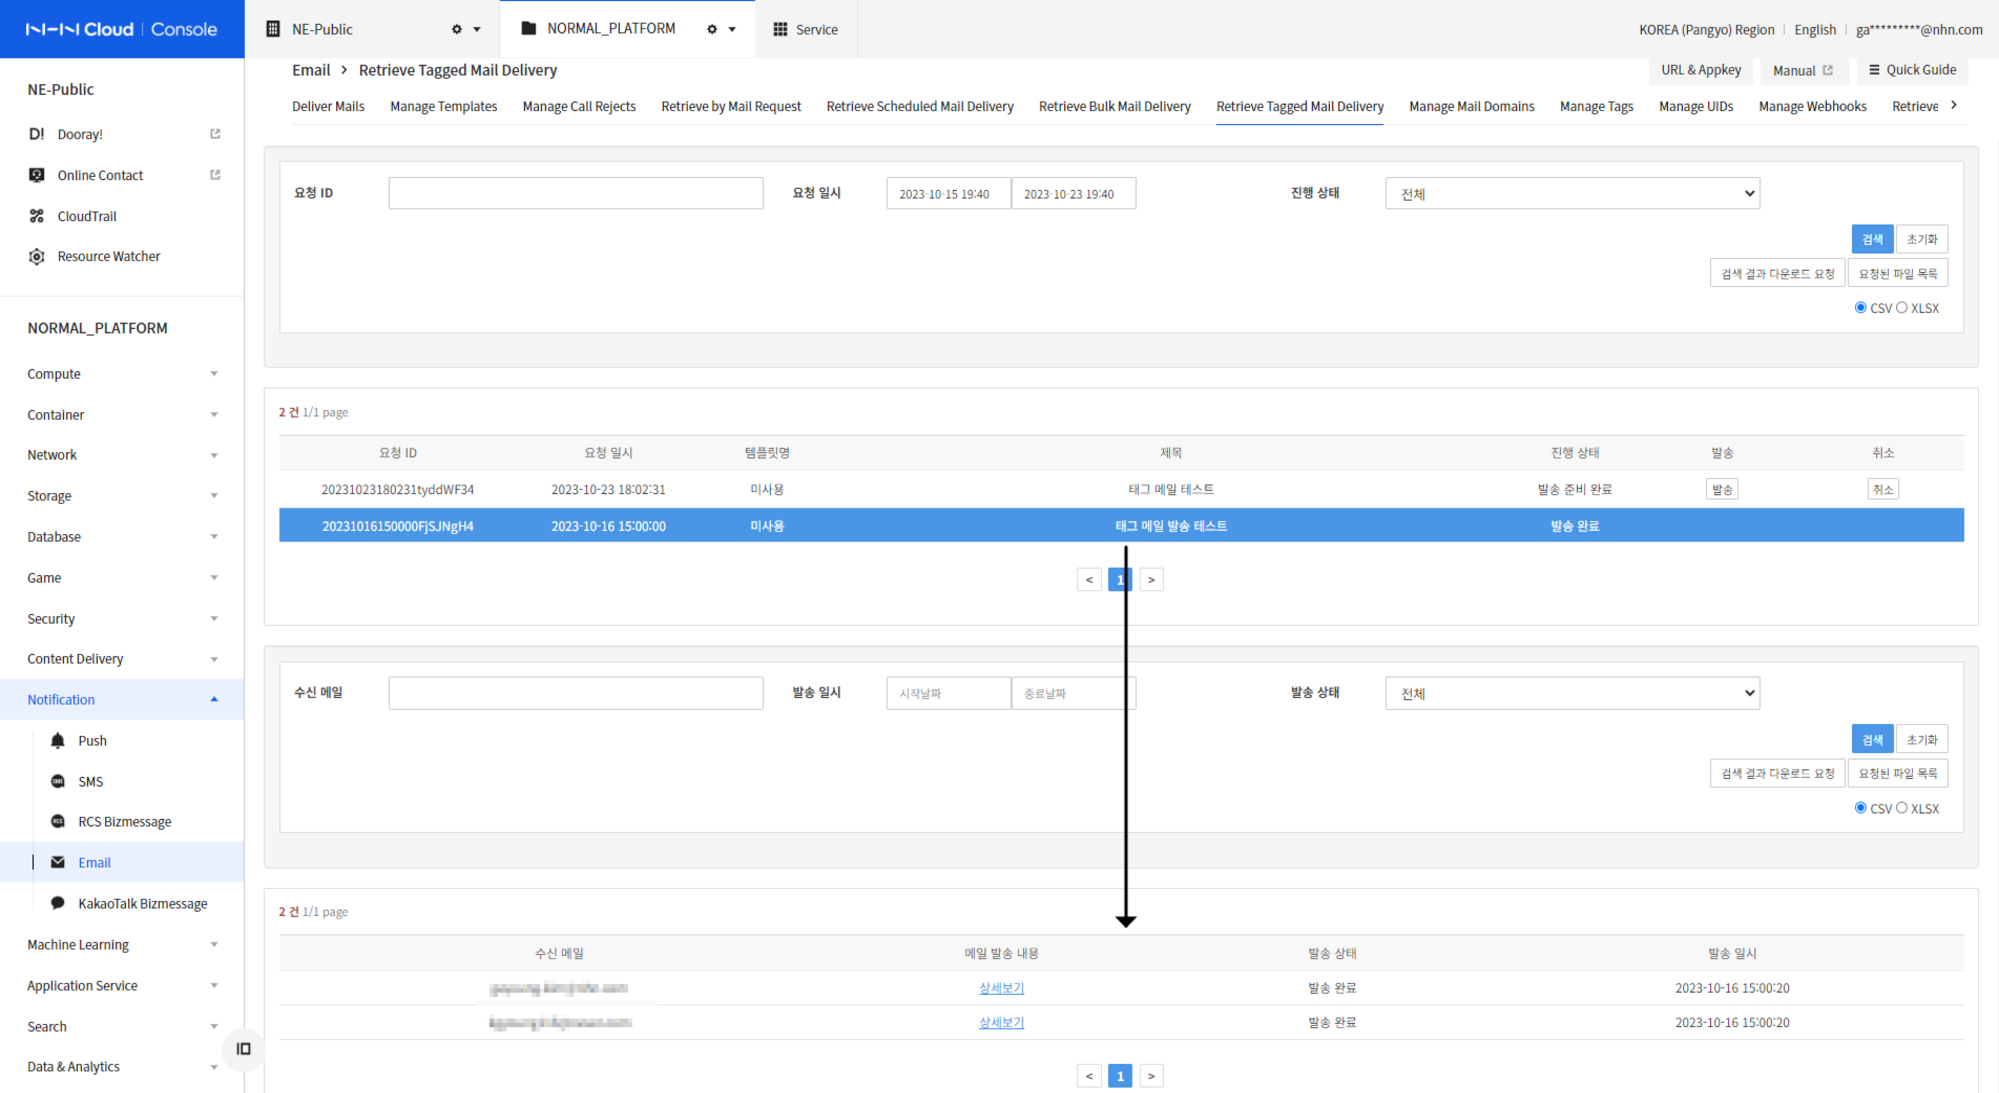
On View by recipient, you can select the corresponding recipient to verify that the delivery content has been sent successfully.
Manage Mail Domain
On the Manage Mail Domain tab, you can manage delivery mail domain. If delivery domain is owned by an individual or a company, it is a feature complete the potential problems that can be exploited by third parties.
- It is not a mandatory feature to use the email service.
- You can use the email service without registering a domain, but there are some restrictions on using the service.
- For more information, see Caution before Delivery.
- It cannot be used unless the domain is owned by an individual or a company.
- You cannot use the domain of companies that provide mail account issuance services such as Daum, Naver and Google.
Register Mail Domain
Click on Register Mail Domain button to register the domain for use in mail delivery. For domain registration, only the root domain can be registered.
Authenticate Mail Domain
Click on Authenticate button to verify domain ownership.
Register the token value issued at the time of domain registration in TXT record of the domain and click on Authenticate button.
- Authentication fails if "toast-domain-verification={token}" value does not exist or does not match in TXT record in the domain.
- After registering TXT record with a domain, it may take some time for the changes to propagate.
Protect Mail Domain
Click on the Protect button to protect the domain. When you protect the domain, the following applies.
- Protected domains are only available for projects that have already been authenticated.
- When there are multiple projects that have been authenticated with the same domain, all certified projects can use the domain even if protection is applied to only one of them.
- Exmaple) After authenticating domain "toast.com " from the email service of projects A and B, and applies protection to project A
- Only A, B project use "toast.com " domain as delivery address
- "toast.com " domain cannot be used as delivery address in project C because the domain "toast.com " is not authenticated for C project.
For more information about mail domain authentication and protection features, refer to Domain Management Guide >Domain Authentication and Protection.
Share Mail Domain
Click Share > Settings button to share the domain. Main features are the following.
- View a project that the domain has been authenticated
- Provides a list of NHN Cloud projects that have completed the authentication process for a specific domain.
- Share domains with other projects
- When you authenticate the same domain across multiple projects, you do not need to go through the authentication process multiple times.
- After being authenticated by one project, you can share the domain by using the sharing feature and entering the email service app key for another project.
- When you authenticate the same domain across multiple projects, you do not need to go through the authentication process multiple times.
Register Sub-domains
Click on Main Sub-domain > Settings button to register a sub-domain. You can only register sub-domains of registered root domains. Registered sub-domains are available with Custom Header feature when sending mail.
-
Custom headers that can use sub-domains
- Header name: X-TC-ENVELOPE-FROM
- Header Value: Sub domain
- Main features are the following.
- Use receiver's mail service as the domain to examine SPF record
- (e.g.,) If you requested to send an email To: test@toast.com , X-TC-ENVELOPE- FROM: to test@cs.toast.com
- Check SPF record from receiver's mail service to domain "cs.toast.com "
- (e.g.,) If you requested to send an email To: test@toast.com , X-TC-ENVELOPE- FROM: to test@cs.toast.com
- Use the receiver's mail service as a mail address to send return mail
- (e.g.,) If you requested to send an email To: test@toast.com , X-TC-ENVELOPE- FROM: to test@cs.toast.com
- Send a return mail from the recipient mail service to test@cs.toast.com mail address
- (e.g.,) If you requested to send an email To: test@toast.com , X-TC-ENVELOPE- FROM: to test@cs.toast.com
- Use receiver's mail service as the domain to examine SPF record
-
For more information, refer to custom header guide.
SPF, DKIM, DMARC Authentication
Since it is sent with email address containing a user-owned domain through NHN Cloud Email service's Mail delivery (SMTP) server, additional settings are required in DNS where user-owned domain is serviced.
SPF, DKIM and DMARC in DNS require additional settings, which can be set additionally in TXT records format. For more information about additional DNS settings, refer to Domain Management Guide.
Tag Management
On Tag Management tab, you can create, modify or delete tags that you use to send mail.
Click on specific tag to view the list of UIDs registered in the tag. Check Note for the meaning of tag and UID terms.

- If no registered tag exists, click on Register Tag button, type tag name on Register/modify Tag window, and click on Register button.
- You can generate up to 2,048 tags.
- To register UID with tag, select desired tag from the list of registered tags and click on Register UID.
- Enter the UID on UID Registration window and click on Register.
- You can register up to 1,000 UIDs in the tag at a time.
UID Management
You can manage UIDs and mail addresses on UID Management tab.
UIDs can easily send mail to a large number of subjects by registering with tags. Check Note for the meaning of tag and UID terms.
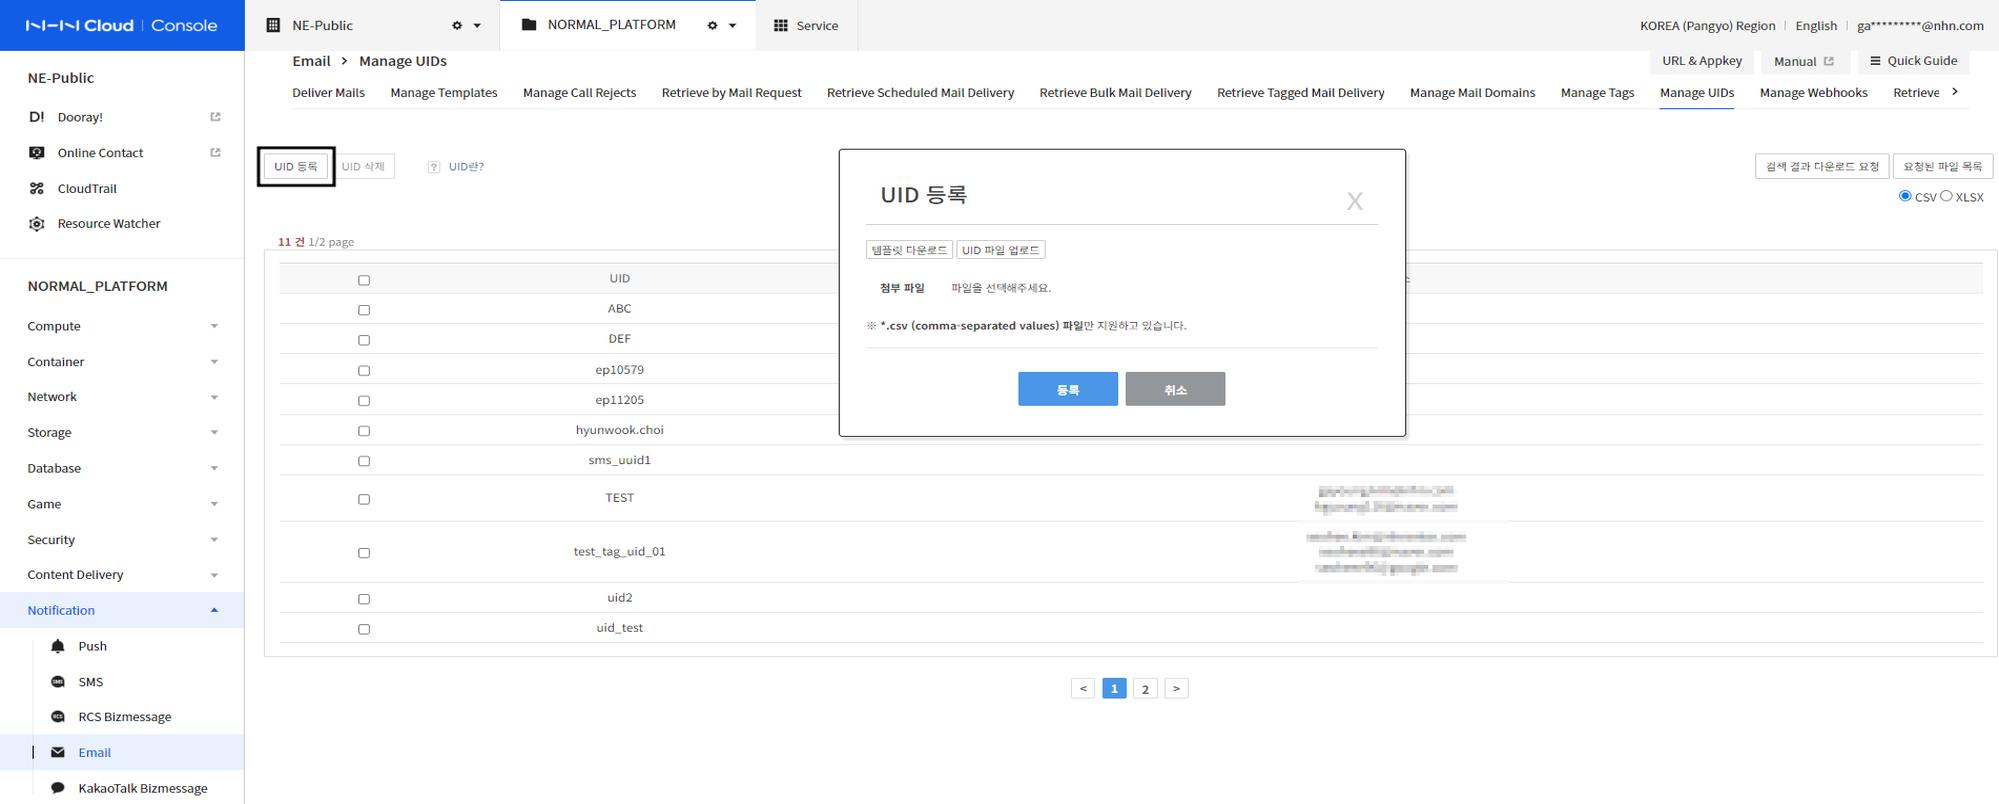

- Click Register UIDs.
- Press Download Template button to enter multiple UIDs and mail addresses in CSV files.
- After downloading the template, enter UID in the first column and the email address in the second column.
- Save the file you entered and click on UID File Upload button to upload it.
- Find the number counts while uploading a template which is created.
- Click Register button.
Webhook Management
Webhook refers to a feature that informs you that a certain task has been done in the service.
When registering a web hook, if a specific event occurs within the email service, it generates HTTP POST request with URL defined in the webhook settings.
Webhook settings can be managed from Webhook Management tab.
Register Webhook Settings
When registering for webhook, enter the settings below.
- Event Type - * Currently supported event types are as follows. - Update message delivery result code, register ad mail Unsubscription address
- Target URL
- It is URL to receive data when an event occurs.
- Supporting protocol is HTTPS only.
- Refer to Web Hook for details on POST requests.
- It is URL to receive data when an event occurs.
- Signature
- Defined signature key is included as the value in the X-Toast-Webhook-Signature header upon POST request.
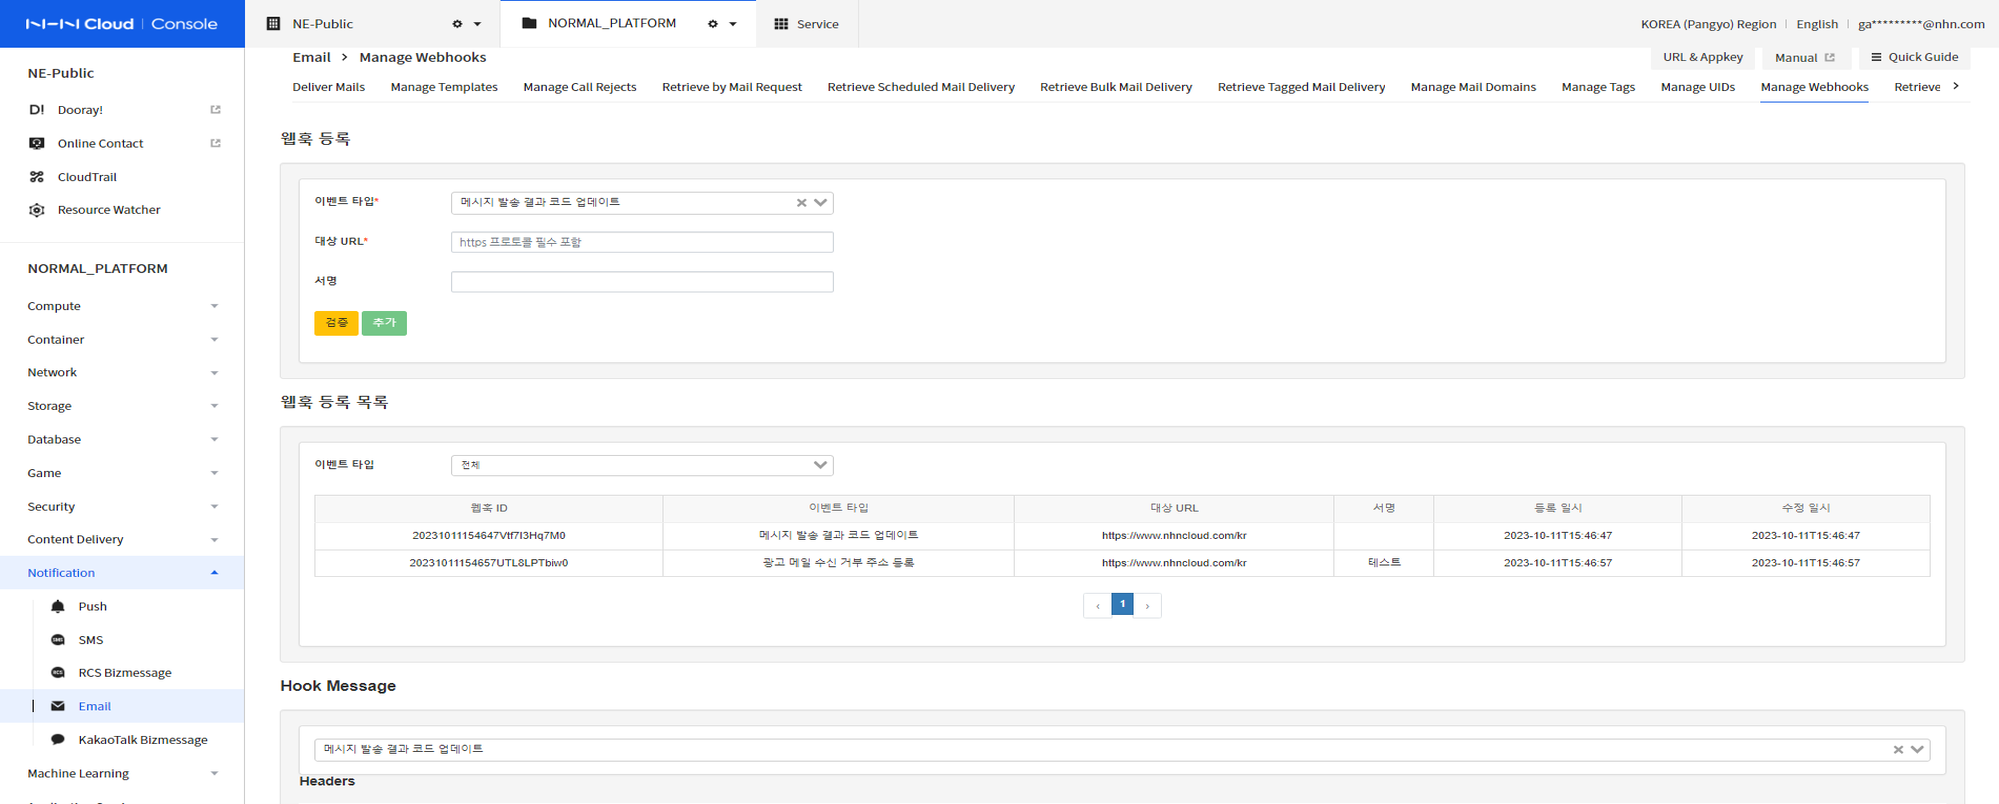
- Select the event type to register.
- Enter URL address where you can receive the data to be sent to webhook.
- Enter the webhook signature to register (not required).
- Get authenticated and click on Add button to register webhook.
Registered webhooks can be checked in the Webhook Registration List.
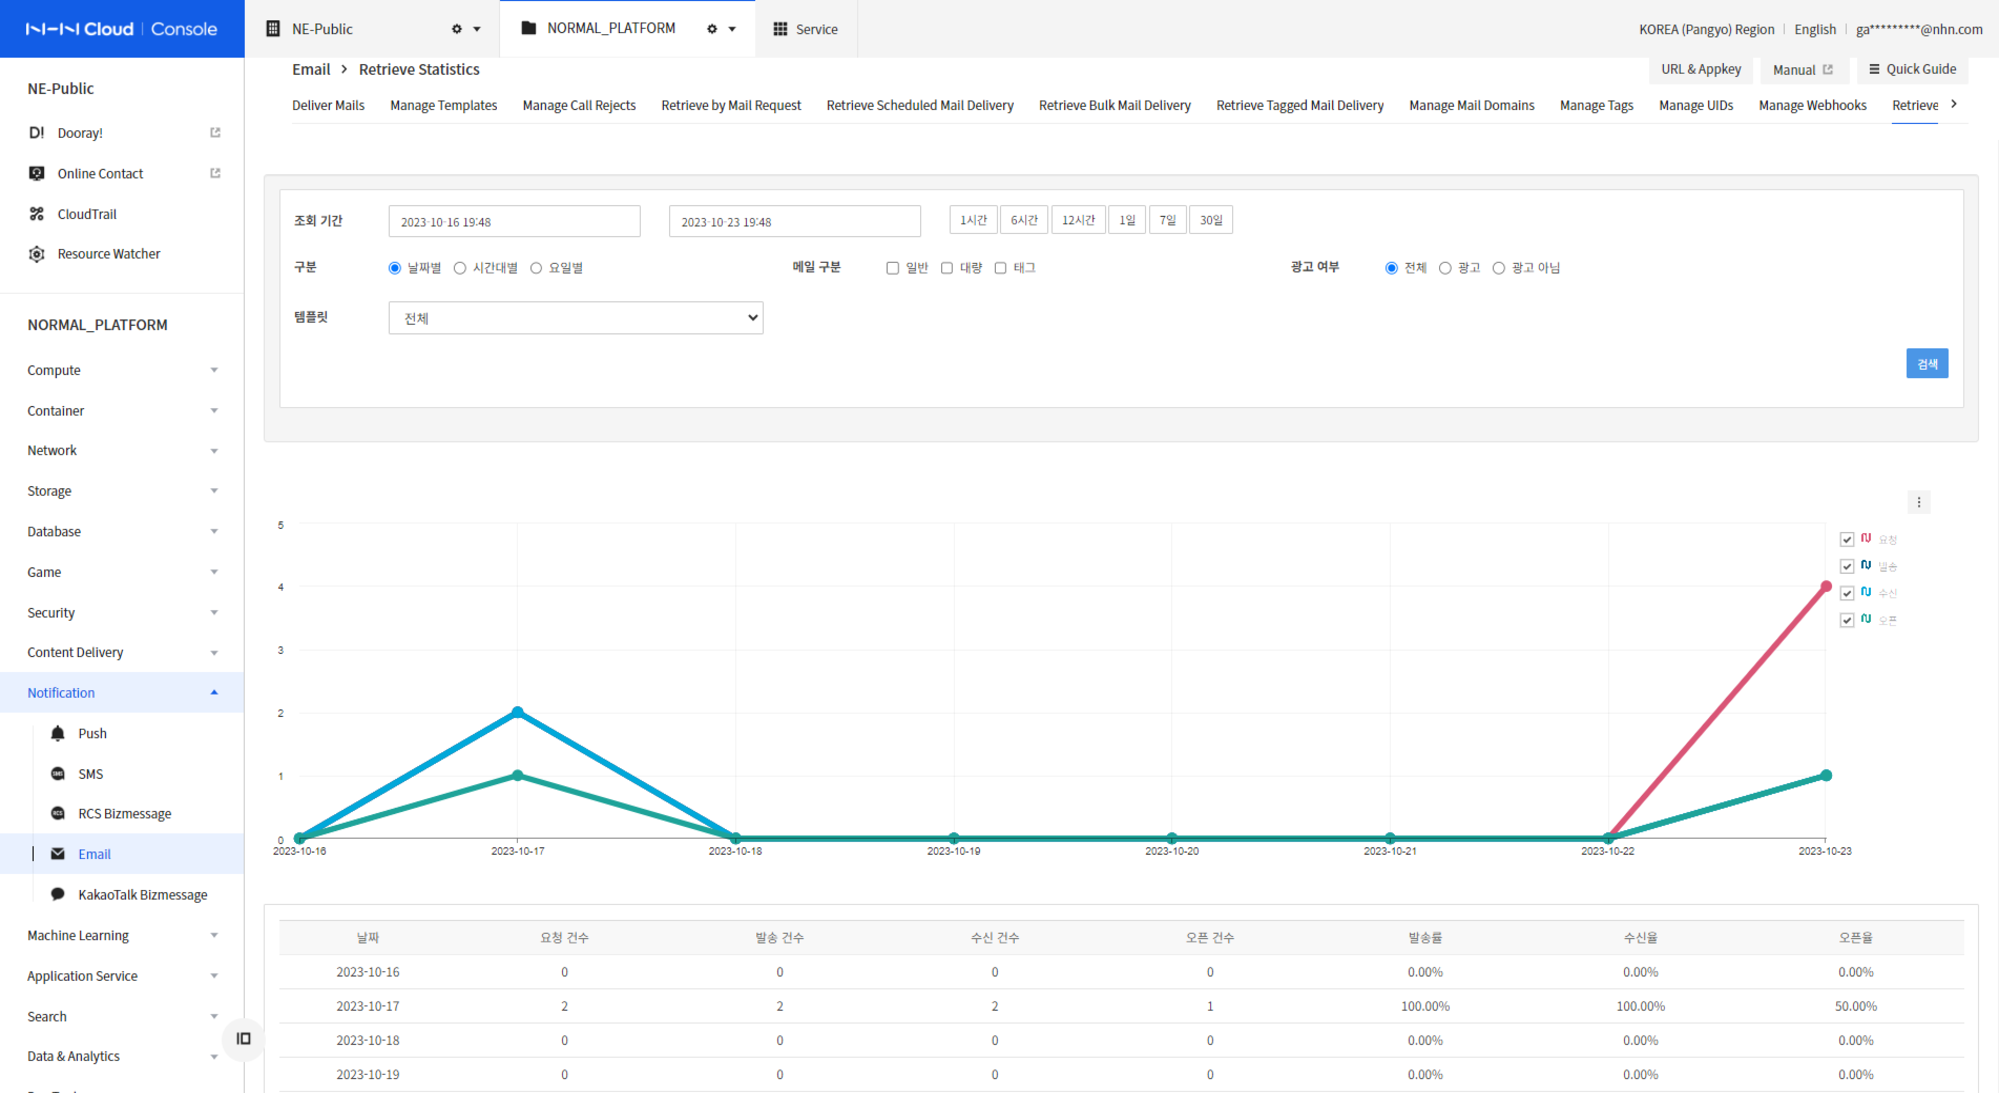
Retrieve Statistics
You can view delivery statistics on the Statistics (old) tab. You can view with conditions such as inquiry period, statistical breakdown (date, time, day of the week), mail type (general, mass) and template.
You can view by date, time zone and day of the week.
Manage Statistical Event Keys
You can manage statistical event keys on the Manage Statistical Event Keys tab. When you create it, you can set a name, description, and event collection period. If you do not set an event collection period, the collection period is set to indefinite. The created statistical event key can be set at the time of sending the message. The sending results of messages with statistical event keys set can be searched by statistical event key on the Statistics tab.
Query Statistics
You can search for message received/viewed data collected in the last 30 days. In the console, select View statistics. You can retrieve statistics for messages, token enrollments, or deletions.
- You can set a time period as a search criteria.
- In addition to the Quick Set Duration button, you can manually set a minimum duration of 1 minute and a maximum duration of 30 days.
- Type lets you set how the graph is displayed.
- Default displays the graph in a type that is automatically optimized based on the set time period.
- In message statistics, you can search by statistical event key, templateid, and mail type.
Sending Settings
Backup Settings
- Depending on the message retention period policy, you can back up sending history data that is older than 90 days.
- If you enter information about whether to back up messages, the file extension, and the storage to upload the file to, a file containing the backup date will be created in that storage.
[Note]
Tags and UID
Service Terms
| Terminology | Description |
|---|---|
| tag | A system for classifying UIDs. Multiple tags can be attached to UID to make it easier for the user to search and use UID information. |
| UID | ID(identifier) that distinguishes users. Multiple contacts can be registered in one UID and used for delivery. |
| Contact | Where you set up to contact. In Notification, you can register contact information from three services: Push, Email, and SMS. Push is token, Email is email address and SMS is phone number. |
Send Using Tags
-
It is a feature that allows you to send mail by selecting a tag instead of the mail address, which is the receiver information.
-
Register UID.
-
On the UID Management tab, register UID and one or more mail addresses.
-
For more information, see UID Management.
-
Register a tag.
-
Register tags On Tags Management tab.
-
For more information, refer to Tag Management.
-
Register UID in tag.
-
Register the UID to the tag registered in the Tag Management tab.
-
Select the tag and send mail.
-
In the Deliver Mails tab, select Tag Delivery instead of email address to register the tag.
- Mail is sent to the mail address of UID registered in the tag.
- For more information, please refer to Tagged Mail Delivery.
Relationship with the Tag Feature of Other Products
- If you are using Push or SMS products in the same project, you can use the same tags and UID information in email together without re-registering them.
- You can add different contacts to the same UID on the console of each product.
Custom Header
- You can add a custom header to your receiving email and send it.
- In NHN Cloud Email service, you can use headers that follow the format described on RFC 822 in addition to the headers below.
Header Unable to Request
- From
- To
- Cc
- Bcc
- Date
- Subject
- Content-Disposition
- Message-ID
- Sender
- Reply-To
- Newsgroups
- Content-ID
- Content-MD5
- MIME-Version
- Content-Transfer-Encoding
- Content-Description
Configuration
| Term | Description |
|---|---|
| Header Name | The name of the header to add. Write between 1-50 characters using only English letters and numbers (a-z, A-Z, 0-9) and hyphen (-). |
| Header Value | Value of the header to be added. Write between 1-1000 bytes. For Non-ASCII characters, encode in Base64 and send. |
Data Retention Period
Based on retention policy, Email service keeps data for the recent 90 days only. Data that has expired has been deleted and cannot be viewed.
Table of Contents
- Notification > Email > Console Guide
- Deliver Mails
- General Mail Delivery
- Advertising Mail Deliver
- Template Mail Delivery
- Mass Delivery
- Tagged Mail Delivery
- Template Management
- Add/Modify Category
- Add/Modify Template
- Unsubscription Management
- Register Directly as Unsubscription
- Register by Uploading as Unsubscription File
- Delete Unsubscription
- Retrieve Delivery
- Retrieve by Mail Request
- View Scheduled Delivery
- View Mass Delivery
- View Tagged Mail Delivery
- Manage Mail Domain
- Register Mail Domain
- Authenticate Mail Domain
- Protect Mail Domain
- Share Mail Domain
- Register Sub-domains
- SPF, DKIM, DMARC Authentication
- Tag Management
- UID Management
- Webhook Management
- Register Webhook Settings
- Retrieve Statistics
- Manage Statistical Event Keys
- Query Statistics
- Sending Settings
- Backup Settings
- [Note]
- Tags and UID
- Custom Header
- Data Retention Period